Sync data from external storage
Integrate popular cloud and external storage systems with Label Studio to collect new items uploaded to the buckets, containers, databases, or directories and return the annotation results so that you can use them in your machine learning pipelines.
| Storage | Community | Enterprise |
|---|---|---|
| Amazon S3 | ✅ | ✅ |
| Amazon S3 with IAM role | ❌ | ✅ |
| Google Cloud Storage | ✅ | ✅ |
| Google Cloud Storage WIF Auth | ❌ | ✅ |
| Google Cloud Storage with service account impersonation for GKE | ❌ | ✅ |
| Microsoft Azure Blob Storage | ✅ | ✅ |
| Microsoft Azure Blob Storage with Service Principal | ❌ | ✅ |
| Databricks Files (UC Volumes) | ❌ | ✅ |
| Databricks Files (UC Volumes) with Service Principal | ❌ | ✅ |
| Redis database | ✅ | ✅ |
| Local storage | ✅ | ✅ |
You can add source storage connections to sync data from an external source to a Label Studio project, and add target storage connections to sync annotations from Label Studio to external storage.
Each source and target storage setup is project-specific. You can connect multiple buckets, containers, databases, or directories as source or target storage for a project.
Source storage
Label Studio does not automatically sync data from source storage. If you upload new data to a connected cloud storage bucket, sync the storage connection using the UI to add the new labeling tasks to Label Studio without restarting. You can also use the API to set up or sync storage connections. See Label Studio API and locate the relevant storage connection type.
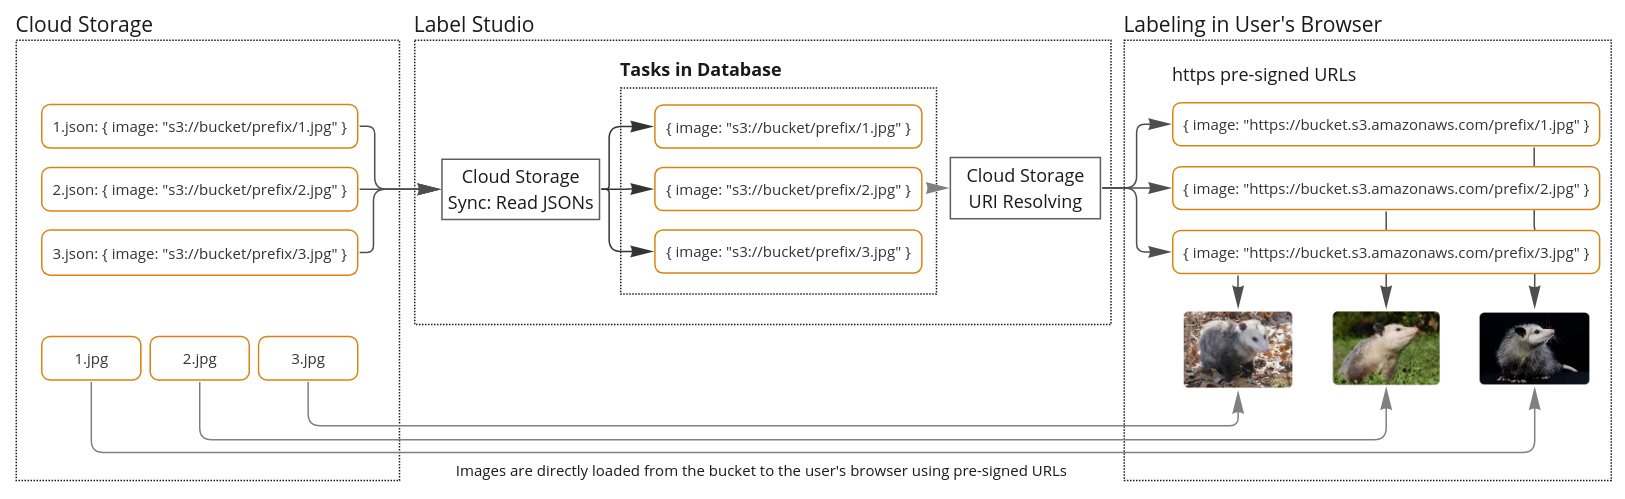
Task data synced from cloud storage is not stored in Label Studio. Instead, the data is accessed using presigned URLs. You can also secure access to cloud storage using VPC and IP restrictions for your storage. For details, see Secure access to cloud storages.
Source storage permissions
If you set the import method to “Files”, Label Studio backend will only need LIST permissions and won’t download any data from your buckets.
If you set the import method to “Tasks”, Label Studio backend will require GET permissions to read JSON files and convert them to Label Studio tasks.
When your users access labeling, the backend will attempt to resolve URI (e.g., s3://) to URL (https://) links. URLs will be returned to the frontend and loaded by the user’s browser. To load these URLs, the browser will require HEAD and GET permissions from your Cloud Storage. The HEAD request is made at the beginning and allows the browser to determine the size of the audio, video, or other files. The browser then makes a GET request to retrieve the file body.
Source storage Sync and URI resolving
Source storage functionality can be divided into two parts:
- Sync - when Label Studio scans your storage and imports tasks from it.
- URI resolving - when the Label Studio backend requests Cloud Storage to resolve URI links (e.g.,
s3://bucket/1.jpg) into HTTPS (https://aws.amazon.com/bucket/1.jpg). This way, user’s browsers are able to load media.
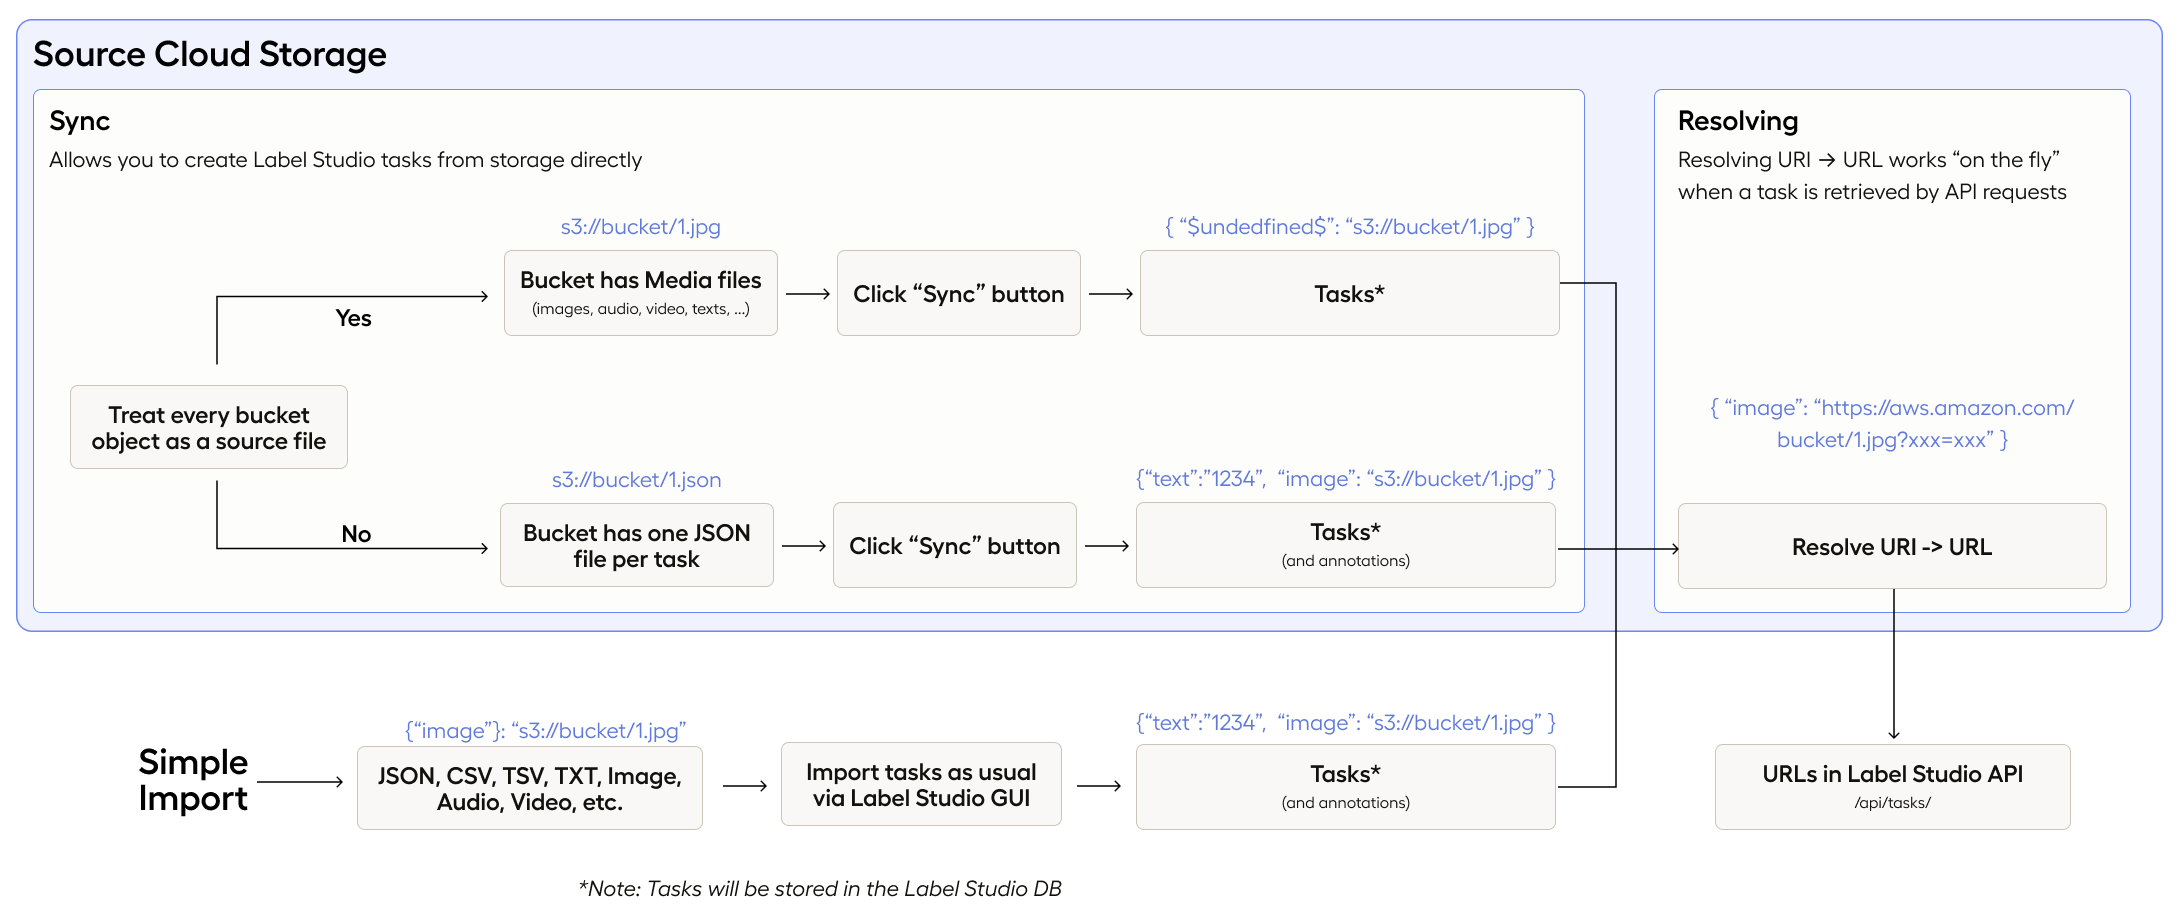
Import method
info
The "Treat every bucket object as a source file" option was renamed and reintroduced as the "Import method" dropdown.
Label Studio Source Storages feature an “Import method” dropdown. This setting enables two different methods of loading tasks into Label Studio.
Tasks
When set to “Tasks”, tasks in JSON, JSONL/NDJSON or Parquet format can be loaded directly from storage buckets into Label Studio. This approach is particularly helpful when dealing with complex tasks that involve multiple media sources.
You may put multiple tasks inside the same JSON file, but not mix task formats inside the same file.
Example with bare tasks
task_01.json
{
  "image": "s3://bucket/1.jpg",
  "text": "opossums are awesome"
}
task_02.json
{
  "image": "s3://bucket/2.jpg",
  "text": "cats are awesome"
}
Or:
tasks.json
[
  {
    "image": "s3://bucket/1.jpg",
    "text": "opossums are awesome"
  },
  {
    "image": "s3://bucket/2.jpg",
    "text": "cats are awesome"
  }
]
Example with tasks, annotations and predictions
task_with_predictions_and_annotations_01.json
{
    "data": {
        "image": "s3://bucket/1.jpg",
        "text": "opossums are awesome"
    },
    "annotations": [...],
    "predictions": [...]
}
task_with_predictions_and_annotations_02.json
{
    "data": {
      "image": "s3://bucket/2.jpg",
      "text": "cats are awesome"
    }
    "annotations": [...],
    "predictions": [...]
}
Or:
tasks_with_predictions_and_annotations.json
[
  {
      "data": {
          "image": "s3://bucket/1.jpg",
          "text": "opossums are awesome"
      },
      "annotations": [...],
      "predictions": [...]
  },
  {
      "data": {
        "image": "s3://bucket/2.jpg",
        "text": "cats are awesome"
      }
      "annotations": [...],
      "predictions": [...]
  }
]
Example with JSONL
tasks.jsonl
{ "image": "s3://bucket/1.jpg", "text": "opossums are awesome" }
{ "image": "s3://bucket/2.jpg", "text": "cats are awesome" }
In Label Studio Enterprise and Starter Cloud editions, Parquet files can also be used to import tasks in the same way as JSON and JSONL.
Files
When set to “Files”, Label Studio automatically lists files from the storage bucket and constructs tasks. This is only possible for simple labeling tasks that involve a single media source (such as an image, text, etc.).*
Pre-signed URLs vs. Storage proxies
There are two secure mechanisms in which Label Studio fetches media data from cloud storage: via pre-signed URLS and via proxy. Which one you use depends on whether you have Use pre-signed URLs toggled on or off when setting up your source storage. Use pre-signed URLs is used by default. Proxy storage is enabled when Use pre-signed URLs is OFF.
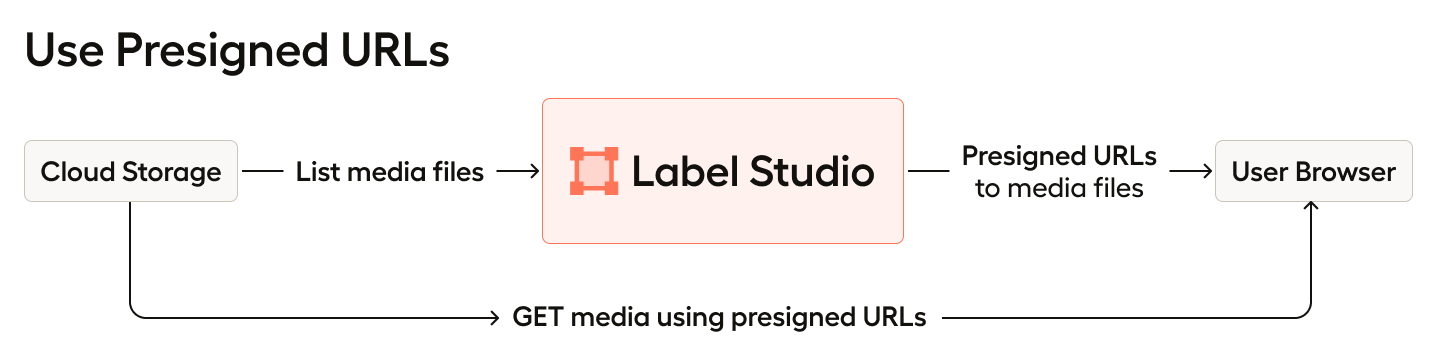
Pre-signed URLs
In this scenario, your browser receives an HTTP 303 redirect to a time-limited S3/GCS/Azure presigned URL. This is the default behavior.
The main benefit to using pre-signed URLs is if you want to ensure that your media files are isolated from the Label Studio network as much as possible.
The permissions required for this are already included in the cloud storage configuration documentation below.
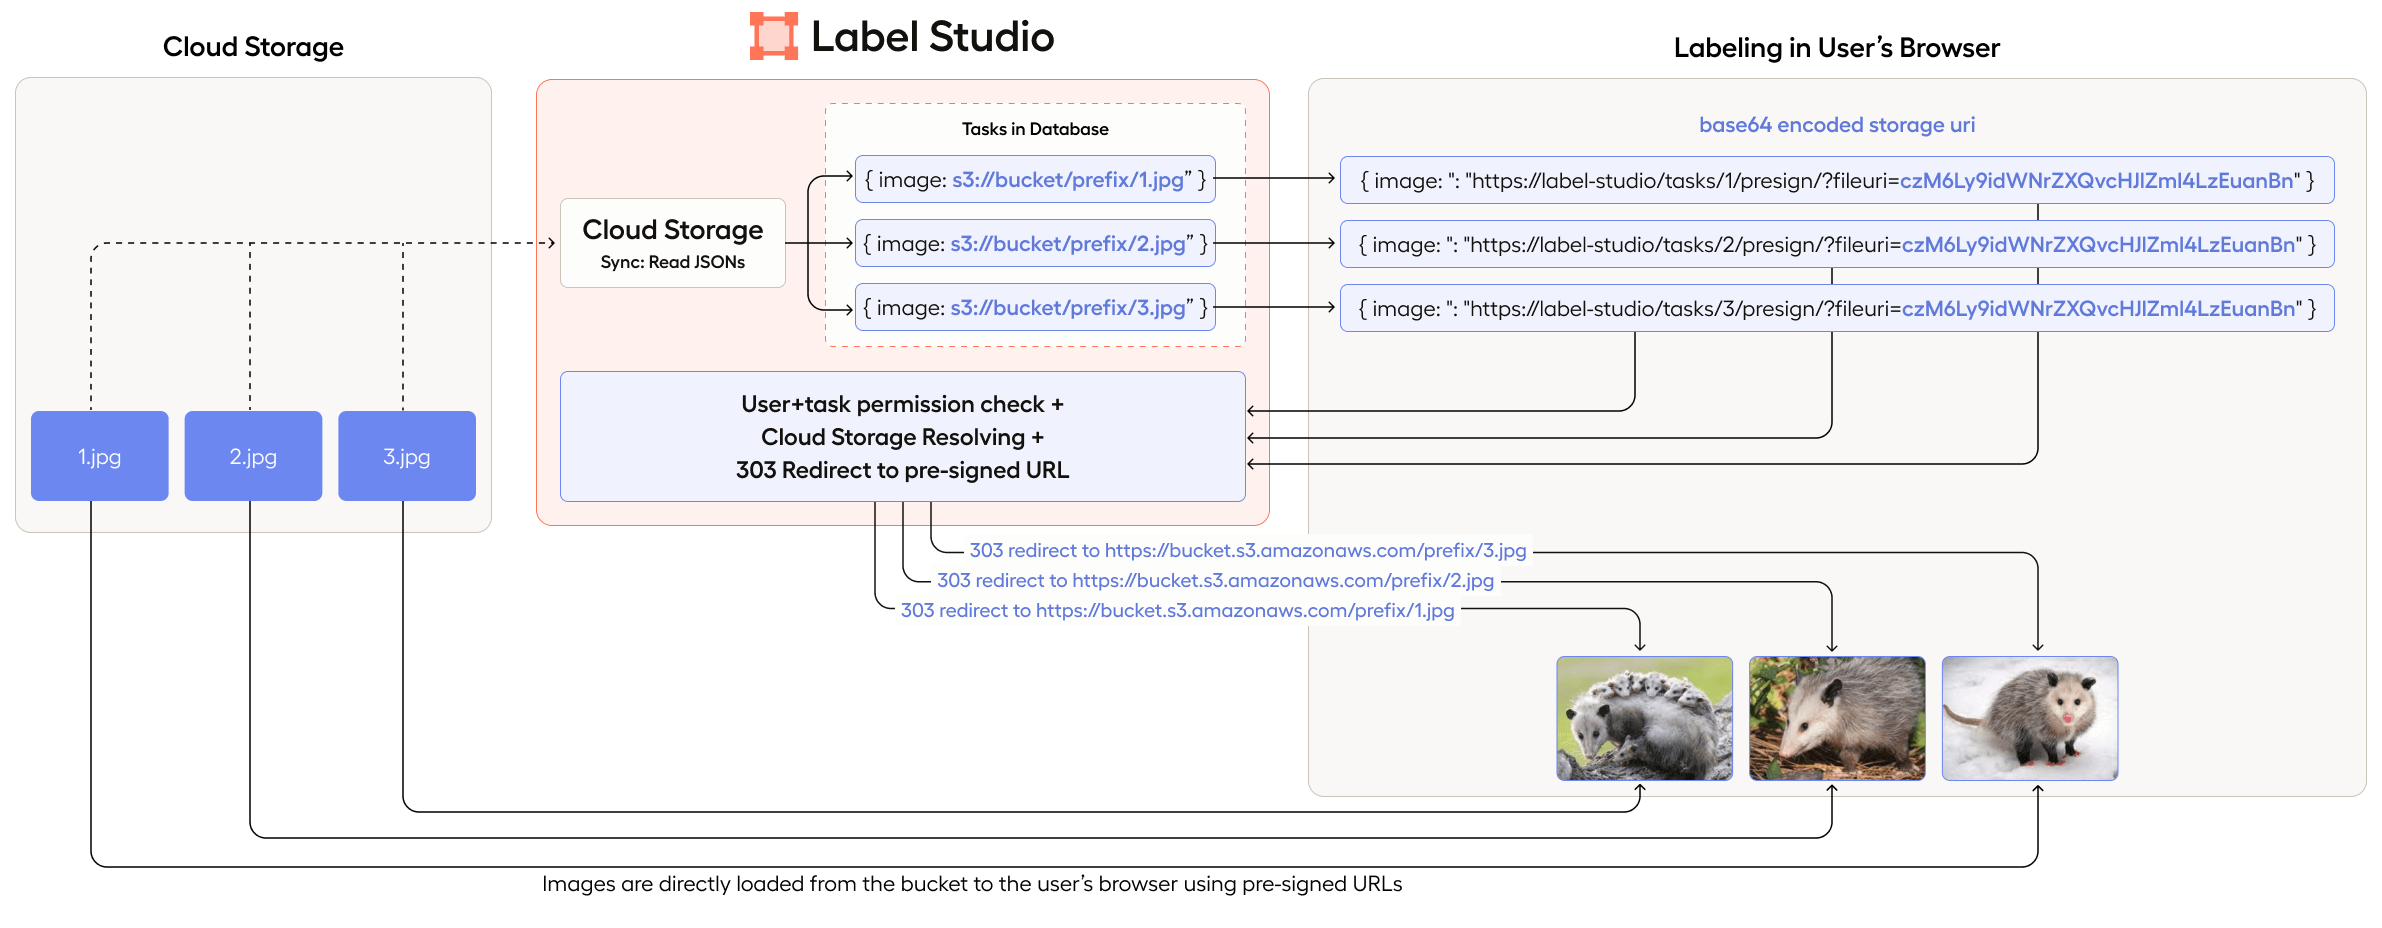
Proxy storage
When in proxy mode, the Label Studio backend fetches objects server-side and streams them directly to the browser.
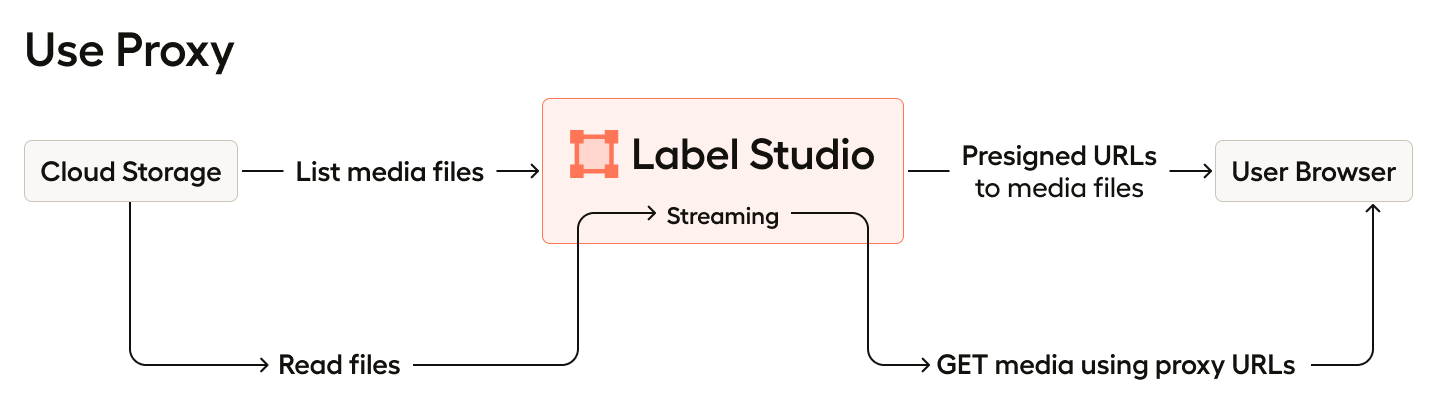
This has multiple benefits, including:
- Security
- Access to media files is further restricted based on Label Studio user roles and project access.
- This access is applied to cached files. This means that even if the media is cached, access will be restricted to that file if a user’s access to the task is revoked.
- Data stays within the Label Studio network boundary. This is especially useful for on-prem environments who want to maintain a single entry point for their network traffic.
- Configuration
- No CORS settings are needed.
- No pre-signed permissions are needed.
To allow proxy storage, you need to ensure your permissions include the following:
AWS S3
{
    "Version": "2012-10-17",
    "Statement": [
        {
            "Effect": "Allow",
            "Action": [
                "s3:GetObject",
                "s3:ListBucket"
            ],
            "Resource": [
                "arn:aws:s3:::your-bucket-name",
                "arn:aws:s3:::your-bucket-name/*"
            ]
        }
    ]
}
Google Cloud Storage
storage.objects.get- Read object data and metadatastorage.objects.list- List objects in the bucket (if using prefix)
Azure Blob Storage
Add the Storage Blob Data Reader role, which includes:
Microsoft.Storage/storageAccounts/blobServices/containers/blobs/readMicrosoft.Storage/storageAccounts/blobServices/containers/blobs/getTags/action
Note for on-prem deployments
Large media files are streamed in sequential 8 MB chunks, which are split into different GET requests. This can result in frequent requests to the backend to get the next portion of data and uses additional resources.
You can configure this using the following environment variables:
RESOLVER_PROXY_MAX_RANGE_SIZE- Defaults to 8 MB, and defines the largest chunk size returned per request.RESOLVER_PROXY_TIMEOUT- Defaults to 20 seconds, and defines the maximum time uWSGI workers spend on a single request.
Target storage
If you configure target storage, your annotations will be saved in two places: in the Label Studio database and in your target storage.
- When annotators click Submit or Update while labeling tasks, an annotation is sent to the target storage as well as to the Label Studio database.
- When a user clicks the Sync button on the target storage, all annotations will be saved again from scratch.
The target storage receives a JSON-formatted export of each annotation. See Label Studio JSON format of annotated tasks for details about how exported tasks appear in target storage.
You can also delete annotations in target storage when they are deleted in Label Studio. By default this option is off.
Target storage permissions
To use this type of storage, you must have PUT permission, and DELETE permission is optional.
Troubleshooting
When working with an external cloud storage connection, keep the following in mind:
- For Source storage:
- When Files import method is selected, Label Studio doesn’t import the data stored in the bucket, but instead creates references to the objects. Therefore, you have full access control on the data to be synced and shown on the labeling screen.
- When Tasks import method is selected, bucket files are assumed to be immutable; the only way to push an updated file’s state to Label Studio is to upload it with a new filename to storage or delete all tasks that are associated with that file and resync.
- Sync operations with external buckets only goes one way. It either creates tasks from objects on the bucket (Source storage) or pushes annotations to the output bucket (Target storage). Changing something on the bucket side doesn’t guarantee consistency in results.
- We recommend using a separate bucket folder for each Label Studio project.
- Storage Regions: To minimize latency and improve efficiency, store data in cloud storage buckets that are geographically closer to your team rather than near the Label Studio server.
For more troubleshooting information, see Troubleshooting Label Studio.