Fine-Tuning Generalist Models for Named Entity Recognition
Named Entity Recognition (NER) is one of the foundational problems of Natural Language Processing. Early NER models, like those trained in SpaCy, show good results on the small set of labels that they’re trained on, but are not easily extendable to new label types. More generalist models, like GLiNER, offer much more flexibility in the label set with minimal training.
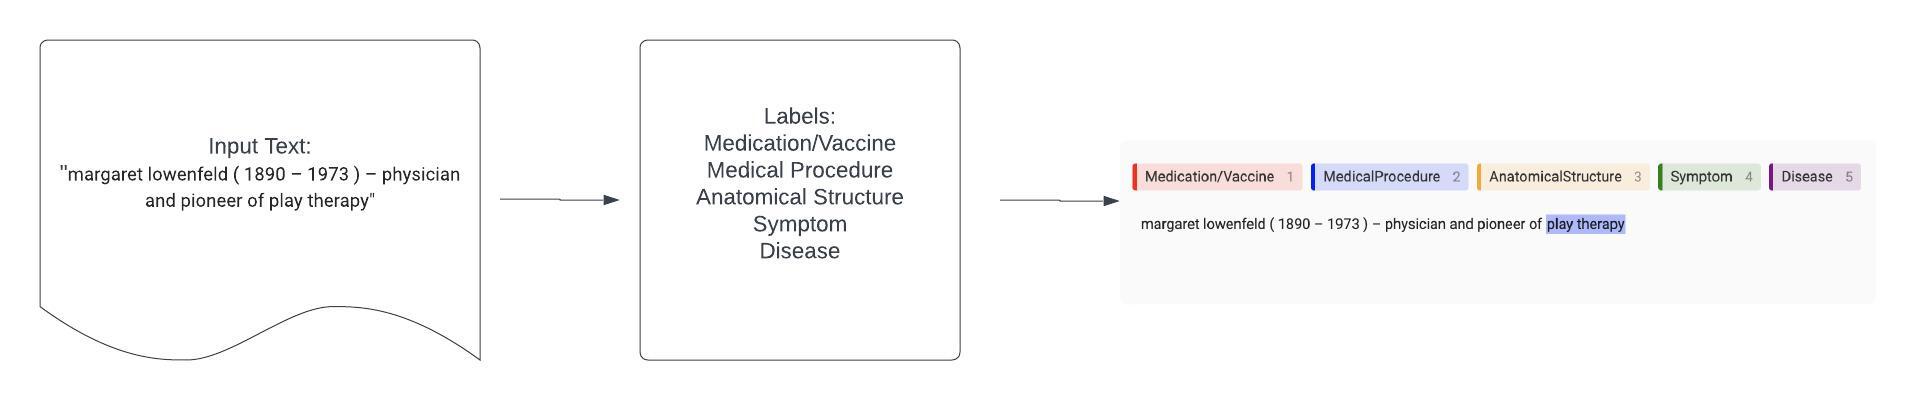
The problem with generalist models is that they’re just that: generalists. They perform well on a broad variety of categories and offer a lot of flexibility off the shelf, but often underperform in specialty or niche areas. Fine-tuning these generalist models is an ideal way to help improve the model’s performance on the more specific areas that we care about. The chart below shows how this workflow works, starting with input text and adding labels to produce labeled spans of text.
Fine-tuning itself is a very data-driven process. Not only do we need data to evaluate the model’s performance on our target area in the first place, but we also need data to fine-tune the model with and then data to evaluate how well that fine-tuning has worked. Label Studio, an open source data labeling platform, makes this process easy by allowing you to connect ML models, generate predictions and even initiate retraining inside the project workflow.
First, we’ll create a Label Studio project and upload our data. Next, we’ll connect the GLiNER model to our project as part of the ML Backend, and use it to dynamically predict the labels for each item in our task. We can then manually evaluate those labels to both understand how the original model performs on our data, and to create new labels for fine-tuning. Finally, we’ll finetune the model right in Label Studio, which will allow us to continuously improve our model using the same cycle.
What is GLiNER?
GLiNER, a model published in 2023 by Zaratiana et. al, is a BERT family model that is tuned for generalist NER. Like Large Language Model (LLM) based NER, GLiNER is extremely flexible when it comes to what labels you can evaluate. In fact, with GLiNER, you simply pass a list the labels you’re interested in, and the model takes care of the rest. Unlike LLM based models, however, GLiNER is lightweight and scalable, making it an excellent choice for NER in many cases.
Follow Along
For this project, we’ve set up a Jupyter notebook you can use to follow along with the code. You can find it here.
Set Up Label Studio
To start, we’ll need to create a new project in Label Studio. If you do not already have Label Studio installed, you can find the installation instructions in the Quickstart Guide. Here, we already have Label Studio running on localhost:8080.
from label_studio_sdk import Client
LABEL_STUDIO_URL = 'http://localhost:8080'
API_KEY = 'your_api_key_here'
ls = Client(url=LABEL_STUDIO_URL, api_key=API_KEY)
ls.check_connection()Create the Dataset
In this example, we’re going to focus on the Medical field. We’ll be using a subset of data from MultiCoNER, an open source NER dataset available on HuggingFace. We’ll be using their predefined NER tags as a way to filter out the data that will be relevant for us, but otherwise ignoring them.
# Load and preprocess sample data
from datasets import load_dataset
from tqdm import tqdm
# We don't need a ton of data, so we'll only look at the training set for now
dataset = load_dataset("MultiCoNER/multiconer_v2", "English (EN)")["train"]
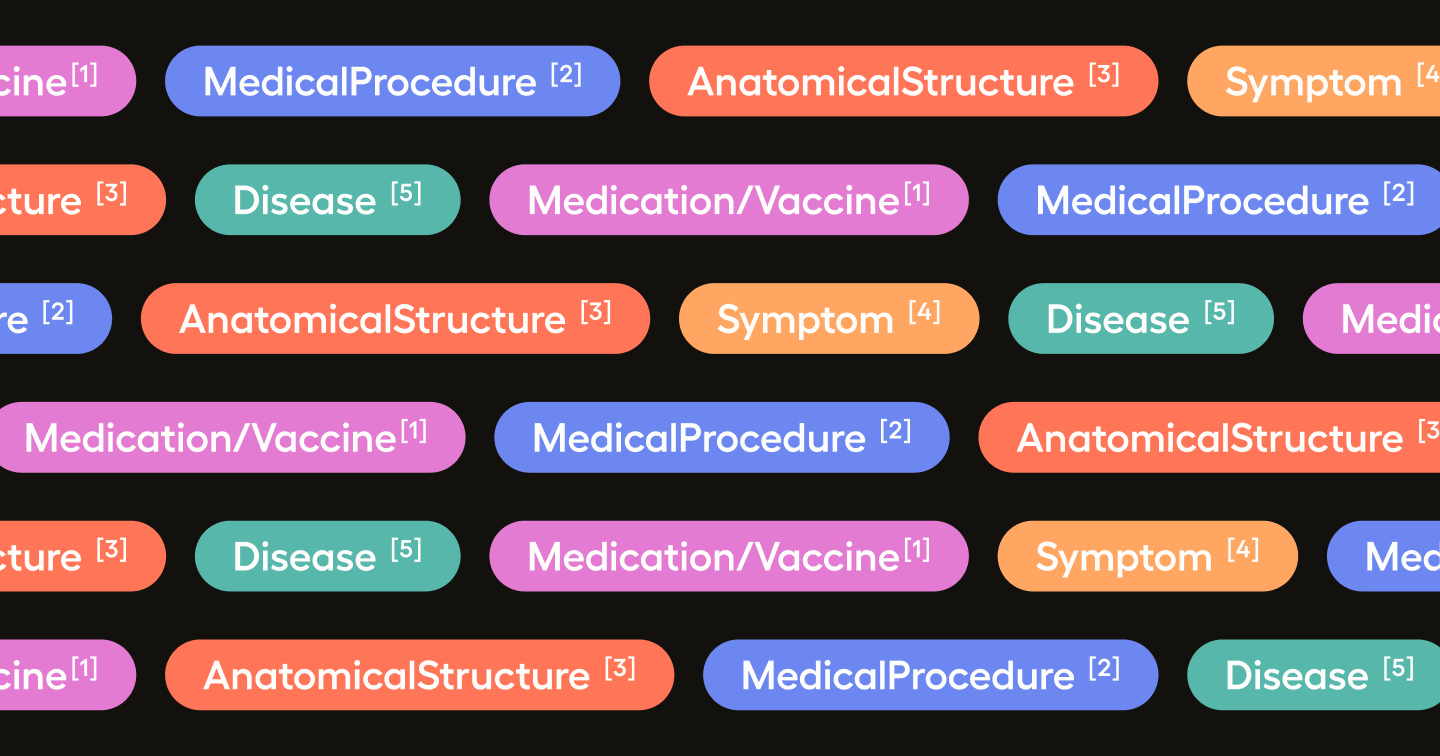
medical_labels = ["Medication/Vaccine", "MedicalProcedure", "AnatomicalStructure", "Symptom", "Disease"]
# Filter so we only look at samples with medical tags
medical_dataset = []
for item in tqdm(dataset):
has_medical = any(any(label in tag for label in medical_labels) for tag in item["ner_tags"])
if has_medical:
# We want the text as a full text and not a list of tokens, so we create that as another key value pair in the item dictionary
item["text"] = " ".join(item["tokens"])
medical_dataset.append(item)Create your Project and Import Data
Now that we have a dataset to use, let’s create a new project in Label Studio that will allow us to mark up these samples for the spans that we’re interested in.
project = ls.start_project(
    title='Medical NER with GLiNER',
    label_config='''
<View>
  <Labels name="label" toName="text">
    <Label value="Medication/Vaccine" background="red"/>
    <Label value="MedicalProcedure" background="blue"/>
    <Label value="AnatomicalStructure" background="orange"/>
    <Label value="Symptom" background="green"/>
    <Label value="Disease" background="purple"/>
  </Labels>

  <Text name="text" value="$text"/>
</View>
'''
)Finally, we can add our dataset to the project we’ve just created.
project.import_tasks(medical_dataset)Connect the ML Backend
Now, we’ll add the GLiNER model as the ML Backend for this project. We’ve gone ahead and created the GLiNER ML Backend for you in this example. To use it, use the follow code, or follow these instructions for creating your own ML Backend.
# Clone the repo
git clone https://github.com/HumanSignal/label-studio-ml-backend.git
cd label-studio-ml-backend/label_studio_ml/examples/gliner

# Configure the ML Backend with your Label Studio API Key in docker-compose.yaml

# Start the ML Backend
docker-compose upWhen the backend is up, it should be serving on localhost:9090. Note that you’ll need to add in your Label Studio API key to the docker-compose.yaml file if you want to use the fit method!
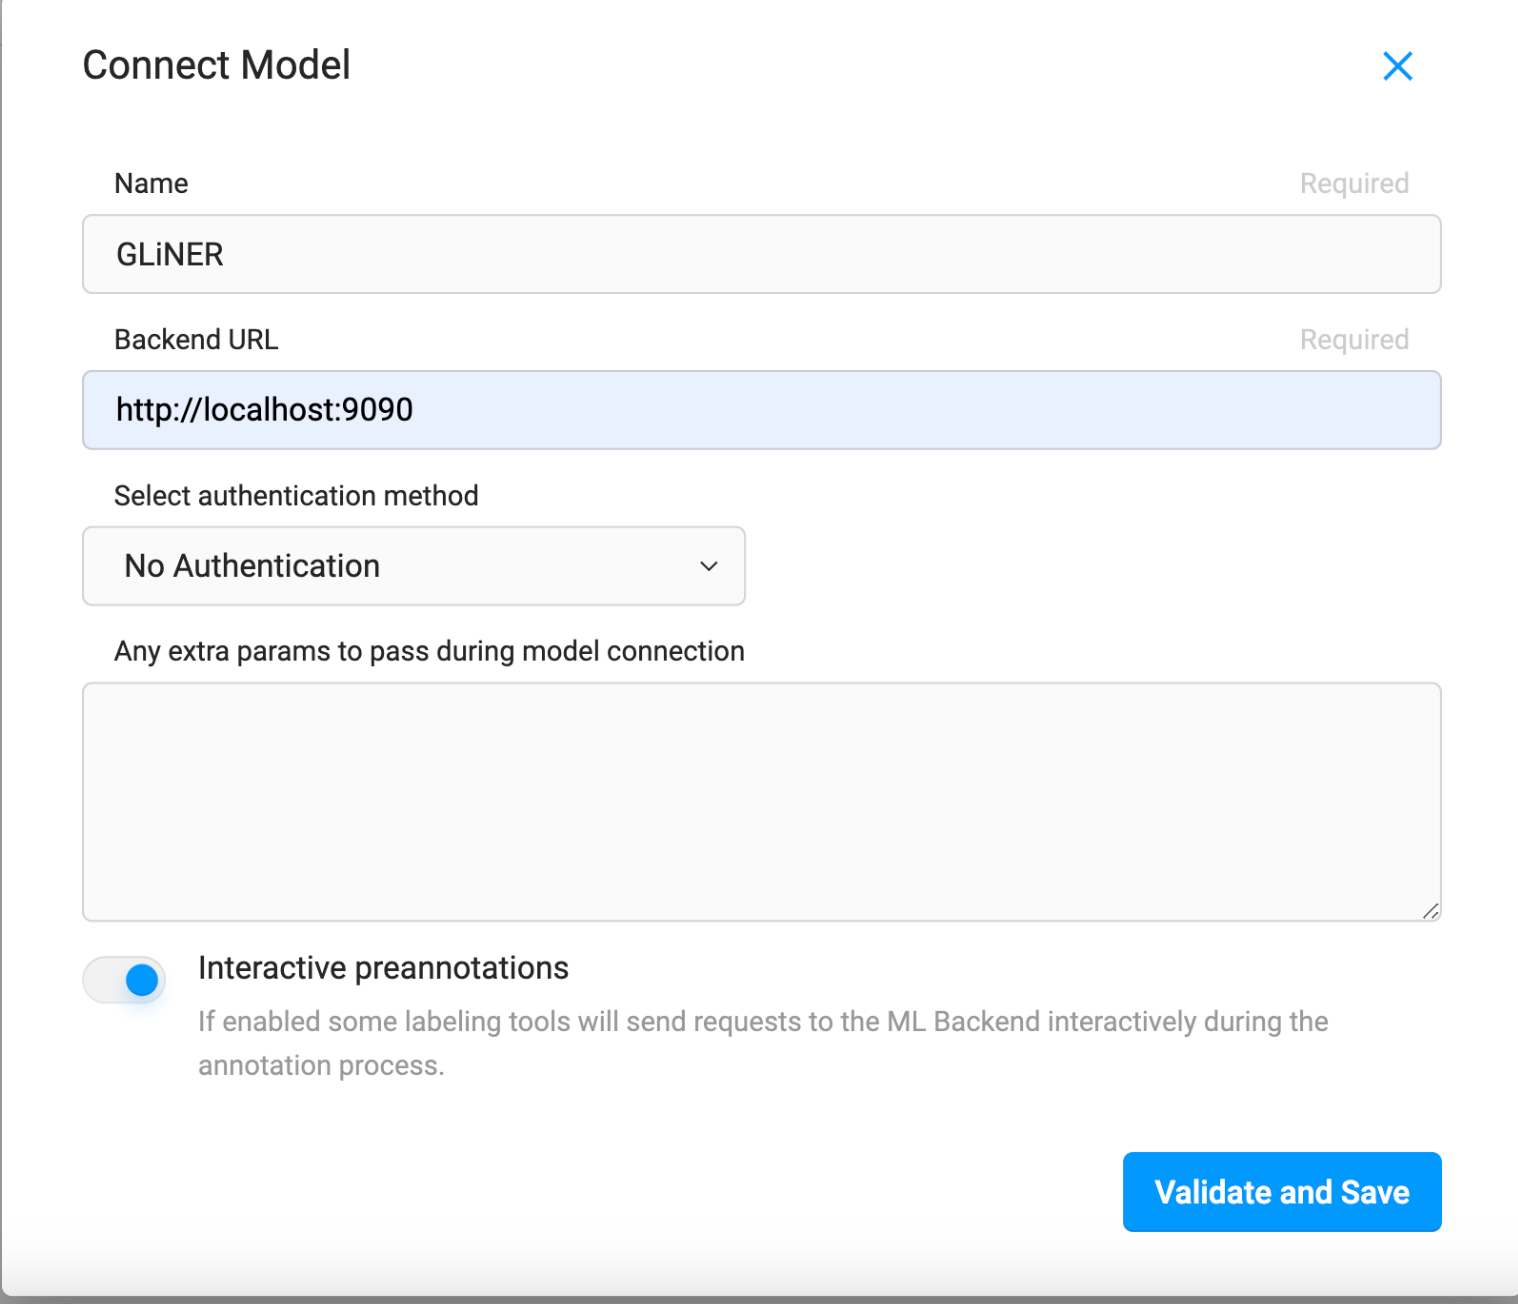
Once the Docker container is up and running, you can add the model to your project as the ML Backend by going to the Settings page of your project and clicking on Model from the menu on the left. From there, click “Connect Model” and configure it as shown below. Make sure you toggle on the “Interactive preannotations” setting at the bottom!
Automatically Generate Pre-Annotations
Now that we have all the data in place, we’ll need to annotate it so that we can evaluate the model against the labels that we care about. We’re going to make use of the interactive pre-annotations setting in Label Studio to really drive efficiency in this process. The predictions are made using the predict method in model.py.
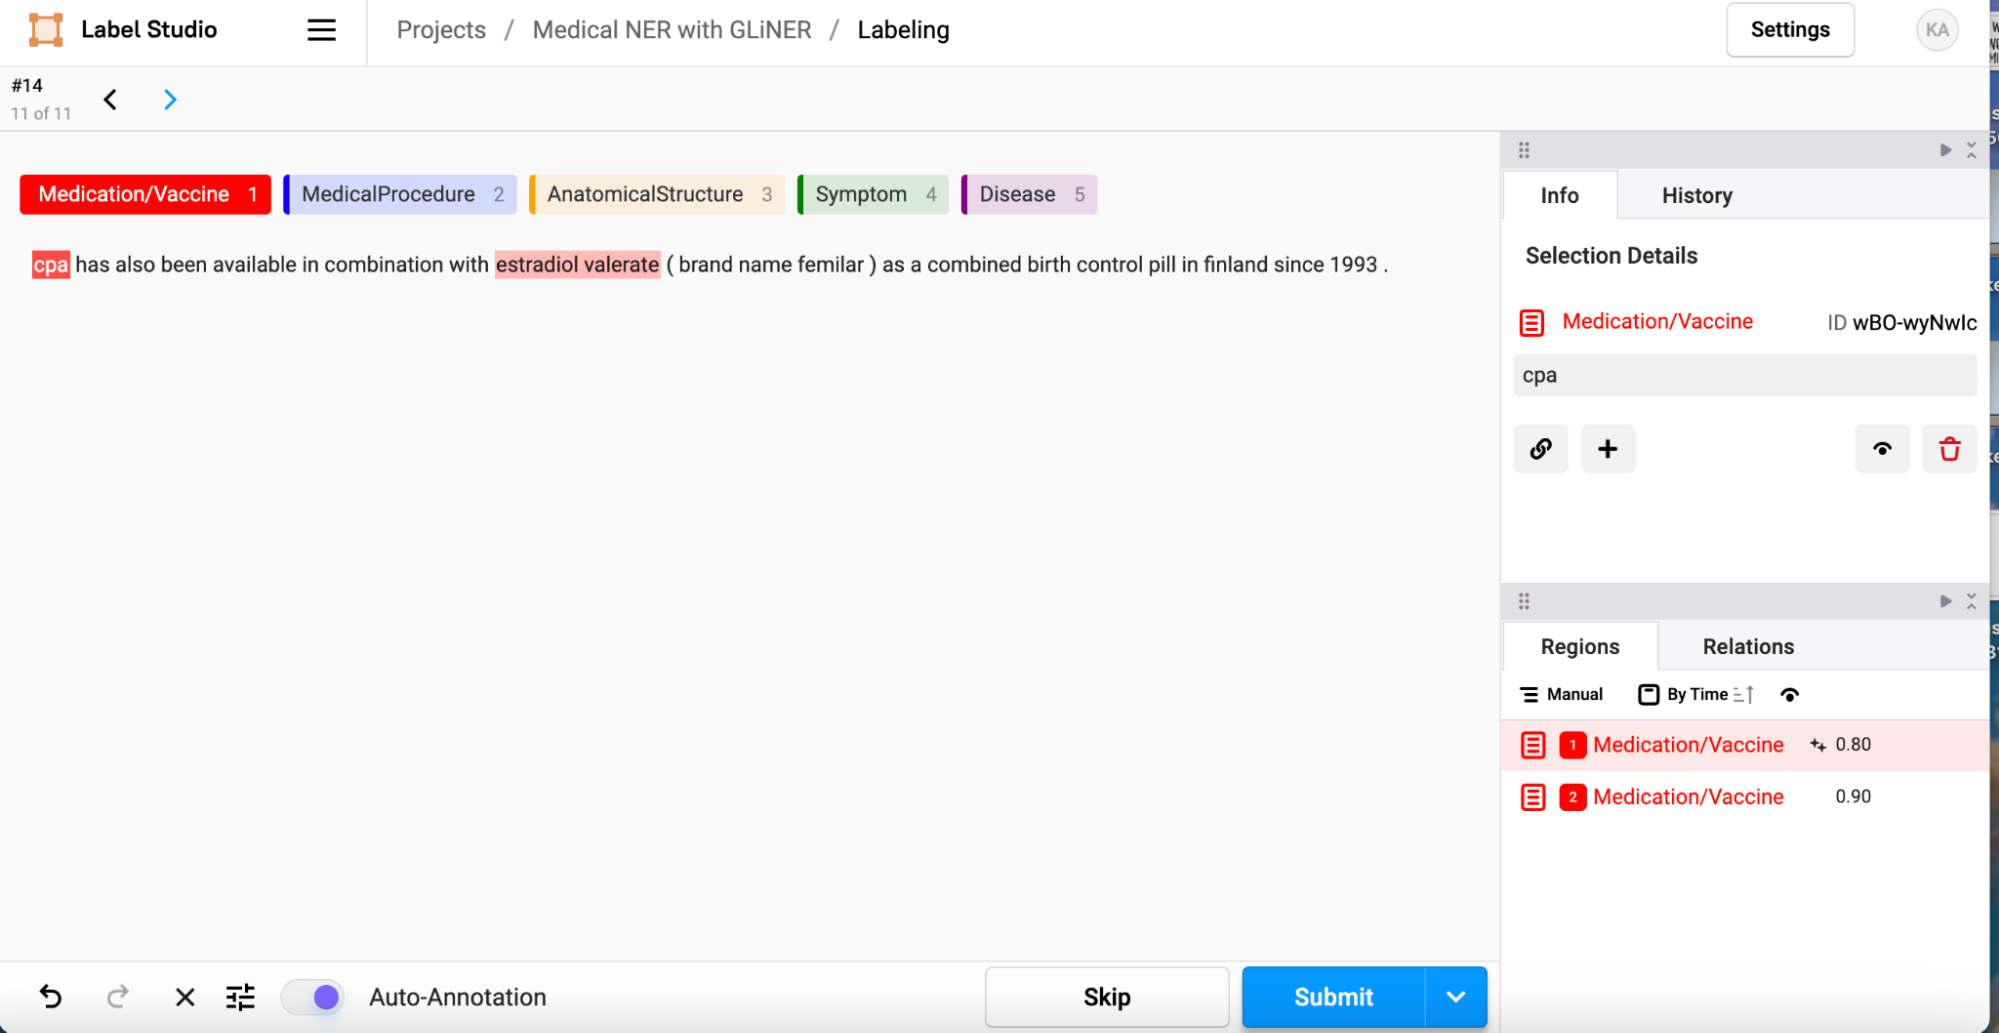
Since we’ve configured the setting already, all we need to do is go back to the main page for this project and click “Label All Tasks”. This will bring you into the labeling workflow. As you can see, regions that the model has identified as being named entities that we care about are automatically prelabeled! If you agree with the model’s verdict, you can simply click submit (or use the hotkey shift+enter) to save these annotations. If the model got it wrong, you can manually delete the annotations by clicking on the span in the text that is highlighted or the corresponding span in the regions section in the bottom right corner, and then selecting the red trashcan icon in the upper right info section. You can also manually add new annotations if the model has missed something by selecting the label from the list above the text (or using the corresponding hotkey) and then highlighting the span of text that corresponds to that label. When everything looks right, click submit!
Fine-tune GLiNER on your Data
Now that we have a labeled dataset to use, we can fine-tune the GLiNER model! We’ll first need to convert the data into the format that is expected by the model, and then we’ll follow GLiNER’s fine-tuning example. Once again, Label Studio makes this process incredibly easy. We’ve added these steps to the same ML Backend code we used for pre-annotations. This time, we’ll be leveraging the fit method in model.py to fine-tune GLiNER.
All you need to do to leverage this tool is to go back to the settings page of your project and navigate to the Model page using the left menu. Scroll down to the GLiNER model we already set up, click on the three dots in the upper right hand corner of the GLiNER model, and select “Start Training”. This will kick off a model training run. You could also turn on the setting that automatically begins retraining the model after an update is made to an annotation or a new annotation is submitted, but we’ve opted not to do that here for efficiency reasons.
What’s Next?
Now that we’ve retrained the model, we can use it to repeat the cycle of fine-tuning that we’ve begun, or we can go ahead and use that model for other purposes. The predictions tab in the settings menu will show us what versions of the model are available to us, and we can select which version we’d like to use as we make predictions going forward.
Conclusion
Generalist models, like GLiNER, provide an excellent starting point for the tasks that they aim to solve. Fine-tuning these models offers us a way to improve their performance in the areas that we care about to solve business problems. By using Label Studio with this process, we can speed up our time to market by seamlessly evaluating our data, driving quick and iterative labeling, and evaluating the output of our models.
Related Content
-
Generate predictions & evaluate models using AI workflows—Label Studio 1.12.0 Release
Harness GenAI and popular ML models for pre-labeling, interactive labeling, and model evaluation. Advancements to the ML backend and a new examples library makes it easy to create powerful automations for Label Studio workflows.

Nikolai Liubimov
April 17, 2024
-
From Foundation Models to Fine-Tuned Applications Using Label Studio
We explore how Label Studio can be employed to build a Question-Answering bot trained on domain-specific knowledge.

Jimmy Whitaker
August 14, 2023
Nikolai Liubimov
August 14, 2023
-
Introducing Ranker for Fine-Tuning LLMs, Generative AI Templates, UI Improvements
We're excited to showcase some new features we've added to Label Studio Enterprise specifically designed to help create datasets for fine-tuning Large Language Models (LLMs) like ChatGPT or LLaMA.

Nate Kartchner
June 26, 2023