Monitor & Evaluate Models in Production with Label Studio

Prerequisites
This guide has a few things you should have and feel comfortable with! They are:
- User of Label Studio, and comfortable with annotation workflows
- Access to a running instance of Label Studio, locally or in our Cloud SaaS offering
- Access (at least read-only) production data, presumably in cloud bucket or datastore
- Comfortable writing python (or similar) with basic logic to transform records to Label Studio format
- Familiar with job schedulers (like cron)
Why Monitoring Models in Production Is So Challenging
Understanding how your production model is performing is the most crucial yet most challenging step in the Machine Learning pipeline. You’ve already trained your model and evaluated it for quality, but there are a range of things that can happen in live production scenarios, from weird model behaviors to unexpected human inputs, not to mention the impacts of our ever changing world on a model’s context.
Traditional gold-standard datasets—those manually created to serve as a baseline for future evaluation, are a great place to start your production level evaluation process. However, as many practitioners can sympathize, they are difficult and costly to build and maintain, and often don’t reflect the realities of your model in production. There are many tools on the market that can help monitor data drift, which often happens when the data being fed to our models changes, but there’s no replacement for a human understanding what’s really going on once a model is in production.
We know that this task is challenging – that’s why we built the Model Monitoring package for Label Studio. This package, which is totally configurable to your needs, helps you scrape your production logs and uploads your real model predictions as preannotations to Label Studio, giving you an easy way to keep a pulse on what is really happening in production. By doing so, you can have confidence that your mission critical AI remains high quality over time, with the added benefit that you can collect real data from production to use when you need to re-train your models.
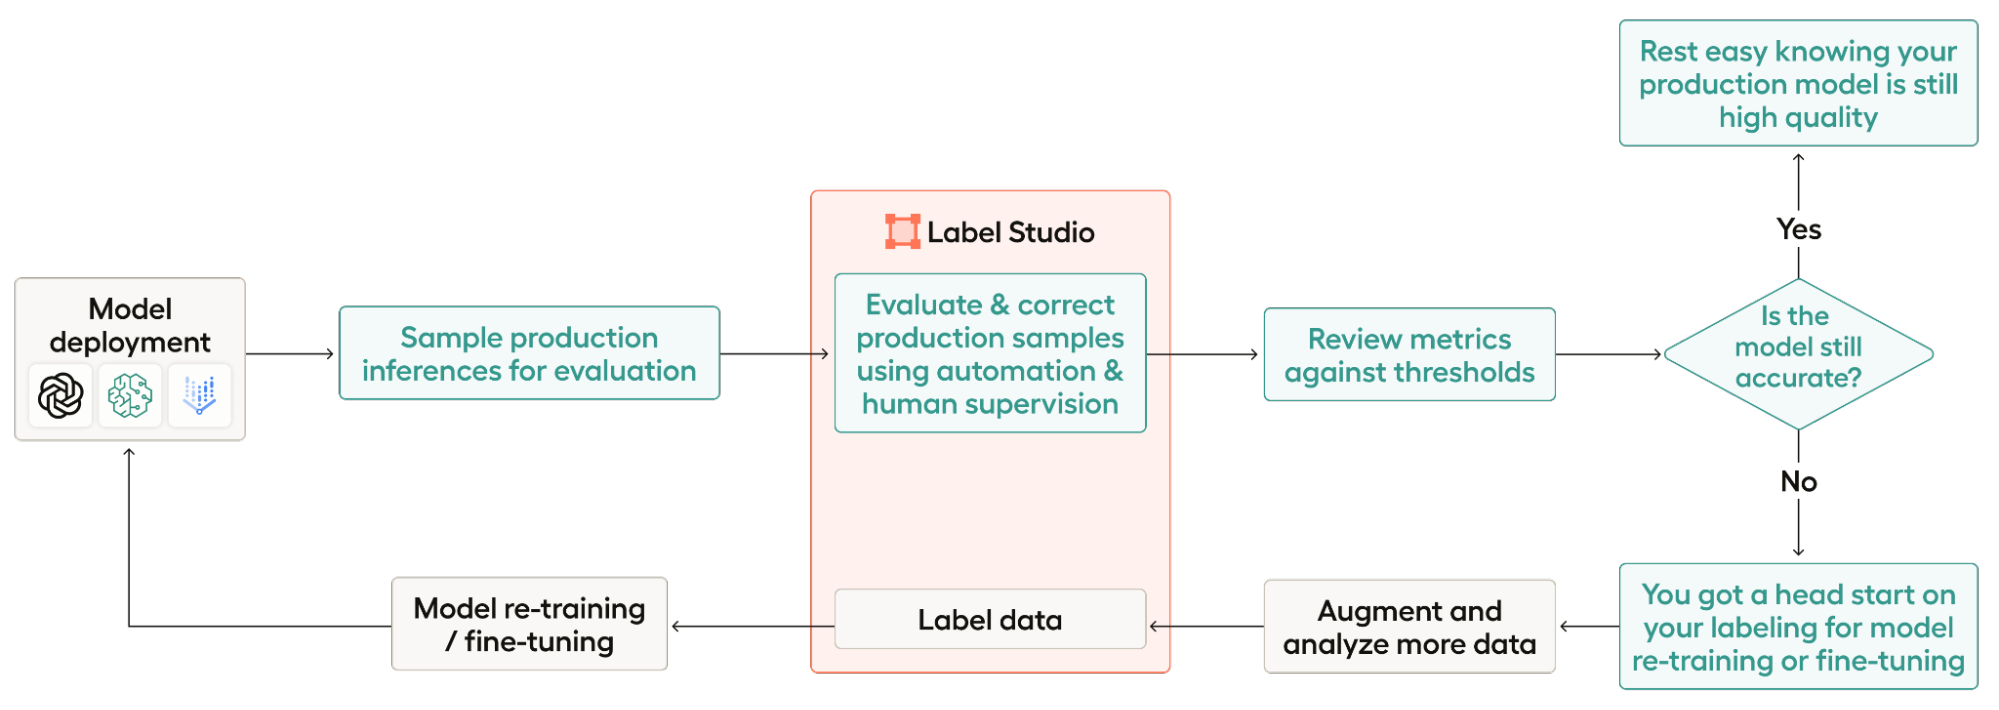
As an overview, here are the steps of the workflow:
- Model deployment: For this workflow, you need to have already deployed a model.
- Sample production inferences for evaluation: This involves both scraping your production logs from wherever they are hosted and sampling from those logs.
- Evaluate and correct production samples using automation and human supervision: A project in Label Studio will automatically be created for you using your real production outputs as predictions on each task. Then, it’s up to you to to take the right steps to evaluate how well your model did, and correct the places where it was wrong.
- Review metrics against thresholds: Export your labeled data and see how your model performed. We provide a basic script for this, but you’re always welcome to add your own!
- Is the model still accurate? If your model performed well, you can leave it alone and continue to monitor it. If your model needs improvement, you’ve already set yourself up with some labeled data you can use for re-training or fine-tuning!
- Augment and analyze more data: The output of step 3 is a great place to start for re-training or fine-tuning, but you’ll likely need more data. In this step, you’ll collect more data for your re-training or fine-tuning set.
- Label data: Label your new dataset for re-training or fine-tuning—you can do that right in Label Studio!
- Model re-training / fine-tuning: Once you’ve collected and annotated enough data, you’re ready to re-train or fine-tune your model.
- Model deployment: Now that you’ve re-trained or fine-tuned your model, you’re ready to deploy the new model and start the process over!
The package is designed with “set it and forget it” functionality in mind. We recommend running the main function in `monitor_project_with_labelstudio.py` as a cron job, so that you have one less thing to worry about remembering to do. By default, we have the program configured to take a look at the last 7 days of your production logs, under an assumption that you’ll want to run this once a week, but the whole system is configurable to your needs. You, or whoever needs to, will also receive an email when the code is done running and your project is ready for review. While you’ll need to set up a different job for each model that you have in production, you should only need to set everything up one time. Once it’s running, you should be good to go!
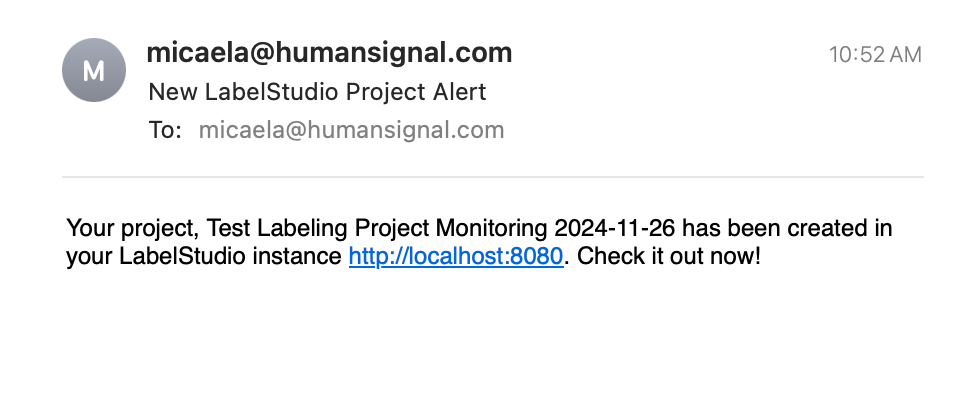
The email generated and sent by the Model Monitoring package.
This package does involve some input and coding from the user, and that’s intentional. One of the biggest reasons why people love Label Studio is due to its flexibility and customization options. We didn’t want to prescribe where your logs might be or what form they would take. We also didn’t want to be too prescriptive about what your project might be or what evaluation or sampling metrics would make sense for your project. Updating this logic is straightforward and should only take a few minutes, but you should think of our setup as a template and a guide, not the end all be all of what’s possible.
Ready to build your own workflow? Let’s get started!
Setting up your project
First, you’ll need to pull the examples repository to get access to our code. Then, you’ll want to start by filling out the `config.ini` file. This is where all your credentials will go, alongside some other custom variables. Note also that we provide two options for providing the labeling config that we’ll use in your newly created project – you can provide the string manually, or you can provide the project ID of an existing label studio project, like the one you used to create your model’s training data, and we’ll use the same one.
[labelstudio]
# Your Label Studio instance url
LabelStudioURL =
# Your Label Studio API key
LabelStudioAPI =
# OPTIONAL The ID of the Label Studio project that you want to use the config from.
LabelStudioProjectID =
# OPTIONAL Your Label Studio Config. Note that you need a space at the beginning of every line!
LabelingConfig =

[data]
# Total number of samples to upload to LabelStudio for review.
total_to_extract =
# BOOLEAN whether or not to sample your data by date
# If true, take an even sample across all 6 days sampled, getting as close as we can to the total_to_extract number without going over.
sample_by_date = True

[logs]
username =
api_key =
bucket =

[notifications]
# Email from which to send the notification
email_sender =
#email or emails, comma separated with no spaces, to receive notification emails
email_recipient =
# SMTP server -- provided by your email client
smtp_server = smtp.gmail.com
smtp_port = 465
# the password or app key for your email. If using gmail, generate an app key here: https://myaccount.google.com/apppasswords
email_password =Establish your ETL pipeline
After your `config.ini` file is good to go, you’ll need to head over to `scrape_logs.py` and update the logic for your system. The important thing is that `scrape()` returns a list of dictionaries, where each dictionary corresponds to one Label Studio task. The keys of the dictionary will be what we use to upload your data according to the label_config, so you’ll want to make sure that you label those fields appropriately.
Updating `scrape_logs.py` involves a few different steps:
1. Update the connection logic. Our example is for an S3 bucket – if you’re using another system, you’ll need to change how you connect.
# Connect to your server here.
# In this example, we use an S3 bucket
session = Session(aws_access_key_id=logs_username, aws_secret_access_key=logs_password)
s3 = session.resource('s3')
bucket = s3.Bucket(logs_bucket)

# for our test, we assume that files have the name "qalogs_MM:DD:YY.txt"
for s3_file in bucket.objects.all():
    key = s3_file.key
    if "qalogs" in key:
        key_date = key.split(".")[0]
        key_date = key_date.split("_")[1]
        key_date = datetime.strptime(key_date, '%m:%d:%y').date()
        print(key_date, end, start)
        if key_date <= end and key_date >= start:
            body = s3_file.get()['Body'].read().decode("utf-8")
   #         # the scrape file method does the file processing.
all_data.extend(scrape_file(body))2. Update the file processing logic in `scrape_file()`. Our example uses the `qalogs_11:12:2024.txt` file in the repo, which you’re more than welcome to play with! We know your production logs will likely look different.
def scrape_file(body):
   # basic file processing template
   # ALL logic will need to be customized based on the format of your logs.
   all_data = []
   if body:
       curr_data = {}
       for line in body.split('\n'):
           if "Timestamp" in line:
               if curr_data:
                   print(curr_data)
                   all_data.append(curr_data)
                   curr_data = {}
               line = line.split(' ')
               date = line[1]
               print(f'date {date}')
               curr_data["date"] = date
           if "User Input" in line:
               line = line.split('User Input: ')
               question = line[1]
               curr_data["question"] = question.strip("\"")
           if "Model Response" in line:
               line = line.split('Model Response: ')
               answer = line[1]
               curr_data["answer"] = answer.strip("\"")
           if "Version" in line:
               line = line.split("Version: ")
               model_version = line[1]
               curr_data["model_version"] = model_version
       if curr_data:
           all_data.append(curr_data)
       return all_data
3. Optional update the subsetting logic. We’ve included logic for taking a random sample of your data by date, but if you want to subset by class or something else, we encourage you to write that into the file!
def get_data_subset(all_data, total_to_extract, sample_by_date):
   """
   Get a sample of all your data. If the total len of data is less than the sample size, return all.
   Else, if sample_by_date, take an even sample across all date ranges as for a total as close as we can get
   to the intended sample number while keeping an even sample across all dates.
   :param all_data: a list of dictionaries containing all the data scraped from the logs
   :param total_to_extract: the goal number of samples to have in total
   :param sample_by_date: boolean, if true, sample the subset by date.
   :return:
   """
   if len(all_data) <= total_to_extract:
       return all_data

   if sample_by_date:
       by_date = {}
       for t in all_data:
           if t["date"] not in by_date.keys():
               by_date[t["date"]] = [t]
           else:
               by_date[t["date"]].append(t)

       per_date = floor(total_to_extract / len(by_date.keys()))
       new_data = []
       for date, data in by_date.items():
           random_sample = sample(data, per_date)
           new_data.extend(random_sample)
       return new_data

   #ToDo: Sample by class?

   else:
       random_sample = sample(all_data, total_to_extract)
return random_sampleUploading Production Data as Predictions
The final step of setting up your project is to update how data is uploaded into your LabelStudio system.
Let’s say you’re working with the following labeling config. In this sample project, we’re monitoring an LLM driven QA system so we’re going to want to upload the question as the input from the user, and our answer will have originally been written by a human, but in our Model Monitoring package will be the output from our LLM.
<View>
  <Header value="Question:"/>
  <Text name="question" value="$question"/>
  <TextArea name="answer" toName="question" editable="true" smart="false" maxSubmissions="1"/>
</View>Here are the steps you’ll need to follow to update this code in `model_monitoring_with_labelstudio.py`:
1. Update the task_data dictionary in the `monitor` function of `monitor_model_with_labelstudio.py`. You can see our sample task_data dictionary below. The “data” key on the top level of the dictionary is required by Label Studio. All you need to do is edit the dictionary that is the value of the “data” key to hold all of the data that is required to set up a task. In your labeling config, this will correspond to any fields that have a “value” key associated to some variable. In our example, that’s only the Text field named “question”, so here we provide the key “question”, which corresponds to the name of the variable in the value field, and our value in the dictionary is the key in the task dictionary that we created in the scraping section that corresponds to the question.
task_data = {
   "data":
       {"question": task["question"]}
}2. Update the result of the PredictionValue object created in the `monitor` method of `monitor_model_with_labelstudio.py` to reflect the fields that ARE predicted by your model. The easiest way to generate this is by using the code in `utils.py`, which will take your config.ini file and use the provided labeling config (or the labeling config from your specified ProjectID) and return a sample of what this Prediction Value should look like. Note that we fill in this dictionary with some dummy information, so you’ll need to update some fields with the information that is relevant to your particular data samples (that you got in scrape_logs.py). For our example above, the `utils.py` code gives us the following json to work with.
{
    "model_version": "sample model version",
    "score": 0.0,
    "result": [
        {
            "id": "ab417d1e-b4ee-4f8f-b4e9-930d35da5e60",
            "from_name": "answer",
            "to_name": "question",
            "type": "textarea",
            "value": {
                "text": [
                    "Lorem Ipsum
                ]
            }
        }
    ]
}Let’s take a look at how this json corresponds to the PredictionValue that you’ll need to write. The first parameter of the PredictionValue object is the `model_version` – this is required by Label Studio. We extract the model version from the logs during scraping and provide it as a key in our task dictionary, so we use it here. Note that in the JSON sample from `utils.py`, we just say “sample model version”. Here, we also include a score value – this is optional. Then, we have the result parameter. This takes a list of all the fields that will need to be filled in. In our example, the only prediction that we are making is the TextArea with the name “answer”, so we provide the information in a single dictionary within the list. The from_name corresponds to the name of the field, the to_name corresponds to the toName of the field, the type is the type of the field (in our case textarea), and the value is whatever needs to be provided to create your annotation. For more information on this section, see our documentation.
from label_studio_sdk.label_interface.objects import PredictionValue
prediction = PredictionValue(
   model_version=task["model_version"],
   result=[
       {
           "from_name": "answer",
           "to_name": "question",
           "type": "textarea",
           "value": {
               "text": [task["answer"]]
           }
       }
   ]
)After completing these steps, you should have code that is ready to scrape your logs and upload them to Label Studio.
Evaluating your model
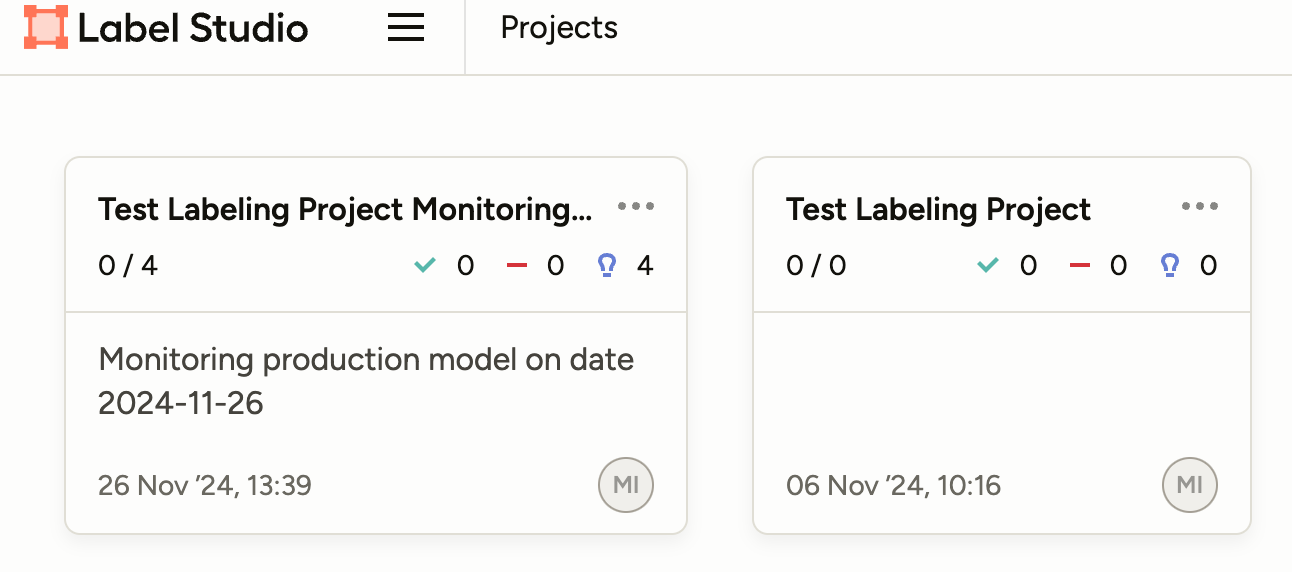
After you run the script or the cron job, you’ll have a new project in Label Studio ready for you to annotate. Since we uploaded the real model predictions as pre-annotations, it’s easy to see what happened in the real world and make changes where there was a better outcome than what really happened. Then, when you’re ready, you can export your annotated data as a full json file (the first export option in the open source version). With that file saved, you can note the path to the file in `evaluate.py` and run the script, which will give you metrics about how many times your model predictions had to be changed.
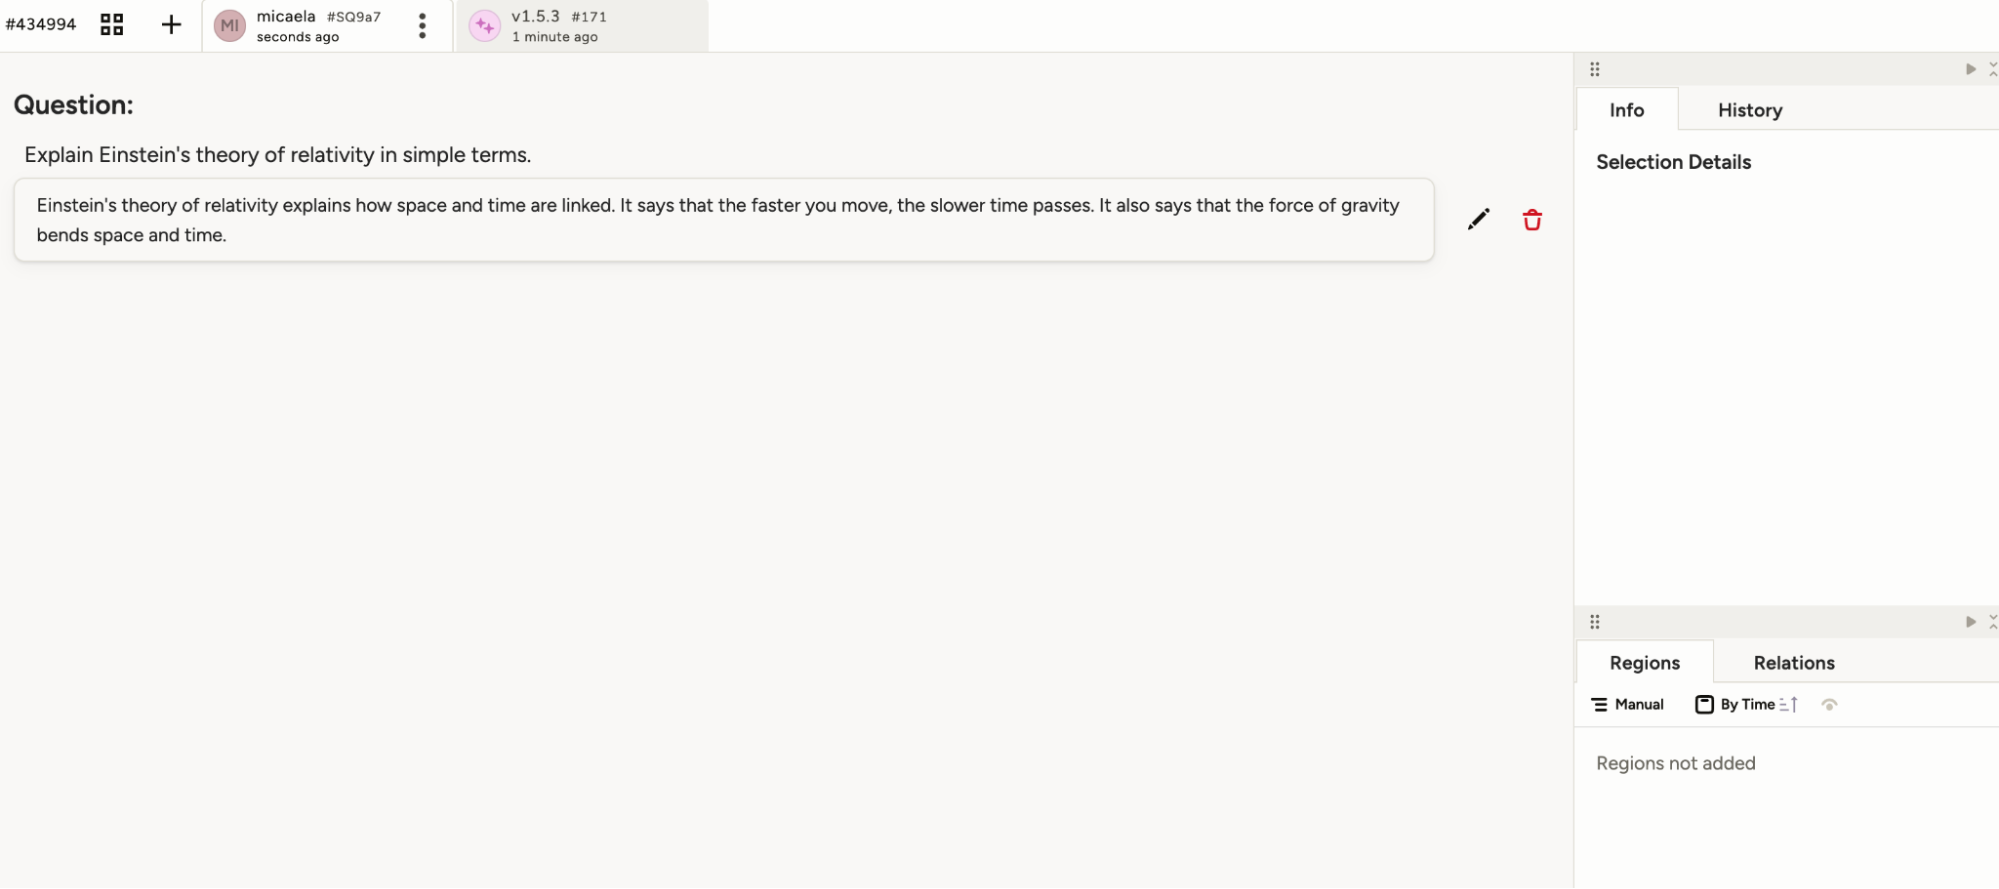
By understanding how often you change model predictions, you’ll get a better understanding of what’s really happening in your production systems, and be able to update the model before problems arise or you hear from your users. . Additionally, annotating production data provides you with data that is ready to be used to fine-tune or re-train your models.
If you want to dive deeper into evaluation workflows, check out our guide to comparing model outputs in Label Studio
Happy labeling!
