How to Create a Prompt Generator with Label Studio and RLVR
Over 72% of data scientists spend half of their time on data preparation, iteration, and labeling. Data labeling is time-consuming and error-prone because it relies on manual effort, which introduces inconsistencies due to annotator variability.
Label Studio lets you integrate any large language model (LLM) API to automate data labeling by writing prompts directly within the annotation interface. However, even powerful models can't guarantee high-quality and consistent labels if the prompts aren't carefully crafted.
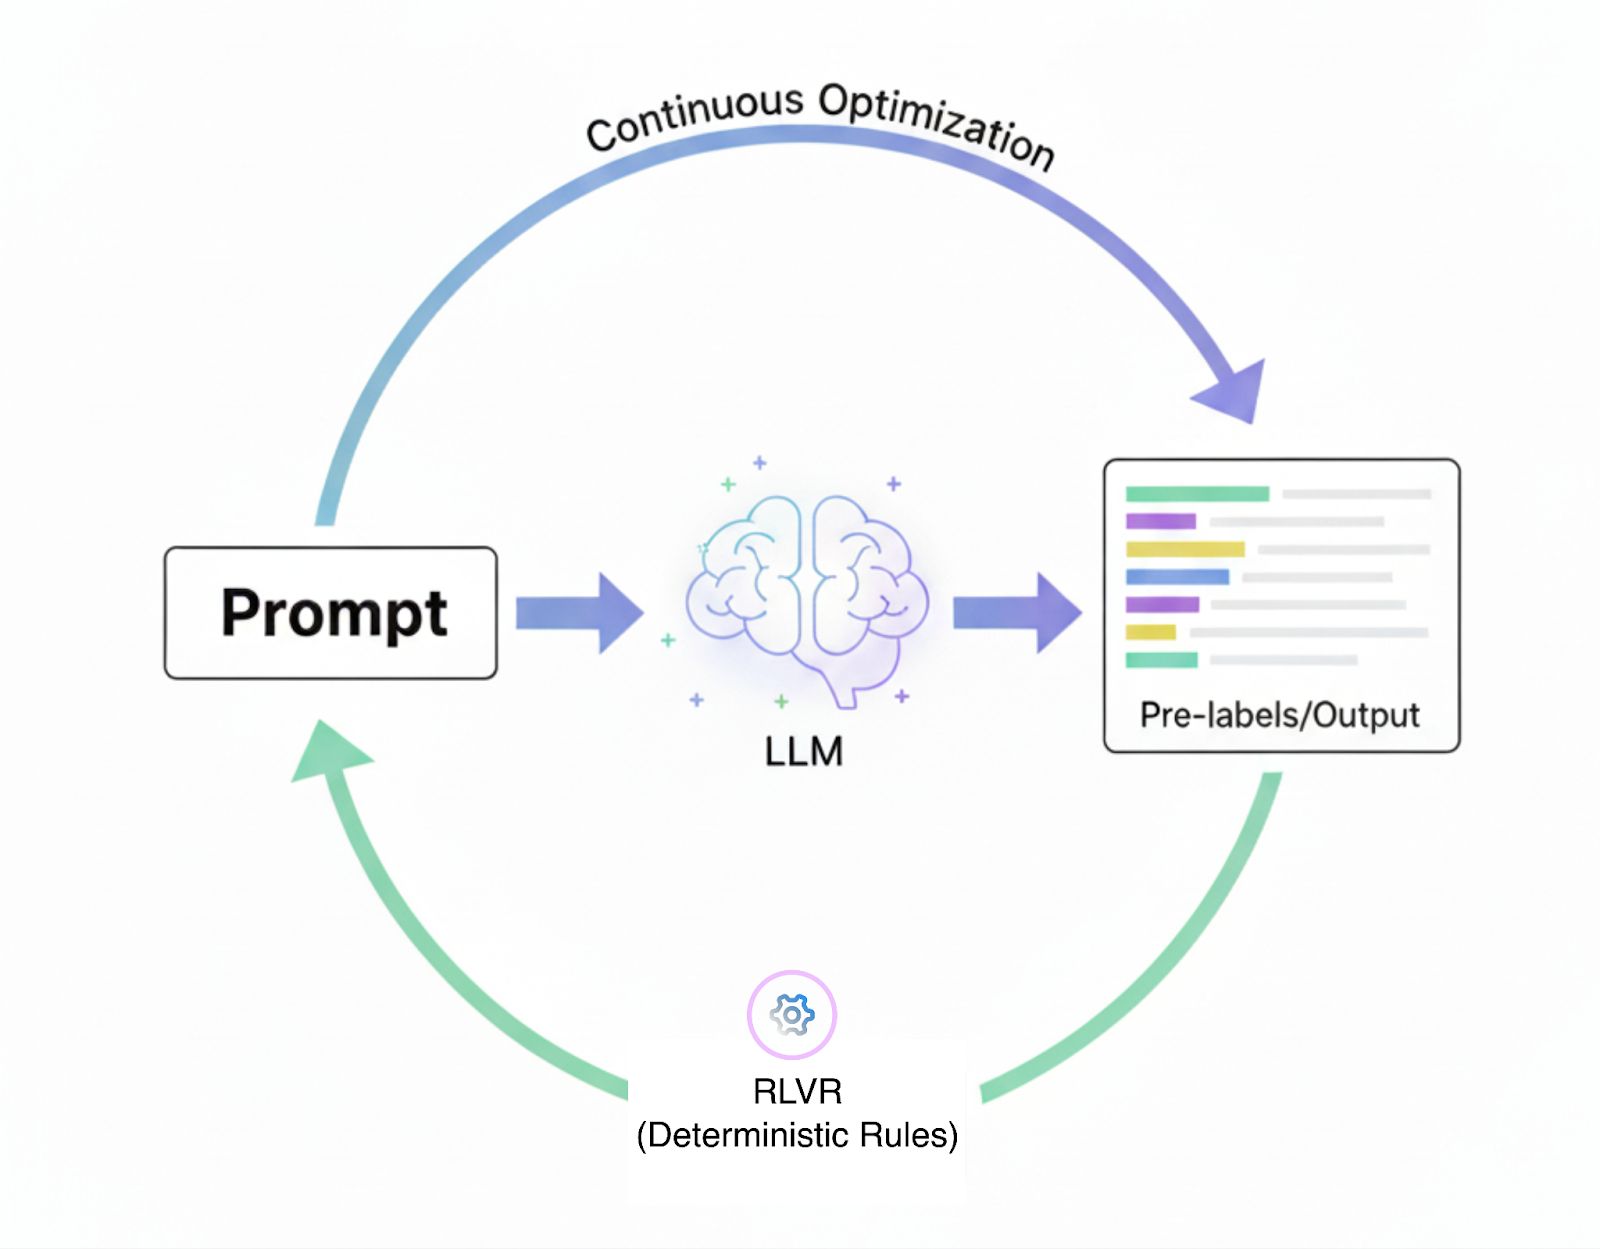
This is where Reinforcement learning with verifiable rewards (RLVR) can help. RLVR helps refine prompts and even automates the process by applying deterministic rules that enhance data label quality.
In this article, we’ll create a prompt-centric workflow in Label Studio. You'll learn how to apply an RLVR-based score verifier and use an LLM as a prompt optimizer to enhance your prompts.
Why Prompt Optimization Matters for Domain Labeling
Prompts shape what the model produces before any manual review takes place. When prompts are unclear or brittle, the model generates inconsistent pre-labels, requiring reviewers to correct the same mistakes repeatedly. Even slight variations in instructions or annotation instruments can significantly change the labels produced and impact downstream model performance.
Prompt-Centric Labeling Cycle
Refining prompts is not a one-time task but a continuous process. Label Studio has introduced prompt-centric workflows, enabling annotators to create, test, and refine prompts directly within the labeling interface. Instead of repeatedly copying outputs between the model and the dataset, predictions and prompts evolve together within the annotation loop.
While this prompt-centric workflow improves upon manual labeling, it can still be cumbersome. Annotators must continually experiment with different prompts to achieve the desired results. RLVR automates this process by applying deterministic rules that refine prompts and continuously improve labeling outcomes.
For example, in a classification task, the system can simply check whether the model's prediction matches the gold label. With a prompt-centric workflow, this creates a feedback loop where prompts generate predictions and rules verify correctness.
Human annotators refine outputs only when necessary. The result is a labeling pipeline that is more objective, easier to scale, and less reliant on subjective human judgments.
Why Use Reinforcement Learning with Verifiable Rewards Instead of Human Feedback
One of the biggest differences between RLVR and reinforcement learning from human feedback (RLHF) is how the reward is derived. With RLHF, you train a reward model based on human judgments or preference rankings. That model then judges which outputs are better and assigns a continuous score.
In contrast, RLVR uses deterministic, rule-based, or verifiable checks like simple yes/no or 1/0 rewards based on whether the output meets a correctness criterion. Because of this, RLVR avoids the need for a learned reward model entirely.
Because RLVR uses binary, verifiable rules, it supports easy automation. You don’t need humans in the loop to judge or label each output or to validate the reward model’s decisions. The model’s predictions can be automatically verified against the rule, for example, ‘does the predicted label equal the gold label?’. That reduces dependence on human feedback and speeds up training.
Another advantage is robustness to reward hacking or unintended shortcuts. Learned reward models in RLHF are vulnerable because the LLM might exploit correlations or biases in the reward model rather than actually improving along the desired dimension. Rule-based verifiable rewards leave much less room for gaming the signal, because passing the check is a strict requirement.
Here’s a quick comparison between RLHF and RLVR:
| RLHF | RLVR | |
| Reward Source | Human judgments, preference rankings | Deterministic, rule-based checks |
| Complexity | Requires training a separate reward model | Typically no reward model needed |
| Objectivity | Inherently subjective, varies between reviewers | Objective, binary verification against gold answers |
| Vulnerabilities | Susceptible to reward hacking, biases in reward model | More resilient to reward hacking |
| Best Suited For | Tasks needing subjective evaluation, nuance (e.g., tone, style) | Tasks with clear, objective correctness (e.g., math, classification) |
However, RLHF still has its place. You should prefer RLHF when you cannot define an objective verifier. If your task requires subjective judgments, nuanced human rubrics, or criteria that are difficult to encode in rules, then RLHF provides flexibility that RLVR lacks.
Case Study: Customer Intent Classification
Customer support is a common domain where chat data must be labeled both efficiently and accurately. This case study demonstrates the impact of automating prompt refinement on improving efficiency and accuracy.
The Challenge
Customer support teams handle large volumes of chat logs where each dialogue may involve multiple overlapping intents. For example, a customer is asking about account verification while also requesting technical support. Manually triaging these requests is slow, inconsistent, and costly, resulting in delayed resolutions and frustrated customers.
Our Approach
We used Label Studio’s prompt-centric workflow for multi-intent classification of customer support dialogues. Our goal was to use prompts and RLVR to automatically label dialogues into intents such as account verification, information requests, greetings, and technical support.
We worked with two datasets.
- Training dataset: An unlabeled collection of 200 dialogues used to draft prompts and generate initial predictions.
- Ground truth dataset: A gold-standard set of 50 dialogues validated by human annotators, used as the benchmark for evaluation.
By comparing predicted labels to the gold dataset, we could directly measure performance. This score then guided prompt refinements over multiple epochs, creating a closed-loop system that improved without additional human supervision.
Results & Impact
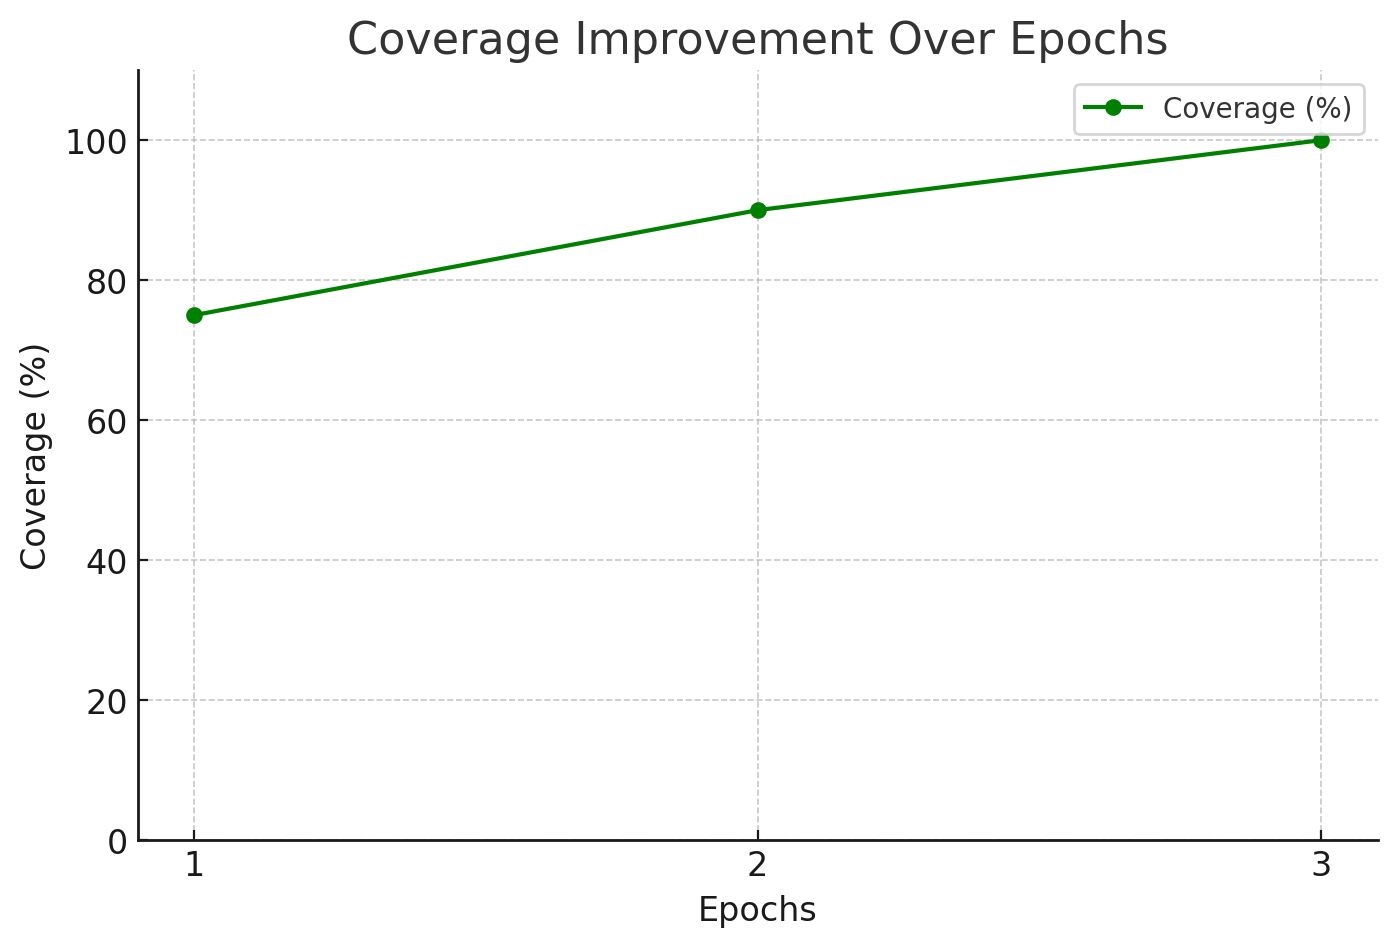
- Coverage increased from 75% to 100%, ensuring that all gold labels were captured by the final epoch.
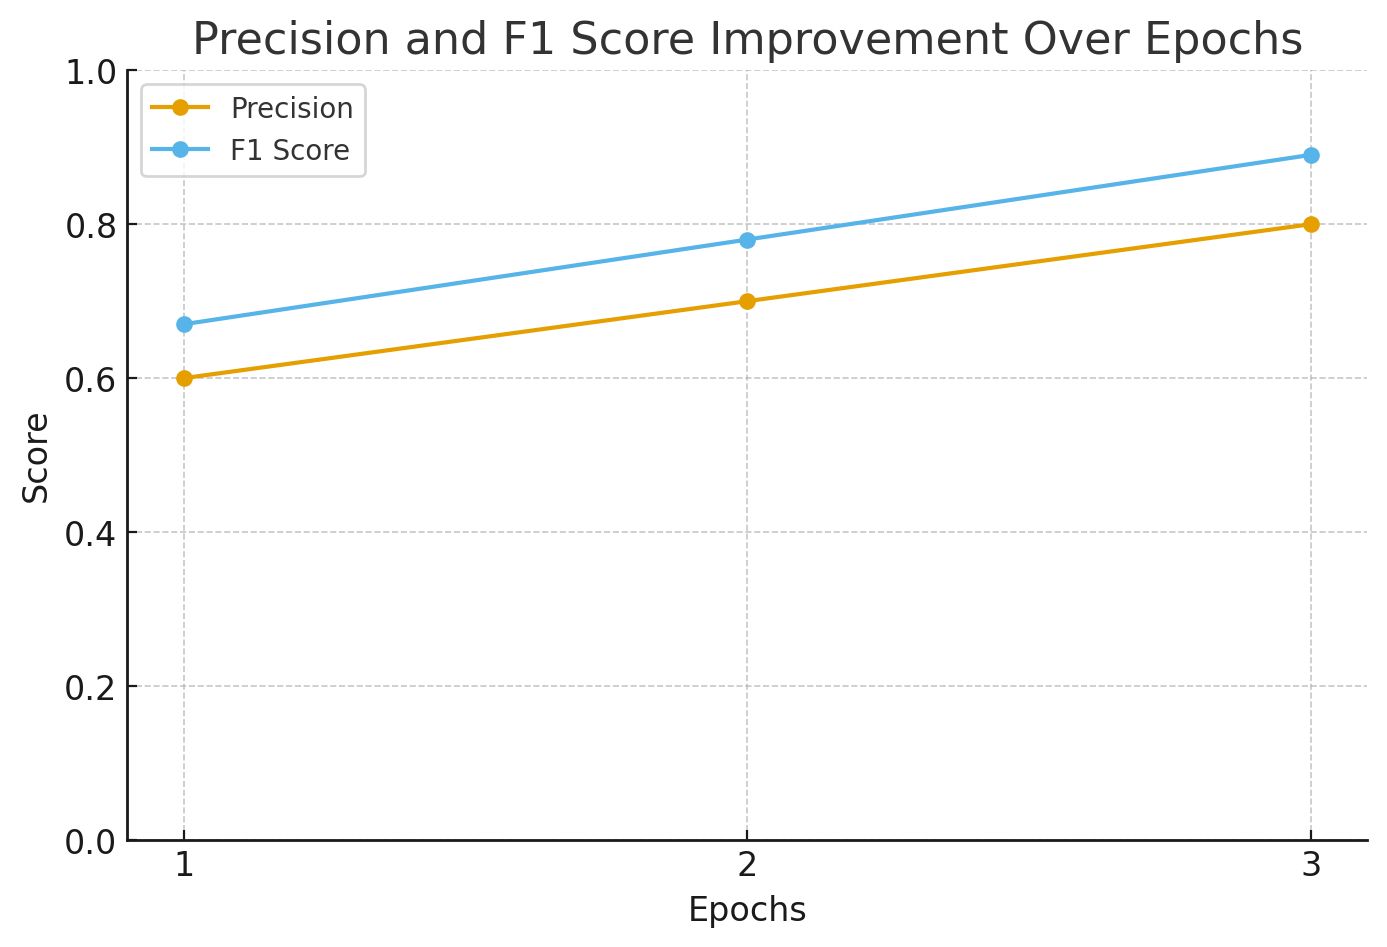
- Precision improved from 0.6 to 0.8, a 33% relative increase that reduced false positives.
- F1 score improved from ~0.67 to ~0.89 over three epochs, indicating a more balanced performance.
- By the final epoch, the optimized prompt consistently identified all key intents, including multi-label cases like Technical Support and Account Verification.
Predictions Get More Accurate with Each Refinement
What We Learned
- RLVR is most effective when predictions can be validated against a gold dataset.
- Iterative prompt refinement delivered measurable improvements with each cycle.
- Having a verified ground truth was essential for accurately tracking real progress.
- The final prompt effectively captured multiple overlapping intents, reducing a common pain point in customer support.
Step-by-Step Implementation
This section walks through the prompt-centric workflow. It contains setting up the necessary tools, creating an annotation project, and then training with RLVR to refine prompts. This also shows Label Studio and RLVR connect to build a self-improving labeling pipeline.
Setting Up the Environment
Start by preparing the ML backend service that enables Label Studio to communicate with the LLM.
- Clone the ML backend repository: Label Studio provides an LLM interactive model example repository that contains the code for the interactive LLM service. This handles prompt submissions from Label Studio.
git clone https://github.com/HumanSignal/label-studio-ml-backend.git
cd label-studio-ml-backend/tree/master/label_studio_ml/examples/llm_interactive- Configure the API key: Open the .env file in the directory we just navigated to and configure the LLM provider's API key. This is how the service authenticates its requests to the model.
- Run the service with docker: Use Docker Compose to launch the service as a local microservice. This containerized approach ensures a simple, reproducible setup.
docker-compose up- Verify the service: Check that the backend is running correctly by sending a simple health check request.
curl http://localhost:9090/healthIf there’s a successful response, our ML backend is ready to accept connections from Label Studio.
Building the Annotation Project
The next step is to set up Label Studio. This is where the annotation happens. We'll need Label Studio running locally. We can either work through the user interface (UI) or use the Python SDK for programmatic setup.
- Install and start label studio: First, install Label Studio and start it from the terminal.
pip install label-studio
label-studio startThen, open http://localhost:8080 in the browser, create an account, and we’re ready to proceed.
- Install the Python SDK: For programmatic project creation, we'll use the Label Studio SDK.
pip install label-studio-sdk- Connect to Label Studio: Run the Python client, replacing the placeholder API key with the Personal Access Token. Generate this token from the Account & Settings in the Label Studio UI.
from label_studio_sdk.client import LabelStudio
from dotenv import load_dotenv


load_dotenv()


LS_URL = os.getenv("LABEL_STUDIO_URL")
API_KEY = os.getenv("LABEL_STUDIO_API_KEY")


ls = LabelStudio(base_url=LS_URL, api_key=API_KEY)Now, define the labels and the custom XML configuration needed for the project.
choices = [
   "Greeting",
   "Account_Verification",
   "Payment",
   "Refund_Request",
   "Complaint",
   "Technical_Support",
   "Information_Request",
   "Feedback",
   "Cancellation",
   "Other"
]
choices_xml = "\n".join([f'           <Choice value="{c}" />' for c in choices])
label_config = f"""
<View>
 <Style>
   .lsf-main-content.lsf-requesting .prompt::before {{ content: ' loading...'; color: #808080; }}
 </Style>
 <Paragraphs name="chat" value="$dialogue" layout="dialogue" />
 <Header value="User prompt:" />
 <View className="prompt">
   <TextArea name="prompt" toName="chat" rows="4" editable="true" />
 </View>
 <Header value="Bot answer:" />
 <TextArea name="response" toName="chat" rows="4" editable="true" />
 <Choices name="response2" toName="chat" choice="multiple">
{choices_xml}
 </Choices>
</View>
"""Create the project on the Label Studio instance using the SDK client.
proj = ls.projects.create(
   title="Customer_Support_Annotation",
   description="Annotate customer support dialogues with intents",
   label_config=label_config,
   color="#FF8800"
)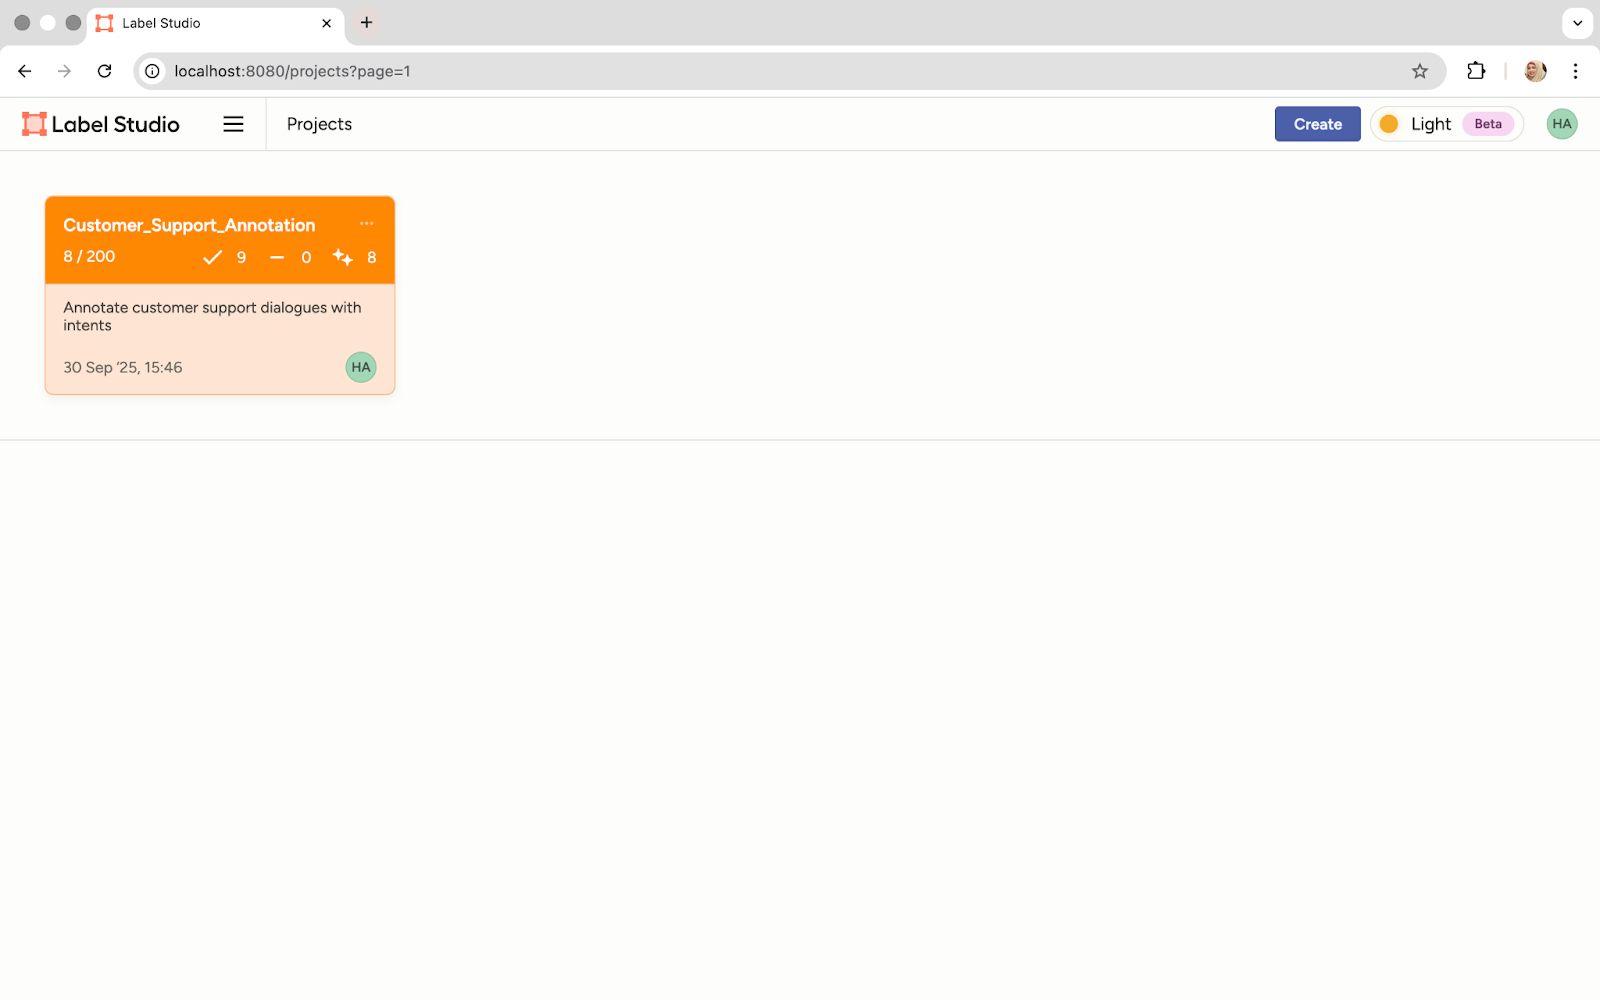
The Project Is Visible in the Label Studio UI
- Upload the dataset: We can open our project and upload the unlabeled chat log dataset. For example, here’s a sample dialogue from our dataset:
{
     "data": {
       "dialogue": [
         {"author": "Agent", "text": "Good morning, thank you for calling TechVault Data Solutions. My name is Sophia. How can I provide you with excellent service today?"},
         {"author": "Customer", "text": "Hi Sophia, good morning. I'm hoping you can help me. I'm locked out of my account—it says my password is incorrect, but I'm certain it's right."},
         {"author": "Agent", "text": "I understand how frustrating that can be. Let's get that sorted for you. To verify your identity, can you please provide the email associated with your account?"},
         {"author": "Customer", "text": "Yes, it's jane.doe@business.com."},
         {"author": "Agent", "text": "Perfect, thank you, Jane. I see your account here. For security, I've just sent a one-time passcode to that email. Could you read it back to me when you receive it?"},
         {"author": "Customer", "text": "Okay, just got it. The code is 748391."},
         {"author": "Agent", "text": "Excellent, that's correct. I'm now resetting your password. You should receive an email with a link to create a new one. Is there anything else I can assist with while I have you on the line?"},
         {"author": "Customer", "text": "Actually, yes. While I have you, could you also help me understand my current storage plan? I think I might need to upgrade."},
         {"author": "Agent", "text": "Of course. I see you're on our 'Basic 100GB' plan and you've used about 95GB. Would you like me to walk you through the options for our 'Professional 1TB' plan?"},
         {"author": "Customer", "text": "Yes, please do."},
         {"author": "Agent", "text": "It would be an additional $15 per month and includes enhanced security features. I can apply a 50% discount for your first three months as a thank you for the trouble today."},
         {"author": "Customer", "text": "That's wonderful, thank you! Let's go ahead with that upgrade."},
         {"author": "Agent", "text": "It's my pleasure. I've processed the upgrade effective immediately. You'll get a confirmation email shortly. Was that everything for you today?"},
         {"author": "Customer", "text": "Yes, that solves all my problems. Thanks for your fantastic help, Sophia."},
         {"author": "Agent", "text": "You're very welcome, Jane. Thank you for choosing TechVault. Have a great day!"}
       ]
     }
   }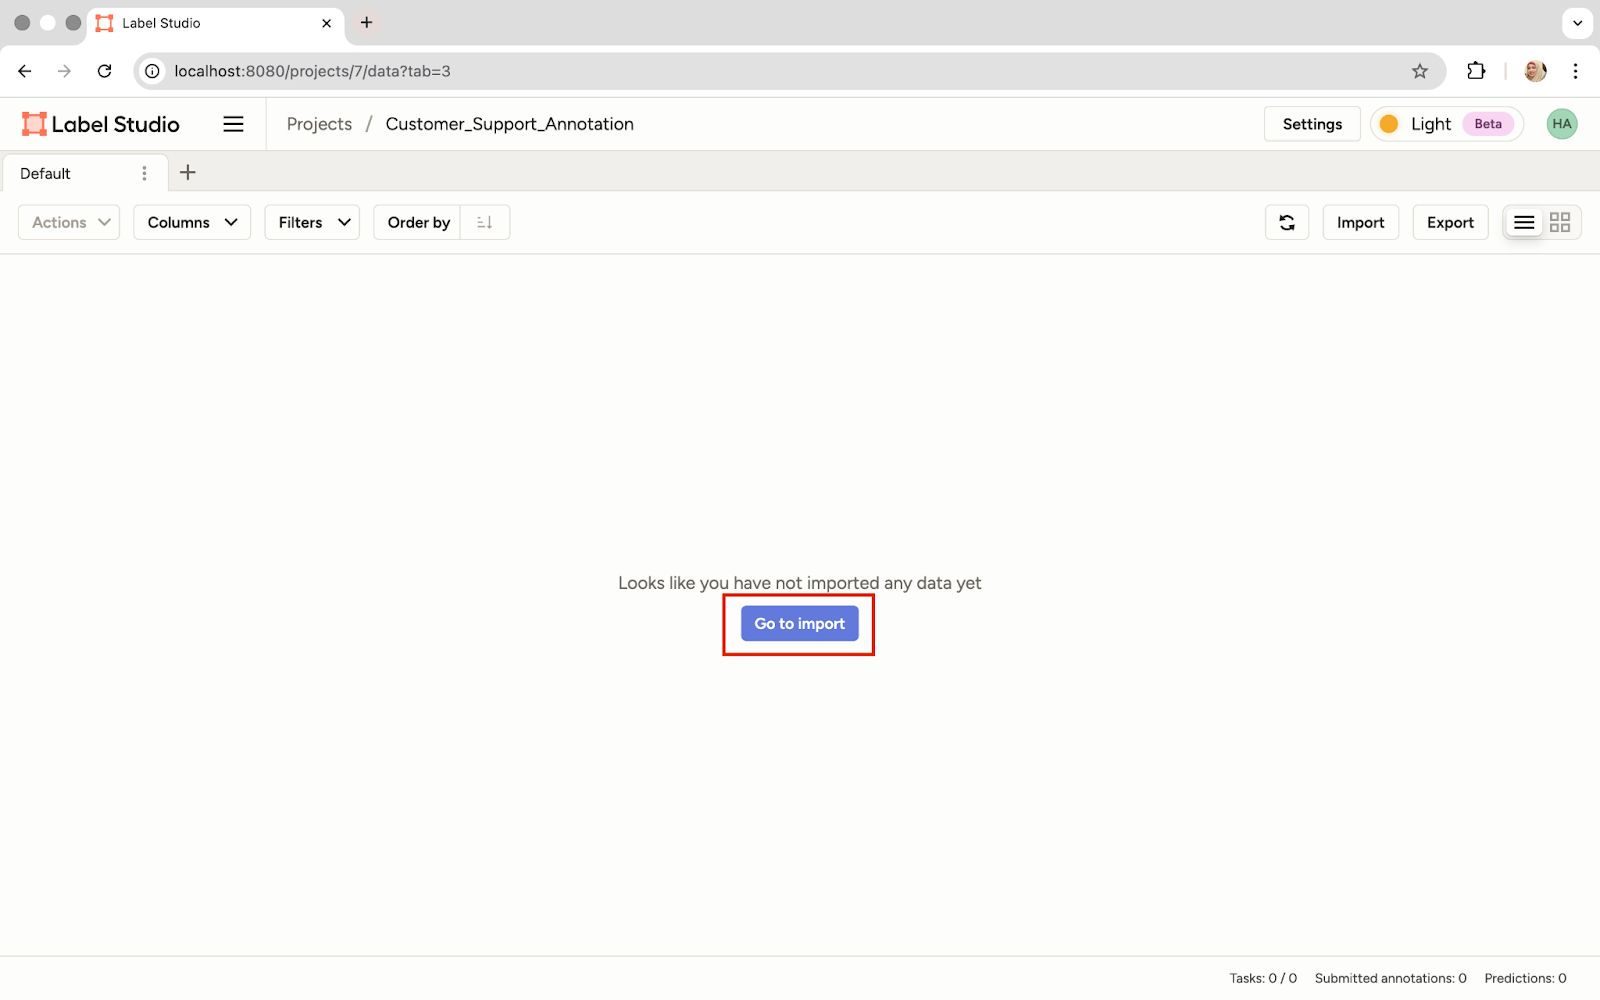
Import the Dataset
Connecting the ML Backend
Now, we'll link the project to the running ML backend. This connection enables the prompt-centric workflow. We provide the prompt, and the backend returns the prediction.
- Navigate to model settings: Go to the project settings in the Label Studio UI.
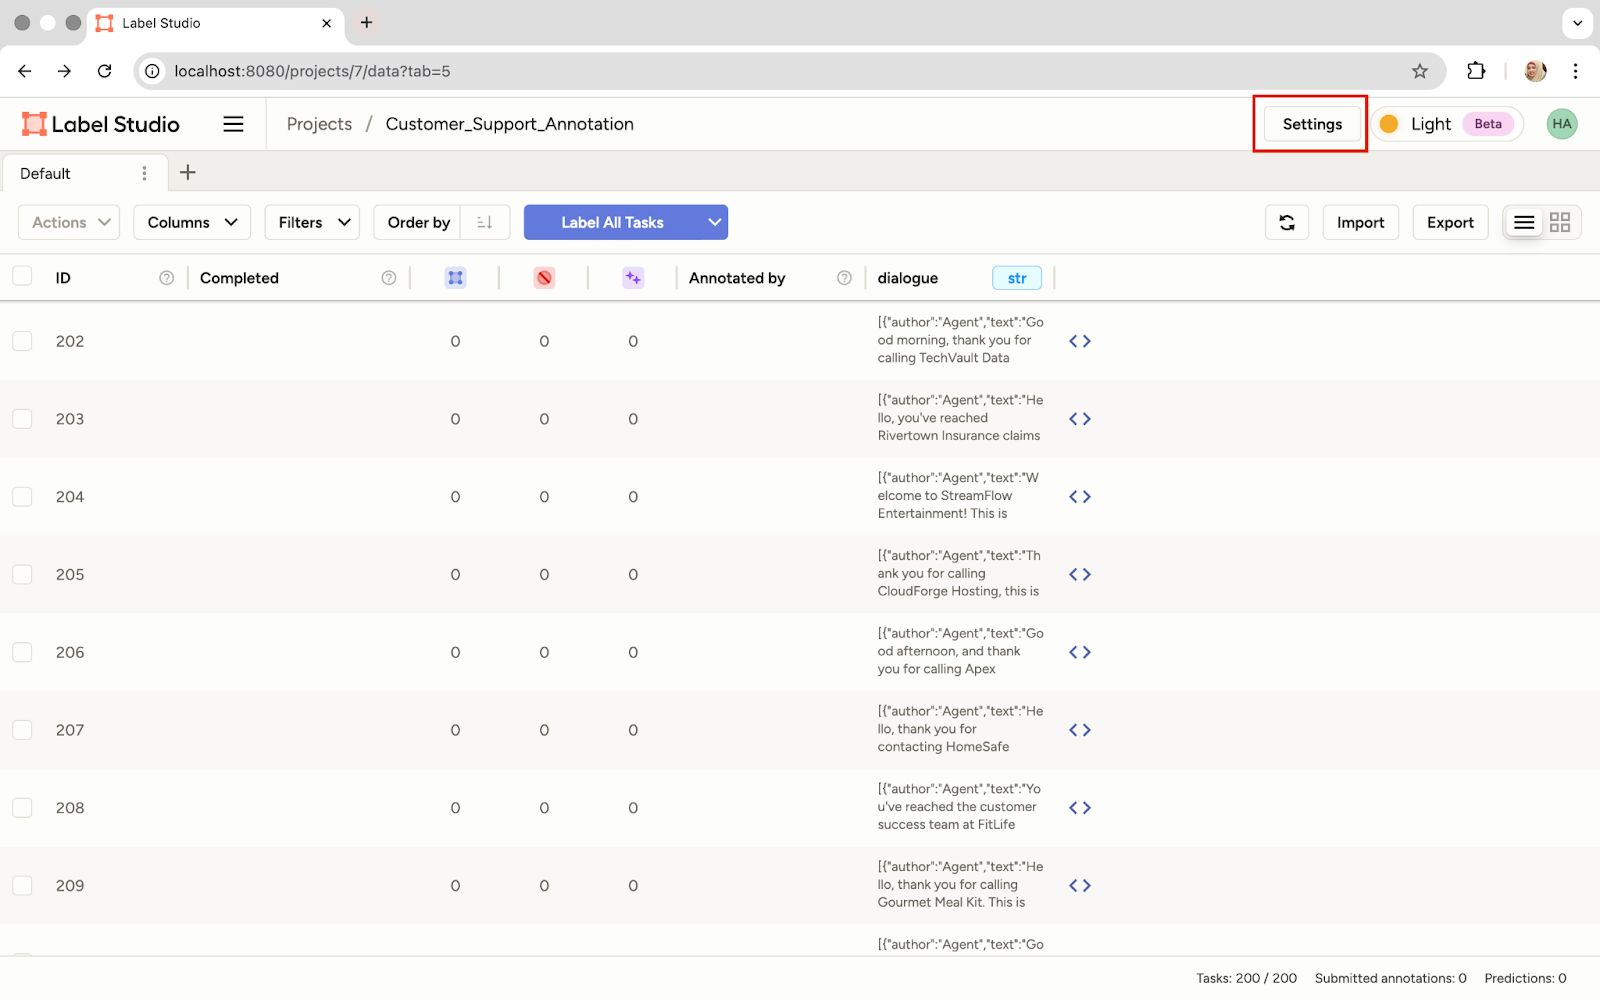
Click 'Settings' in the Project
- Connect the model: In the Model section, click the option to connect a new model.
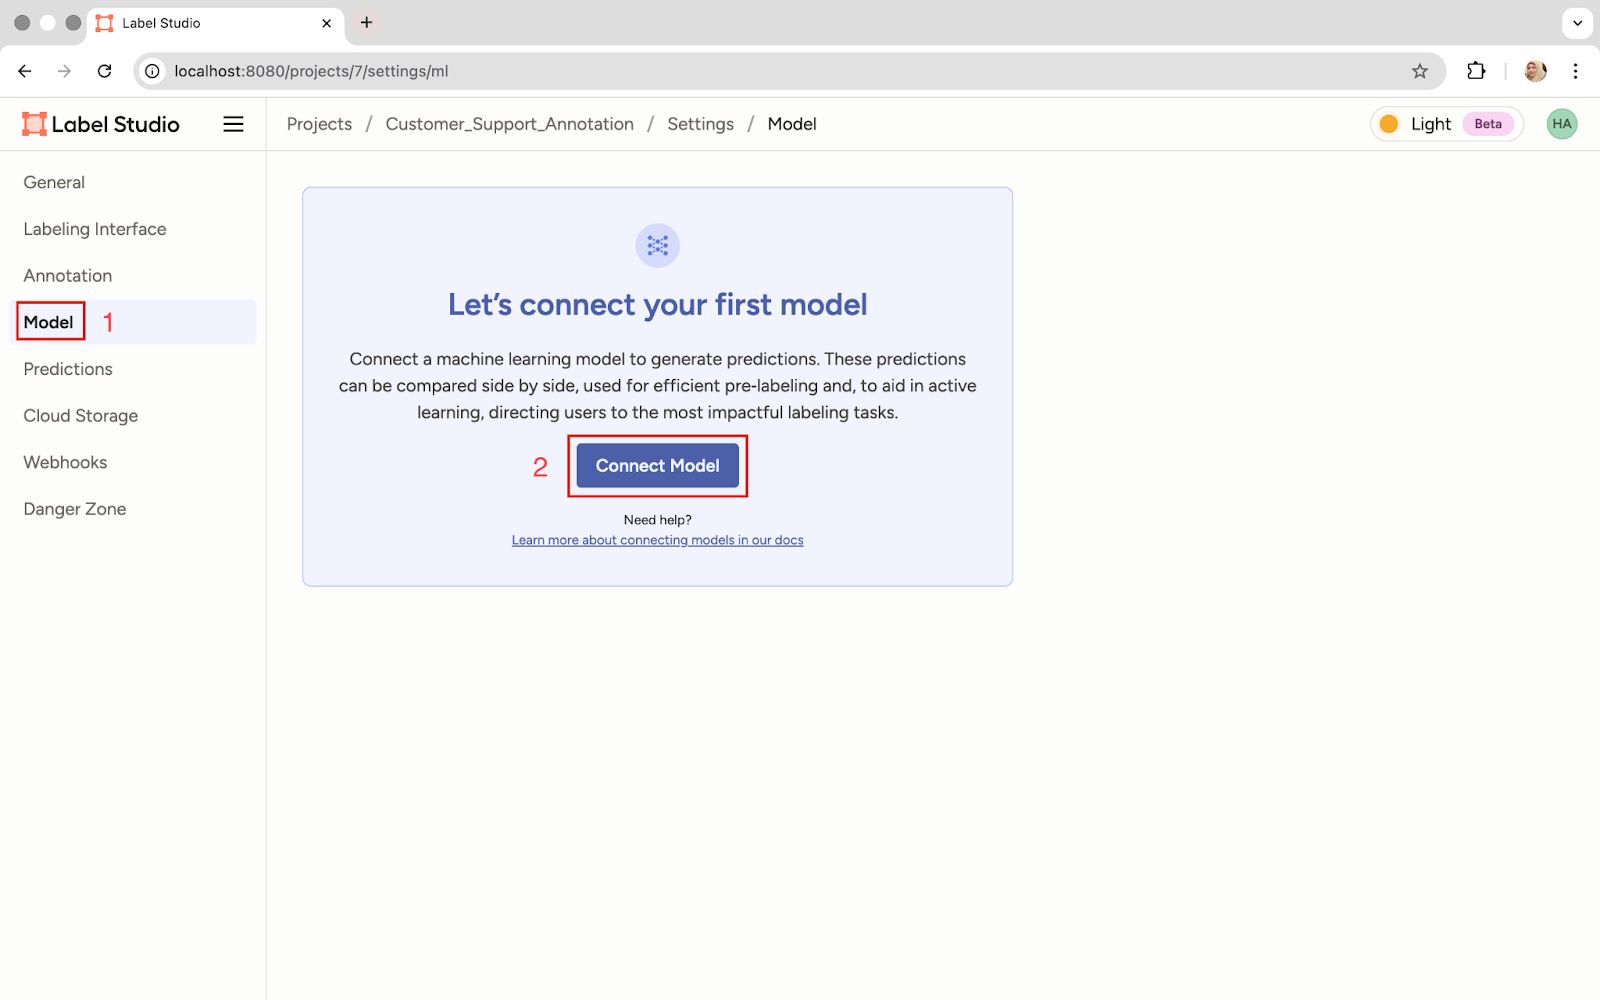
The 'Connect Model' Option
- Configure the connection: Give the model a name and provide the backend URL, which is where our Docker container is running, http://localhost:9090. Then enable pre-annotations so the model's predictions are automatically generated when we add the prompt.
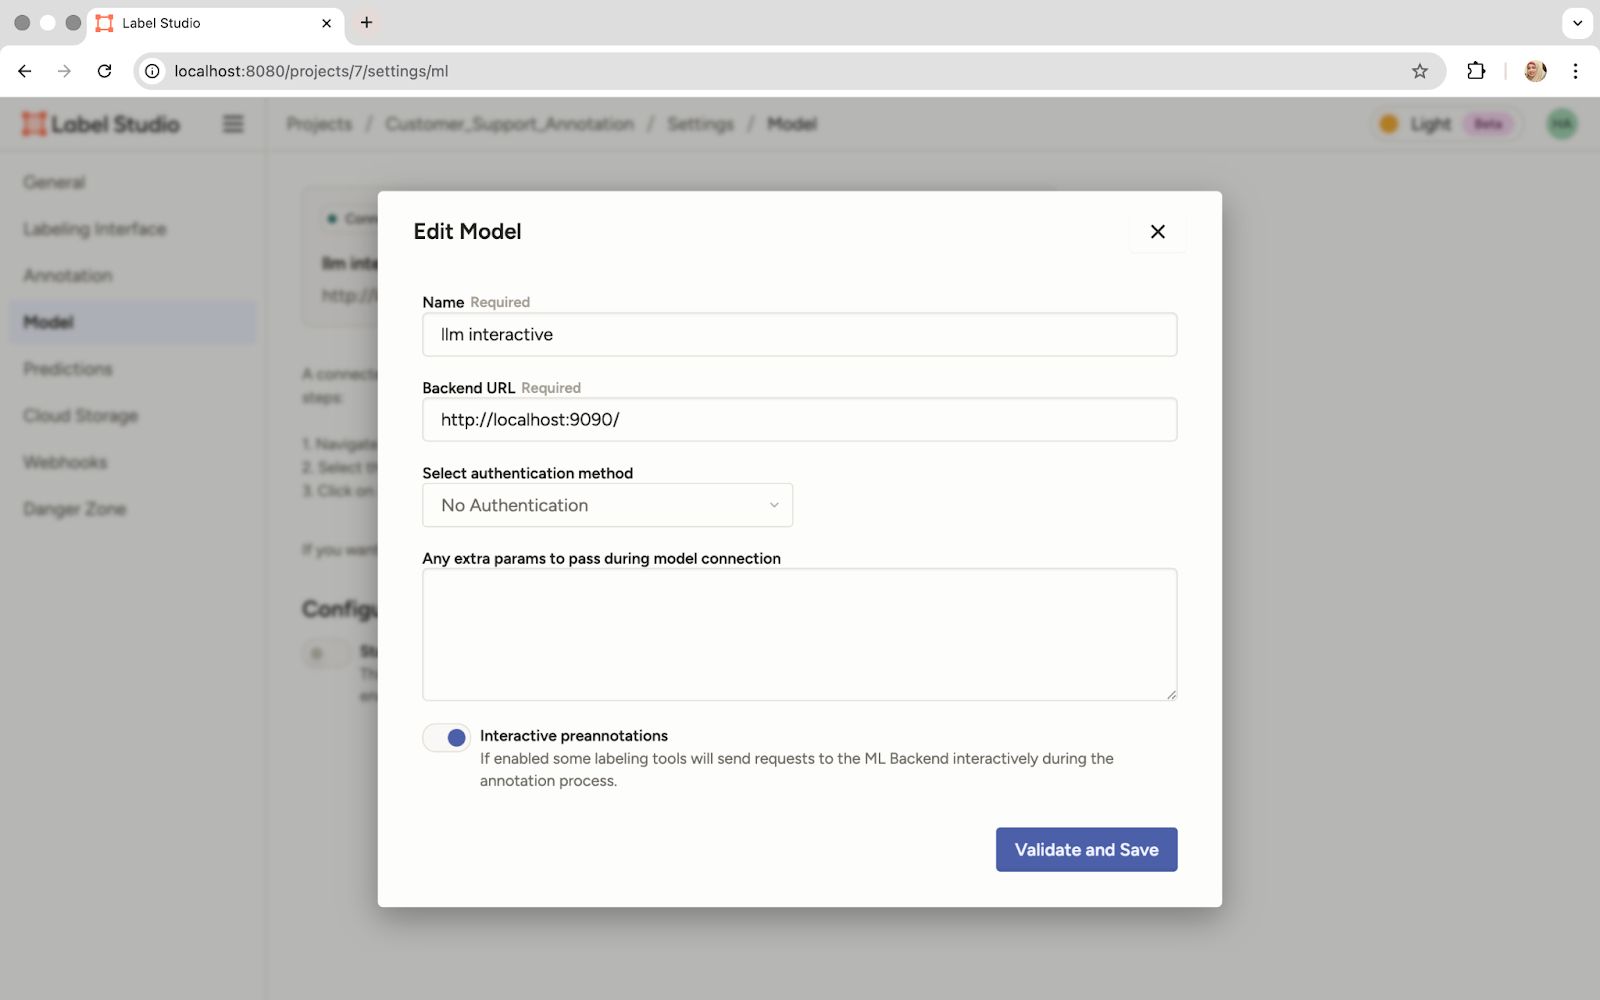
Input the Model Name, the Local Backend URL, and Enable Pre-Annotations
- Initial prompt and prediction: Once connected, the power of the prompt-centric workflow is ours. Click on any task, write an initial prompt in the dedicated field, and submit it.
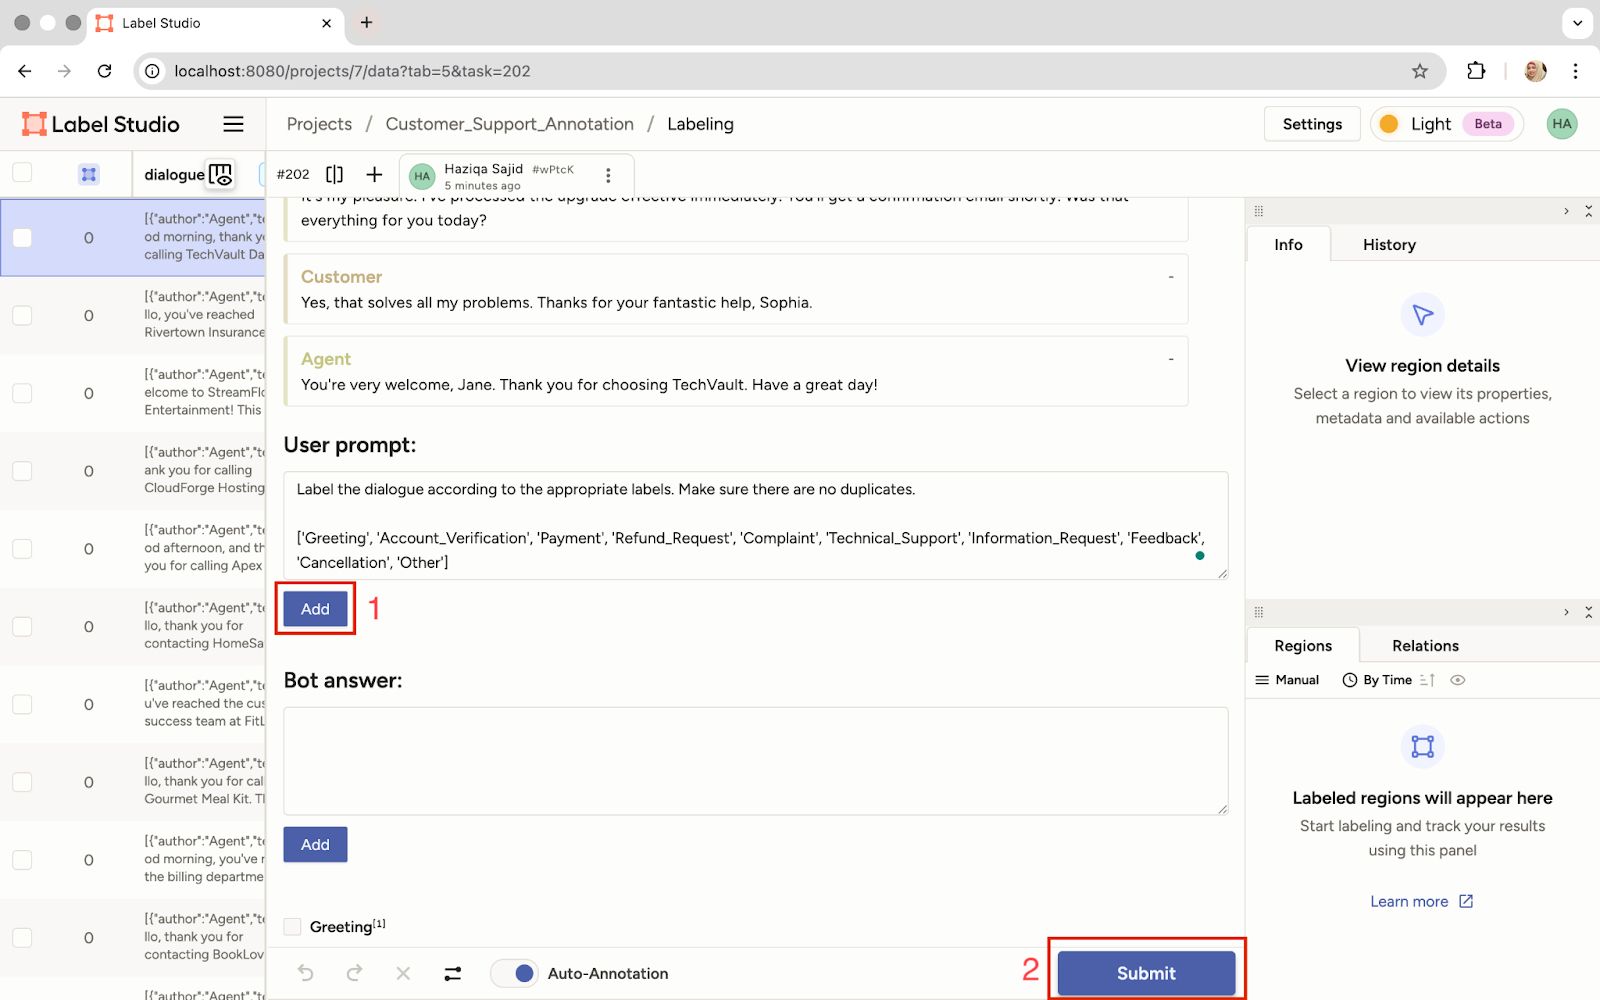
Write the Initial Prompt and Click 'Submit' to Get a Prediction
- Review predictions: The LLM's prediction will appear in the ‘Bot answer’ field based on our prompt.
The Model's Predicted Labels Are Displayed Based on the Submitted Prompt
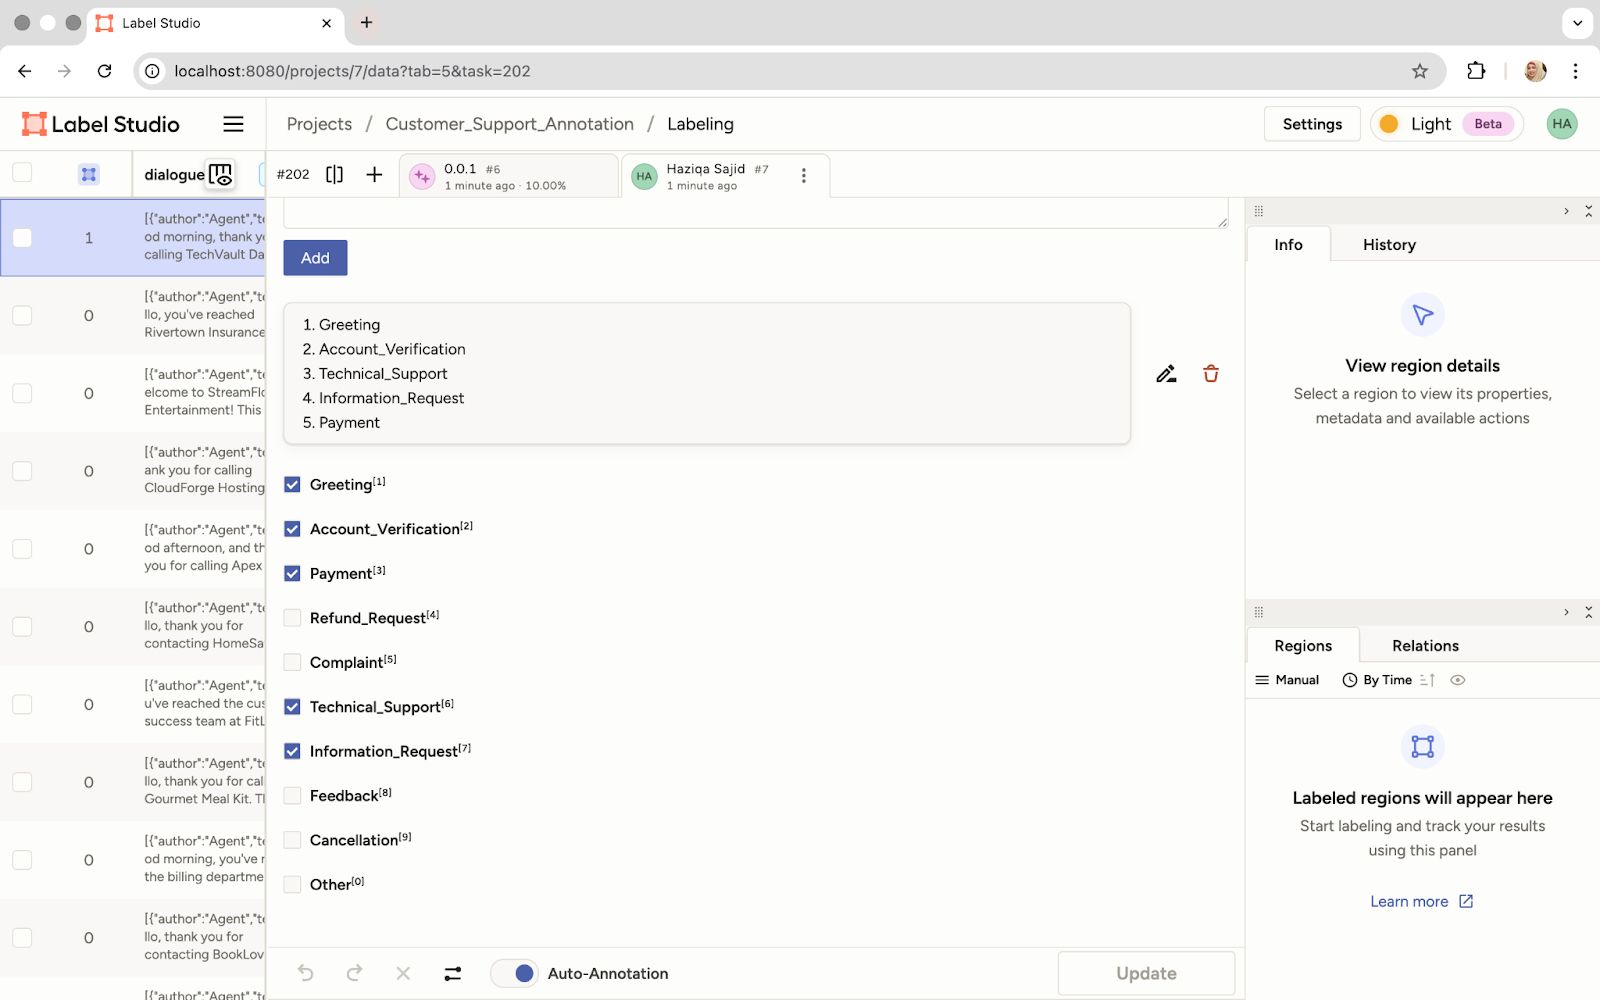
- Generate predictions: The real efficiency gain comes now. We can use that initial prompt to retrieve predictions for all tasks in our dataset. This significantly speeds up the labeling process.
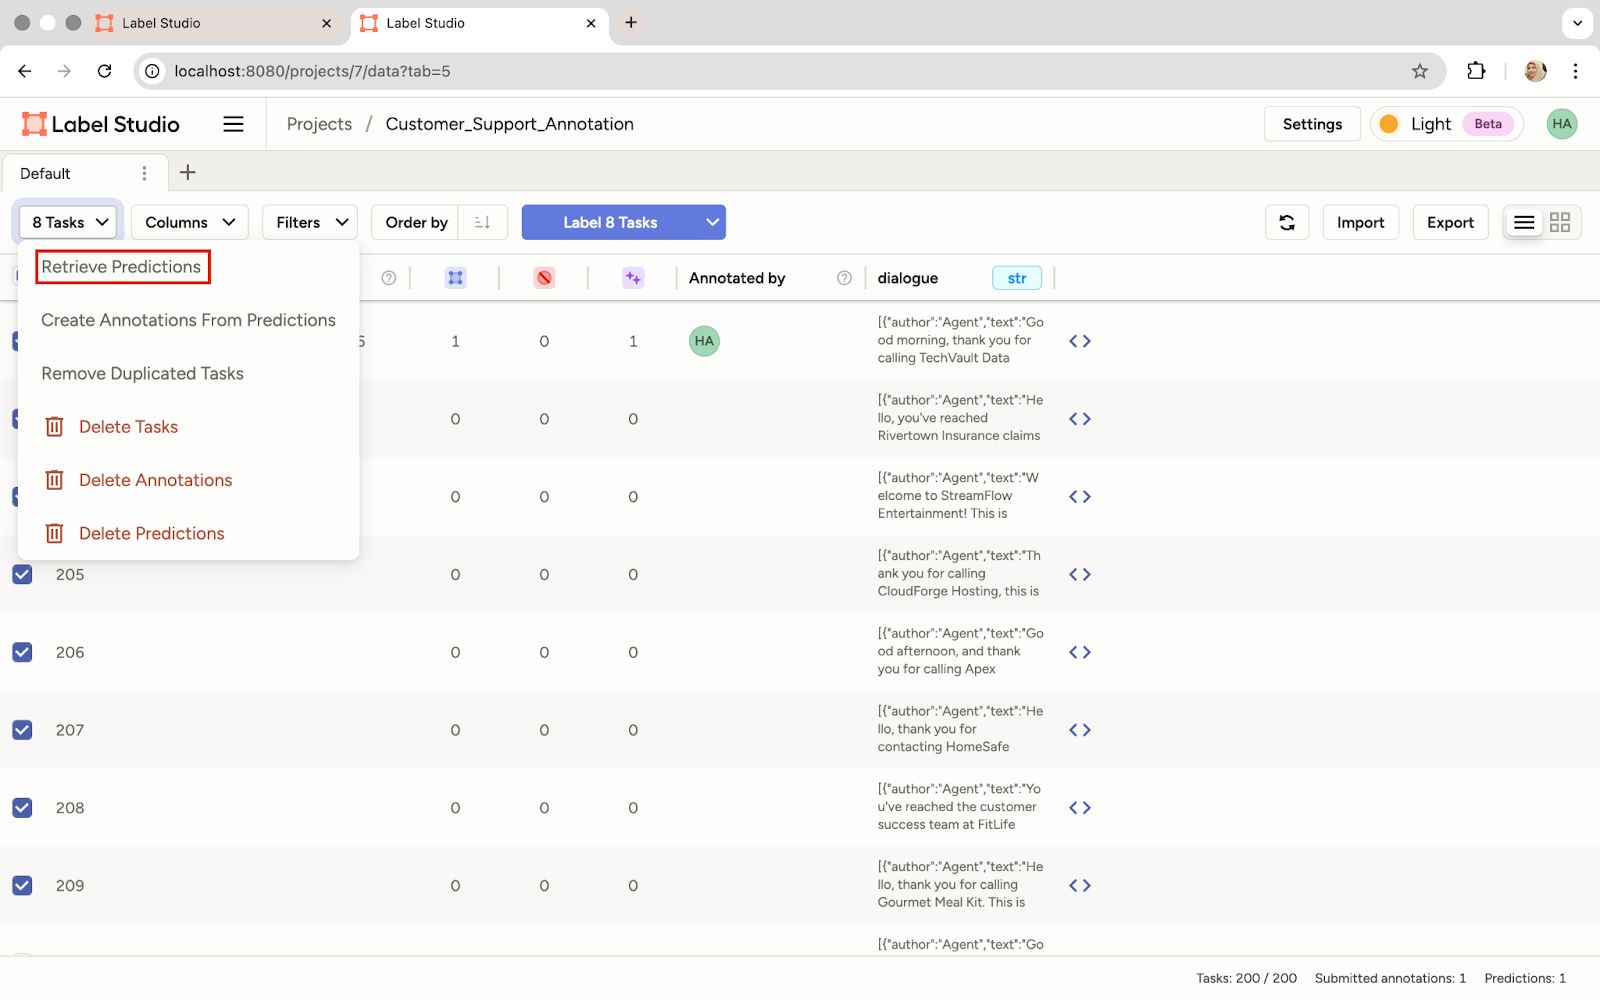
Retrieve Predictions for the Entire Dataset Using the Same Prompt
- Create annotations from predictions: Now, convert all those predictions into actual annotations. This gives us a fully labeled dataset based on the current prompt policy.
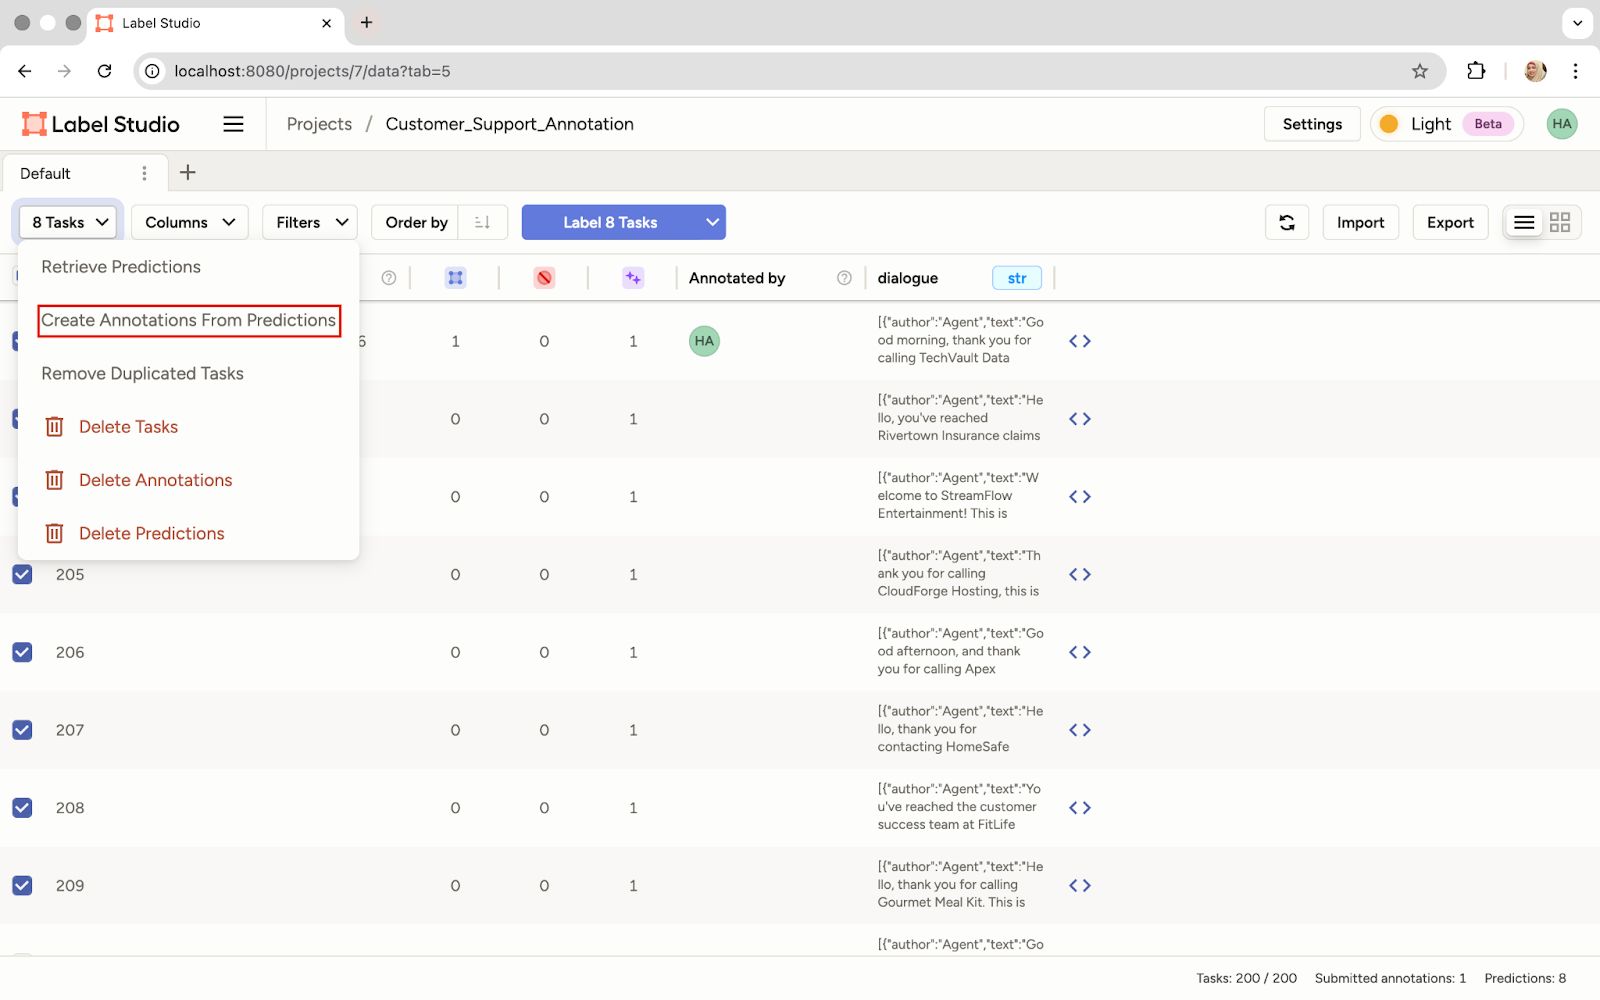
Create Annotations from the Model's Predictions
Training with RLVR
Now we have a dataset labeled based on our initial prompt. The goal of RLVR is to programmatically improve that prompt. A ground truth dataset will be used to verify the model's output and then let the LLM optimize the prompt. The idea is simple:
- Generate predictions for the gold dataset based on the initial prompt
- Compare the predictions against the gold dataset labels
- Apply deterministic reward rules like F1 score.
- Refine the prompt over several epochs.
Now, let's look at the script that executes this iterative improvement loop.
- Retrieve the initial prompt policy: We'll use the Label Studio SDK to pull the initial prompt we wrote in the UI. We'll need the Project ID from the Label Studio URL.
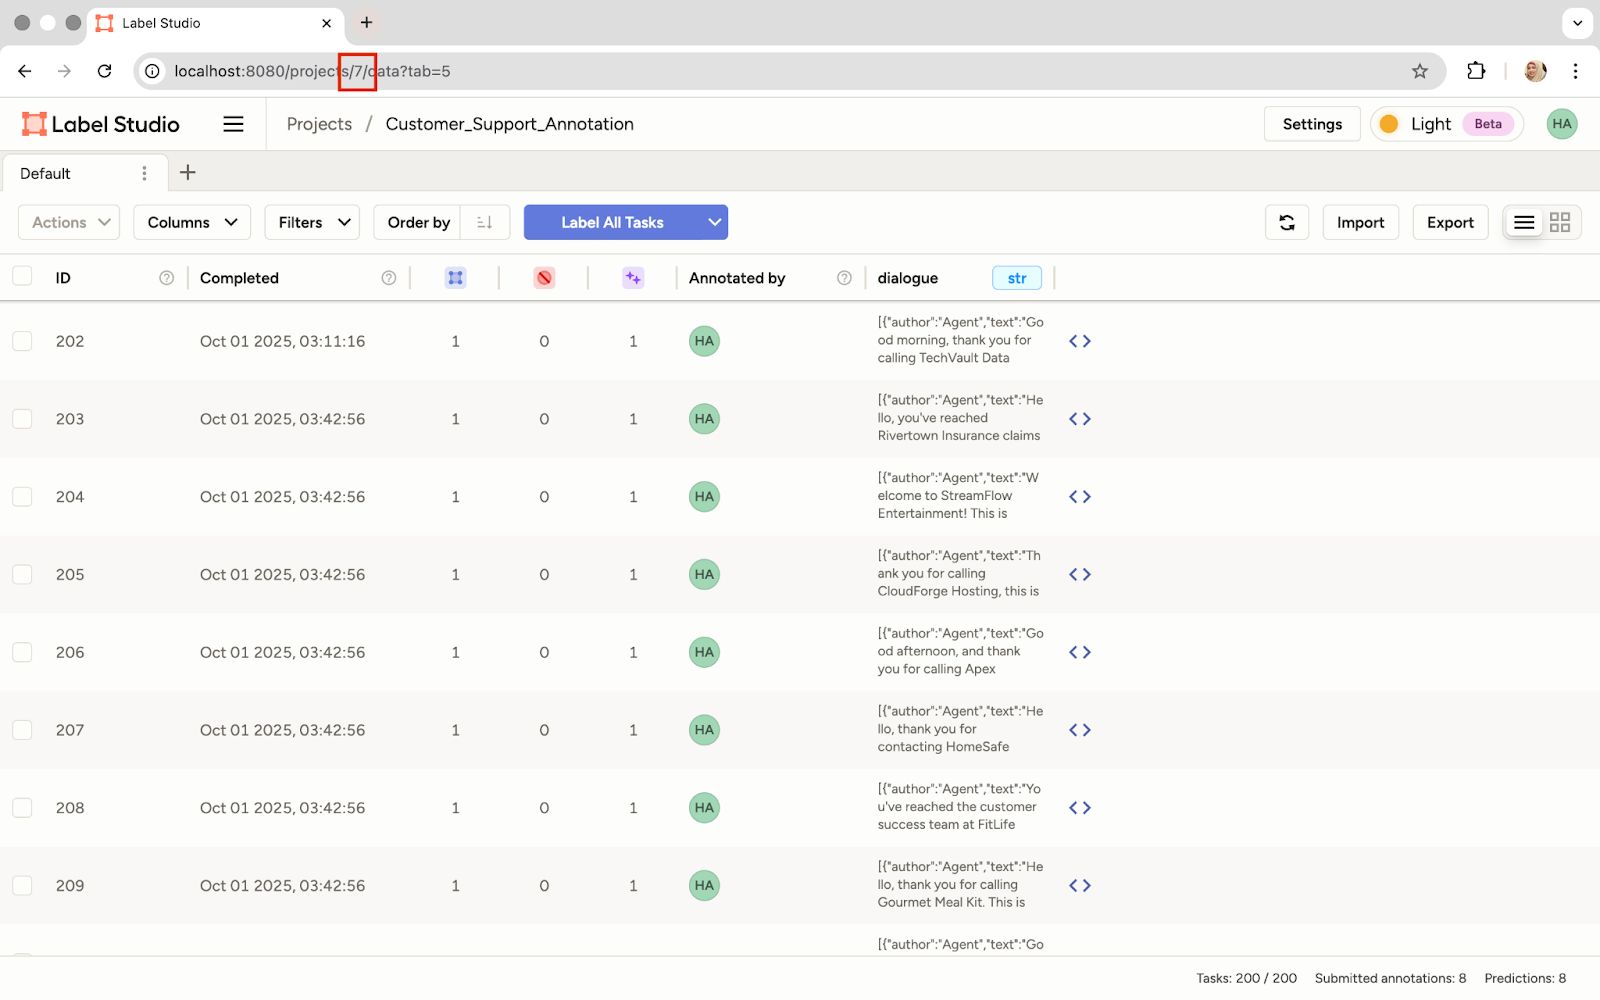
Locate the Project ID in the URL for Use in the Script
- Import libraries and set up clients: Import all necessary libraries and initialize clients for Label Studio and the LLM API.
import json
import os
from openai import OpenAI
from dotenv import load_dotenv
from label_studio_sdk.client import LabelStudio


load_dotenv()


OPENAI_API_KEY = os.getenv("OPENAI_API_KEY")
LS_URL = os.getenv("LABEL_STUDIO_URL")
API_KEY = os.getenv("LABEL_STUDIO_API_KEY")


client = OpenAI(api_key=OPENAI_API_KEY)
ls = LabelStudio(base_url=LS_URL, api_key=API_KEY)- Define number of epochs: Set the number of iterations the RLVR loop will run to refine our prompt.
EPOCHS = 3


OUTPUT_PROMPT_FILE = "optimized_prompt.txt"- Load ground truth data: Load the gold dataset from a JSON file. This step is essential for verifying the LLM’s output.
with open("ground_truth_data.json", "r", encoding="utf-8") as f:
 ground_truth_data = json.load(f)


all_labels = sorted({label for item in ground_truth_data for label in item["labels"]})- Retrieve initial prompt from Label Studio: Set the Label Studio Project ID and retrieve the initial prompt we wrote in the UI.
PROJECT_ID = 7 # Replace with the actual Project ID
tasks = list(ls.tasks.list(project=PROJECT_ID))
prompt_from_ui = None


if tasks and tasks[0].annotations:
   for result in tasks[0].annotations[0].get("result", []):
       if result.get("from_name") == "prompt":
           prompt_from_ui = result["value"]["text"][0]
           break


prompt_policy = prompt_from_ui- Define the verifier and reward functions: This is the core of RLVR. The verifier function compares the LLM's prediction against the gold-standard labels to calculate metrics like F1 score, coverage, and precision. The compute_reward function then uses the F1 score as an objective reward signal.
def verifier(preds, golds):
   preds_set, golds_set = set(preds), set(golds)


   missing = list(golds_set - preds_set)
   correct = list(preds_set & golds_set)


   coverage = len(correct) / max(1, len(golds_set))
   precision = len(correct) / max(1, len(preds_set)) if preds_set else 1.0


   # The F1 score is a deterministic measure of quality
   f1 = (2 * coverage * precision) / max(1e-8, (coverage + precision))


   feedback = {
       "missing": missing,
       "correct": correct,
       "coverage": coverage,
       "precision": precision,
       "f1": f1
   }
   return feedback


def compute_reward(feedback):
return feedback["f1"]The reward isn't learned, it's verifiable and deterministic.
- Define prediction and prompt update functions: We'll need get_prediction to query the LLM with the current prompt and update_prompt to use an LLM. LLM acts as a prompt optimizer to iteratively refine the prompt based on the reward signal.
def get_prediction(dialogue, prompt):
   # Queries the LLM (gpt-4o-mini) for a prediction
   resp = client.chat.completions.create(
       model="gpt-4o-mini",
       messages=[
           {"role": "system", "content": prompt},
           {"role": "user", "content": dialogue}
       ],
       temperature=0 # Low temp for deterministic output
   )
   # Process the raw text output into a list of labels
   text = resp.choices[0].message.content.strip()
   preds = [l.strip().strip("'\"") for l in text.split("\n") if l.strip()]
   preds = [p for p in preds if p in all_labels]
   return preds


def update_prompt(policy, avg_reward, feedback_examples):
   # Uses the LLM to write a better prompt based on performance
   feedback_summary = json.dumps(feedback_examples[:5], indent=2)


   resp = client.chat.completions.create(
       model="gpt-4o-mini", # The optimizer model
       messages=[
           {"role": "system", "content": "You are a prompt optimizer."},
           {"role": "user", "content": f"""
The current labeling prompt is:


{policy}


Here are feedback examples showing model predictions vs gold labels:


{feedback_summary}


Average reward (F1 score): {avg_reward:.2f}


Please propose a refined version of the prompt that improves performance.
Only return the new prompt text, nothing else.
           """}
       ],
       temperature=0.7 # Higher temp for creative prompt generation
   )


   new_policy = resp.choices[0].message.content.strip()
return new_policy- Run the RLVR loop: This is the training process. The code iterates for a defined number of epochs, where each epoch involves:
- Getting predictions for the ground truth data using the current prompt_policy.
- Calculating the reward (F1 score) using the verifier.
- Using the update_prompt function to generate a better prompt for the next epoch
	for epoch in range(EPOCHS):
   rewards, feedback_examples = [], []
   for item in ground_truth_data:
       dialogue = " ".join([turn["text"] for turn in item["dialogue"]])
       gold = item["labels"]


       preds = get_prediction(dialogue, prompt_policy)
       fb = verifier(preds, gold)
       reward = compute_reward(fb)


       rewards.append(reward)
       feedback_examples.append(fb)


   avg_reward = sum(rewards) / len(rewards)


   print(f"Epoch {epoch}: training step completed.")
   print(f"Sample feedback : {feedback_examples[0]}")


   # The core RLVR step: update the prompt based on the measured reward
prompt_policy = update_prompt(prompt_policy, avg_reward, feedback_examples)The output shows steady improvement, with the F1 score rising from 0.67 to 0.89 in three epochs. This steady gain produced the final optimized prompt.
Output:
verify:True
Epoch 0: training step completed.
Sample feedback : {'missing': ['Technical_Support'], 'correct': ['Account_Verification', 'Information_Request', 'Greeting'], 'coverage': 0.75, 'precision': 0.6, 'f1': 0.6666666666666665}
Epoch 1: training step completed.
Sample feedback : {'missing': ['Technical_Support'], 'correct': ['Account_Verification', 'Information_Request', 'Greeting'], 'coverage': 0.75, 'precision': 0.6, 'f1': 0.6666666666666665}
Epoch 2: training step completed.
Sample feedback : {'missing': [], 'correct': ['Account_Verification', 'Information_Request', 'Technical_Support', 'Greeting'], 'coverage': 1.0, 'precision': 0.8, 'f1': 0.888888888888889}- Save the Optimized Prompt: Save the final, best-performing prompt to a file. We can now use this highly reliable prompt to label the rest of our large dataset with high accuracy.
with open(OUTPUT_PROMPT_FILE, "w", encoding="utf-8") as f:
f.write(prompt_policy)Here's what our optimized prompt looks like:
Label the dialogue with all relevant labels from the following list, ensuring to include every applicable category. Use newlines to separate each label:

['Account_Verification', 'Feedback', 'Greeting', 'Information_Request', 'Other', 'Technical_Support', 'Payment', 'Cancellation', 'Complaint', 'Refund_Request']

Please be thorough in your labeling, as each dialogue may fall into multiple categories. Carefully analyze the context and intent of the dialogue to provide the most accurate labels. Consider the following aspects while labeling:

- Identify the primary purpose of the dialogue.
- Capture any requests or inquiries made by the user.
- Note any emotions or sentiments expressed, particularly in complaints or feedback.
- Ensure to include labels that may not be immediately obvious but are relevant to the user's intent.

Aim for comprehensive labeling to enhance accuracy and relevance.Conclusion
We've moved beyond the traditional challenges of data labeling, including manual iteration, inadequate audit trails, and slow progress. By combining Label Studio’s prompt-centric annotation interface with the feedback loop of RLVR, we created a system in which prompts are iteratively refined based on data.
The improvement was possible because the reward signal was verifiable and directly tied to performance metrics. This contrasts with the ambiguities of subjective human preference rankings used in RLHF. Furthermore, automating this process allows human reviewers to focus on truly challenging edge cases instead of repetitive corrections.
Combining RLVR with Label Studio accelerates data labeling and contributes to building more robust, auditable, and scalable AI pipelines.
Explore the LLM Interactive Model Backend on GitHub.
Start building your self-improving labeling pipeline with Label Studio today.
Related Content
-

The 5 Metrics That Actually Move AI Into Production
A practical framework for turning AI metrics into clearer decisions about what to fix, ship, and scale.

Sheree Zhang
April 15, 2026
-
Scaling AI Data Quality: Best Practices for Onboarding and Evaluating Annotators
A practical workflow for onboarding and evaluating annotators with clear instructions, calibration, quality gates, reviewer feedback, and dashboards that keep labeling consistent as volume grows.

Alec Harris
March 12, 2026
-

How to Scale Evaluation for RAG and Agent Workflows
A practical workflow for evaluating RAG and agent systems consistently through prompt, model, and workflow changes.

HumanSignal Team
January 23, 2026