Getting Started with Image Classification
Back in 2015, when Google released 'Search for personal photos' in Google Photos, the world got to see a proof of concept that computer vision software could accurately classify images to human standards.
Users no longer had to manually tag photos to categorize their visual content and could explore their image collection in new ways they never thought possible. For example, typing “phone” in the platform would show them all photos with a phone in them.
Image classification makes this possible.
Image classification was a game-changer then and is just as innovative today. From remote sensing to medical imaging, it's at the core of many revolutionary products and features. Yet a sense of ambiguity still shrouds the term.
In this guide, we'll dig deeper into image classification—what it means, how it works, and the main steps to help you get started.
What is image classification?
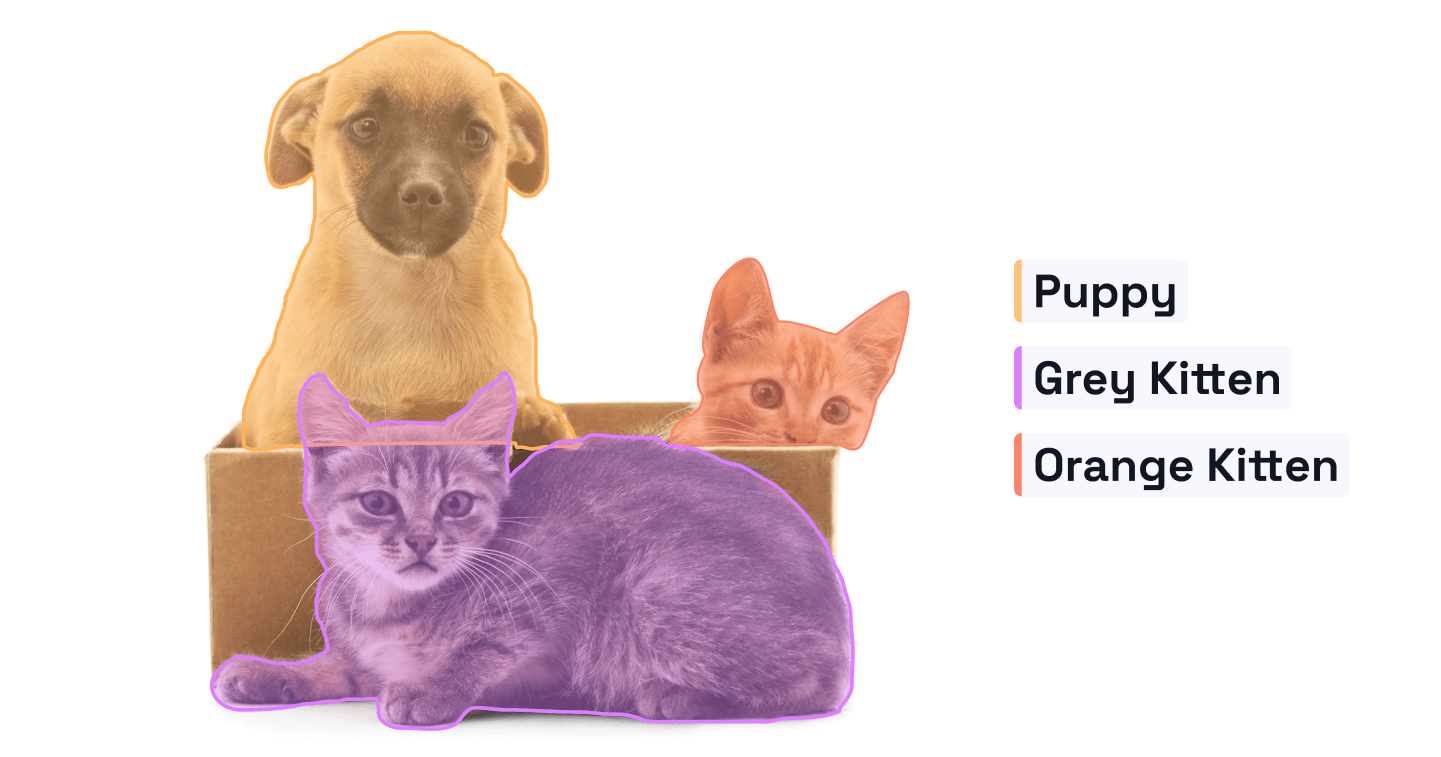
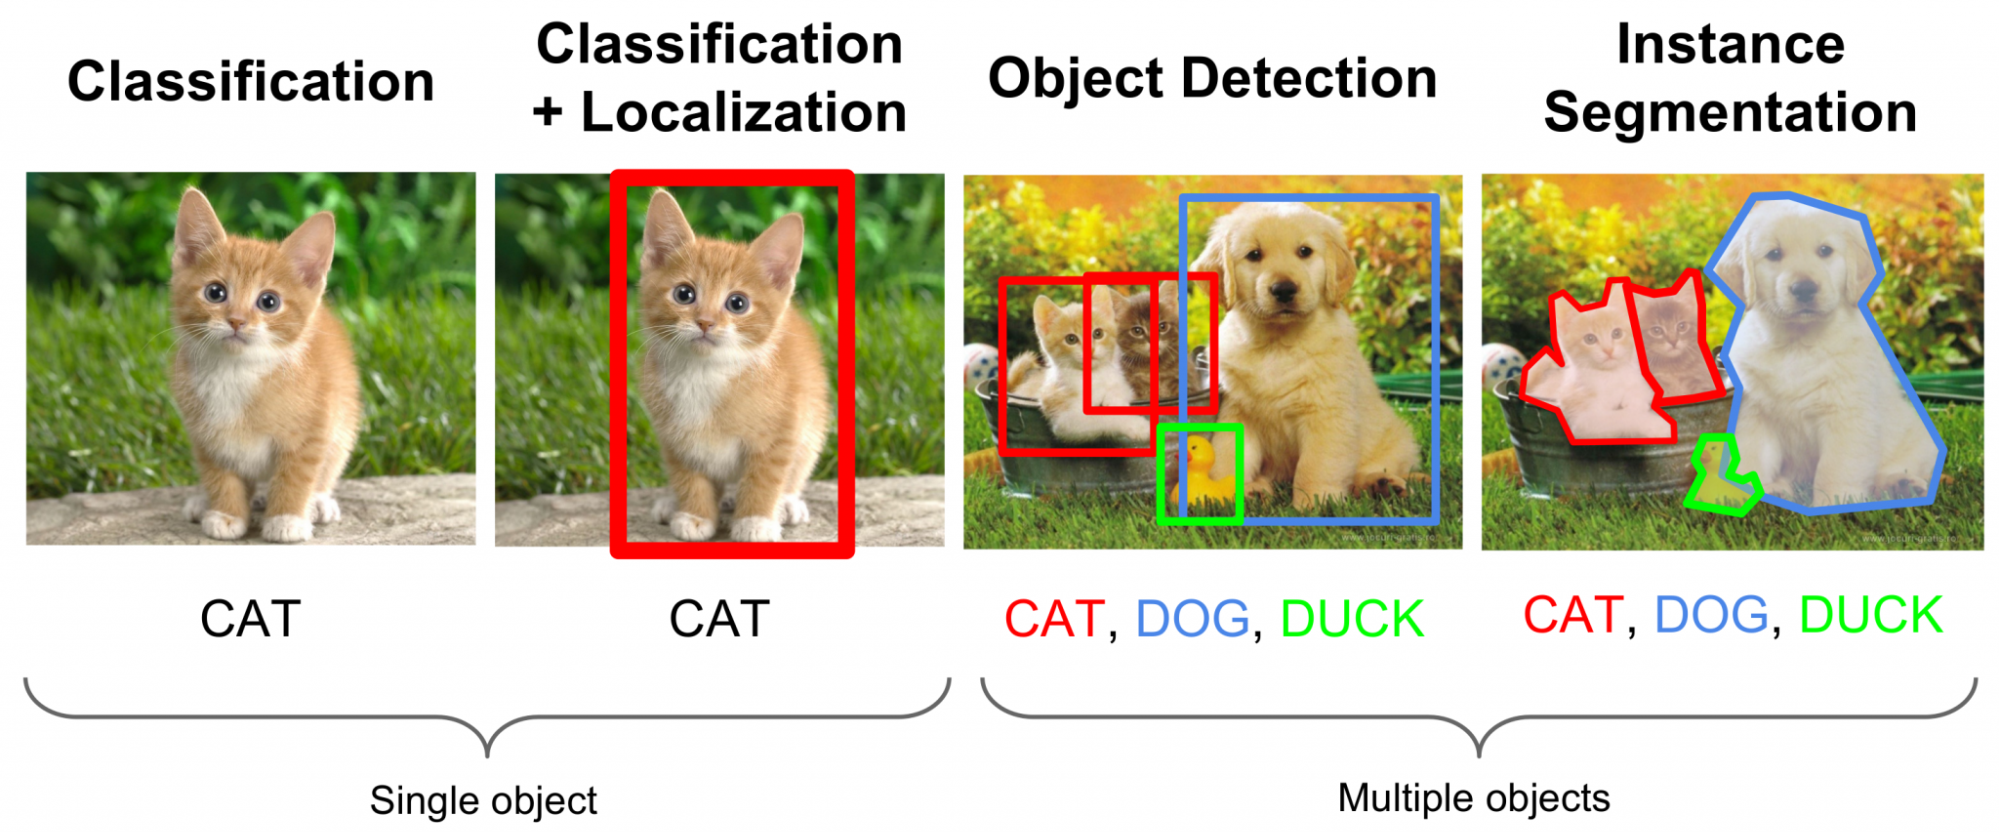
Image classification is the task of assigning one (single-label classification) or more (multi-label classification) labels to vectors within a given image or groupings of images. If you’ve ever wondered how Google Photos identifies your, your family members, and your friends' faces, it’s because of image classification.
Here's an example of what image classification looks like:
Single-label classification vs. multi-label classification
- In single-label classification, every image has only one label or annotation. Your AI model will analyze and categorize each image based on one criterion alone. For example, categorizing images based on whether they include dogs or not.
- In multi-label classification, you can program an AI model to categorize images based on multiple labels, with some images having all of the labels you set. A common example is classifying movie posters, where a movie poster can be a part of multiple movie genres.
Types of image classification
Depending on the interaction between the computer and analyst during classification, there are two types of classification: supervised and unsupervised.
Supervised classification
Supervised classification relies on the user selecting sample pixels in a given image that represents specific classes, followed by directing the image processing software to use these training sites as references for classifying all other pixels in the image. Training sites or training sets are chosen based on user knowledge.
The user also sets the bounds for how similar other pixels need to be before being grouped together. These bonds are often based on the spectral characteristics of the training area. Designating the number of classes the image gets classified into is again the user’s responsibility.
Supervised classification uses classification algorithms and regression techniques to build predictive models. The algorithms here include linear regression, neural networks, decision tree, and logistic regression.
Unsupervised classification
In unsupervised classification, groupings of pixels with common characteristics are based on the software analysis of an image without the user providing sample classes.
It’s completely computer-based, with a device using specific techniques to decide which pixels are related and group them into classes. The most common algorithms used in unsupervised learning are anomaly detection, neural networks, and cluster analysis.
While the user isn’t actively involved in the classification process, some level of user input is still required. They need to specify which algorithm the software will use and the desired number of output classes.
How image classification works
In the world of computer vision, everything takes the form of pixels. A computer considers each image as an array of matrices, and the matrix size relies on the image resolution.
In terms of image classification, a computer analyzes statistical data using algorithms, where it automatically groups pixels into specific categories (also known as classes). These algorithms segregate the image into a series of its most prominent features or characteristics to give the final classifier a clearer idea of:
- what the image represents, and
- which class should be labeled into.
The characteristic extraction process is the most critical step in categorizing an image and serves as the foundation of the remaining steps. Plus, a well-optimized classification dataset will always work better compared to a bad dataset with data imbalance based on class and poor quality of image and annotation.
Note that accuracy is extremely crucial here, with image classification (especially supervised classification) completely relying on the data fed to the algorithm.
The structure of image classification
Here’s a structural gist of a typical image classification task:
- Image pre-processing: This process suppresses unwanted distortions and enhancement of important data features to improve image data. This way, computer vision models film can produce more accurate results.
- Object detection: This process aims to localize objects, which entails segmenting the image and identifying the position of the object of interest.
- Feature extraction and model training: Model training is the process where the AI model learns the features from the dataset. It leverages statistical or deep learning methods to identify the most interesting patterns of the image, as well as features unique to a specific class, to make it easier for the AI model to differentiate between different classes.
- Object classification: This process categorizes detected objects into pre-defined classes using the appropriate image classification technique for comparing the image patterns with the target patterns.
We’ll discuss these image classification processes in greater detail below.
How to get started with image classification
Here’s a step-by-step breakdown of the image classification process:
Step 1: Building your dataset
Here, you’ll create a high-quality dataset for image classification. Every dataset is composed of images and a set of labels, with each image having one or more labels. The challenging part here is ensuring your dataset is balanced and without bias.
Dataset building starts with images. To get this visual data, you’ll have to either scrape the internet or install image acquisition systems, followed by labeling and retrieving information about each image.
Step 2: Prepping data through pre-processing
As mentioned, this step is all about eliminating undesirable elements and enhancing key aspects of the picture so that it is easier for computer vision models to use it accurately.
Think of it as cleaning your data to help the AI model process it faster by removing duplicates, cutting relevant data, and filtering unwanted outliers. Data cleaning also helps you detect and update missing data and fix structural errors to ensure all your datasets are properly organized.
Ensure your data is properly organized for accurate image classification. Otherwise, you may end up with an unnecessarily slowed down training process or get erroneous results.
To avoid this, you can use the following image pre-processing techniques:
Greyscale conversion
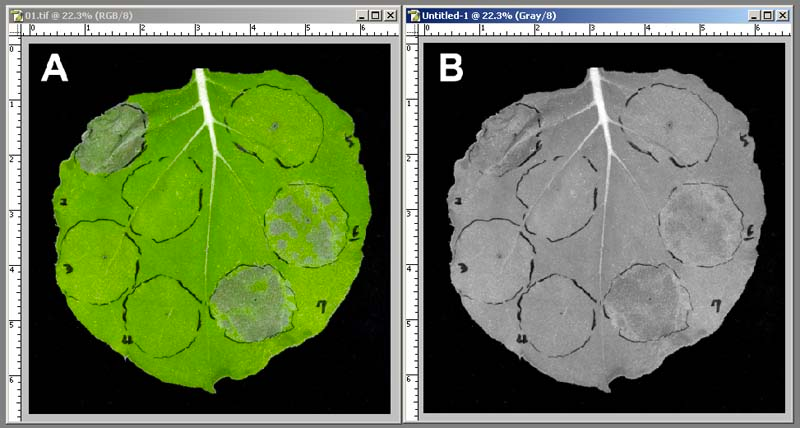
Greyscale involves converting colored images to their black-and-white versions.
It reduces the number of pixels in an image, thereby lowering the computation complexity in machine learning algorithms. As images don’t have to be colored to be recognized by a computer, greyscale conversion is highly recommended for pre-processing.
Data re-scaling
Data re-scaling or normalization is the process of projecting image data pixels (intensity) to a predefined range—usually (-1, 1) or (0, 1)—and is used on different data formats, normalizing all images so you can apply the same algorithms over them.
Normalizing your data leads to fairness across all images, which enables all images to contribute equally to the total loss. On the other hand, using images with both high and low pixel ranges will give strong and weak losses, respectively.
Data augmentation
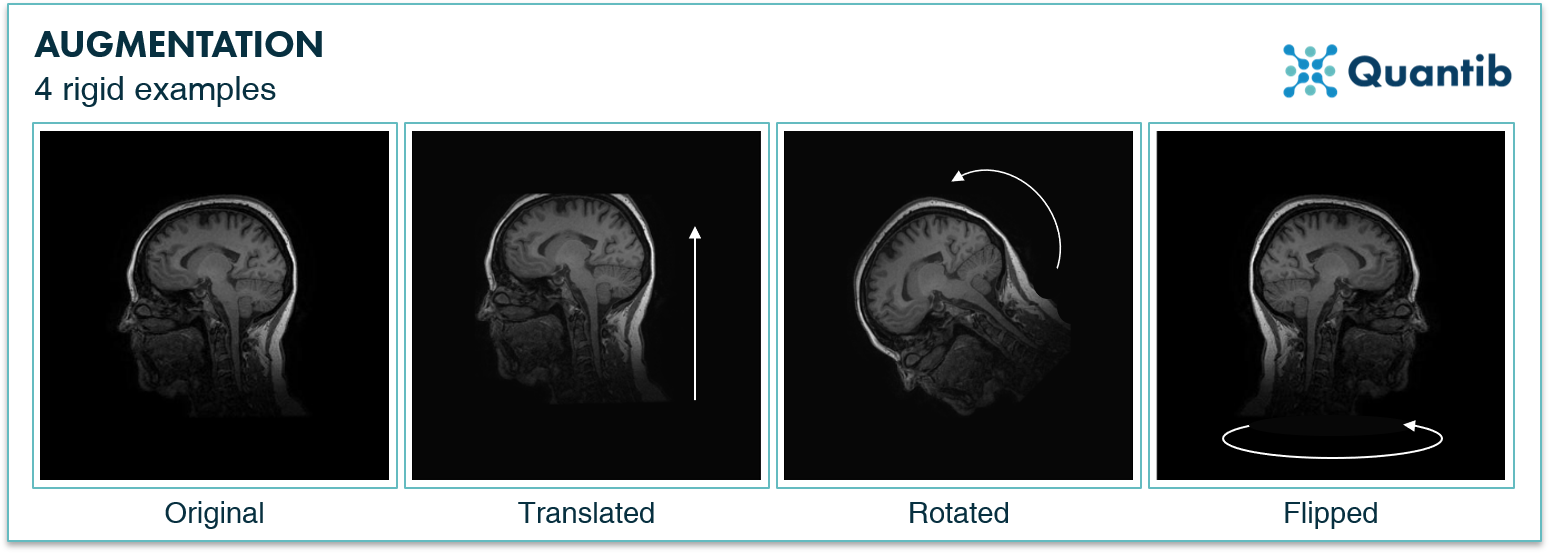
In data augmentation, minor alterations are made to existing data to increase its diversity—all without using any new data input.
You can use standard data augmentation techniques, such as rotation, cropping, horizontal and vertical flipping, change in brightness, and shearing, to enlarge a dataset. Performing them helps prevent a neural network from learning irrelevant features, resulting in better model performance.
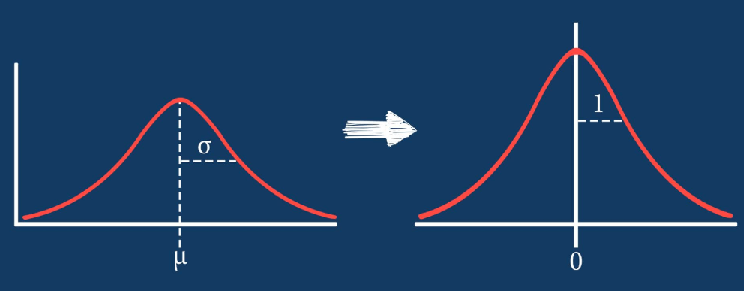
Image standardization
Standardizing images involves scaling and reprocessing images to give them similar heights and widths. It re-scales data so they have a standard deviation of 1 (unit variance) and a mean of 0, ultimately improving data quality and consistency.
Use any of these pre-processing techniques to make your data relevant and refined to get high-quality and well-lit images with no duplicates.
Step 3: Object detection
As the name suggests, the object detection step is about segmenting the picture to determine the location of a given object.
Let's explain this using an example—suppose you have a set of fashion images and want the algorithm to locate the different types of clothing like jeans, skirts, T-shirts, and shirts.
In this case, the AI model can be trained to recognize T-shirts and shirts in the upper part of the image and jeans and skirts in the lower part.
Step 4: Object recognition and training
Here, deep learning algorithms will identify patterns in the picture and the characteristics unique to a specific label. Your AI model will then learn from this dataset to generate more accurate results.
Continuing with our previous fashion example, you can add more granular tags to images, like short-sleeved, long-sleeved, midi, and maxi.
After labeling your data, you need to train your AI model to accurately analyze and recognize the data.
To do this, upload large amounts of data to each of your labels to give the AI model information to learn from. This data serves as training for the AI model. Think of it this way: the more training data you upload, the more accurately will the model determine the content of each image.
You can also use interactive image classification templates to train the AI model to identify the type of content in images. Here’s an image classification template from Label Studio:

If you want to train a model to identify the type of content in images, for example for a content moderation use case, use this template to perform image classification with checkboxes.
Step 5: Object classification
At this point, you have an AI model that can accurately classify images based on different criteria.
Next, the algorithm will compare picture patterns to desired patterns using an appropriate classification approach to accurately classify observed items into predetermined classes. The tags you added in Step 4 will come in handy here, helping the algorithm recognize the observed items on actual pictures.
Step 6: Connecting to an AI workflow
Connect your image-classifying AI model to an AI workflow.
This will define the input (where the new data comes from) and output (what happens after that data is classified). For instance, your data could come from new stock intake, while the output could be to add the data to Excel.
The Label Studio Approach
Label Studio is a fully-collaborative data labeling tool that simplifies and streamlines labeling and exploring multiple datasets. With it, you can perform different types of labeling, regardless of the diversity of data formats.
What’s more, the platform also integrates with machine learning models to supply predictions for labels (useful for pre-labeling) or carry out continuous active learning.
In terms of image classification, Label Studio helps you better train the AI model to accurately detect the most prominent features or characteristics of your images and categorize them into predefined classes faster and more efficiently.
Here's a quick rundown of some of the key features that make this possible:
- Easily integrates with your ML/AI pipeline and is equipped with advanced filters to prepare and manage your dataset
- Uses predictions to assist and accelerate your labeling process with ML backend integration, saving precious time.
- Allows you to perform image segmentation labeling
- Facilitates collaboration with a team of annotators to quickly label a training dataset for a custom YOLO object detection model
Interested in learning more? Come take Label Studio for a spin to experience firsthand what makes us the most popular open-source leveling platform. Or you can give our hosted Enterprise version a try here.
Related Content
-

The 5 Metrics That Actually Move AI Into Production
A practical framework for turning AI metrics into clearer decisions about what to fix, ship, and scale.

Sheree Zhang
April 15, 2026
-
Scaling AI Data Quality: Best Practices for Onboarding and Evaluating Annotators
A practical workflow for onboarding and evaluating annotators with clear instructions, calibration, quality gates, reviewer feedback, and dashboards that keep labeling consistent as volume grows.

Alec Harris
March 12, 2026
-
How to Create a Prompt Generator with Label Studio and RLVR
In this article, you'll learn how to apply an RLVR-based score verifier and use an LLM as a prompt optimizer to enhance your prompts.

Label Studio Team
March 2, 2026