Labeling Audio Data With Label Studio
Check out the audio transcription labeling interface, designed for greater speed and quality, now available in Label Studio Enterprise.
The world of data labeling and annotation has come leaps and bounds recently. It’s essential that the tooling used by researchers, academics, enterprise data scientists, and machine learning professionals can keep up with the needs of the industry at large. In an increasingly multimedia world with a plethora of file formats, data annotation tools must be able to handle every single file format that you may work with on any given day.
Audio annotations can be used to develop speech recognition technology further. As part of larger Natural Language Utterance (NLU) initiatives, audio annotations can detect dialects, context, and stress in transcription tools or even break down the parts of a song and provide better music recommendations.
Before diving head-first into a data annotation or labeling tool, let’s explore how to get started annotating audio data types and what you may need to know. For the sake of this tutorial, you can use any data labeling tool you’d like, but we’ll be using Label Studio. These features are available in the Label Studio Enterprise edition or the open-source Label Studio Community edition. The latest release of Label Studio includes enhanced sound detection, new selection methods, advanced timeline zoom of up to x1500 times, and fine-tuned controls.
New to Label Studio or data labeling? Check out this tutorial to get started!
Create a new Project.
In Label Studio, add a name and brief description of your project, and you’re off to the races. Navigate to the next tab to begin to start your data import.
Uploading your files
In the data import tab, upload the audio files you are working to label. Sometimes, you may already have files available via a cloud storage option. For the sake of this walkthrough, we will be working with a prepared audio file, a liquid drum, and a bass audio track.
We’ll be setting up the sound event detection to detect the various instruments, voices, and anything else that will be heard in the audio track.
Handling larger file types
As a heads up, if you have larger audio files that may exceed what can be uploaded to Label Studio, you can always set JSON data or upload JSON data given the keys exactly as shown here:
{“data”:{“audio”:””}}A large audio file might come from an external S3 bucket that’s not directly connected to your Label Studio instance or account. Put JSON data exactly like this in the form fill box and put in the URL where you may find that file, or upload a JSON file with the same data here, and your data will be connected.
User-friendly templates
Label Studio’s platform provides user-friendly templates to help you get up and going with your data labeling process. You can now find additional audio templates in this latest software update on the Enterprise and open-source versions.
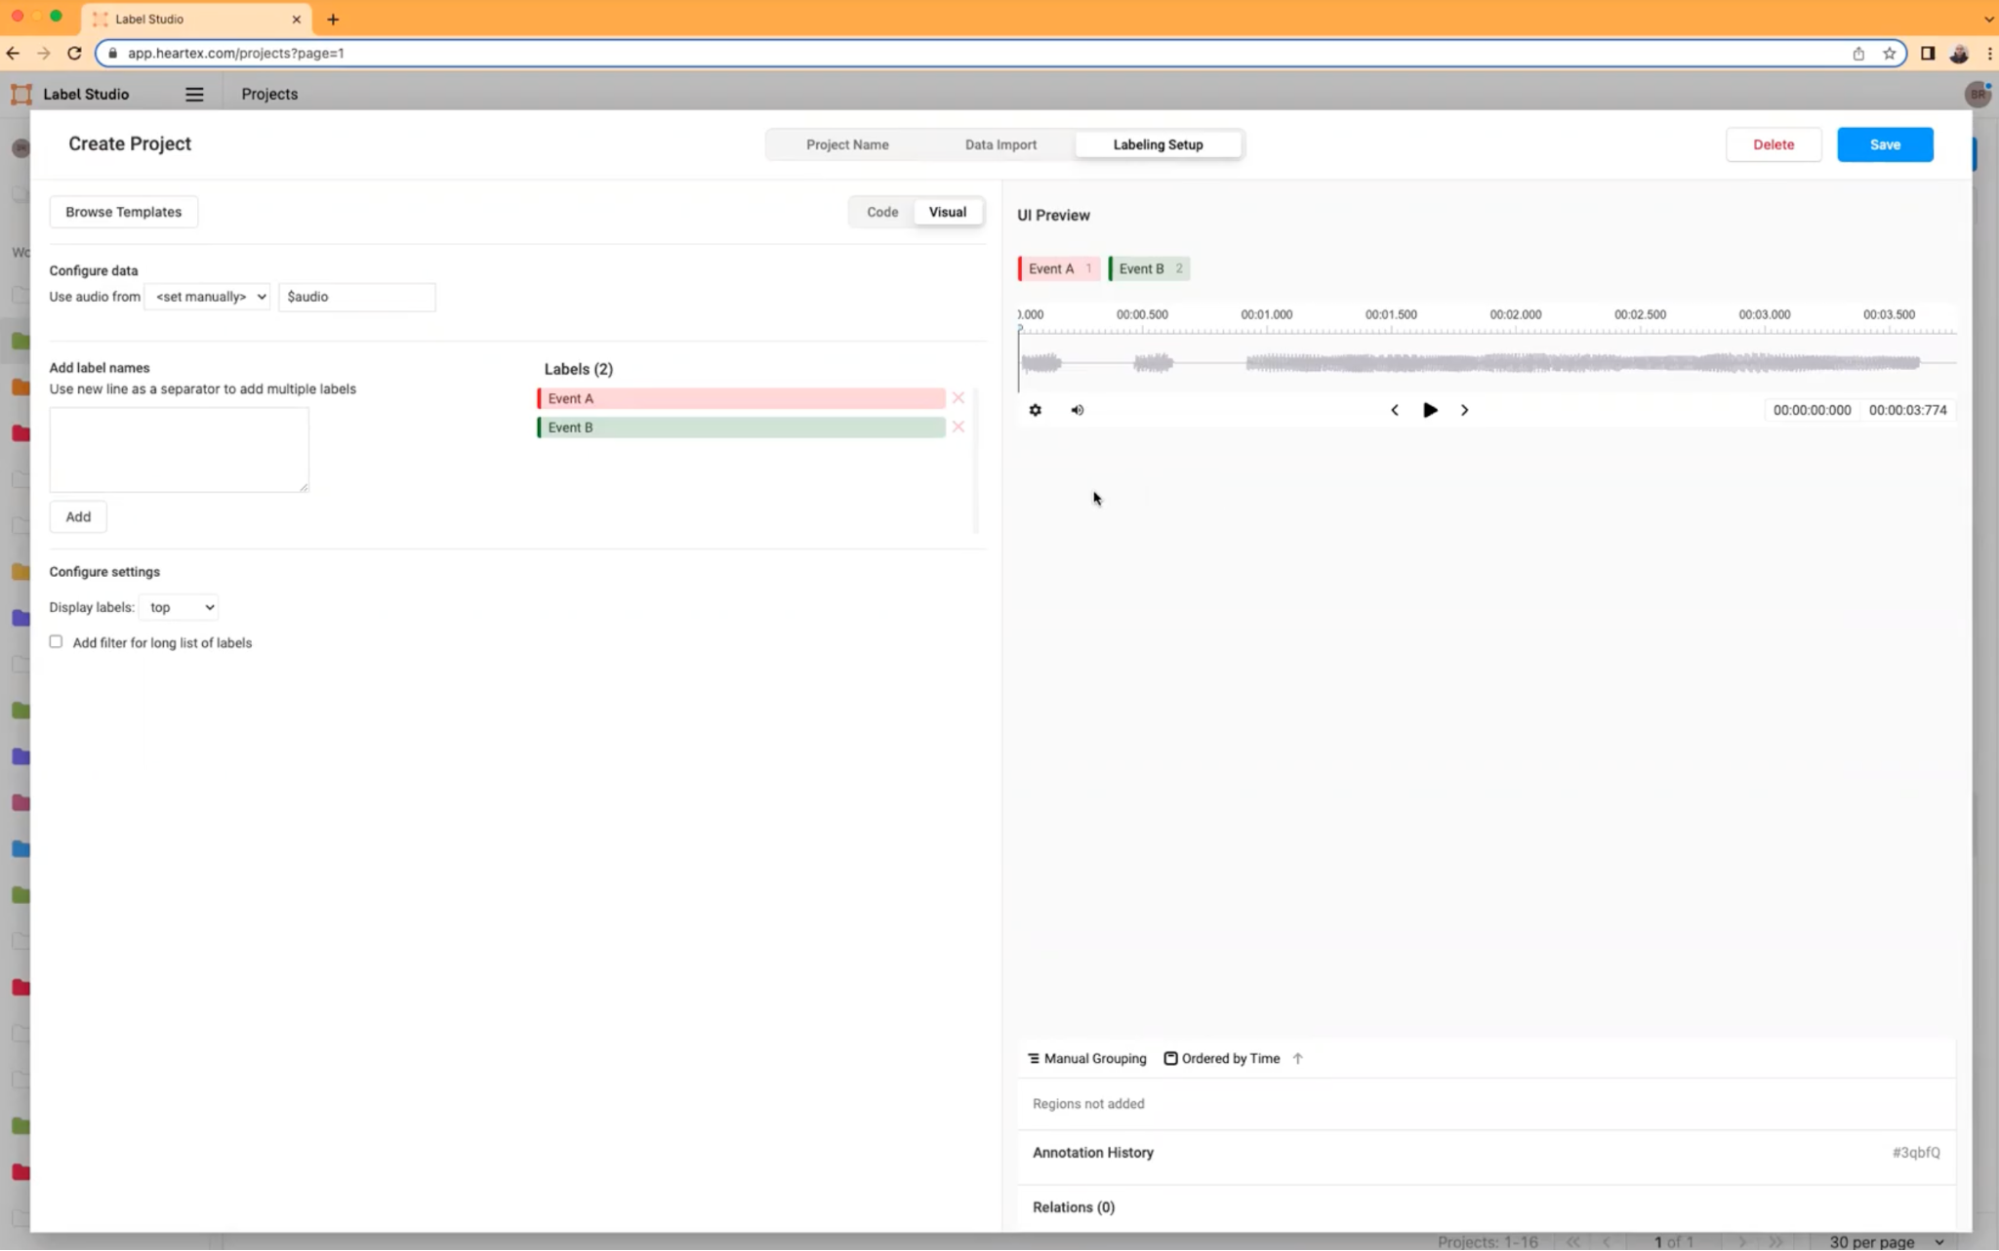
For the sake of today’s tutorial, let’s explore the base sound event detection template to get started with audio labeling here. This template comes pre-built with two labels, Event A and Event B. You can rename these to something that makes more sense for your needs.
Exploring the audio labeling interface
You’ll notice that annotating audio looks slightly different than annotating text or image files. You’ll be presented with a timeline-like view — familiar to folks who have used an audio or video editor before.
Customizing the labeling interface
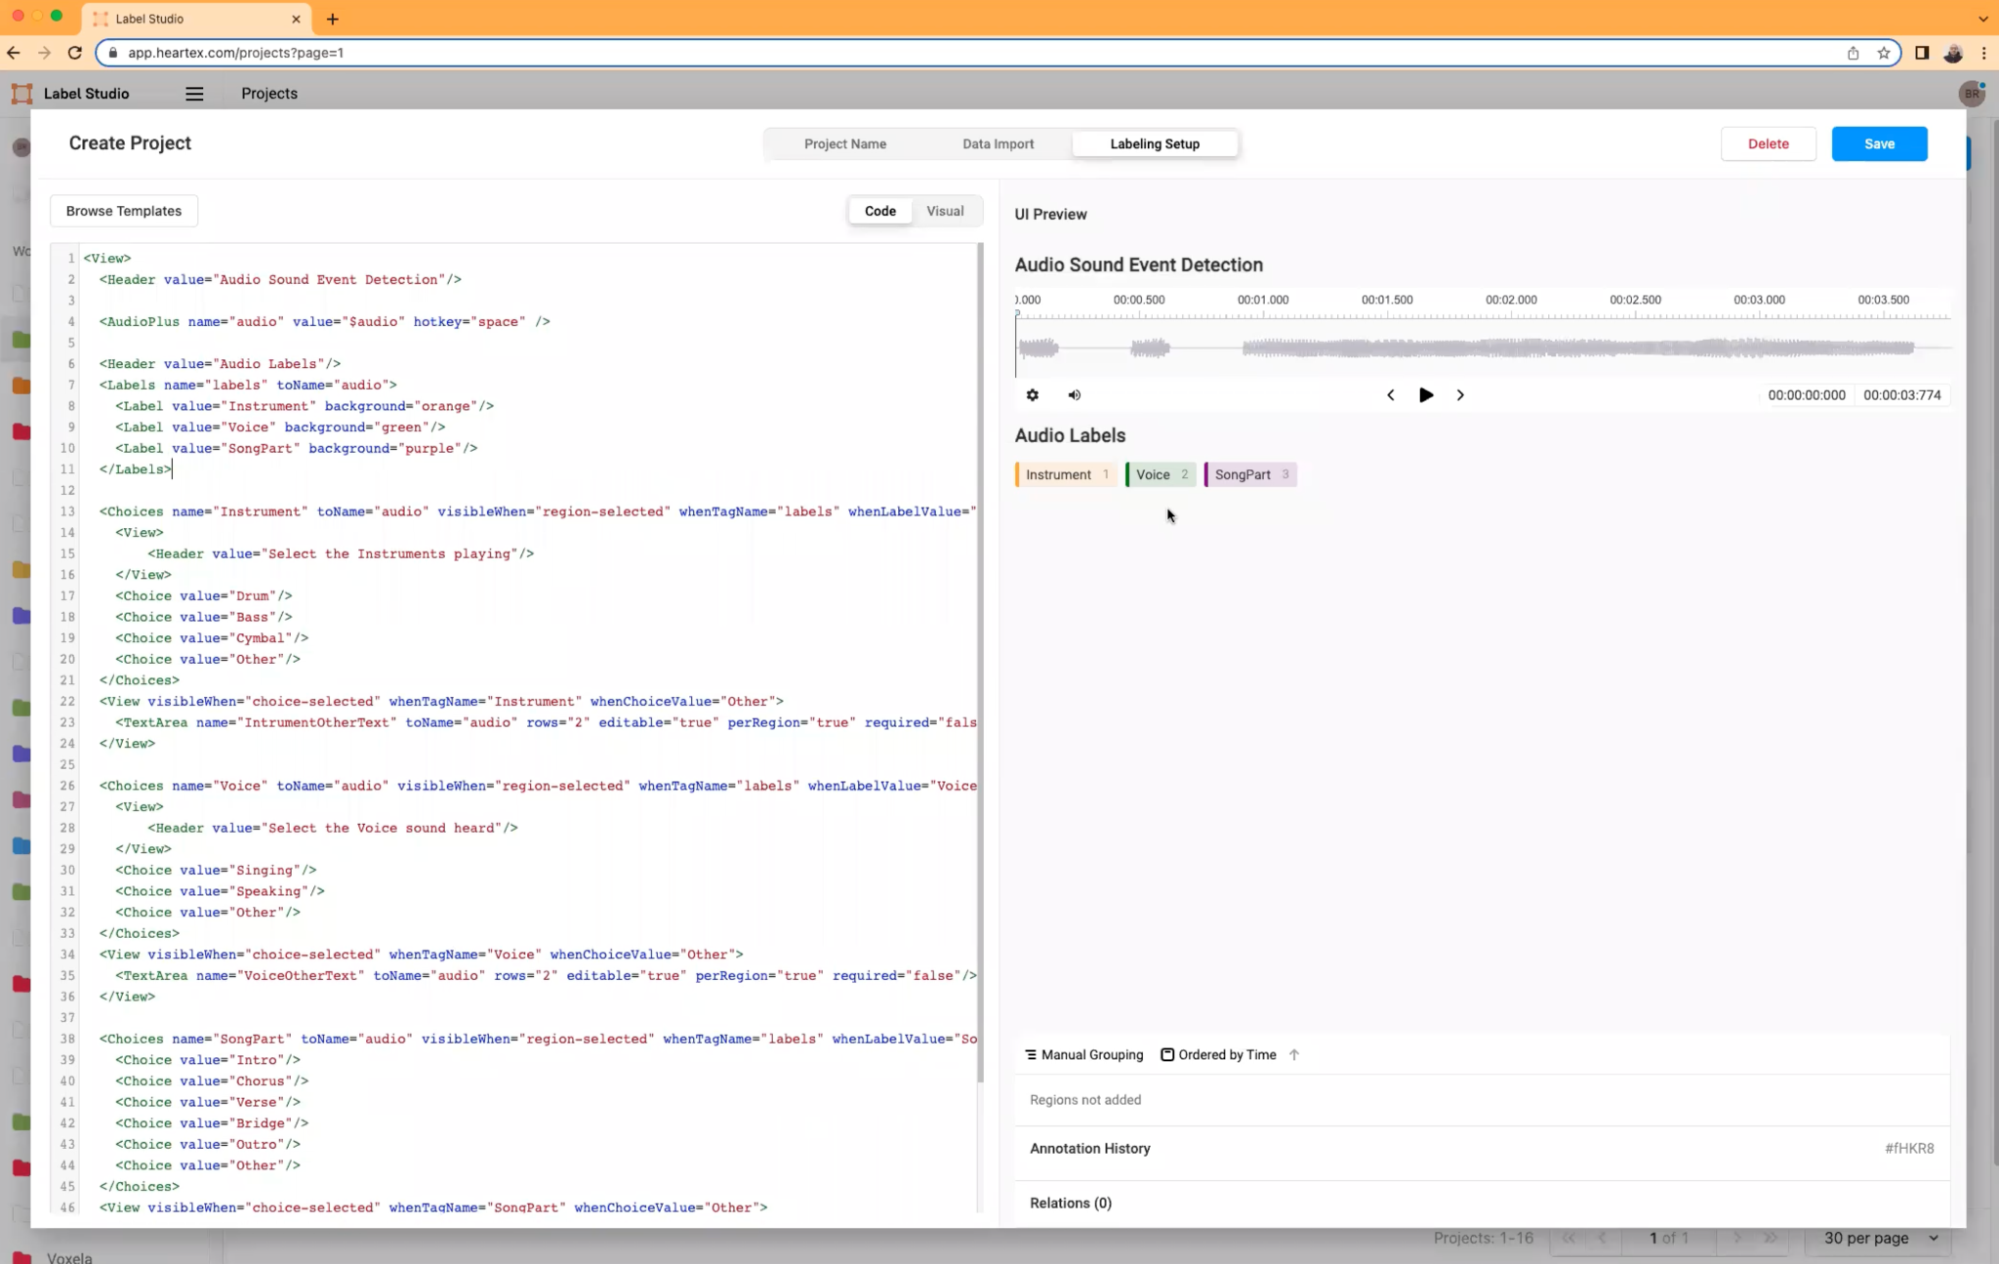
While we’re starting with the base sound effect detection template, we will use the flexibility of the Label Studio frontend to showcase a little bit more of the power and potential possible within Audio Labeling. This is an extrapolation of the base sound effect template. Within the template selection window, select ‘code’ and remove what currently exists in there, and paste in this code block instead:
<View>
   <Header value="Audio Sound Event Detection" />
   <AudioPlus name="audio" value="$audio" hotkey="space" />
   <Header value="Audio Labels" />
   <Labels name="labels" toName="audio">
      <Label value="Instrument" background="orange" />
      <Label value="Voice" background="green" />
      <Label value="SongPart" background="purple" />
   </Labels>
   <Choices name="Instrument" toName="audio" visibleWhen="region-selected" whenTagName="labels" whenLabelValue="Instrument" choice="multiple" showInLine="true" perRegion="true">
      <View>
         <Header value="Select the Instruments playing" />
      </View>
      <Choice value="Drum" />
      <Choice value="Bass" />
      <Choice value="Cymbal" />
      <Choice value="Other" />
   </Choices>
   <View visibleWhen="choice-selected" whenTagName="Instrument" whenChoiceValue="Other">
      <TextArea name="IntrumentOtherText" toName="audio" rows="2" editable="true" perRegion="true" required="false" />
   </View>
   <Choices name="Voice" toName="audio" visibleWhen="region-selected" whenTagName="labels" whenLabelValue="Voice" choice="single" showInLine="true" perRegion="true">
      <View>
         <Header value="Select the Voice sound heard" />
      </View>
      <Choice value="Singing" />
      <Choice value="Speaking" />
      <Choice value="Other" />
   </Choices>
   <View visibleWhen="choice-selected" whenTagName="Voice" whenChoiceValue="Other">
      <TextArea name="VoiceOtherText" toName="audio" rows="2" editable="true" perRegion="true" required="false" />
   </View>
   <Choices name="SongPart" toName="audio" visibleWhen="region-selected" whenTagName="labels" whenLabelValue="SongPart" choice="multiple" showInLine="false" perRegion="true">
      <Choice value="Intro" />
      <Choice value="Chorus" />
      <Choice value="Verse" />
      <Choice value="Bridge" />
      <Choice value="Outro" />
      <Choice value="Other" />
   </Choices>
   <View visibleWhen="choice-selected" whenTagName="SongPart" whenChoiceValue="Other">
      <TextArea name="SongPartText" toName="audio" rows="2" editable="true" perRegion="true" required="false" />
   </View>
</View>This code creates some Audio Sound Event Detection and provides us a little more detail with each event, showcasing the different choices and different regions that could exist within the larger world of data labeling. Additionally — for the sake of the blog post — this gives us a more real-world scenario.
Previewing your data
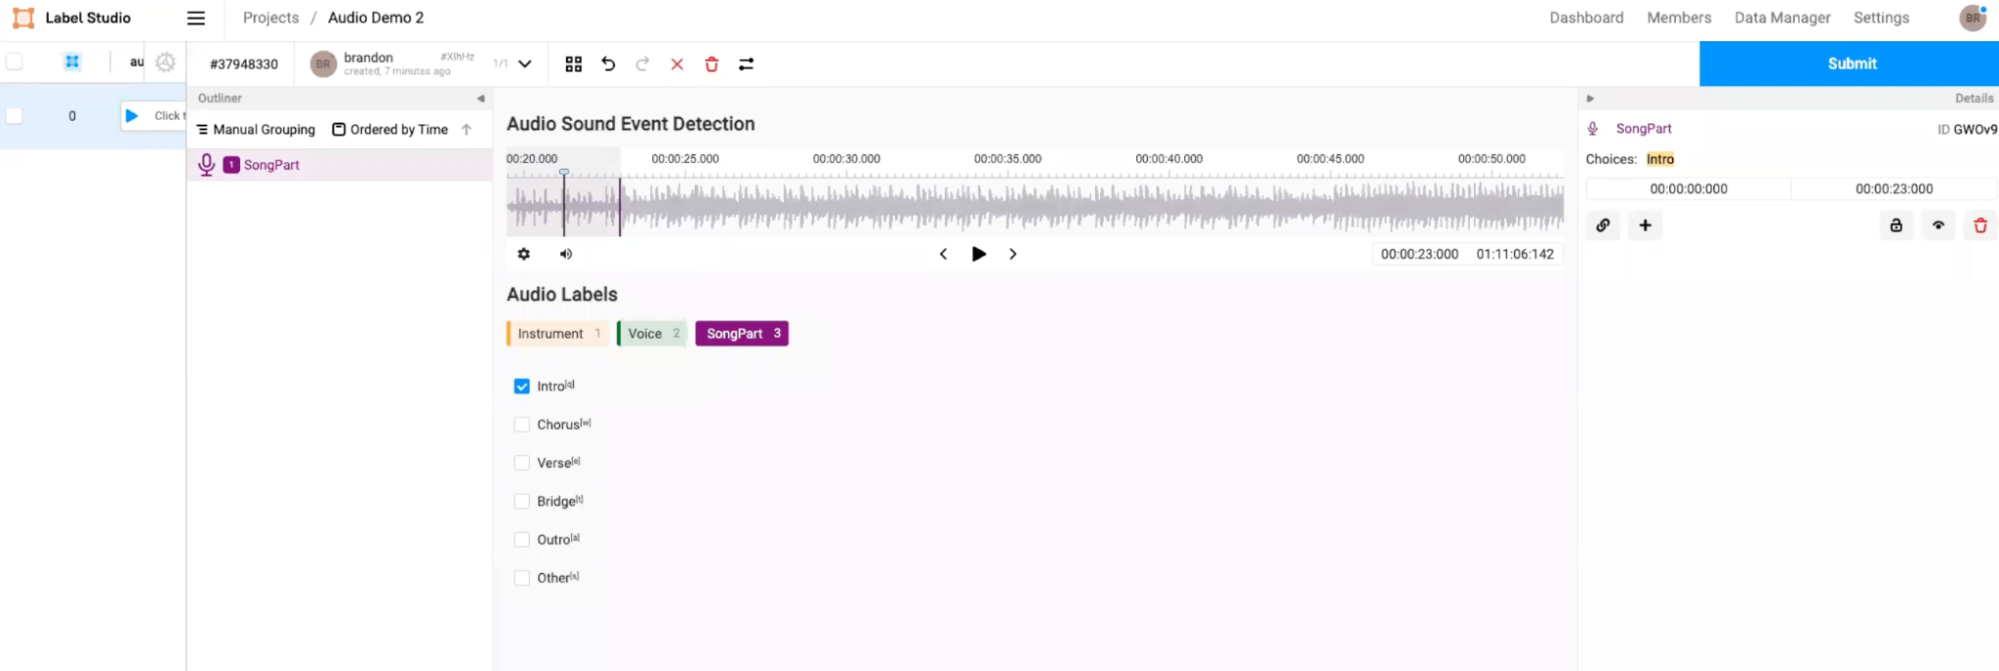
Now that we’ve got the project named, data uploaded, and template prepared — let’s load this up.
You’ll be presented with a waveform that we can visually see. You can play the audio by hitting the spacebar, which we configured in the actual configuration itself on the audio tag. Unless you specify something else for that parameter, it defaults to the spacebar. So now, you can play and listen for the audio cues and visually see exactly where you would want to mark a label as far as the sound you heard.
Start with the intro of the song, for example. You can get started with that to immediately be able to see anything on a zoomed-out waveform. A lot of times, if there's a lot of data, it's really hard to tell much of anything with regard to what you're possibly able to see with the data peaks themselves.
Using Keyboard and Mouse shortcuts
Work with efficiency thanks to the help of keyboard and mouse shortcuts built right into the platform. Use your mouse scroll wheel or keyboard commands to zoom in and out. On Linux or Windows-based PCs, that'll be ctrl and the scroll wheel, on macOS devices it will be command and scroll wheel. If you're using a trackpad, you can pinch to zoom in on the x-axis. You can also swipe back and forth for navigation in the x-axis.
Examining audio data
Examine audio data on the timeline and use the handy zoom in and zoom out features to get a better view of what’s happening within the audio data. Through taking a closer look at the peaks and valleys of the audio file, you can identify different events that are happening.
To examine the flatter portion of the waveform more closely, you can zoom in on the y-axis to see some points a little bit better if they're on a small scale. Starting from the beginning, you can move the play head by clicking and dragging it, or you can click around on both the timeline and the waveform for navigation purposes. If you just want a quicker way to do it, you can just enter it into the time boxes themselves, and that'll update the current time to where the play head should be.
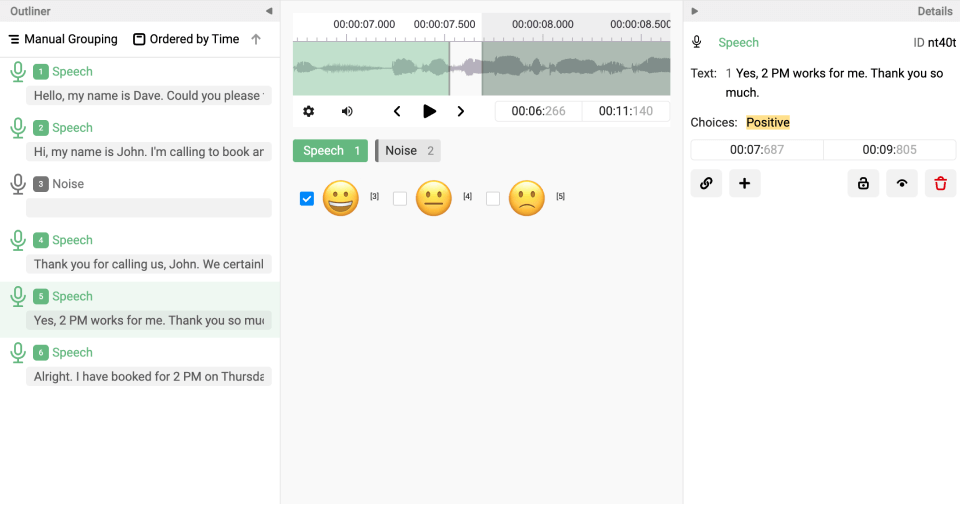
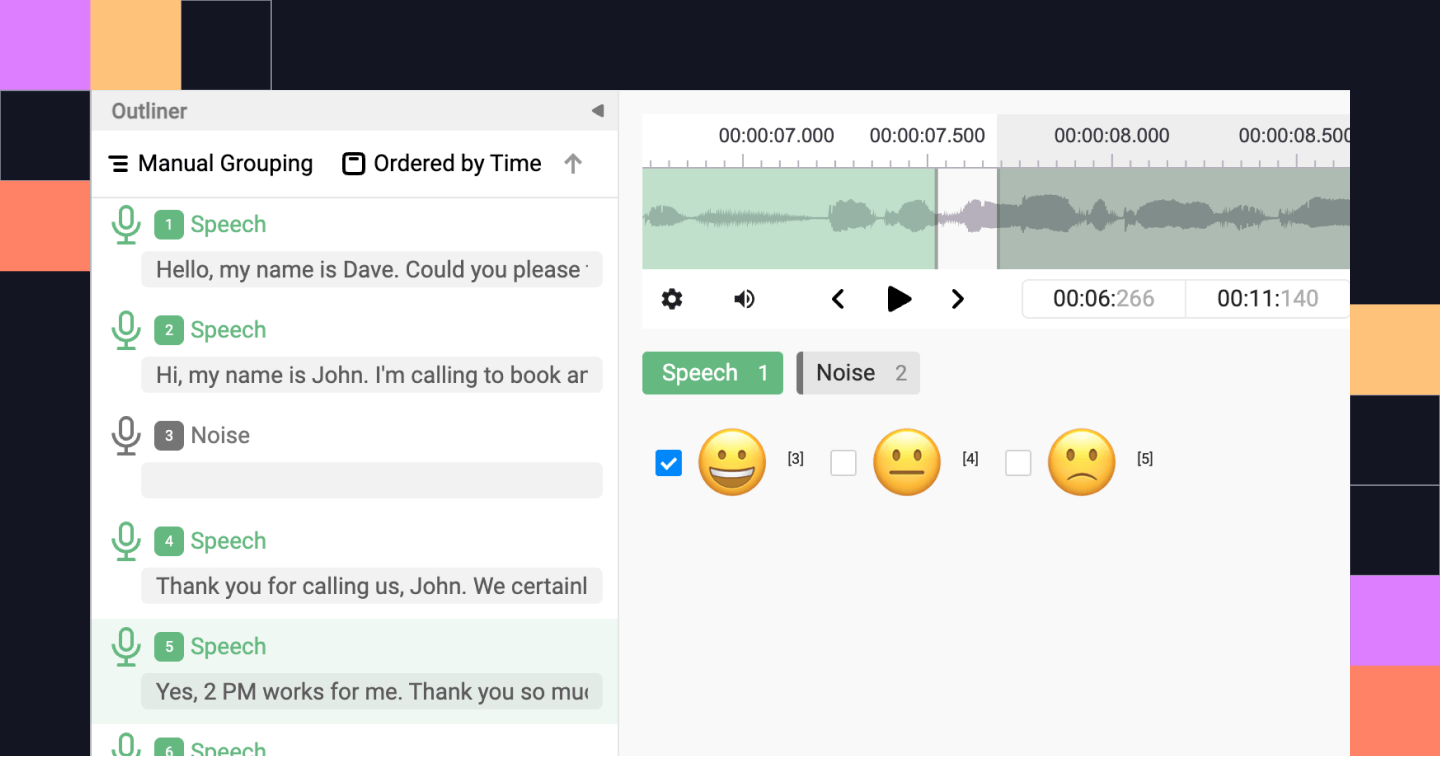
Annotating Audio Data
In this video example, you can see how our Senior Engineer Brandon listens for and labels different song parts. In your own files, you’ll want to scroll through the file and identify where different elements may be. This may be listening for different song parts, like the intro chorus, verse, and so on, or other loud events such as yelling, planes taking off, or whatever else you are working with the audio files to detect.
Work from the start of your file and measure the first moment where the audio event begins. Drop a pin and label that moment. You can also drag your mouse to draw a selection. When you release the mouse, it will start playing the exact selection up to where the cursor currently is and then loop. From there, you can start and stop playback in between and adjust the selection before making any actual label selections.
Playback Speed
You can also toggle the settings plate to adjust the playback speed. In the case of playback speed, it’s set to default between .5 to 2.5, but be aware that your browser’s capability may limit your playback speed. Be cautious about going too fast because you may miss events if you power through. The zoomed-in level scan sometimes helps you be able to tell the difference between something with small float numbers, like a pindrop or other small event that may happen on the track that would otherwise be mistaken for silence in some cases. You could miss that unless you zoom in and set those values a bit lower.
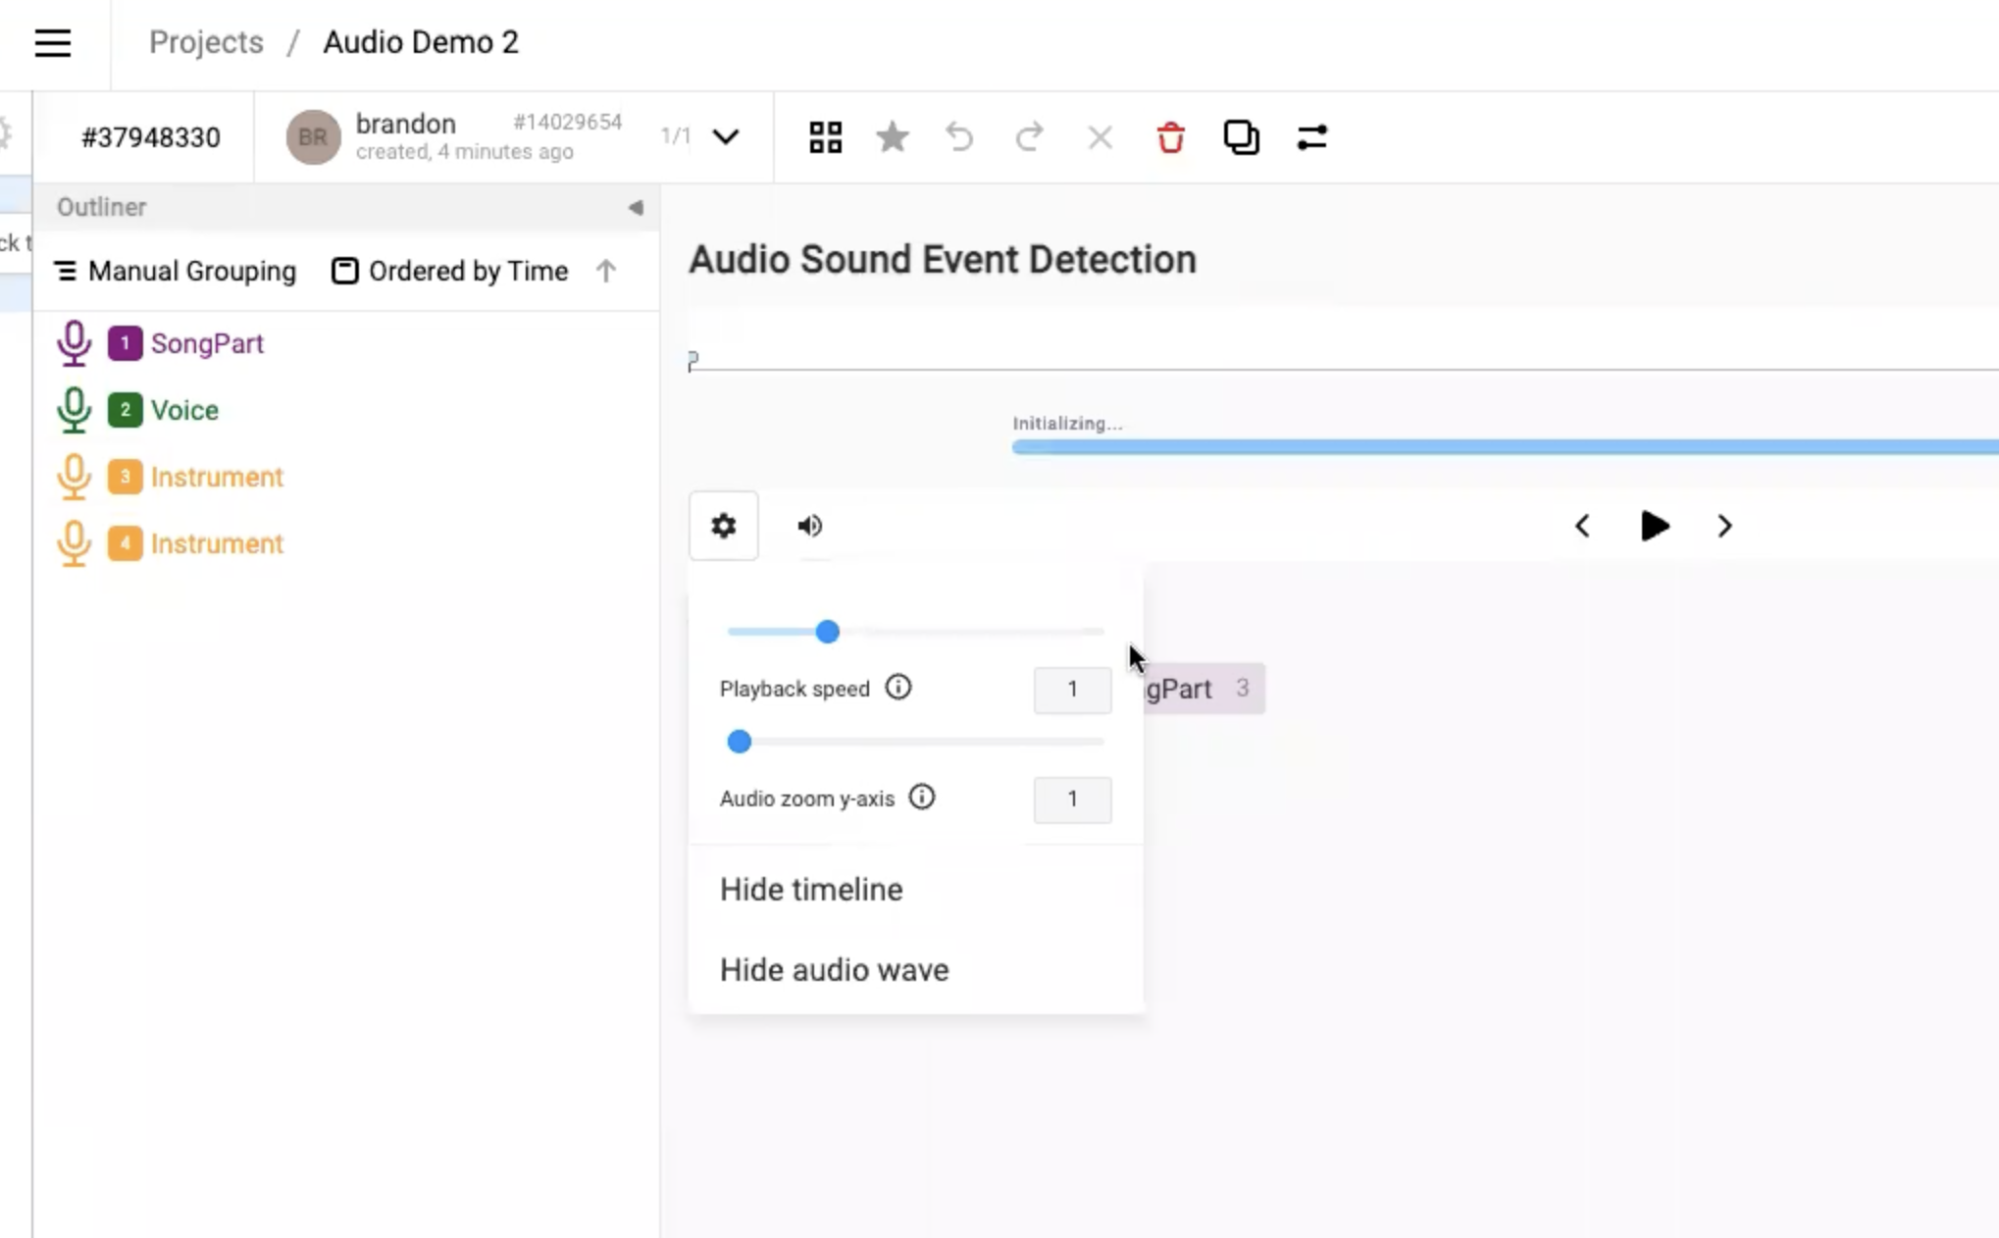
Toggle Timeline View
You can hide the timeline and turn the audio off if you just need to listen and not focus on anything there. You can bring back just the timeline itself, or you can still scrub the playhead just along the timeline without a waveform.
Edit and Adjust Labels
Like other labeling platforms and tools, if you don't submit anything and deselect the timeline, your labels will be saved in the draft annotations of your project.
These drafts are editable as well. Use the sliders in any of these cases or enter valid values. These will then be validated, so it'll be in red unless you give it something that is appropriate.
Looping Playback
Use unlabeled sections, or segments to listen in a loop of exactly what portion of the track that you’re focusing on trying to listen to and see what might correlate to something you want to label.
Using spacebar to pause — you can set this using the custom code settings above — work through your dataset to identify different areas in your which may be of interest to you. While you have a segment selected, you can still label or start an additional segment, or expand your current selection to include multiple different pieces. When you feel as if you’ve hit a point that you’re ready to move on you can clear your selections using the backspace key. You can then continue your labeling process from that point.
If you ever get stuck or get lost while panning around the timeline, you can use a landmark to help recenter yourself or quickly identify key points. Whether it’s a label at key points or selections or key areas — identify these to quickly navigate and find your way in the timeline.
Lastly — if you make an error, you can always undo by tapping Command/Ctrl Z. And if you have a region that’s not really in the right place, you can delete it by using the button in the Outliner, or by tapping backspace or delete.
Related Content
-
Understanding Audio Classification: Everything You Need to Know
This article takes a look at audio classification and discusses the various use cases that can benefit from this technique.

Label Studio Team
November 16, 2022
-
Label Studio 1.7 is Here With Improved Audio Labeling!
The latest version of Label Studio is here. Significant features include performance improvements to its audio labeling engine and new support for production-ready deployment methods using Terraform scripts or Helm charts.
Label Studio Team
December 15, 2022
-
Implementing Audio Classification for Machine Learning Projects Using Label Studio
With this guide, learn how audio classification works and how to implement it when building audio ML projects, so you can optimize your ML models and build a better overall product.
Label Studio Team
November 23, 2022