Improve Amazon Transcribe Audio Transcriptions with Label Studio
Audio transcription quality is important for accessibility, but also to ensure the quality of a service that you provide, such as customer support, or the outcomes of a meeting. You might need to transcribe any of the following types of audio:
- A recording from a journalism, user research, or radio interview
- Customer support call recordings
- Depositions for legal cases
- Business meeting recordings
- Arbitration discussions
Quality is important, but speed matters too, especially when you need to transcribe a high volume of recordings in a short time frame.
Why audio transcription quality matters
For many cases where you're using audio transcriptions, they must be completely accurate so that patterns that you search for in the transcribed content can be easily discovered for research purposes, to help you build a stronger legal case, to more easily improve your product, to ensure high quality customer support interactions, or to reduce error in automated downstream analysis by machine learning models, such as sentiment analysis.
When high quality is crucial, having human involvement in the transcript is necessary. An expert transcriber brings field-specific knowledge and vernacular to a transcript, but it's difficult to scale high-quality human transcription. It can get expensive and time consuming. Rather than shortchange the skills of an expert, you can use automated transcription to provide a shortcut. Then, the expert can focus on correcting inaccuracies in the transcript rather than performing the entire transcription manually.
With Label Studio, you can improve audio transcription quality at scale with an easy-to-use interface.
How to improve audio transcription quality with Label Studio
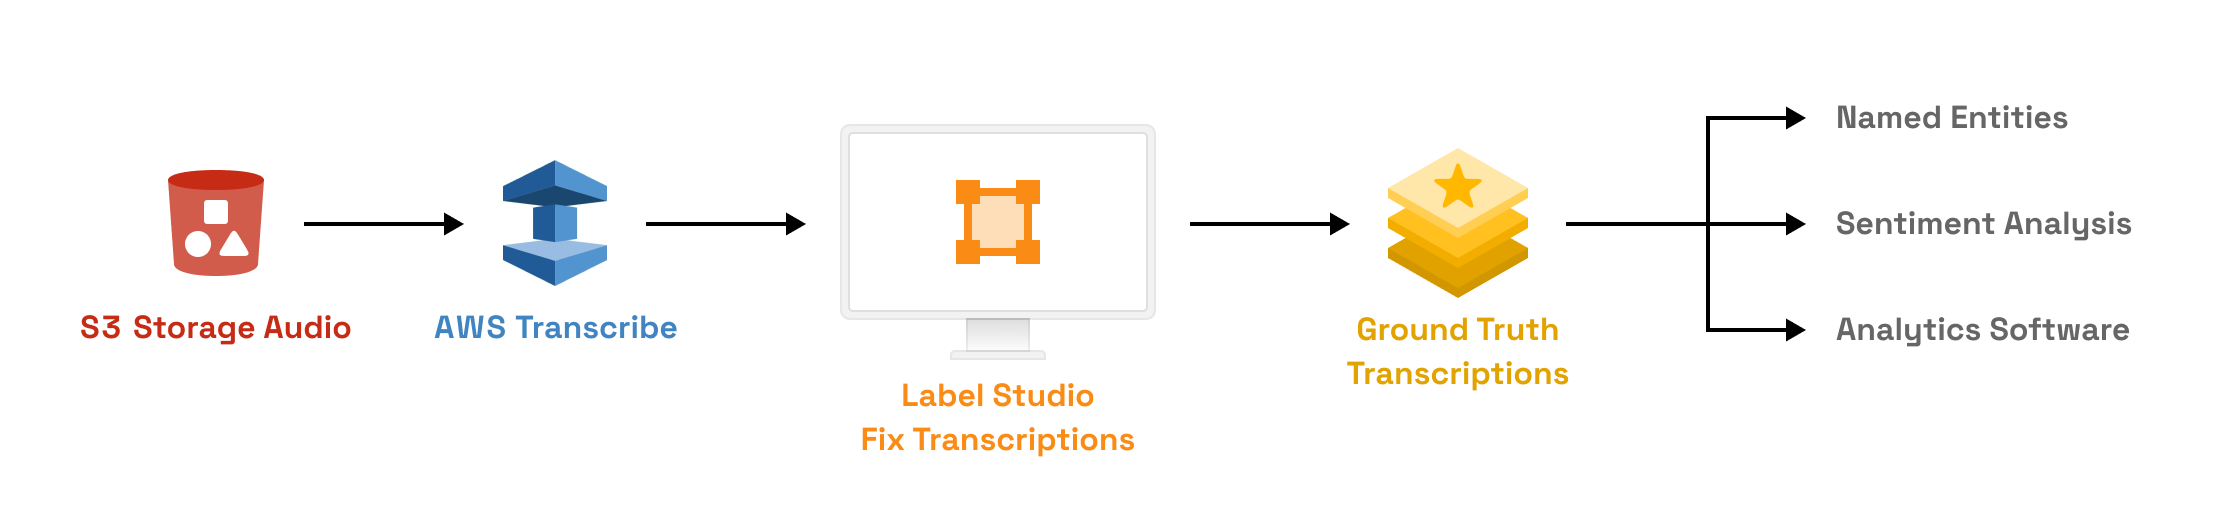
In this example tutorial, you can use the Amazon Transcribe service to create an automated audio transcript of an interview and combine it with human intervention in Label Studio to produce a high quality audio transcript.
Before you start
Before you start your transcription process, make sure you have the following:
- An AWS account
- Audio files stored in Amazon S3 Buckets supported by the Amazon Transcribe service.
- The AWS command line interface tool installed
- Python version 3.7 or higher installed
This example uses a Sports Byline radio interview with Hank Aaron from the Library of Congress digital collection.
Configure programmatic access to Amazon Transcribe
Set up your Amazon S3 buckets with the audio files to allow the Amazon Transcribe service to read the contents programmatically.
Create IAM user
Use the AWS CLI tool to create an identity to access the bucket on behalf of the Amazon Transcribe service. As the root user for the Amazon account, run the following command:
aws iam create-user --user-name test-transcribe-client Create AWS credentials for programmatic access
Create the credentials for the username that you just created to allow the transcription service to access the bucket. Run the following command and review the results:
aws iam create-access-key --user-name test-transcribe-client
{
    "AccessKey": {
        "UserName": "test-transcribe-client",
        "Status": "Active",
        "CreateDate": "2021-05-04T15:23:21Z",
        "SecretAccessKey": "soHt5...",
        "AccessKeyId": "AKIA..."
    }
} Set the AWS access key ID and AWS secret access key using the aws configure command. See the Amazon documentation on the aws configure command for more.
Create a policy to access Amazon Transcribe
In order to allow the Amazon Transcribe service to access your bucket, you must set an IAM access policy. Refer to this policy as an example, as it provides expansive resource access.
If you're following this example with non-production data, create a file with the following contents, replacing BUCKET-NAME with your bucket name, and name it TranscribePolicy.json:
{
    "Version": "2012-10-17",
    "Statement": [
        {
            "Action": [
                "transcribe:*"
            ],
            "Resource": "*",
            "Effect": "Allow"
        },
        {
            "Effect": "Allow",
            "Action": "s3:*",
            "Resource": [
              "arn:aws:s3:::BUCKET-NAME",
              "arn:aws:s3:::BUCKET-NAME/*"
            ]
        }
    ]
}Otherwise, set your existing bucket policy to allow access to the Amazon Transcribe service.
After creating a policy, from the command line, run the following to attach the policy to the user:
aws iam put-user-policy --user-name test-transcribe-client --policy-name TestTranscribePolicy --policy-document file://TranscribePolicy.json Now you have an IAM user that you can use to securely allow access to your S3 bucket with audio files. The Amazon Transcribe service can use that user to read the audio files and write transcripts into the S3 bucket.
Create Label Studio tasks
After setting up programmatic access for the Amazon Transcribe service, create a Python script that does the following:
- Read the audio files in your S3 bucket.
- Transcribe the speech in the audio files by calling the Amazon Transcribe service to run a transcription job on each audio file from your S3 bucket.
- Create Label Studio tasks, saving the transcript output from the service as pre-annotations.
Start by specifying the location of the audio files in your S3 bucket. Use the format s3://BUCKET-NAME/<audio_file> to specify the bucket objects. If your recordings are stored in a different file format than mp3, you'll need to make further changes to this script.
Copy and paste this example code into a text editor, and update it to match your S3 bucket name and audio file:
audio_files = [
  's3://BUCKET-NAME/<audio_file>',
  's3://BUCKET-NAME/<audio_file>'
] The next part of the code creates an Amazon Transcribe client using the credentials and IAM role that you defined earlier. Copy and paste this example code into the same file. If your S3 bucket is not in the us-east-1 region, update this section of the code.
import boto3
transcribe_client = boto3.client('transcribe', region_name='us-east-1')The next part of the code retrieves the Amazon Transcribe job by the job name. Copy and paste this example code into the same file:
from botocore.exceptions import ClientError

def get_job(client, job_name):
    """Check if current job already exists"""
    try:
        response = client.get_transcription_job(
            TranscriptionJobName=job_name
        )
        return response
    except ClientError:
returnThe script then formats the results from the Amazon Transcribe service and stores them in the Label Studio JSON format as pre-annotated audio transcripts. Copy and paste this example code into the same file:
import requests

def create_task(file_uri, job):
    try:
        download_uri = job['TranscriptionJob']['Transcript']['TranscriptFileUri']
        results = requests.get(download_uri).json()['results']
        transcriptions = [r['transcript'] for r in results['transcripts']]
        # confidence score for the entire phrase is a mean of confidence for individual words
        confidence = sum(float(item['alternatives'][0]['confidence']) for item in results['items'] if item['type'] == 'pronunciation') / \
            sum(1.0 for item in results['items'] if item['type'] == 'pronunciation')

    except Exception as exc:
        print(exc)
    else:
        return {
            'data': {'audio': file_uri},
            'predictions': [{
                'result': [{
                    'from_name': 'transcription',
                    'to_name': 'audio',
                    'type': 'textarea',
                    'value': {'text': transcriptions}
                }],
                'score': confidence
            }]
} After preparing the format of the output, the final section of code creates an Amazon Transcribe job and saves the results in Label Studio JSON pre-annotation format. Copy and paste this example code into the same file, updating the media_format and language_code variables if needed:
import time

def transcribe_file(job_name, file_uri, transcribe_client, media_format='mp3', language_code='en-US'):
    job = get_job(transcribe_client, job_name)
    if job:
        print(f'Transcription job {job_name} already exists.')
        return create_task(file_uri, job)

    print(f'Start transcription job {job_name}')
    transcribe_client.start_transcription_job(
        TranscriptionJobName=job_name,
        Media={'MediaFileUri': file_uri},
        MediaFormat=media_format,
        LanguageCode=language_code
    )

    max_tries = 60
    while max_tries > 0:
        max_tries -= 1
        job = transcribe_client.get_transcription_job(TranscriptionJobName=job_name)
        job_status = job['TranscriptionJob']['TranscriptionJobStatus']
        if job_status in ['COMPLETED', 'FAILED']:
            print(f'Job {job_name} is {job_status}.')
            if job_status == 'COMPLETED':
                return create_task(file_uri, job)
        else:
            print(f'Waiting for {job_name}. Current status is {job_status}.')
time.sleep(10) After the transcribed data is retrieved and reformatted to be imported into Label Studio, the code saves the results as a file called tasks.json in the data/aws-transcribe-output directory. Copy and paste this example code into the same file and update the path in the output_file variable to specify a location on your machine:
import os
import json

tasks = []
for audio_file in audio_files:
    job_name = os.path.splitext(os.path.basename(audio_file))[0]
    task = transcribe_file(job_name, audio_file, transcribe_client)
    if task:
        tasks.append(task)
output_file = 'data/aws-transcribe-output/tasks.json'
with open(output_file, mode='w') as f:
    json.dump(tasks, f, indent=2)
print(f'Congrats! Now import {output_file} into Label Studio.') Save the script as a python script called transcribe_tutorial.py and run it from the command line:
python transcribe_tutorial.py When you open the tasks.json file, you see something like the following example:
[{
    "data": {
      "audio": "s3://BUCKET-NAME/sportsbyline_hankaaron.mp3"
    },
    "predictions": [
      {
        "result": [
          {
            "from_name": "transcription",
            "to_name": "audio",
            "type": "textarea",
            "value": {
              "text": [
                "Yeah, this is America's sports talk show, Sports Byline USa Here's Ron bar. Yeah, yeah. Hank Aaron joins us here on Sports Byline USA. The Hall of Famer and also the home run king who had 755 home runs and back on april the 8th, 1974. He broke babe Ruth's all time home run record Of 714. Good evening, nice to have you back here on sports byline. It's my pleasure. Let's talk a little bit first about your career, 23 years in the majors. When you reflect back, what type of perspective do you put on your baseball career? I don't know, I think it was I was satisfied with it. You know, I don't think that I look back at my career and can find any fault with it. You know, I did just about everything I wanted to do. I accomplished all of my goals and so I I feel like it was a mission well accomplished. Did you ever think back when you were a kid growing up that you would do what you were able to do? I mean what was the dream of hank Aaron when he was a kid? No, I didn't think about it at all, you know, all I wanted to do back then of course and I was just talking to somebody about it was to try to get it in five years and that would have been, I would have been invested in the pension fund and that's mostly what ball players thought about. You know, You didn't think in terms of playing 2020, some years like I did, you know, but I'm also glad that I did. I think one thing that fans don't realize hank is that mobile Alabama turned out an awful lot of good baseball players. It seemed like it was the breeding ground for great players, wasn't it? Well, I tell you, you're absolutely right about that run. We had, we had that one time, I think that was as many as eight or nine major league players that was playing in the big leagues, you know, and they were all good. In fact Billy Williams and McCovey, they all went into the Hall of Fame. So, you know, you're talking about myself, Billy Williams to cover and satchel paige all in the Hall of Fame. So, you know, mobile doesn't have anything to be ashamed of. I think we turn loose our share of athletes. What was your first exposure to baseball hank? I don't know. I think my first exposure to baseball was just baseball itself was just playing in the negro league. I played softball in high school but never played baseball. So I started playing, actually start playing baseball when I was uh in the negro american league when I think back and I've talked with Willie Mays about the negro leagues and how special that time was..."
              ]
            }
          }
        ],
        "score": 0.9722586794792298
      }
    ]
  }
]The transcript has been shortened for readability.
Set up Label Studio for audio transcription
1. Install Label Studio using your desired method.
2. Because the transcribed pre-annotations specify s3:// URLs to the audio files in your S3 bucket, set an environment variable so that Label Studio creates presigned URLs to access the audio using the AWS credentials and the S3 access policy that you configured with the aws configure command. Expose the following variable on the machine with Label Studio installed:
export USE_DEFAULT_S3_STORAGE=true 3. Start Label Studio:
4. On the Label Studio UI, click Create to create an Audio Transcription project.
5. On the Data Import tab, upload the tasks.json file with pre-annotations from the Amazon Transcribe service.
6. On the Labeling Setup tab, select the Automatic Speech Recognition template.
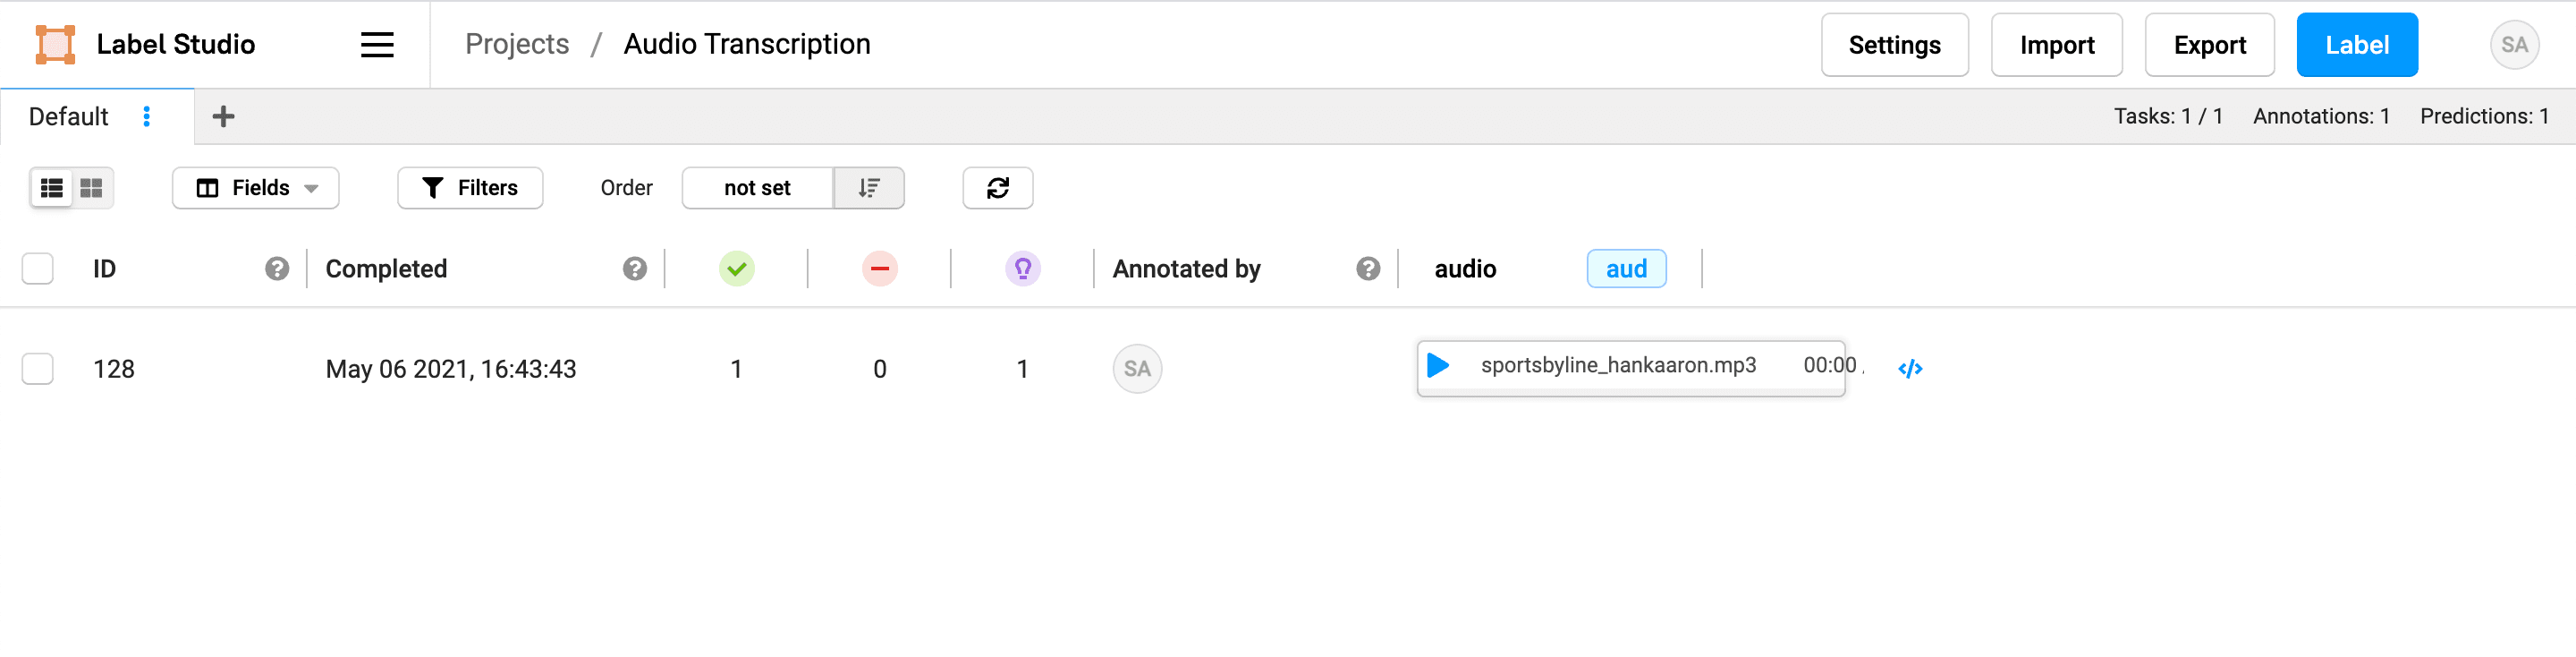
7. Save your project. If you want, you can sort the tasks by prediction score so that you can review the least confident results first.
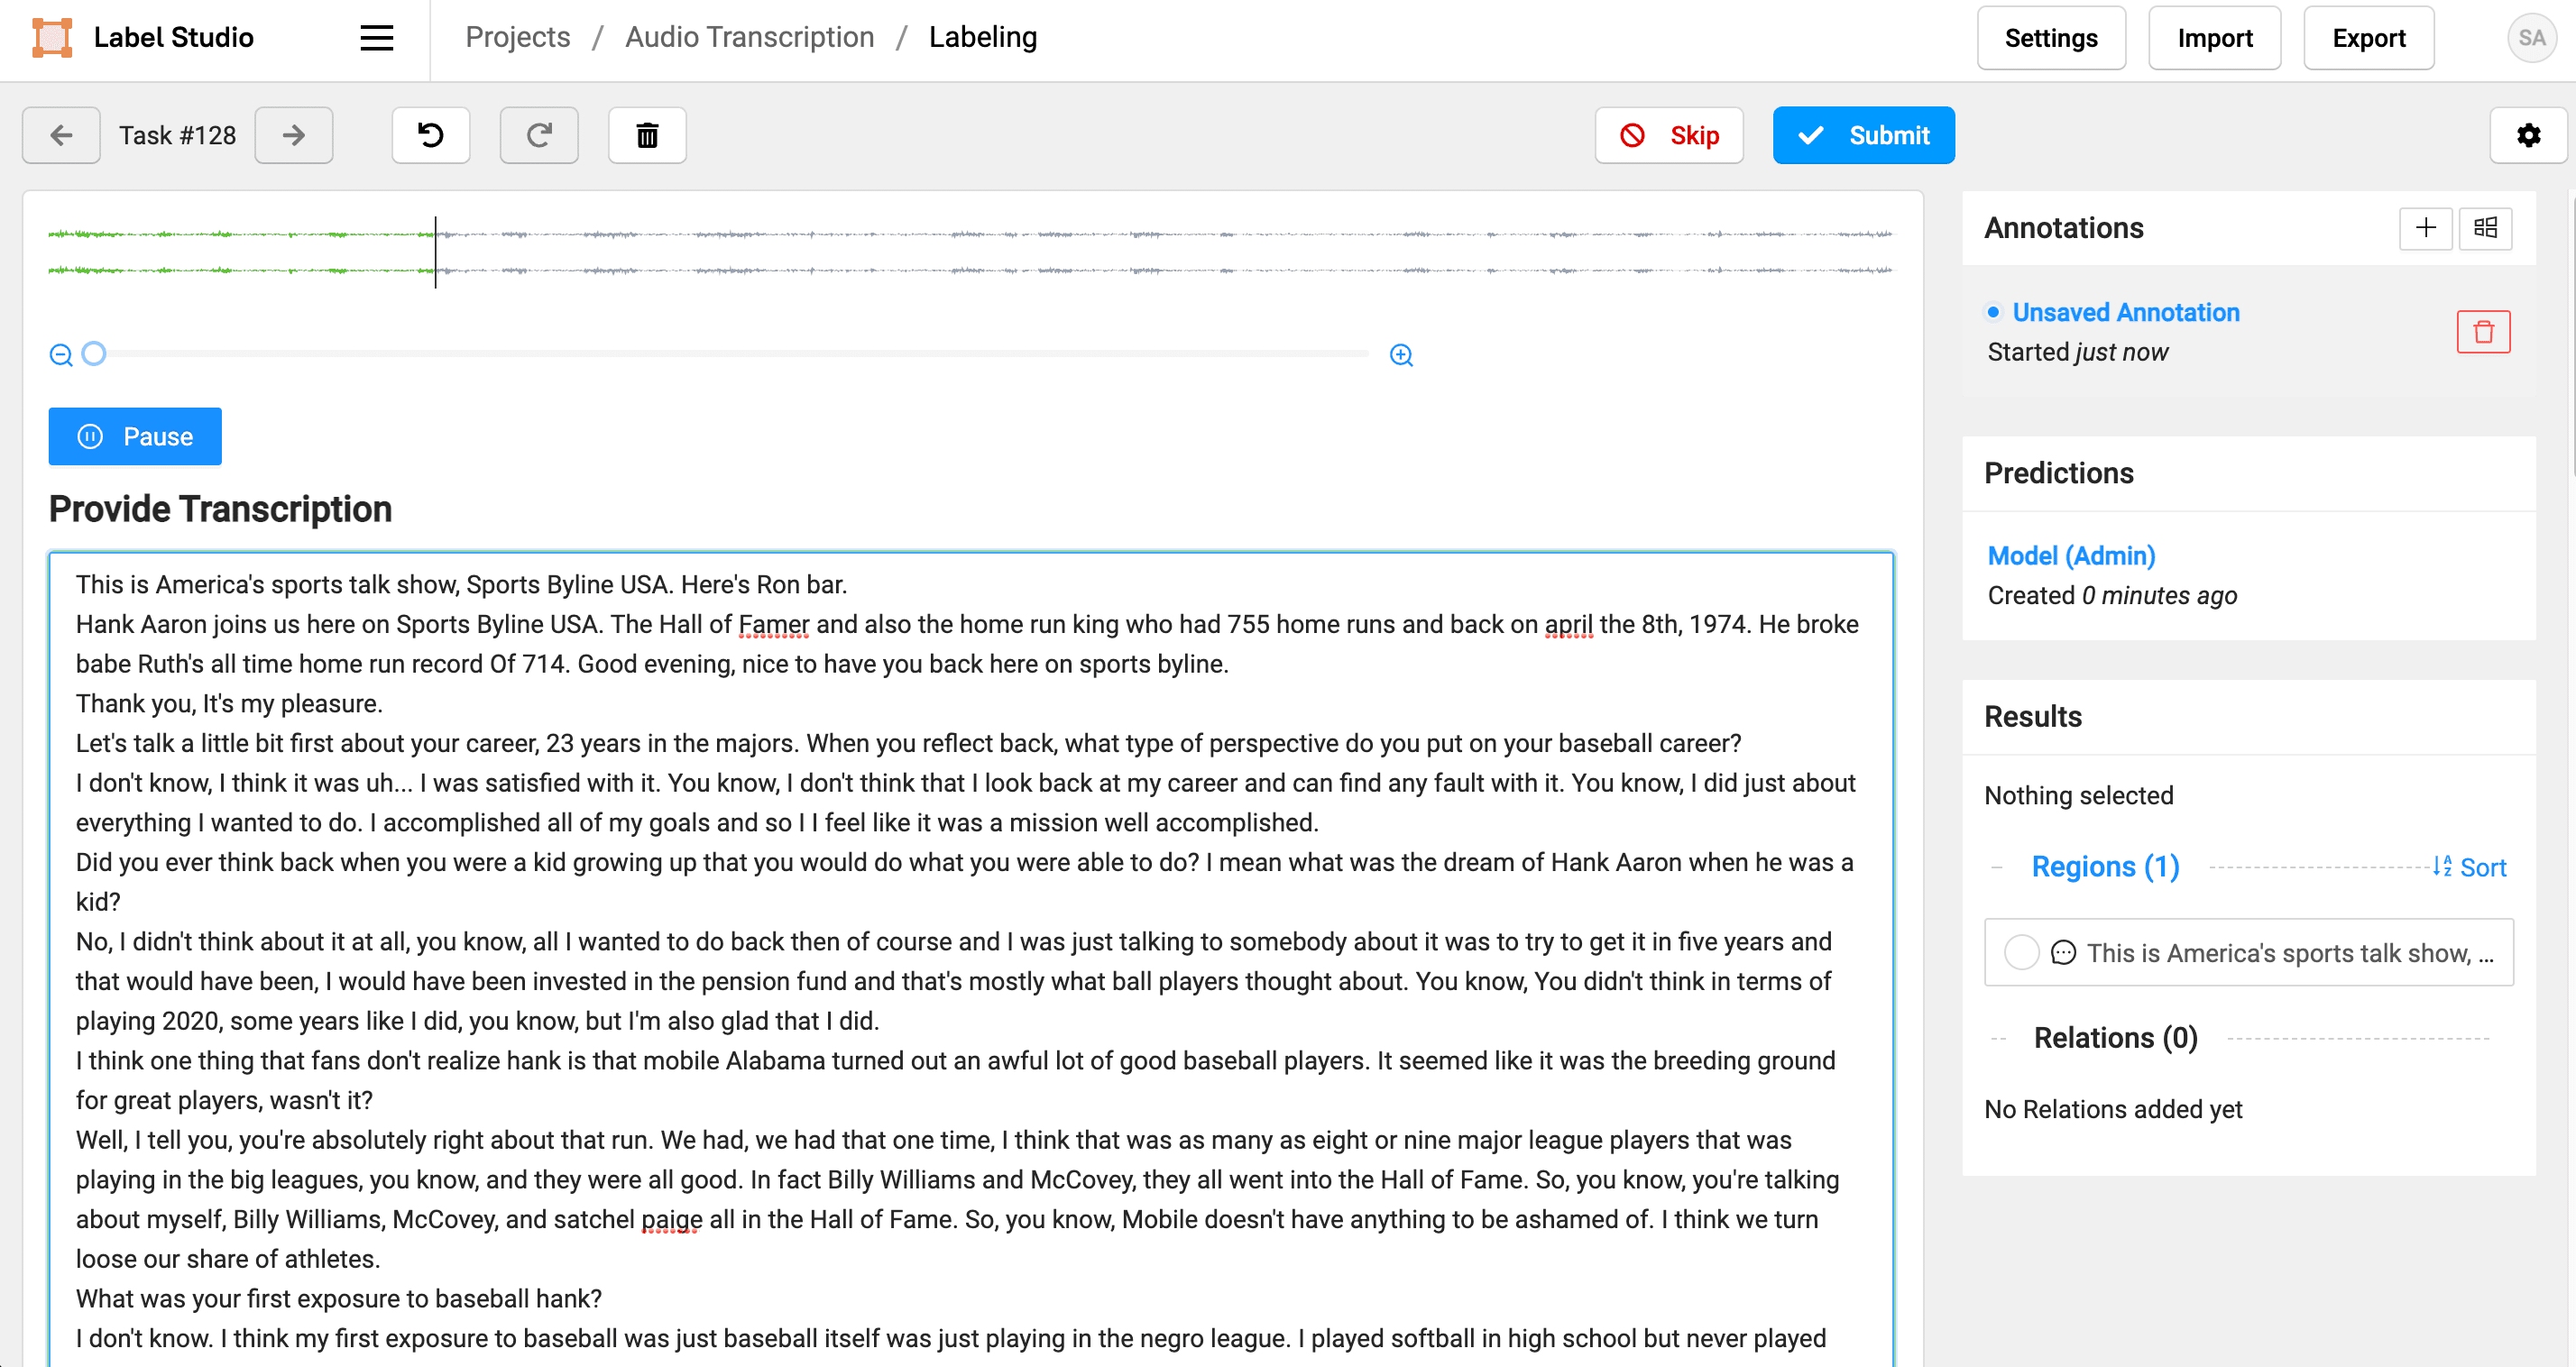
8. Click Label to review and correct the transcript from the Amazon Transcribe service as necessary. When you first open the task, you see the predicted transcript and the audio file.
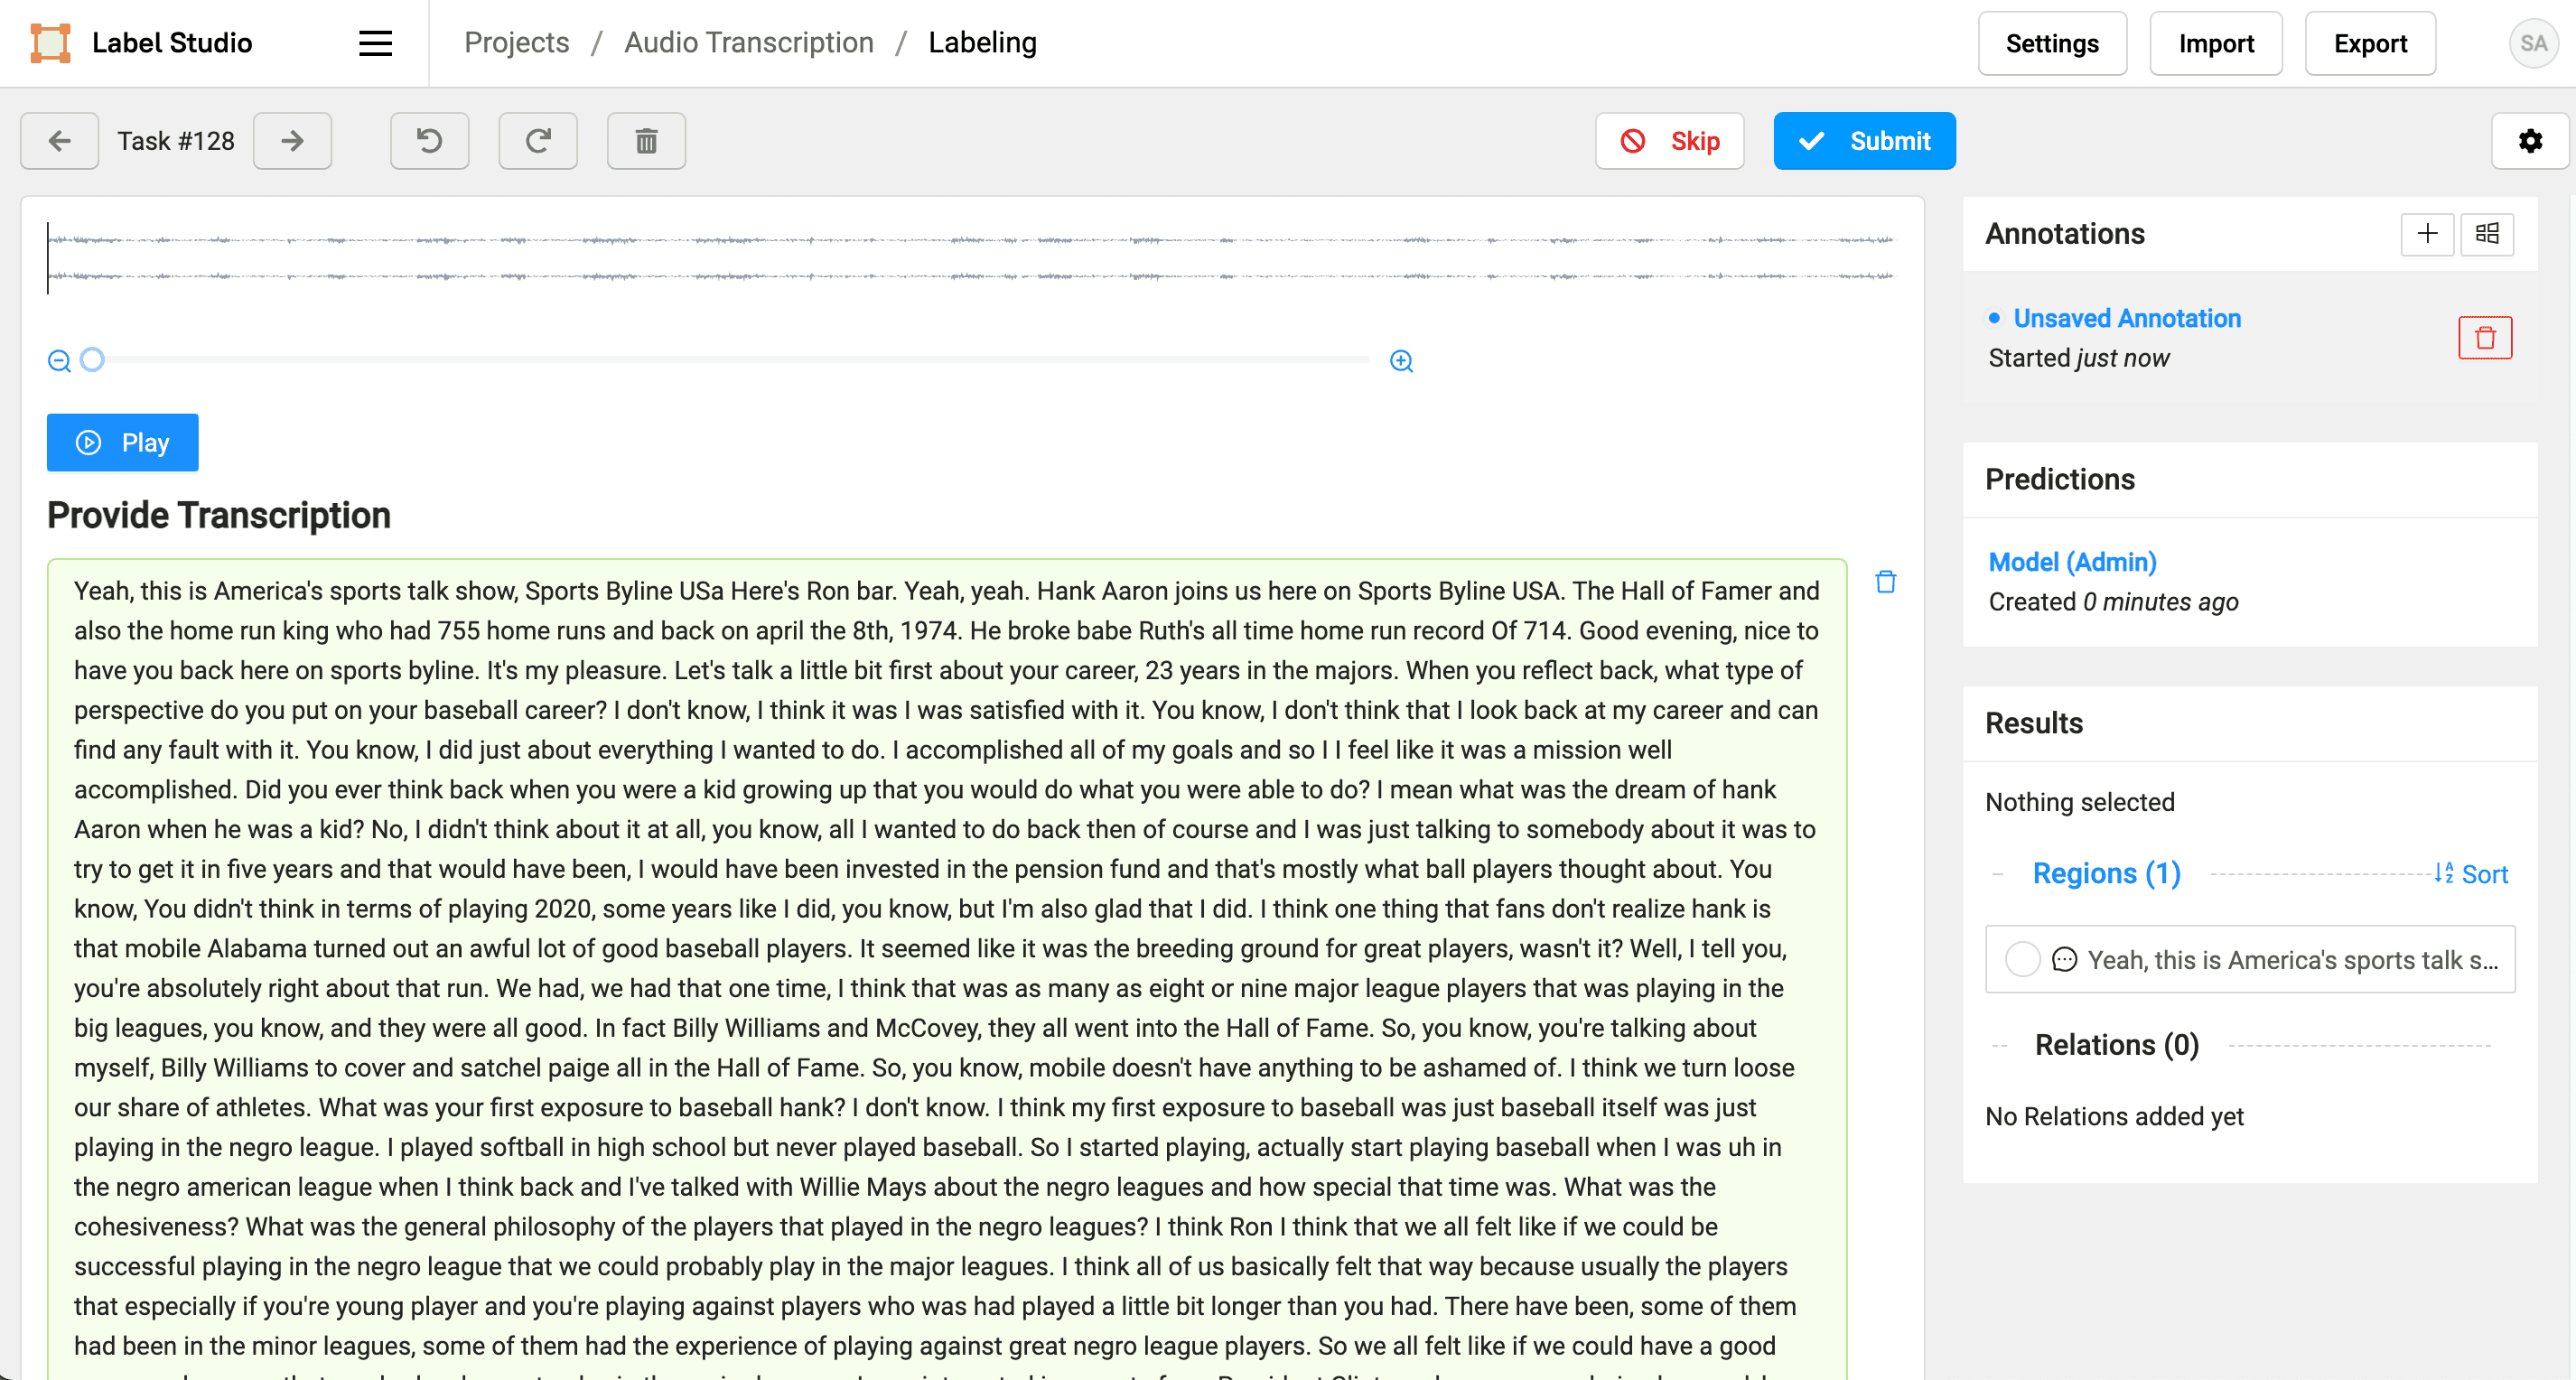
9. Click the pencil icon at the bottom of the automatically-generated transcript to make corrections. Click Submit when you're done to save your updated transcript as an annotation.
When you're finished reviewing and correcting transcripts, click Export to export the annotations in your desired format.
What's next
By automatically transcribing a radio interview and then manually correcting the transcript using Label Studio, you can perform reliable research and trustworthy analysis on audio recordings. By combining existing automated transcription services like Amazon Transcribe with subject matter experts using Label Studio, you can quickly discover patterns and search for important information in transcribed recordings.
Beyond this example, when you improve audio transcripts with Label Studio, you can more easily trust the results of your machine learning models. You can reduce error in any automated downstream analysis that you perform, such as sentiment analysis or another contextual analysis. AWS Machine Learning provides an example of analyzing contact center calls using Amazon Transcribe and Amazon Comprehend, and with Label Studio as part of that pipeline, you can get higher quality and robust call center analytics from the Amazon Comprehend service.
Related Content
-
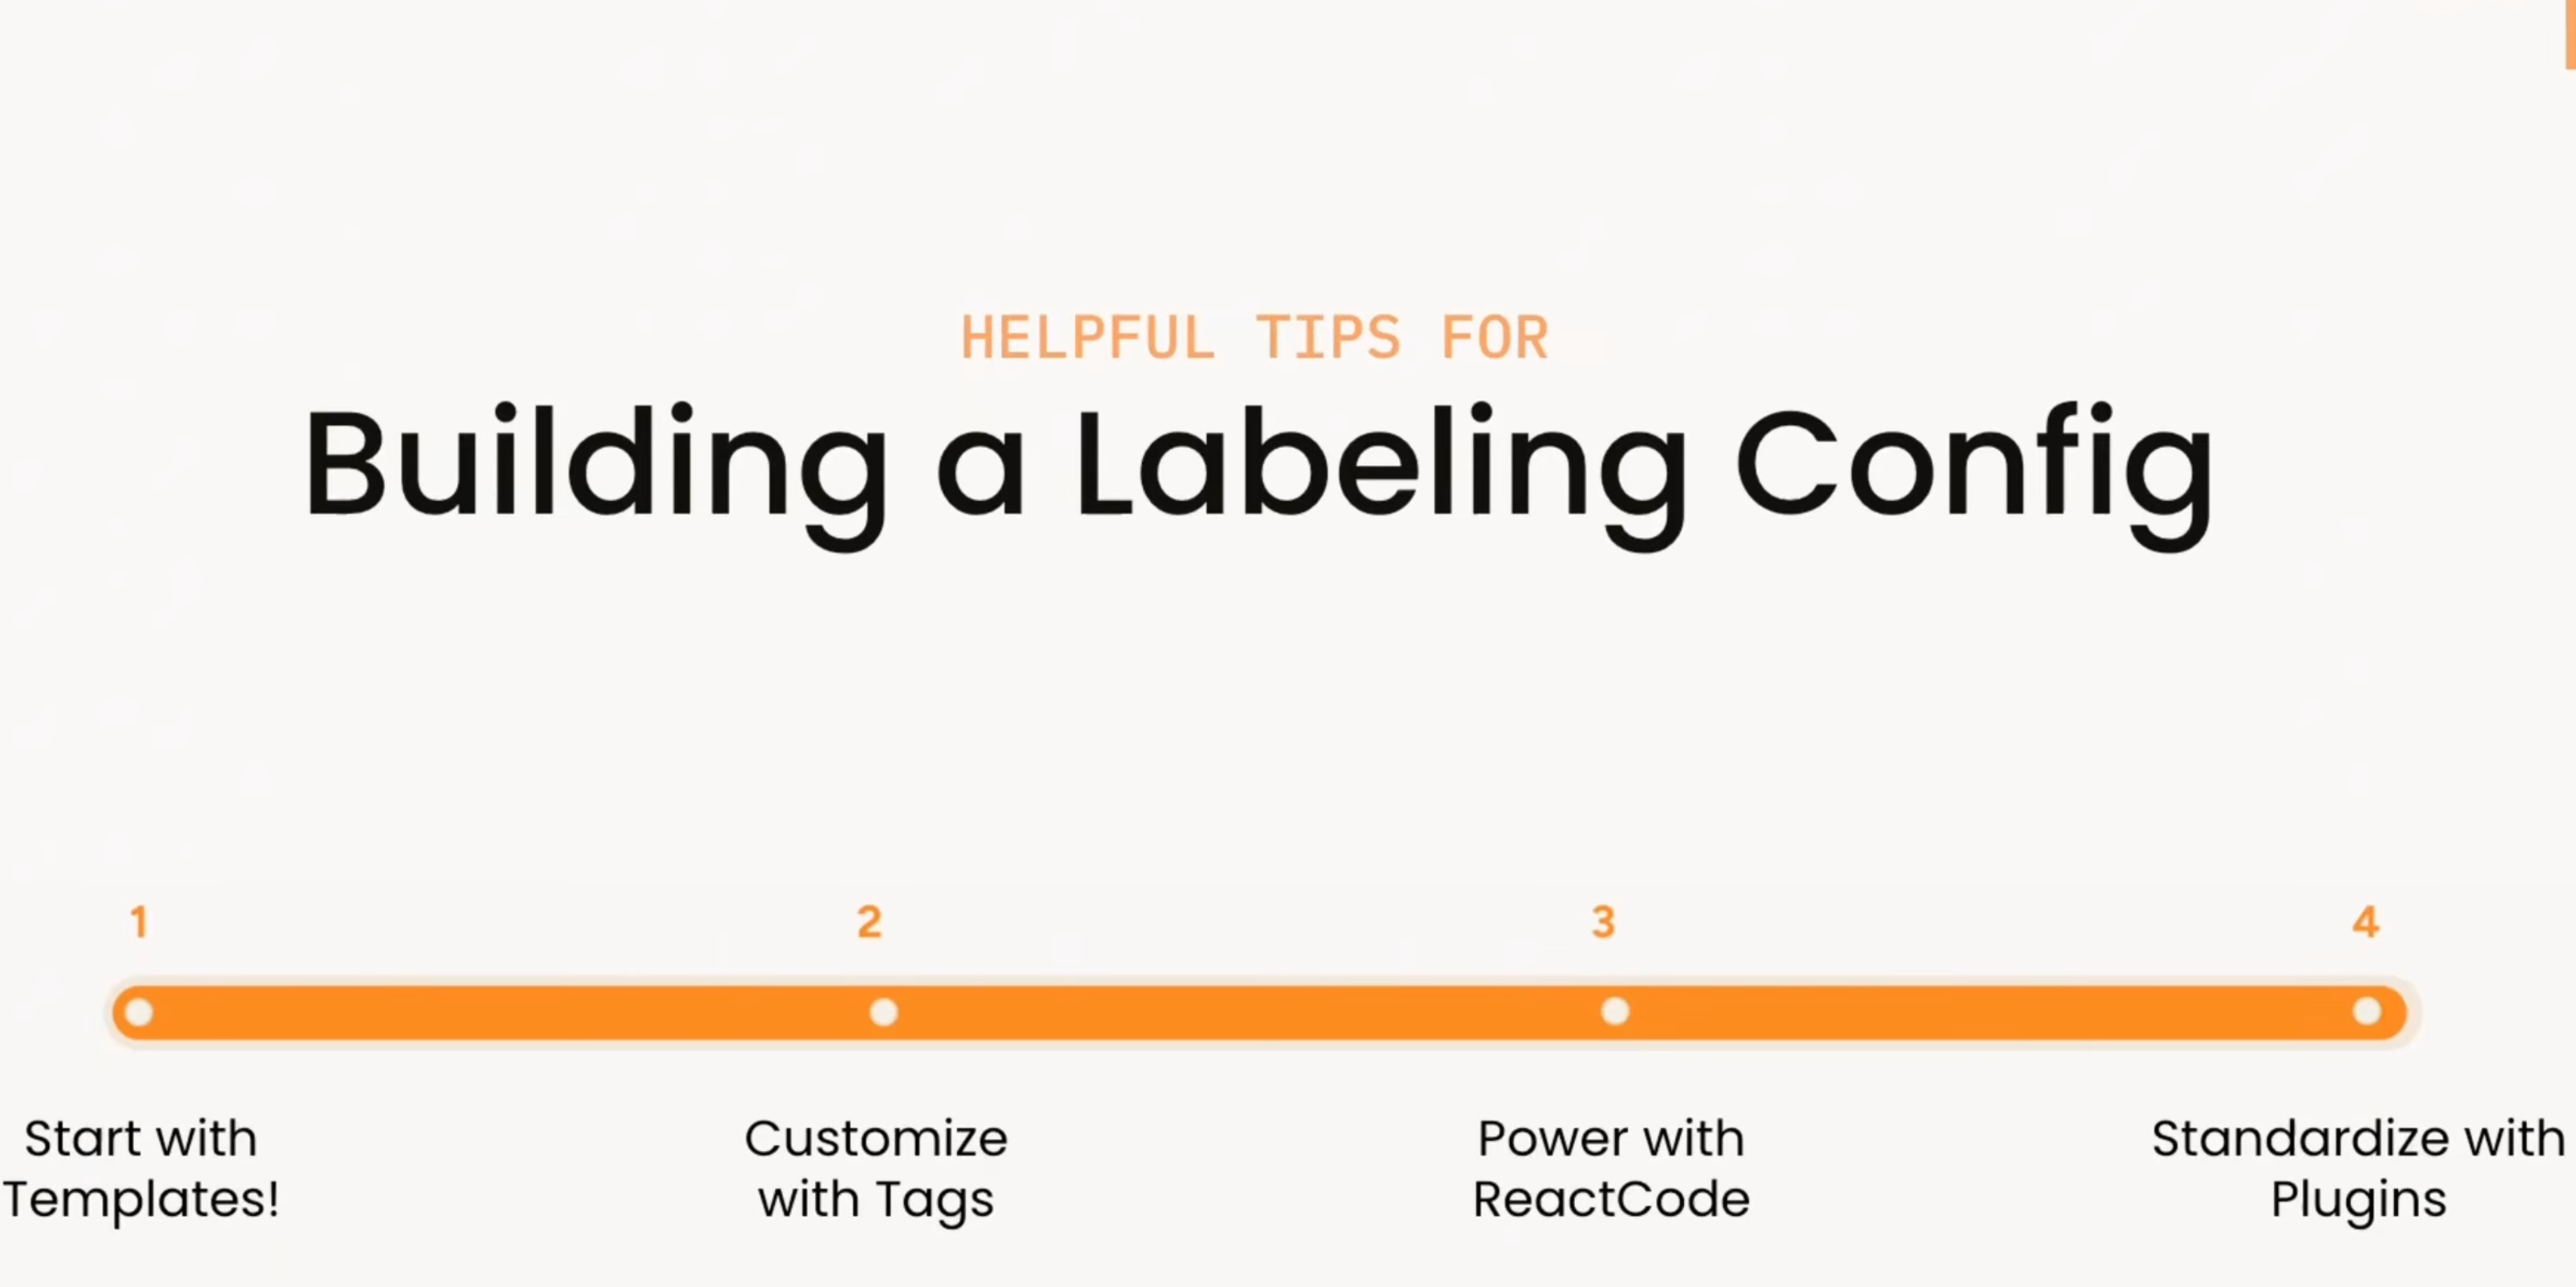
Building A Labeling Config in Label Studio Enterprise
How do you build the right labeling interface in Label Studio? This video walks through a practical progression: start with templates, customize with XML tags, extend with React Code, and standardize workflows with plugins.
-
Learn how to connect YOLO26 to a Label Studio project using the YOLO ML Backend so annotators can start from model predictions and focus on review and correction instead of drawing boxes from scratch.

Micaela Kaplan
February 12, 2026
-
Getting started with Label Studio
Everything you need to know about Label Studio to get started, from downloading and installing the tool to creating your first project, adding new members, and more!