Import pre-annotated data into Label Studio
If you have predictions generated for your dataset from a model, either as pre-annotated tasks or pre-labeled tasks, you can import the predictions with your dataset into Label Studio for review and correction. Label Studio automatically displays the pre-annotations that you import on the Labeling page for each task.
You can import pre-annotated tasks into Label Studio using the UI or using the API.
note
To generate interactive pre-annotations with a machine learning model while labeling, see Set up machine learning with Label Studio.
enterprise
Label Studio Enterprise customers have access to a powerful tool called Prompts. With Prompts, you can leverage LLMs to automatically generate predictions for your Label Studio tasks. For more information, see Prompts.
Prepare pre-annotations for Label Studio
To import predicted labels into Label Studio, you must use the Basic Label Studio JSON format and set up your tasks with the predictions JSON key. The Label Studio ML backend also outputs tasks in this format. Check this common video tutorial showing how to convert a submitted annotation to a prediction:
JSON format for pre-annotations
Label Studio JSON format for pre-annotations must contain two sections:
- A
dataobject which references the source of the data that the pre-annotations apply to. This can be a URL to an audio file, a pre-signed cloud storage link to an image, plain text, a reference to a CSV file stored in Label Studio, or something else. See how to specify the data object. - A
predictionsarray that contains the pre-annotation results for the different types of labeling. See how to add results to the predictions array.
The JSON format for pre-annotations must match the labeling configuration used for your data labeling project.
Specify the data object
Use the data object to reference the value of the data specified by the Object tag in your labeling configuration. For example, the following excerpt of a time series labeling configuration:
...
  <TimeSeries name="ts" value="$csv" valueType="url">
      <Channel column="first_column"/>
  </TimeSeries>
...
This excerpt specifies value="$csv" in the TimeSeries Object tag. As a result, the data object for the pre-annotations JSON file for this labeling configuration must use “csv” to specify the location of the CSV data for the time series pre-annotations, like in the following example:
[
  {
    "data": {
      "csv": "https://app.heartex.ai/samples/time-series.csv?time=None&values=first_column"
    },
    "predictions": [ ]
  }
]
Add results to the predictions array
The predictions array also depends on the labeling configuration. Some pre-annotation fields are only relevant for certain types of labeling. The following table describes the JSON objects and arrays that exist for all pre-annotations:
| JSON key | type | description |
|---|---|---|
predictions |
array | Contains all pre-annotations for a specific task. |
predictions.model_version |
string | Specifies the model version that produced the prediction. |
predictions.result |
array | Contains all pre-annotated results for a specific task in a JSON object. |
result.value |
object | Contains details for a specific labeled region. |
result.id |
string | Arbitrary string used to identify a labeled region. Must match related regions, such as in OCR pre-annotations. |
result.from_name |
string | String used to reference the labeling configuration from_name for the type of labeling being performed. Must match the labeling configuration. |
result.to_name |
string | String used to reference the labeling configuration to_name for the type of labeling being performed. Must match the labeling configuration. |
result.type |
string | Specify the labeling tag for the type of labeling being performed. For example, a named entity recognition task has a type of labels. |
result.readonly |
bool | readonly mode for a specific region |
result.hidden |
bool | default visibility (eye icon) for a specific region |
Other types of annotation contain specific fields. You can review the examples on this page, or review the tag documentation for the Object and Control tags in your labeling configuration labeling-specific result objects. For example, the Audio tag, HyperText tag, Paragraphs tag, KeyPointLabels and more all contain sample result JSON examples.
info
If you're generating pre-annotations for a custom ML backend, you can use the self.parsed_label_config variable to retrieve the labeling configuration for a project and generate pre-annotations. See the custom ML backend documentation for more details.
Predictions are read-only
Predictions cannot be modified and are always read-only.
If the “Show predictions to annotators in the Label Stream and Quick View” toggle in the project settings (Machine Learning section) is enabled, predictions will be automatically copied to newly created annotations. In Quick View mode, annotations can be created from predictions by using the special copy button on the editor tool panel:

Specific examples for pre-annotations
Refer to the following examples for sample pre-annotation formats:
- Import bbox and choice pre-annotations for images
- Import pre-annotated rectangle, polygon, ellipse & keypoint regions without labels for images
- Text pre-annotations with NER spans
- Brush pre-annotations for segmentation with masks
- OCR pre-annotations with bounding boxes, labels, and text transcriptions
To format pre-annotations for Label Studio not represented in these examples, refer to the sample results JSON for the relevant object and control tags for your labeling configuration, such as the Audio tag for audio classification tasks. Each tag must be represented in the JSON pre-annotations format to render predictions in the Label Studio UI. Not all object and control tags list sample results JSON.
You can also use the Label Studio Playground to preview the output JSON for a specific labeling configuration.
Import bbox and choice pre-annotations for images
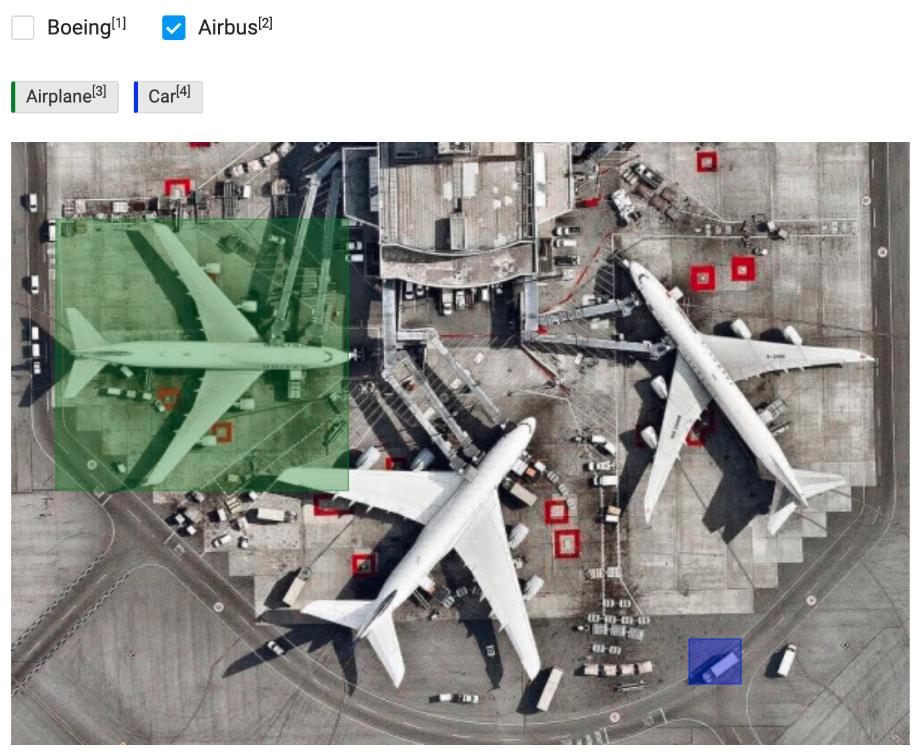
For example, import predicted bounding box regions (rectangles) and choices for tasks to determine whether an item in an image is an airplane or a car.
For image pre-annotations, Label Studio expects the x, y, width, and height of image annotations to be provided in percentages of overall image dimension. See Units for image annotations on this page for more about how to convert formats.
Use the following labeling configuration:
<View>
  <Choices name="choice" toName="image" showInLine="true">
    <Choice value="Boeing" background="blue"/>
    <Choice value="Airbus" background="green" />
  </Choices>

  <RectangleLabels name="label" toName="image">
    <Label value="Airplane" background="green"/>
    <Label value="Car" background="blue"/>
  </RectangleLabels>

  <Image name="image" value="$image"/>
</View>
After you set up an example project, create example tasks that match the following format:
Click to expand the JSON example with predictions
Save this example JSON as a file to import it into Label Studio, for example, example_prediction_task.json.
[{
  "data": {
    "image": "/static/samples/sample.jpg"
  },

  "predictions": [{
    "model_version": "one",
    "score": 0.5,
    "result": [
      {
        "id": "result1",
        "type": "rectanglelabels",
        "from_name": "label", "to_name": "image",
        "original_width": 600, "original_height": 403,
        "image_rotation": 0,
        "value": {
          "rotation": 0,
          "x": 4.98, "y": 12.82,
          "width": 32.52, "height": 44.91,
          "rectanglelabels": ["Airplane"]
        }
      },
      {
        "id": "result2",
        "type": "rectanglelabels",
        "from_name": "label", "to_name": "image",
        "original_width": 600, "original_height": 403,
        "image_rotation": 0,
        "value": {
          "rotation": 0,
          "x": 75.47, "y": 82.33,
          "width": 5.74, "height": 7.40,
          "rectanglelabels": ["Car"]
        }
      },
      {
        "id": "result3",
        "type": "choices",
        "from_name": "choice", "to_name": "image",
        "value": {
          "choices": ["Airbus"]
      }
    }]
  }]
}]
In this example there are 3 results inside 1 prediction, or pre-annotation:
result1- the first bounding boxresult2- the second bounding boxresult3- choice selection The prediction score applies to the entire prediction.
Import pre-annotated tasks into Label Studio using the UI or using the API.
In the Label Studio UI, the imported prediction for this task looks like the following:
Import pre-annotated rectangle, polygon, ellipse & keypoint regions without labels for images
If you want to import images with pre-annotated regions without labels assigned to them, follow this example.
Use the following labeling configuration:
<View>
  <Image name="image" value="$image" zoom="true" zoomControl="true" rotateControl="false"/>

  <Rectangle name="rect" toName="image" showInline="false"/>
  <Polygon name="polygon" toName="image"/>
  <Ellipse name="ellipse" toName="image"/>
  <KeyPoint name="kp" toName="image"/>

  <Labels name="labels" toName="image" fillOpacity="0.5" strokeWidth="5">
    <Label value="Vehicle" background="green"/>
    <Label value="Building" background="blue"/>
    <Label value="Pavement" background="red"/>
  </Labels>
</View>
After you set up an example project, create example tasks that match the following format:
Click to expand the JSON example
Save this example JSON as a file to import it into Label Studio, for example, example_prediction_task.json.
[{
  "data": {
    "image": "/static/samples/sample.jpg"
  },

  "predictions": [
    {
      "model_version": "one",
      "score": 0.5,
      "result": [
        {
          "original_width": 800,
          "original_height": 450,
          "image_rotation": 0,
          "value": {
            "x": 55.46,
            "y": 2.36,
            "width": 35.86,
            "height": 46.9,
            "rotation": 0
          },
          "id": "ABC",
          "from_name": "rect",
          "to_name": "image",
          "type": "rectangle"
        },
        {
          "original_width": 800,
          "original_height": 450,
          "image_rotation": 0,
          "value": {
            "points": [
              [
                20.93,
                28.90
              ],
              [
                25.86,
                64.69
              ],
              [
                38.40,
                62.79
              ],
              [
                34.13,
                27.48
              ]
            ]
          },
          "id": "GHI",
          "from_name": "polygon",
          "to_name": "image",
          "type": "polygon"
        },
        {
          "original_width": 800,
          "original_height": 450,
          "image_rotation": 0,
          "value": {
            "x": 8.4,
            "y": 20.14,
            "radiusX": 4,
            "radiusY": 7.10,
            "rotation": 0
          },
          "id": "JKL",
          "from_name": "ellipse",
          "to_name": "image",
          "type": "ellipse"
        },
        {
          "original_width": 800,
          "original_height": 450,
          "image_rotation": 0,
          "value": {
            "x": 38.40,
            "y": 34.21,
            "width": 1.0
          },
          "id": "DEF",
          "from_name": "rect",
          "to_name": "image",
          "type": "keypoint"
        }
      ]
    }
  ]
}]
In this example there are 3 regions inside 1 result field for a prediction, or pre-annotation:
- region
ABC- a rectangle bounding box - region
DEF- a second rectangle bounding box - region
GHI- a polygonal segmentation - region
JKL- an ellipse None of the regions have labels applied. The labeling configuration must use theRectangletag instead of theRectangleLabelstag to support this type of prediction. Even though the labeling configuration for this example has aLabelstag, the predictions do not need to specify labels for the regions.
Import span pre-annotations for text
In this example, import pre-annotations for text using the named entity recognition template (NER):
<View>
  <Labels name="label" toName="text">
    <Label value="Person"></Label>
    <Label value="Organization"></Label>
    <Label value="Fact"></Label>
    <Label value="Money"></Label>
    <Label value="Date"></Label>
    <Label value="Time"></Label>
    <Label value="Ordinal"></Label>
    <Label value="Percent"></Label>
    <Label value="Product"></Label>
    <Label value="Language"></Label>
    <Label value="Location"></Label>
  </Labels>
  <Text name="text" value="$text"></Text>
</View>
This example JSON file contains two tasks, each with two sets of pre-annotations from different models. The first task also contains prediction scores for each NER span:
Click to expand the NER JSON example
Save this example JSON as a file, for example: example_preannotated_ner_tasks.json.
[
  {
    "data": {
      "text": "All that changed when he was 27 and he came to Jerusalem. It was the weekend of both Easter and Passover, and the city was flooded with tourists."
    },
    "predictions": [
      {
        "model_version": "one",
        "score": 0.5,
        "result": [
          {
            "id": "abc",
            "from_name": "label",
            "to_name": "text",
            "type": "labels",
            "value": {
              "start": 29,
              "end": 31,
              "score": 0.70,
              "text": "27",
              "labels": [
                "Date"
              ]
            }
          },
          {
            "id": "def",
            "from_name": "label",
            "to_name": "text",
            "type": "labels",
            "value": {
              "start": 47,
              "end": 56,
              "score": 0.65,
              "text": "Jerusalem",
              "labels": [
                "Location"
              ]
            }
          },
          {
            "id": "ghi",
            "from_name": "label",
            "to_name": "text",
            "type": "labels",
            "value": {
              "start": 65,
              "end": 76,
              "score": 0.95,
              "text": "the weekend",
              "labels": [
                "Date"
              ]
            }
          },
          {
            "id": "jkl",
            "from_name": "label",
            "to_name": "text",
            "type": "labels",
            "value": {
              "start": 85,
              "end": 91,
              "score": 0.50,
              "text": "Easter",
              "labels": [
                "Date"
              ]
            }
          }
        ]
      },
      {
        "model_version": "two",
        "score": 0.42,
        "result": [
          {
            "id": "mno",
            "from_name": "label",
            "to_name": "text",
            "type": "labels",
            "value": {
              "start": 29,
              "end": 31,
              "score": 0.55,
              "text": "27",
              "labels": [
                "Date"
              ]
            }
          },
          {
            "id": "pqr",
            "from_name": "label",
            "to_name": "text",
            "type": "labels",
            "value": {
              "start": 47,
              "end": 56,
              "score": 0.40,
              "text": "Jerusalem",
              "labels": [
                "Location"
              ]
            }
          },
          {
            "id": "stu",
            "from_name": "label",
            "to_name": "text",
            "type": "labels",
            "value": {
              "start": 65,
              "end": 76,
              "score": 0.32,
              "text": "the weekend",
              "labels": [
                "Time"
              ]
            }
          },
          {
            "id": "vwx",
            "from_name": "label",
            "to_name": "text",
            "type": "labels",
            "value": {
              "start": 85,
              "end": 91,
              "score": 0.22,
              "text": "Easter",
              "labels": [
                "Location"
              ]
            }
          },
          {
            "id": "yz1",
            "from_name": "label",
            "to_name": "text",
            "type": "labels",
            "value": {
              "start": 96,
              "end": 104,
              "score": 0.96,
              "text": "Passover",
              "labels": [
                "Date"
              ]
            }
          }
        ]
      }
    ]
  },
  {
    "data": {
      "text": " Each journal was several inches thick and bound in leather. On one page are drawn portraits of Sunny in a flowery, Easter dress and sun hat. On another page are hundreds of sketches of leaves that Niyati saw in her yard."
    },
    "predictions": [
      {
        "model_version": "one",
        "result": [
          {
            "id": "ab2",
            "from_name": "label",
            "to_name": "text",
            "type": "labels",
            "value": {
              "start": 18,
              "end": 32,
              "text": "several inches",
              "labels": [
                "Product"
              ]
            }
          },
          {
            "id": "cd3",
            "from_name": "label",
            "to_name": "text",
            "type": "labels",
            "value": {
              "start": 64,
              "end": 67,
              "text": "one",
              "labels": [
                "Percent"
              ]
            }
          },
          {
            "id": "ef4",
            "from_name": "label",
            "to_name": "text",
            "type": "labels",
            "value": {
              "start": 96,
              "end": 101,
              "text": "Sunny",
              "labels": [
                "Person"
              ]
            }
          },
          {
            "id": "gh5",
            "from_name": "label",
            "to_name": "text",
            "type": "labels",
            "value": {
              "start": 162,
              "end": 170,
              "text": "hundreds",
              "labels": [
                "Percent"
              ]
            }
          },
          {
            "id": "ij6",
            "from_name": "label",
            "to_name": "text",
            "type": "labels",
            "value": {
              "start": 198,
              "end": 204,
              "text": "Niyati",
              "labels": [
                "Person"
              ]
            }
          }
        ]
      },
      {
        "model_version": "two",
        "result": [
          {
            "id": "kl7",
            "from_name": "label",
            "to_name": "text",
            "type": "labels",
            "value": {
              "start": 18,
              "end": 32,
              "text": "several inches",
              "labels": [
                "Fact"
              ]
            }
          },
          {
            "id": "mn8",
            "from_name": "label",
            "to_name": "text",
            "type": "labels",
            "value": {
              "start": 64,
              "end": 67,
              "text": "one",
              "labels": [
                "Percent"
              ]
            }
          },
          {
            "id": "op9",
            "from_name": "label",
            "to_name": "text",
            "type": "labels",
            "value": {
              "start": 96,
              "end": 101,
              "text": "Sunny",
              "labels": [
                "Time"
              ]
            }
          },
          {
            "id": "qr10",
            "from_name": "label",
            "to_name": "text",
            "type": "labels",
            "value": {
              "start": 116,
              "end": 122,
              "text": "Easter",
              "labels": [
                "Location"
              ]
            }
          },
          {
            "id": "st11",
            "from_name": "label",
            "to_name": "text",
            "type": "labels",
            "value": {
              "start": 162,
              "end": 170,
              "text": "hundreds",
              "labels": [
                "Money"
              ]
            }
          },
          {
            "id": "uv12",
            "from_name": "label",
            "to_name": "text",
            "type": "labels",
            "value": {
              "start": 198,
              "end": 204,
              "text": "Niyati",
              "labels": [
                "Person"
              ]
            }
          }
        ]
      }
    ]
  }
]
Import pre-annotated tasks into Label Studio using the UI or using the API. In the Label Studio UI, the imported prediction for the first task looks like the following:

You can sort the prediction scores for each labeled region using the Regions pane options.
Import brush segmentation pre-annotations in RLE format
If you want to import pre-annotations for brush mask image segmentation using the BrushLabels tag, you must convert the masks to RLE format first. The Label Studio Converter package has some helper functions for this. See the following for common conversion cases and guidance.
Install Label Studio Converter:
pip install -U label-studio-converterImport brush tools:
from label_studio_converter import brushConvert masks to RLE. This expects an
np.arraywithshape=[image_width, image_height]anddtype=np.uint8. Add the following to your python code to perform the conversion:mask = (np.random.random([10, 20]) * 255).astype(np.uint8) # just a random 2D mask mask = (mask > 128).astype(np.uint8) * 255 # better to threshold, it reduces output annotation size rle = brush.mask2rle(mask) # mask image in RLE formatTo convert OpenCV contours, use
brush.contour2rle(contours, contour_id, img_width, img_height).To convert an image from path (jpg, png. bmp), use
brush.image2rle(path).To prepare the pre-annotation, use
brush.image2annotation(path, label_name, from_name, to_name, ground_truth=False, model_version=None, score=None)
For more assistance, review this example code creating a Label Studio task with pre-annotations for brush labels.
Import OCR pre-annotations
Import pre-annotations for optical character recognition (OCR), such as output from tesseract like in this example blog post.
In this example, import pre-annotations for OCR tasks using the OCR template:
<View>
  <Image name="image" value="$ocr"/>
  <Labels name="label" toName="image">
    <Label value="Text" background="green"/>
    <Label value="Handwriting" background="blue"/>
  </Labels>
  <Rectangle name="bbox" toName="image" strokeWidth="3"/>
  <Polygon name="poly" toName="image" strokeWidth="3"/>
  <TextArea name="transcription" toName="image" editable="true" perRegion="true" required="true" maxSubmissions="1" rows="5" placeholder="Recognized Text" displayMode="region-list"/>
</View>
This example JSON contains one task with three results dictionaries, one for each type of tag in the labeling configuration: Rectangle, Labels, and TextArea:
Click to expand the JSON example
Save this example JSON as a file to import it into Label Studio, for example, example_prediction_task.json.
{
   "data": {
      "ocr": "/data/upload/receipt_00523.png"
   },
   "predictions": [
      {
         "model_version": "best_ocr_model_1_final",
         "result": [
            {
               "original_width": 864,
               "original_height": 1296,
               "image_rotation": 0,
               "value": {
                  "x": 48.9333,
                  "y": 61.3336,
                  "width": 9.73333,
                  "height": 2.8446,
                  "rotation": 0
               },
               "id": "bb1",
               "from_name": "bbox",
               "to_name": "image",
               "type": "rectangle"
            },
            {
               "original_width": 864,
               "original_height": 1296,
               "image_rotation": 0,
               "value": {
                  "x": 48.9333,
                  "y": 61.3336,
                  "width": 9.7333,
                  "height": 2.8446,
                  "rotation": 0,
                  "labels": [
                     "Text"
                  ]
               },
               "id": "bb1",
               "from_name": "label",
               "to_name": "image",
               "type": "labels"
            },
            {
               "original_width": 864,
               "original_height": 1296,
               "image_rotation": 0,
               "value": {
                  "x": 48.9333,
                  "y": 61.3336,
                  "width": 9.7333,
                  "height": 2.8446,
                  "rotation": 0,
                  "text": [
                     "TOTAL"
                  ]
               },
               "id": "bb1",
               "from_name": "transcription",
               "to_name": "image",
               "type": "textarea"
            }
         ],
         "score": 0.89
      }
   ]
}
This example JSON also includes a prediction score for the task. The IDs for each rectangle result match the label assigned to the region and the text area transcription for the region.
Import pre-annotated tasks into Label Studio using the UI or using the API.
note
The image data in this example task references an uploaded file, identified by the source_filename assigned by Label Studio after uploading the image. The best way to reference image data is using presigned URLs for images stored in cloud storage, or absolute paths to image data stored in local storage and added to Label Studio by syncing storage.