Interactive Data Labeling with LLMs and Label Studio’s Prompt Interface
Integrating Large Language Models (LLMs) into data labeling tackles one of the most challenging issues in machine learning - enhancing efficiency in dataset curation. We’ve previously discussed how to use LLMs to kick-start a project with context-aware predictions (highlighted in our articles From Foundation Models to Fine-Tuned Applications Using Label Studio and Adala - The First Open Source Data-Labeling Agent). These efforts, however, have largely centered on the initial stages of data labeling. However, refining prompts for LLMs is a dynamic process in itself. By combining prompt refinement with data labeling, we can significantly enhance efficiency. Our aim is to transition from the conventional, static methods of dataset annotation to a dynamic, interactive model that leverages LLMs not just as tools but as partners that augment human insight.
In this blog, we want to introduce a prompt-centric workflow, which combines real-time prompt engineering with data labeling. The value in combining prompt engineering into Label Studio is that it significantly reduces the manual overhead involved in using something like ChatGPT directly. Instead of copying and pasting each example and response back and forth between applications, you can perform all the operations you need in your labeling environment. The goal of this prompter is to make working with data and LLMs seamless and dynamic. Let’s jump in and see how it works!
Classifying Chatbot Intent
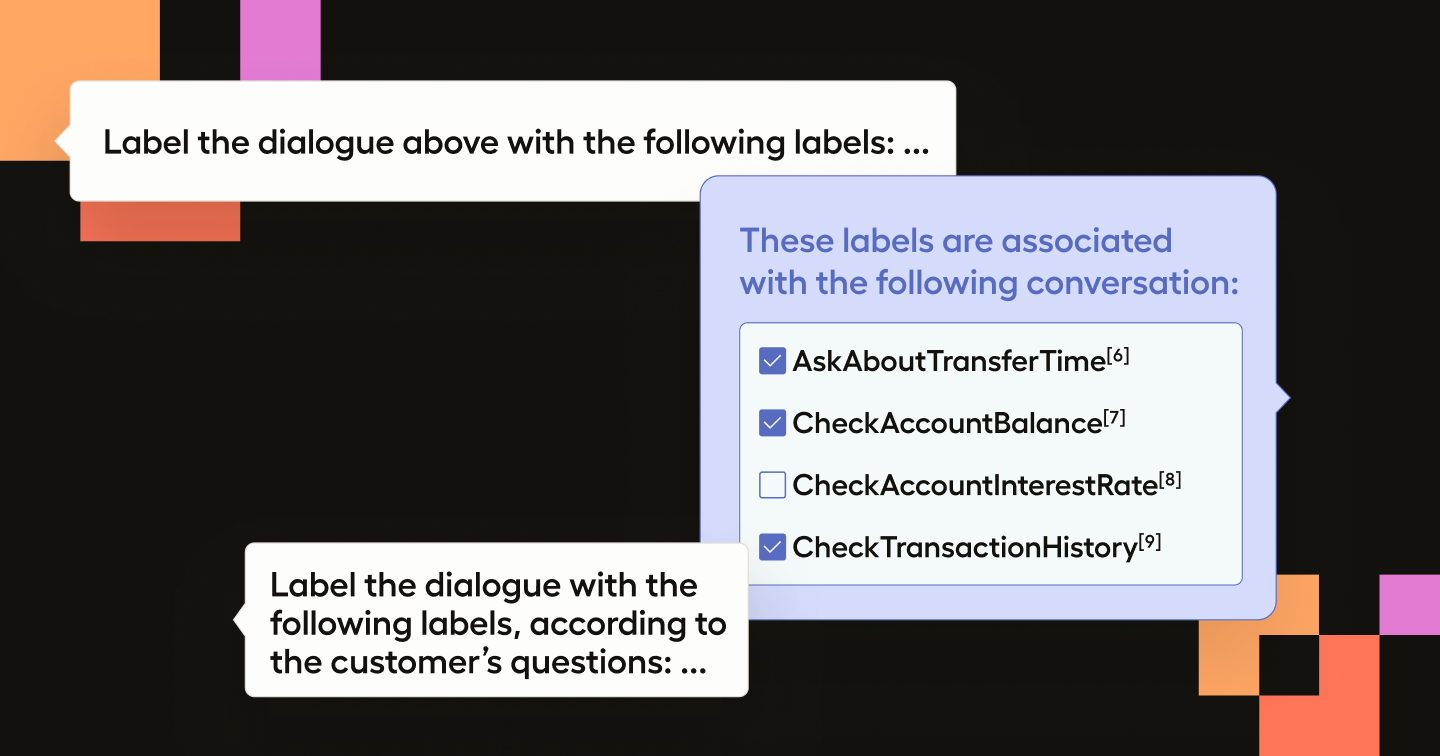
Let’s first take a look at the prompt-centric workflow with a practical example: analyzing customer chat dialogues to determine their intentions. This task is a foundational step in developing advanced chatbot systems. We will utilize a dataset of customer support conversations to identify the intentions behind customer inquiries. Let’s see what this looks like in action.
From the recording, we can get an idea of the prompt-centric workflow. We see how when we enter a prompt and run it (shift+enter), a response is given. The response is then parsed and applied to our labels. We can then go through the dialogue to ensure that the Bot answer is correct and modify the annotation if it isn’t. But with the prompter integrated into the labeling workflow, we have an additional option to refine the prompt.
In this case, our initial prompt produced the correct output, but it also contained duplicate instances of the labels. Instead of manually correcting the predictions, we can merely change the prompt and have it try again. After the modification, we can see that the Bot answer looks correct, and we can accept the annotation or modify it as needed.
This simple but effective workflow creates an iterative loop of applying AI predictions, refining the prompt, and reviewing labels. Such a methodology not only streamlines the annotation workflow but also continually enhances the quality of the dataset and prompt. On top of that, once we have a strong prompt it can be applied to other examples.
As we iterate through our dataset, our prompt and prompter (human) interactions become stronger and stronger. This setup allows for real-time prompt engineering, where annotators can refine prompts based on the evolving requirements of the dataset, thus enhancing the LLM's prediction capabilities for subsequent tasks and improving the human understanding of the dataset being labeled.
Run It Yourself
We’ve created a notebook for you to run this example yourself, but we’ll walk through the main steps here.
Preliminary Setup
First, we’ll need to initialize a Label Studio project. We’ll use the Label Studio API to simplify the process. Here, we already have Label Studio running locally on `localhost:8080`. To get an API key for your Label Studio instance, see the documentation here.
from label_studio_sdk import Client
LABEL_STUDIO_URL = 'http://localhost:8080'
API_KEY = 'your_api_key_here'
ls = Client(url=LABEL_STUDIO_URL, api_key=API_KEY)
ls.check_connection()Dataset Creation
Following this, the dataset is downloaded and processed into a structured format suitable for annotation. We will transform the dialogues into a format that includes speaker roles and utterances for our project.
import requests, json

# Download JSONL file from URL and save locally
file_url = "https://raw.githubusercontent.com/.../dialogues.jsonl"
response = requests.get(file_url)
if response.ok:
    with open("dialogues.jsonl", 'wb') as file:
        file.write(response.content)

# Transform dialogues from JSONL format
transformed_dialogues = []
with open("dialogues.jsonl", 'r') as infile:
    for line in infile:
        dialogue = json.loads(line)
        transformed = {'dialogue': [{'author': turn['speaker_role'], 'text': turn['utterance']} for turn in dialogue['turns']]}
        transformed_dialogues.append(transformed)

print(f"Transformed {len(transformed_dialogues)} dialogues.")Project configuration
Now let’s set up the Label Studio project configuration to leverage the prompt-centric workflow to suggest annotations. Notice here we are also using the provided classes in the dataset to allow for classification choices in the UI.
# Generate choice XML elements dynamically from intents
choices_xml = '\n'.join([f'      <Choice value="{intent}" />' for intent in sorted_unique_intents])

project = ls.start_project(
    title='Finance Support Chats',
    label_config=f'''
<View>
  ...
  <Choices name="response" toName="chat" editable="true" maxSubmissions="1" choice="multiple">
{choices_xml}
  </Choices>
</View>
    '''
)Now we have a user-friendly interface that will allow annotators to interact with the LLM.
Import Data
Finally, we can import the transformed dialogues into the Label Studio project.
project.import_tasks(transformed_dialogues)Configure the ML Backend
We have set up all of the backend and data components for this project. Now we just need to connect the ML Backend to our project in Label Studio. In this example, we will run the backend separately through docker-compose.
# Clone the repo
git clone https://github.com/HumanSignal/label-studio-ml-backend.git
cd label-studio-ml-backend/tree/master/label_studio_ml/examples/llm_interactive

# Configure the ML Backend with your OpenAI API Key in docker-compose.yaml

# Start the ML Backend
docker-compose upOnce the backend is up, it should be serving the on localhost:9090. Note, if you are using GPT-4 like we are in this example, you will need to configure the docker-compose.yaml file with your OpenAI API key.
Connect to the ML Backend
We now need to enable the project to use the ML Backend by configuring it in the Machine Learning section of our project settings. To do this, we pass the URL of our ML Backend and enable interactive predictions.
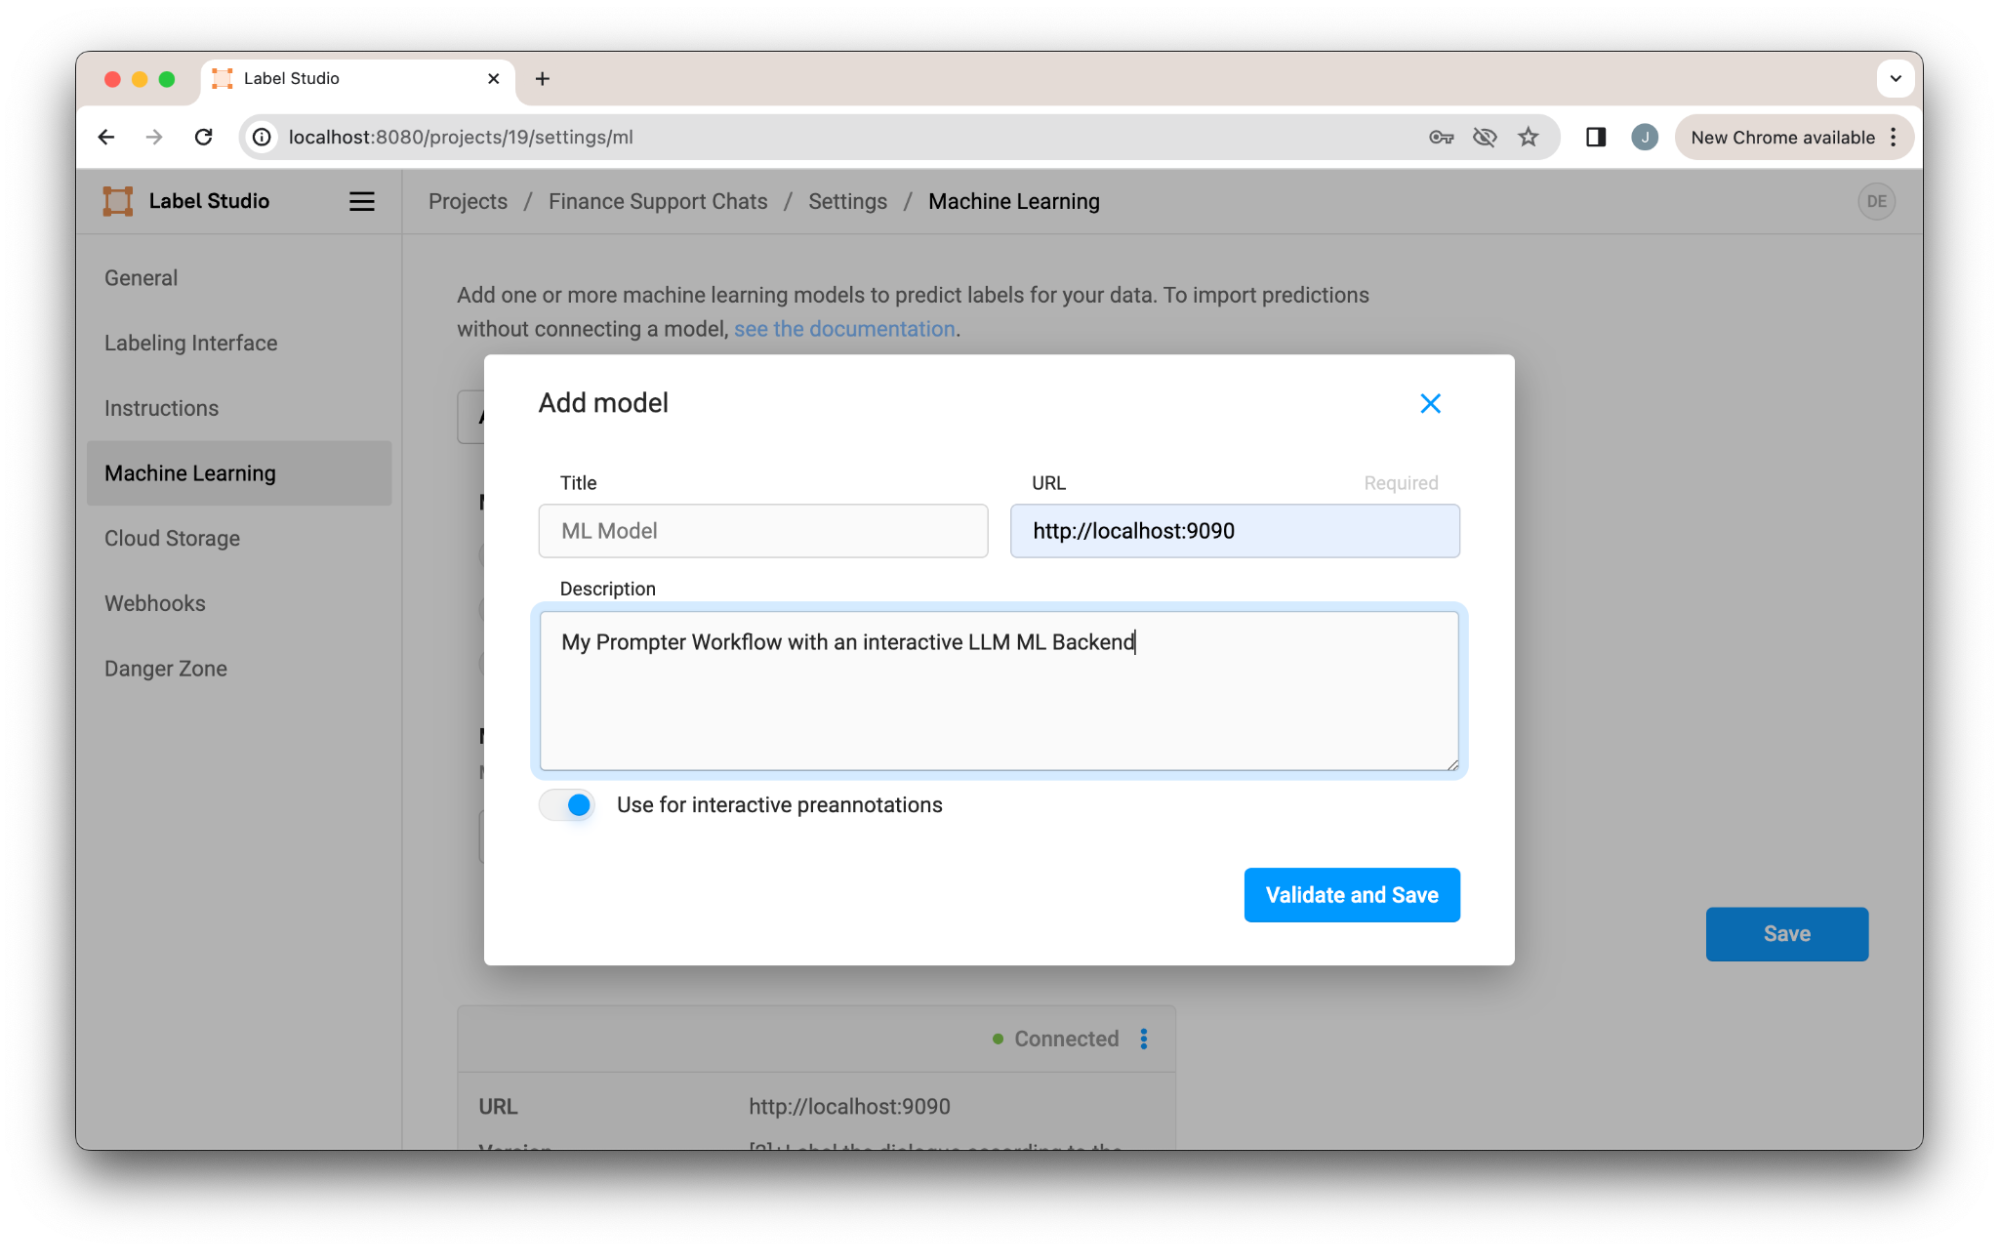
Once we save, we’re ready to use the prompt-centric workflow!
How the Prompter Works
Under the hood, the prompter works by combining a special labeling configuration with the ML Backend. You can see the full implementation in the ML Backend LLM Interactive Example.
The labeling configuration defines labeling interface labeling for our data. In our case here, a tag in the labeling config defines what data should be sent to the ML Backend. Let’s take a look at a sample of the labeling configuration to understand how it works.
<Paragraphs name="chat" value="$dialogue" layout="dialogue" />
<TextArea name="prompt" toName="chat" rows="4" editable="true" maxSubmissions="1" showSubmitButton="false" />First, we see the paragraphs section that holds the chat dialogue. Next we have a TextArea, “prompt,” where our prompt can be typed in. The key here is “toName.” This tag tells us what data the prompt should apply to. In our case, this will be the entire support chat. We also have “showSubmitButton” set to false to simplify the interface.
In order to send the correct data to the ML Backend, we must tell it what component in the labeling configuration to pass to the LLM. In our case, we want to pass the `prompt` TextArea. To do this, we can set the name as an environment variable in the ML Backend or use the default name which is conveniently, `prompt`. When retrieving predictions, the ML Backend will pull the content from the text area (our prompt) and the data that it references, in our case the chat dialogue. The ML Backend forwards tasks to an GPT-4 (any LLM could be used), processes the response, and supplies the classifications as shown in the diagram below.
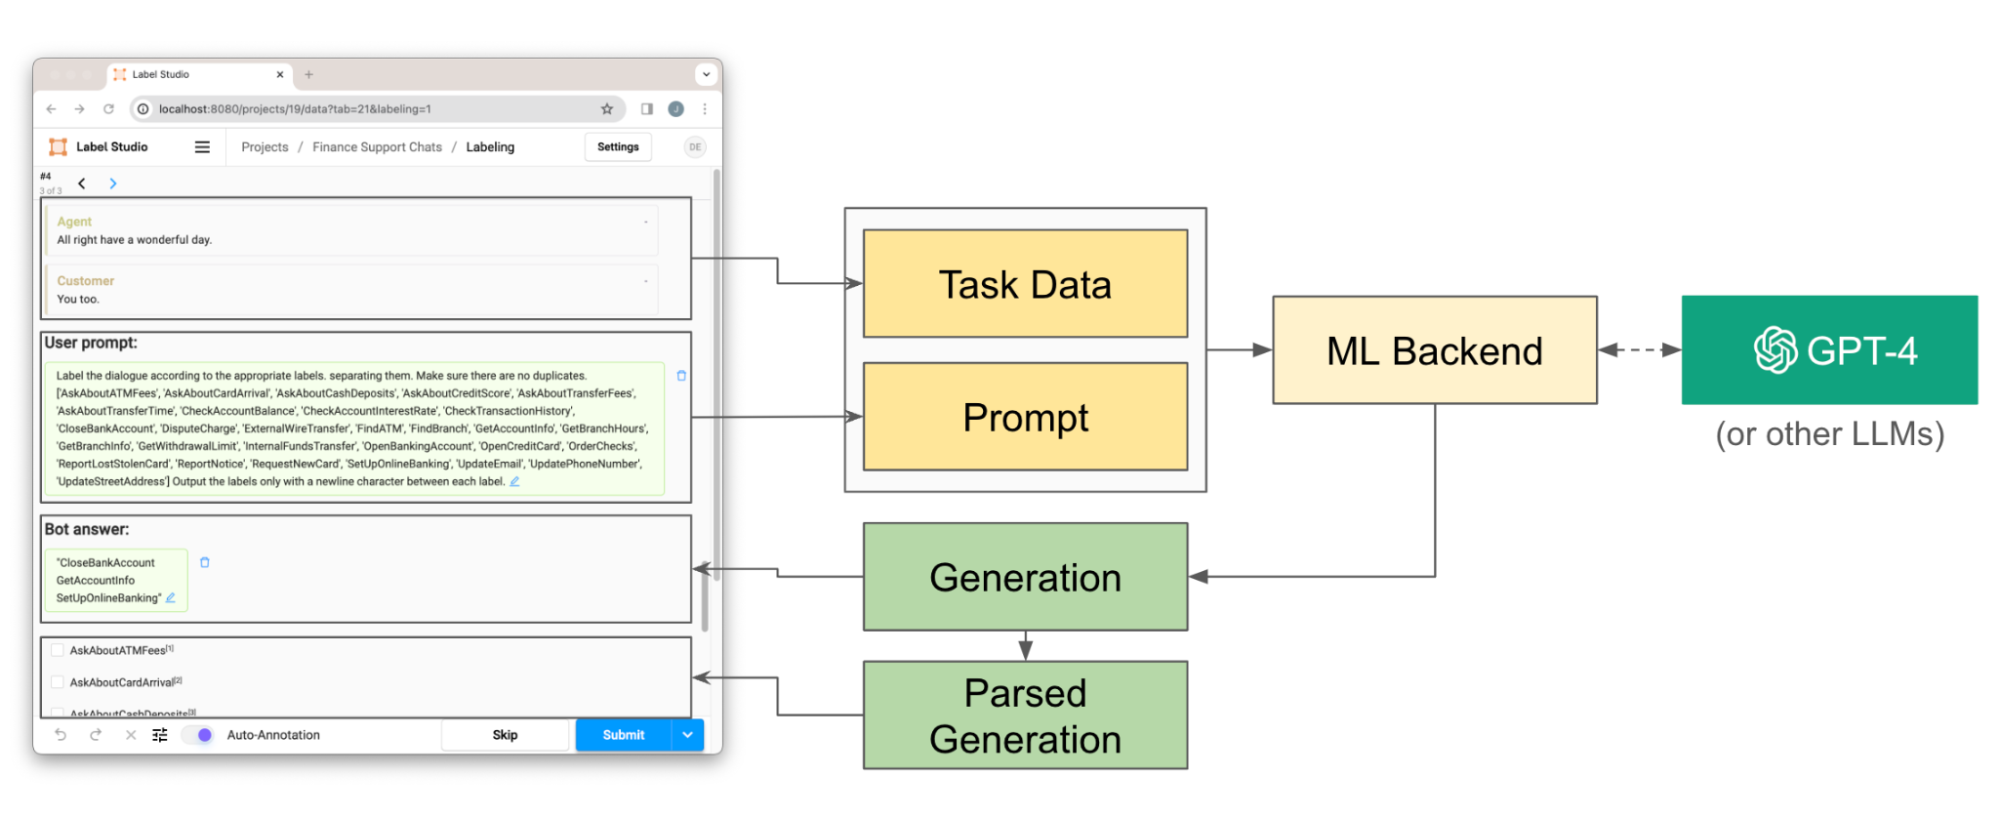
Overview of the prompt-centric workflow with the backend. When a prompt is entered, the task data and prompt are pulled from the frontend and passed to the ML Backend. The ML Backend retrieves a response from our LLM (in this case GPT-4) and then passes the Generation back to the front end. The generation is also parsed to populate the classes in the labeling interface.
The ML Backend serves as the intermediary that forwards task data to the LLM, processes the response, and applies it to the labels, enriching the dataset with accurate classifications based on the dialogue content.
Conclusion
The integration of Large Language Models (LLMs) into the data labeling process marks a significant shift towards more dynamic and efficient dataset creation. Through the introduction of the prompt-centric workflow, we've highlighted how LLMs can serve not just as tools but as collaborative partners in the annotation process, facilitating context-aware predictions and enabling real-time prompt engineering. This approach can not only streamline the task of dataset annotation, but also significantly improve the quality of the data.
The journey from manual annotation to a nuanced, LLM-assisted labeling environment underscores the power of modern AI to accelerate and scale traditional processes.This example has shown what’s possible using open source tools and integrations, but but a fully featured prompter can still be difficult to reason about when it comes to quality at scale. For those serious about using LLMs to automate your labeling workflow, request early access to the new LLM automation feature in Label Studio Enterprise. The Enterprise version of the prompt workflow includes a reliability layer to optimize your prompt for accurate labeling at scale, including constrained generation and real-time prompt evaluation metrics against your ground truth dataset.
Related Content
-
From Foundation Models to Fine-Tuned Applications Using Label Studio
We explore how Label Studio can be employed to build a Question-Answering bot trained on domain-specific knowledge.

Jimmy Whitaker
August 14, 2023

Nikolai Liubimov
August 14, 2023
-

How to use our Generative AI Templates
With the latest 1.8 release — we launched the all-new Generative AI template library — a set of templates designed for you to work with foundation models and adapt them to your needs, right within Label Studio. Get started with fine-tuning models such as Llama 2, GPT-4, Whisper, Alpaca, and PaLM 2 among others.

Erin Mikail Staples
July 31, 2023
-
Make Your Labeling Team More Efficient With Label Studio
Learn some advanced techniques to get the most out of Label Studio and drive more efficiencies into your labeling process.

Nate Kartchner
July 11, 2023