Create a High-Quality Dataset for Reinforcement Learning from Human Feedback
AI has quickly become an integral part of modern technology, powering everything from voice assistants to self-driving cars. However, these models are only as good as the data they are trained on. In order to create accurate and effective models, we need to ensure that the training data is diverse and free from bias. This is where human feedback comes in. By actively seeking input from a variety of sources, we can improve the quality of our data and create more accurate models.
But how do we go about incorporating this feedback without overburdening humans with the task of labeling massive amounts of data? Well, that’s where RLHF and Label Studio come in. RLHF is a technique to simulate human feedback from a moderately-sized labeled dataset. Label Studio is an open-source tool that allows you to create your own dataset for almost any task. In this blog, we will show you how to use Label Studio to create your own dataset and train an RLHF reward model to integrate human feedback into your machine learning models without sacrificing the time and effort of your team.
A full notebook for the concepts described can be found in our GitHub repo.
Introduction to RLHF
Reinforcement Learning from Human Feedback (RLHF) is a promising new approach to training language models that integrates human preferences directly into the training process. Traditional language models (LM) are trained to predict the next-token, and tuning them typically means giving the LM an input and a human curated, desired output. But these methods can be limited in their ability to capture complex human values like creativity, accuracy, and understandability. RLHF seeks to address these limitations by training language models to optimize human feedback in the form of rewards.
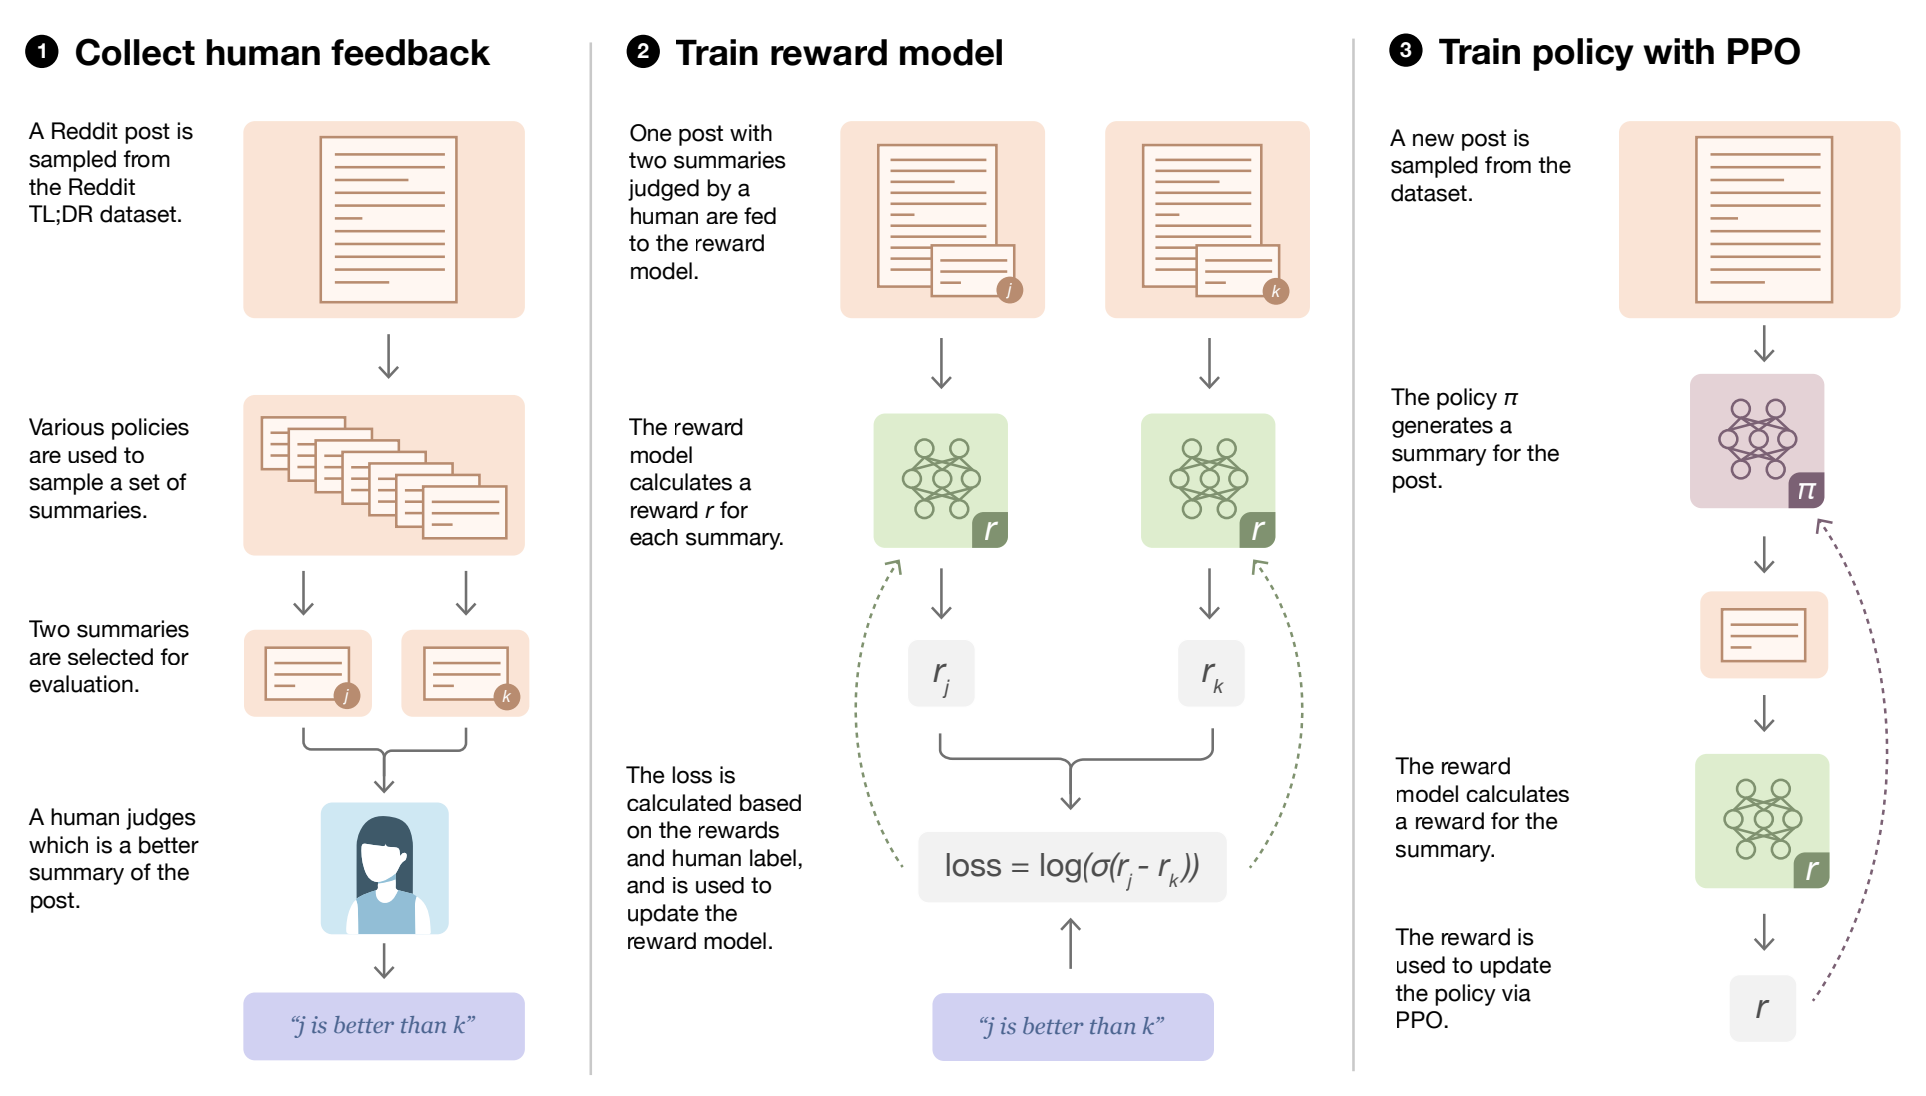
The RLHF process involves three core steps: collecting human feedback, training a reward model, and fine-tuning the language model using the reward model. A diagram of the steps involved is shown below.
Before we start tuning, we need a language model that has been pre-trained using classical pre-training objectives. These large language models (LLMs) are frequently trained on a very large amount of training data, and learn impressive representations of the human language and beyond. Our LLM will be the starting point for adapting to our own dataset.
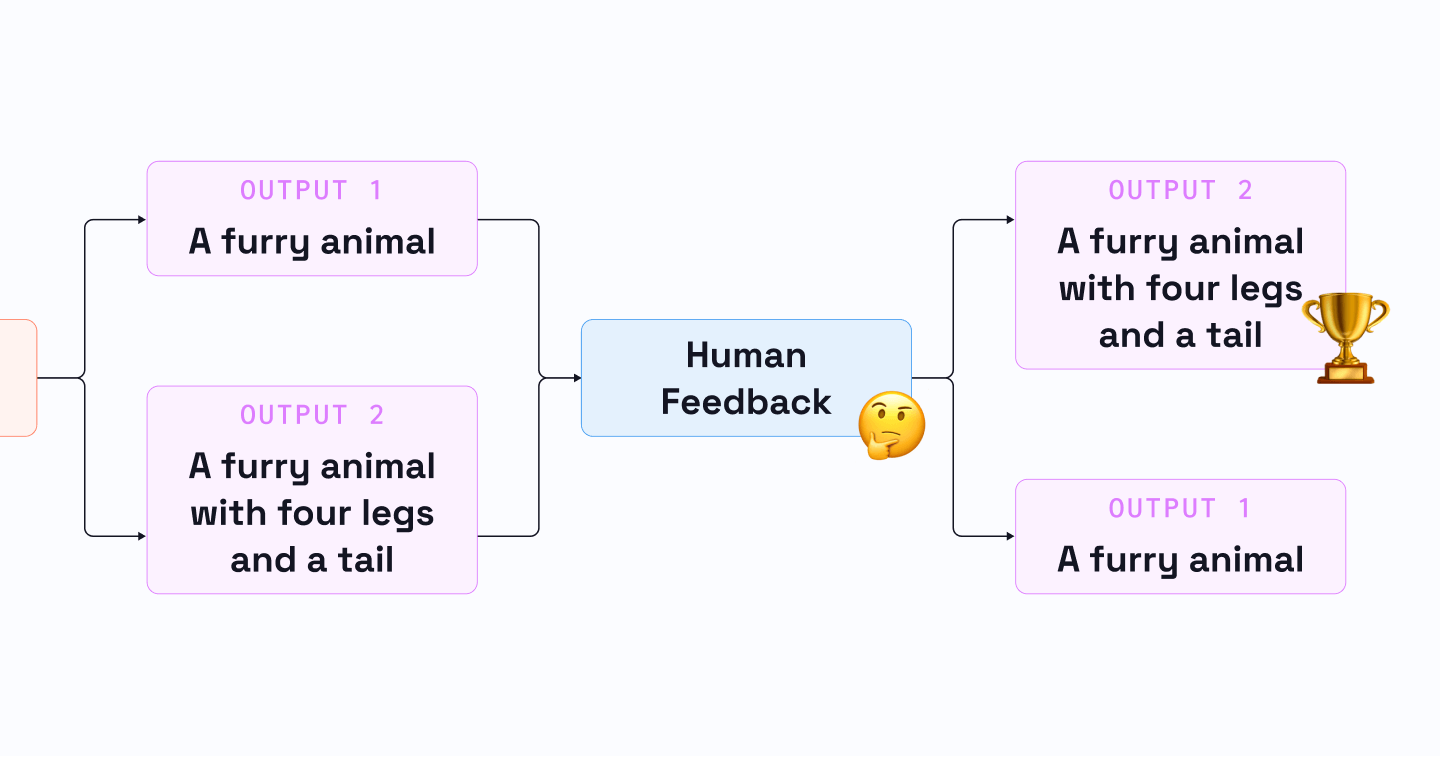
In order to tune our LLM, we will simulate human feedback with a reward model. The reward model takes in any text and assigns it a score of how well humans perceive it. In order to train this model, we need to collect a prompt-generation pairs dataset from our LLM. Next, we’ll have human annotators rank the generated text outputs from the initial language model. These rankings are used during the training process to teach the reward model how good humans think prompt-generation results are, while also having the labeling process be as simple as “which result is better.”
Once the reward model is trained, the initial language model is fine-tuned with reinforcement learning, using the reward model to optimize the model's output. The reward function is a combination of the preference model and a constraint on how much the LLM should change from step to step. The reward model is used to calculate a scalar notion of "preferability", which is compared to the text from the initial model to compute a penalty on the difference between them. The final reward sent to the RL update rule is the difference between the preference model reward and the penalty.
RLHF has enabled language models to begin to align a model trained on a general corpus of text data to that of complex human values. It represents a promising new approach to training language models that integrates human feedback directly into the training process, and could have far-reaching implications for natural language processing and other AI applications.
In the following sections, we’ll detail each of these steps to show how you can train a reward model on your own data.
Creating a custom dataset
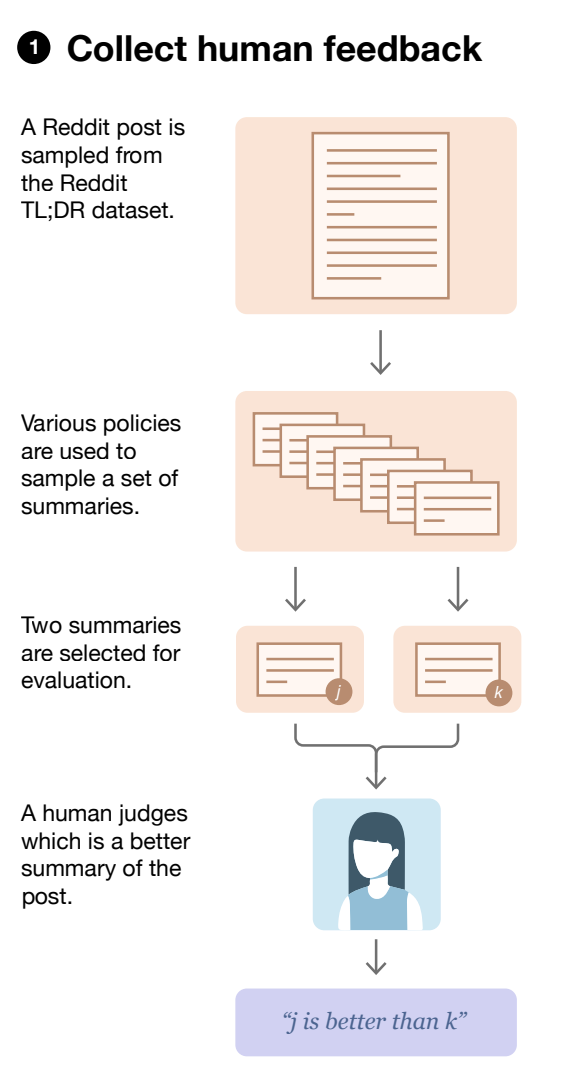
Collect Human Feedback Step
In this section we will create a custom dataset for training our reward model. The dataset starts with a series of prompts for the LM. Prompts can be quite diverse, for example conversational prompts like ChatGPT, summary prompts, or even very technical questions with rigid outputs. These prompts will be passed through the LLM multiple times (usually just 2x) to get different responses. A simple prompt-generation example may look like the following.
{
  "prompt": "The quick brown fox...",
  "answer1": "jumps over the lazy dog.",
  "answer2": "bags few lynx.",
}The prompt and responses are then provided to data labelers to decide which is preferred. This is the human feedback that will be incorporated into the system. This ranking by human labels allows us to learn a model that scores the quality of our language model's responses.
Let’s create our own dataset. We'll start with a set of prompts for the LLM. Next, we’ll generate predictions for them using GPT-2. Note we are using GPT-2 for simplicity, as modern LLMs require multiple GPUs and much more sophisticated infrastructure setup.
prompts = [
  "What is the latest news on the stock market?",
  "What is the current state of the economy?",
  "What are the latest developments in technology?"
]


def generate_examples(prompt_list,
                      model_name='gpt2',
                      max_length=50,
                      num_return_sequences=2,
                      seed=42):
  generator = pipeline('text-generation',
                       model=model_name,
                       device=0)
  set_seed(seed)
  examples = []
  for prompt in prompt_list:
    result = generator(prompt,
                       max_length=max_length,
                       num_return_sequences=num_return_sequences)
    example = {'prompt': prompt}
    for i, res in enumerate(result):
      answer = res['generated_text']
        .lstrip()
        .removeprefix(prompt)
        .strip()
    example[f'answer{i + 1}'] = answer
    examples.append(example)
    print(json.dumps(example, indent=2))
return examples


generated_examples = generate_examples(prompts)We now have a prompt-generation pairs dataset ready to be labeled.
Labeling our dataset with Label Studio
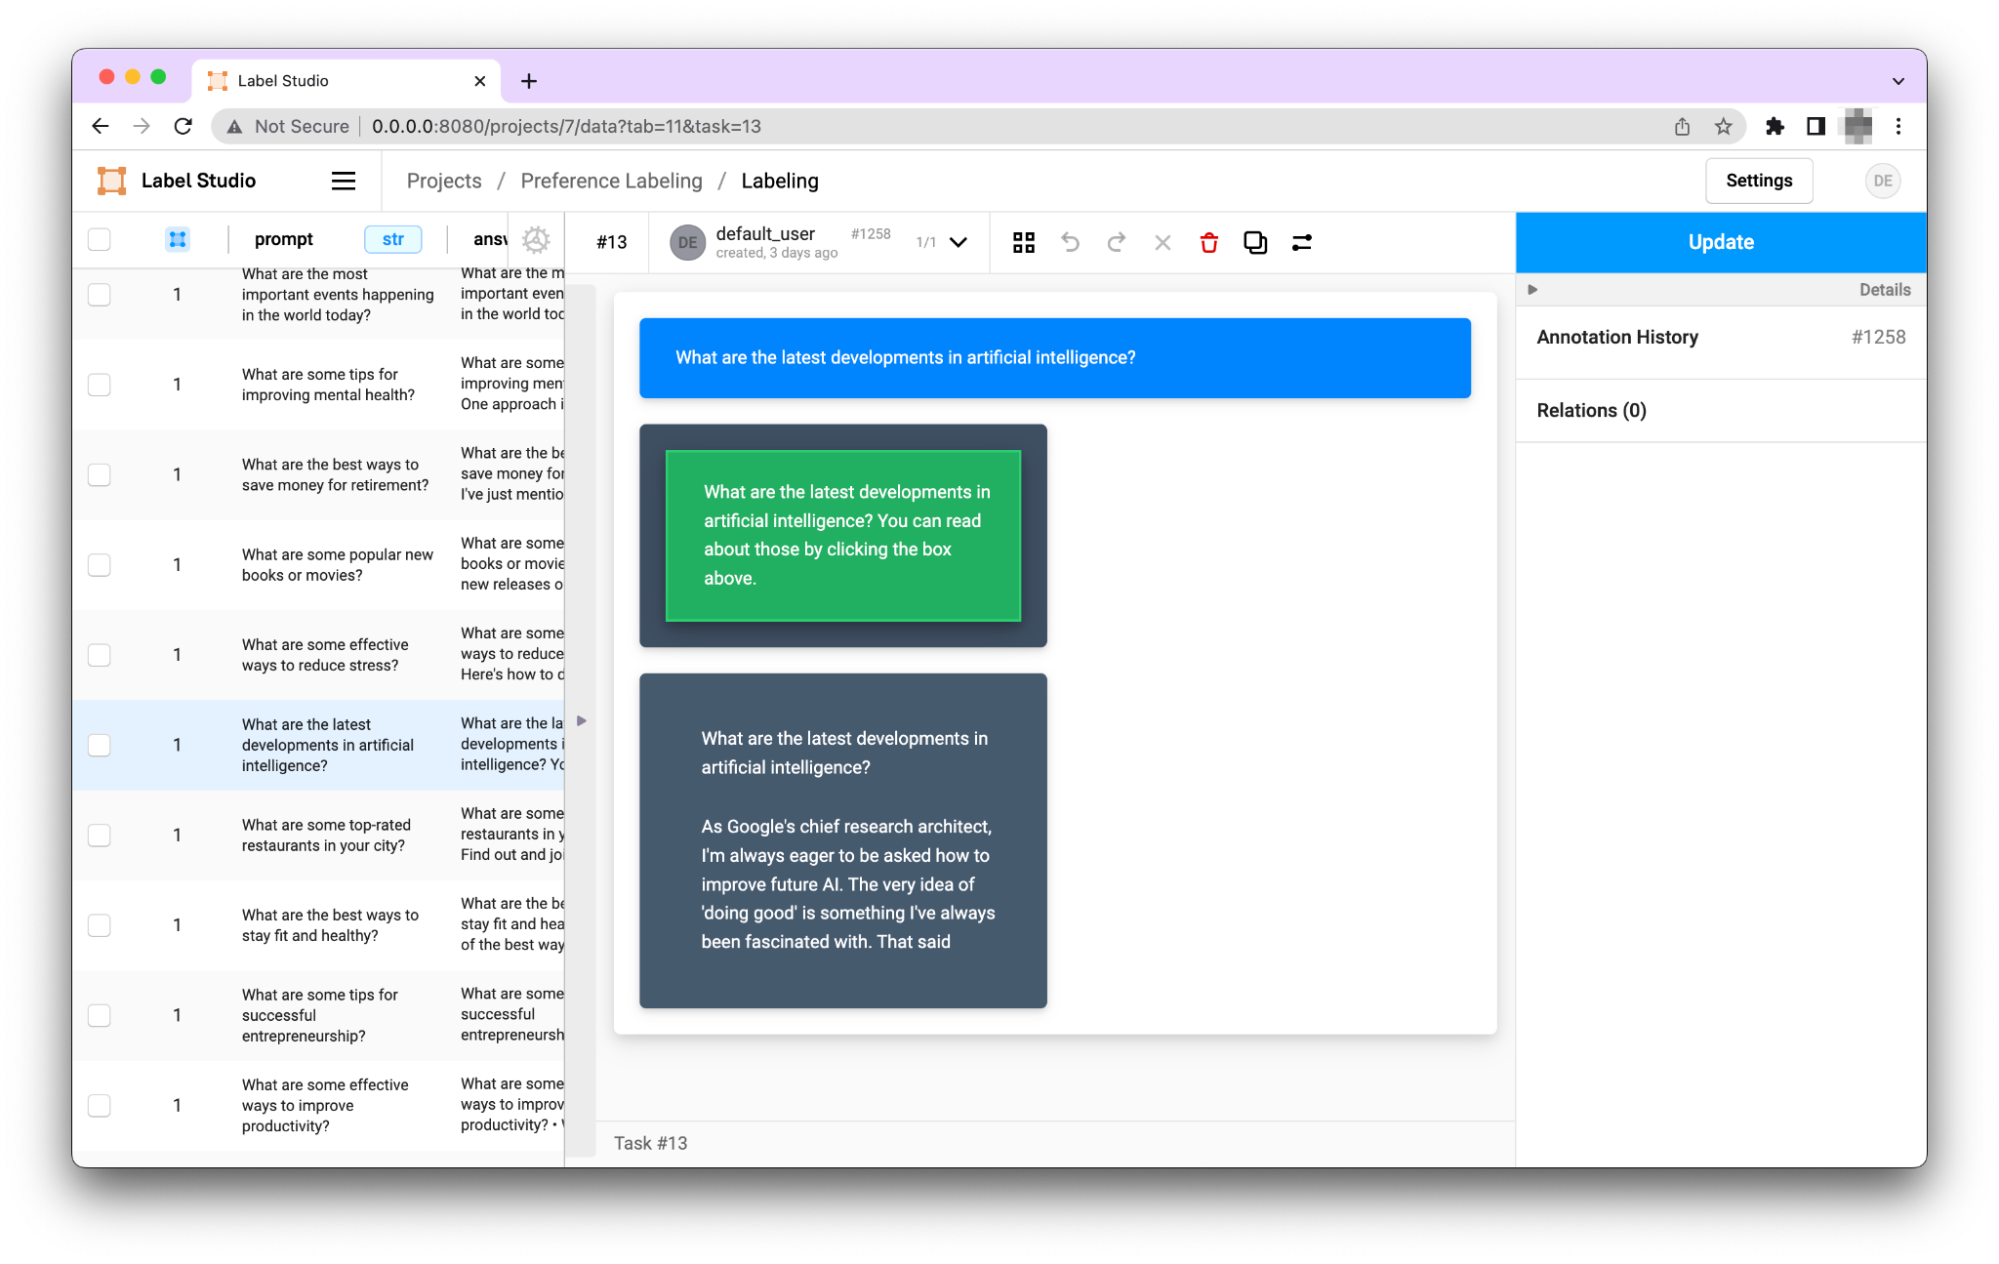
Ranking prompts with a custom interface in Label Studio
We can now rank these prompts in Label Studio to create our dataset. First, we can start Label Studio following the instructions here.
Once we have label studio running, we can create a new project with the Pairwise Classification template. The templates themselves are very flexible, so we'll do some minor edits to make it look a little nicer. The configuration for this template is shown below.
<?xml version="1.0" encoding="UTF-8"?>
<View>
  <Style>* { box-sizing: border-box; margin: 0; padding: 0; } body { font-family: 'Roboto', sans-serif; line-height: 1.6; background-color: #f0f0f0; } .container { margin: 0 auto; padding: 20px; background-color: #ffffff; border-radius: 5px; box-shadow: 0 4px 8px 0 rgba(0, 0, 0, 0.1), 0 6px 20px 0 rgba(0, 0, 0, 0.1); } .prompt { padding: 20px; background-color: #0084ff; color: #ffffff; border-radius: 5px; margin-bottom: 20px; box-shadow: 0 2px 4px 0 rgba(0, 0, 0, 0.1), 0 3px 10px 0 rgba(0, 0, 0, 0.1); } .answers { display: flex; justify-content: space-between; flex-wrap: wrap; gap: 20px; } .answer-box { flex-basis: 49%; padding: 20px; background-color: rgba(44, 62, 80, 0.9); color: #ffffff; border-radius: 5px; box-shadow: 0 2px 4px 0 rgba(0, 0, 0, 0.1), 0 3px 10px 0 rgba(0, 0, 0, 0.1); } .answer-box p { word-wrap: break-word; } .answer-box:hover { background-color: rgba(52, 73, 94, 0.9); cursor: pointer; transition: all 0.3s ease; } .lsf-richtext__line:hover { background: unset; } .answer-box .lsf-object { padding: 20px }
  </Style>
  <View className="container">
    <View className="prompt">
      <Text name="prompt" value="$prompt" />
    </View>
    <View className="answers">
      <Pairwise name="pw" toName="answer1,answer2" selectionStyle="background-color: #27ae60; box-shadow: 0 4px 8px 0 rgba(0, 0, 0, 0.2), 0 6px 20px 0 rgba(0, 0, 0, 0.2); border: 2px solid #2ecc71; cursor: pointer; transition: all 0.3s ease;" />
      <View className="answer-box">
        <Text name="answer1" value="$answer1" />
      </View>
      <View className="answer-box">
        <Text name="answer2" value="$answer2" />
      </View>
    </View>
  </View>
</View>Once we have the results of our human labels, we are ready to export the data and train our reward model.
Reward Model
Building and training a reward model can be a challenge in itself. These models tend to be similar in size to the LLM we started with, and can require sophisticated training techniques. The trlX library makes this much easier.
trlX
TrlX is a distributed training framework that is designed to focus on fine-tuning large language models with reinforcement learning (RL). It has implementations for a variety of RL algorithms and makes it easy to integrate these techniques with the training process of LLMs. The training example we show below is an extension of the Summary Example provided in the trlX library.
Loading the Data
We can use the PairwiseDataset class to tokenize the selected and rejected responses in our dataset.
class PairwiseDataset(Dataset):

  def __init__(self, pairs, tokenizer, max_length):
    self.chosen_input_ids = []
    self.chosen_attn_masks = []
    self.rejected_input_ids = []
    self.rejected_attn_masks = []

    for pair in tqdm(pairs):
      chosen, rejected = pair["chosen"], pair["rejected"]
      chosen_encodings_dict = tokenizer(
        "<|startoftext|>" + chosen + "<|endoftext|>",
        truncation=True,
        max_length=max_length,
        padding="max_length",
        return_tensors="pt",)
      rejected_encodings_dict = tokenizer(
        "<|startoftext|>" + rejected + "<|endoftext|>",
        truncation=True,
        max_length=max_length,
        padding="max_length",
        return_tensors="pt",)

    self.chosen_input_ids.append(chosen_encodings_dict["input_ids"])
    self.chosen_attn_masks.append(chosen_encodings_dict["attention_mask"])
    self.rejected_input_ids.append(rejected_encodings_dict["input_ids"])
    self.rejected_attn_masks.append(rejected_encodings_dict["attention_mask"])


  def __len__(self):
    return len(self.chosen_input_ids)


  def __getitem__(self, idx):
    return (
      self.chosen_input_ids[idx],
      self.chosen_attn_masks[idx],
      self.rejected_input_ids[idx],
self.rejected_attn_masks[idx],)We also have a collator that creates batches for training the reward model.
class DataCollatorReward:
  def __call__(self, data):
    batch = {}
    batch["input_ids"] = torch.cat([f[0] for f in data] + [f[2] for f in data])
    batch["attention_mask"] = torch.cat([f[1] for f in data] + [f[3] for f in data])
    batch["labels"] = torch.tensor([0] * len(data) + [1] * len(data))
return batchFor more details, see the trlX summarization example.
Training
To train our reward model, we start with a custom preference dataset that is loaded with our two samples, one that was chosen and one that was rejected. The ground truth label, or label, for each sample is the human feedback, with a 0 indicating the chosen sample and a 1 indicating the rejected sample.
Using trlx, we can efficiently train our reward model on this preference dataset by minimizing the negative log likelihood of the ground truth labels. This approach allows us to effectively learn the reward function that will guide the reinforcement learning process in our RLHF framework.
Overall, trlx is a powerful tool that allows us to train models with human feedback efficiently and effectively. By using trlx to train our reward model, we are able to optimize the performance of our RLHF framework and ultimately provide more personalized and effective healthcare recommendations.
Trainer(
  model=model,
  args=training_args,
  train_dataset=train_dataset,
  compute_metrics=compute_metrics,
  eval_dataset=val_dataset,
data_collator=data_collator,).train()In the example notebook, we also incorporate Weights & Baises to track our training progress.
LLM Training with PPO
Once our reward model is finished training, we can run pairs of examples through the model and receive a reward based on how good the model thinks they are. We can now use this model to tune our LLM, simulating human feedback constantly.
TrlX recommends using the accelerate library to tune LLMs with PPO. This can be a resource intensive process with a variety of gotchas, so we refer the reader to this post for more details on tuning with PPO.
Conclusion
As AI models continue to grow in complexity, it becomes increasingly important to incorporate human feedback to enhance their quality and reduce potential bias. While RLHF is an effective method for simulating human feedback during model training, it still requires human annotations to inform its decision-making. In this article, we demonstrated how Label Studio can be used to generate a custom preference dataset and train a reward model for simulating human feedback. Now is your chance to give it a try! Check out the full example on GitHub or reach out to learn more!
Related Content
-

The 5 Metrics That Actually Move AI Into Production
A practical framework for turning AI metrics into clearer decisions about what to fix, ship, and scale.

Sheree Zhang
April 15, 2026
-
Scaling AI Data Quality: Best Practices for Onboarding and Evaluating Annotators
A practical workflow for onboarding and evaluating annotators with clear instructions, calibration, quality gates, reviewer feedback, and dashboards that keep labeling consistent as volume grows.

Alec Harris
March 12, 2026
-
How to Create a Prompt Generator with Label Studio and RLVR
In this article, you'll learn how to apply an RLVR-based score verifier and use an LLM as a prompt optimizer to enhance your prompts.

Label Studio Team
March 2, 2026