Introduction to Data Labeling in Hugging Face Spaces using Label Studio

Introduction
The Label Studio community is excited to announce the official launch of Label Studio in Hugging Face Spaces. This tutorial is designed to get you started with data annotation using Label Studio, focusing on how to use Label Studio inside of Hugging Face Spaces to quickly launch the application and collaborate with other users.
Zero prior experience is required to get started today. Whether or not you’ve written a line of code or created a machine learning query in your life — our goal is that you can follow along and learn something new regardless of your level of expertise.
What you'll need:
For this tutorial, we’ll keep things simple. You only need one thing a Hugging Face community account.
The Hugging Face platform will provide you with everything you need to start with Spaces, a platform for building, hosting, and sharing ML applications. If you don’t already have a Hugging Face account, now is the perfect time to create one.
Launching Label Studio
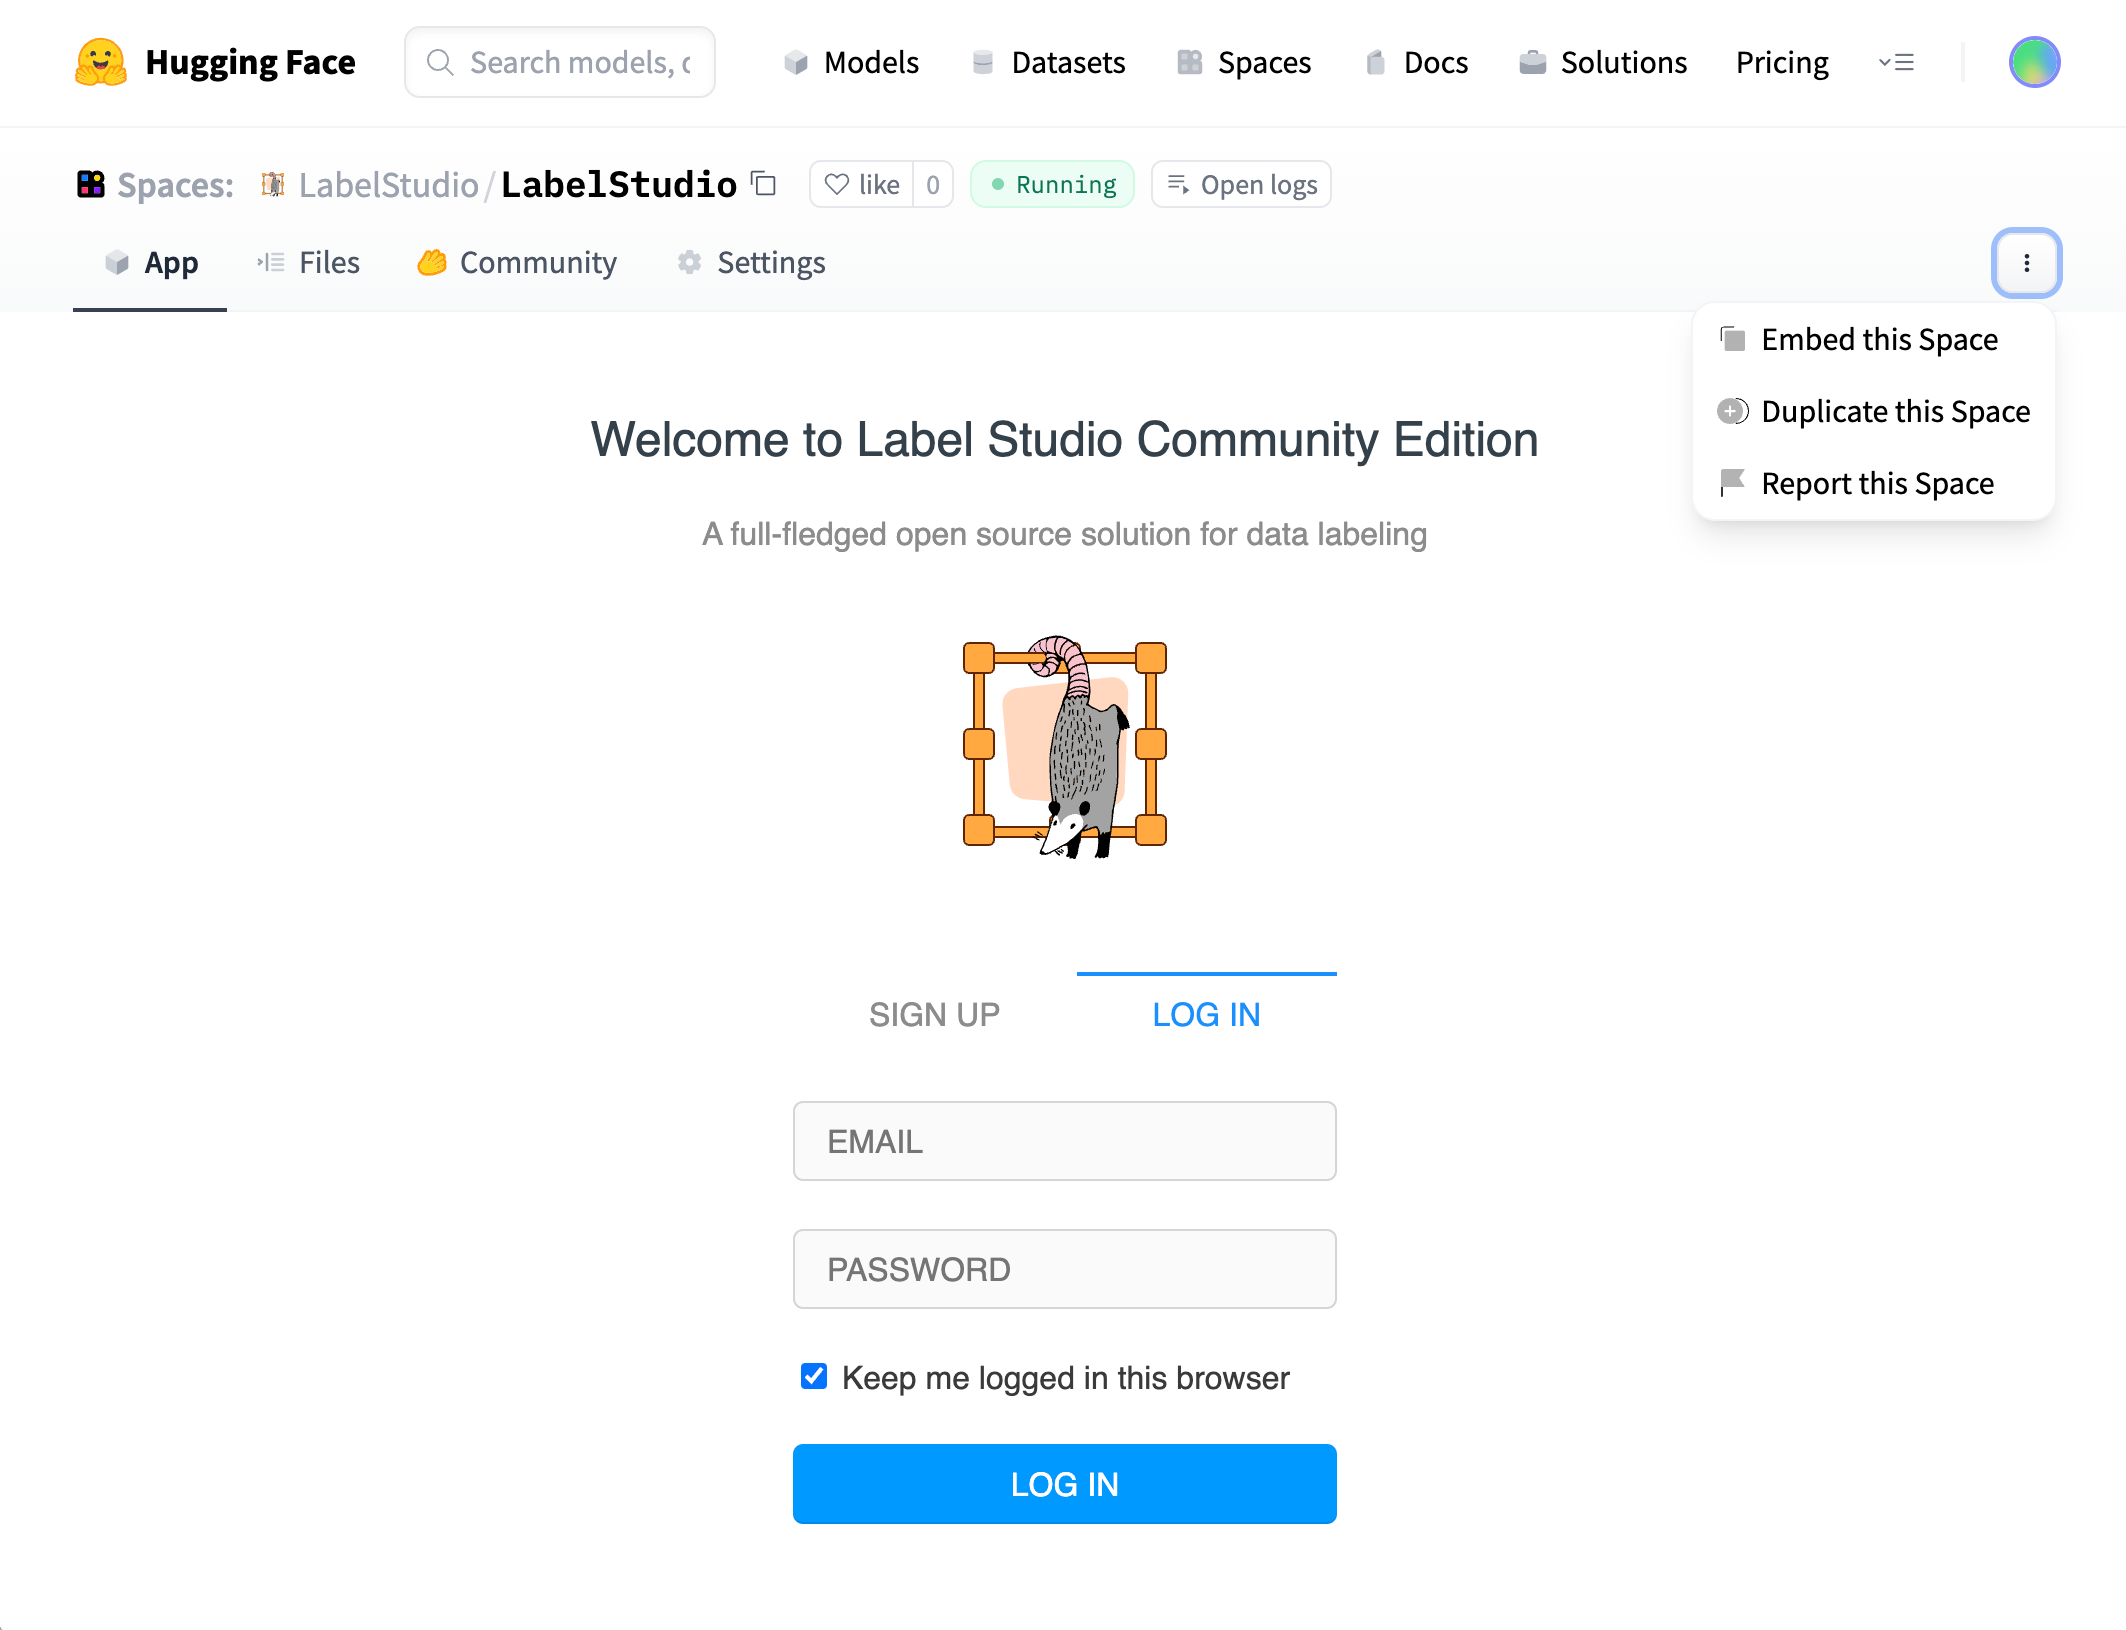
You can start with Label Studio Spaces by heading to the official page. You’ll be presented with the Label Studio Community Edition login screen, with an option to create a new account.
While you can create an account within the official space, because it’s hosted as a public space you will want to start with a new environment. Hugging Face makes it easy to launch your own instance of Label Studio. Click on the three dots to the right of the interface to activate the dropdown menu and select “Duplicate this Space.” The Label Studio instance will be replicated into your account, and you’ll have a dedicated application to start working with.
Alternatively, you can launch a copy of Label Studio from the Hugging Face Docker template directory. Select "Docker" from the list of available SDKs, choose Label Studio, adjust your space options, then launch with "Create Space."
With your space ready to go, select the “Sign Up” tab and create a new account. After your account is active, you can start a new labeling project.
There are some important caveats to using this space as-is:
Hugging Face Spaces do not have permanent storage, meaning you can lose your work if the space is restarted because of a configuration change or a long period of inactivity. Because of this, you should treat this instance as a demonstration and learning environment to get you started.
This Space allows unrestricted account sign-ups, meaning anyone with access to your space could create an account in the application. This is great for sharing with your friends and colleagues, but you’ll want to limit access to a production environment.
At the end of this tutorial, we will give you hints on how to attach a database for a more permanent configuration by connecting to cloud storage for data hosting and enabling user authentication, turning your Label Studio Space into a production-ready environment.
With the Label Studio Space created, it’s time to talk about what data labeling is, how Label Studio helps with the data labeling process, and an initial example based on Natural Language Processing to frame the tutorial with.
What is Label Studio?
Label Studio is an open source data labeling platform for labeling, annotating, and exploring many different data types. Additionally, the tool includes a powerful machine learning interface that can be used for new model training, active learning, supervised learning, and many other training techniques.
But wait, what is data labeling?
Data labeling (sometimes called data annotation or dataset development) is an essential step in your data science or machine learning practice. By adding meaningful information to your data through labeling, you can improve the accuracy of your models, identify and remove bias, and improve the efficiency of your machine learning and data science operations.
Let’s look at where data labeling fits into a general machine learning pipeline.
- Define the problem and gather data.
- Prepare and label the data.
- Choose a model and train it.
- Evaluate the model.
- Fine-tune the model.
- Deploy the model.
- Continuously monitor and update the model with newly labeled data.
Data preparation tips:
When importing data into Label Studio, there are a few things to remember. Here are some tips from our very own Solutions Engineer, Abubakar Saad, for folks just getting started with data labeling:
- Take the time to prepare your data: look for inconsistencies, flaws, or errors that may lead to inaccurate results.
- Provide documentation: show your work, share where the data came from, and how you cleaned the data.
- Check your work: when cleaning up data, it’s easy to get lost in a step. Take time to regularly check your work to ensure the validity and accuracy of your dataset.
Finding data to label
For the sake of this exploration — we’ll be working from an open and well-known dataset. We’ll be using the IMDB Dataset provided by Andrew Maas (ref). This is a large dataset, with over 100,000 reviews. We will use a much smaller sampling of only 100 reviews for this tutorial. It may be small, but it will give you a flavor of how you can organize a large dataset for distribution for your labeling team. At the end of this article, you can find a description of the complete data set and how we prepared it for this tutorial.
Supported Data Types in Label Studio
One of the community’s most loved features of Label Studio is the ability to handle many different file types on the same platform. Label Studio has you covered from text, audio, image, or even video and time series data.
The file type may change depending on your use case and the project you’re working with.
It’s important to understand what file type is best for your goals and how to format your data best to prepare it for labeling.
Sentiment analysis is one of the most popular use cases for data labeling and machine learning. It falls under a category of machine learning known as Natural Language Processing, or NLP. This tutorial aims to prepare the data for training a sentiment analysis model for movie reviews.
Creating your Project
The first time you log in to Label Studio, you’ll be presented with the Projects Page, the home base for all your data labeling projects. You’ll be able to create new projects, edit or revisit existing projects or even invite teammates. This will become your default view, presenting you with all the projects you can access.
To create a new project, click on the blue button in the upper right-hand corner of your screen to create a new project. If there are no projects in your space, an option to create a project will appear in the middle of the screen.
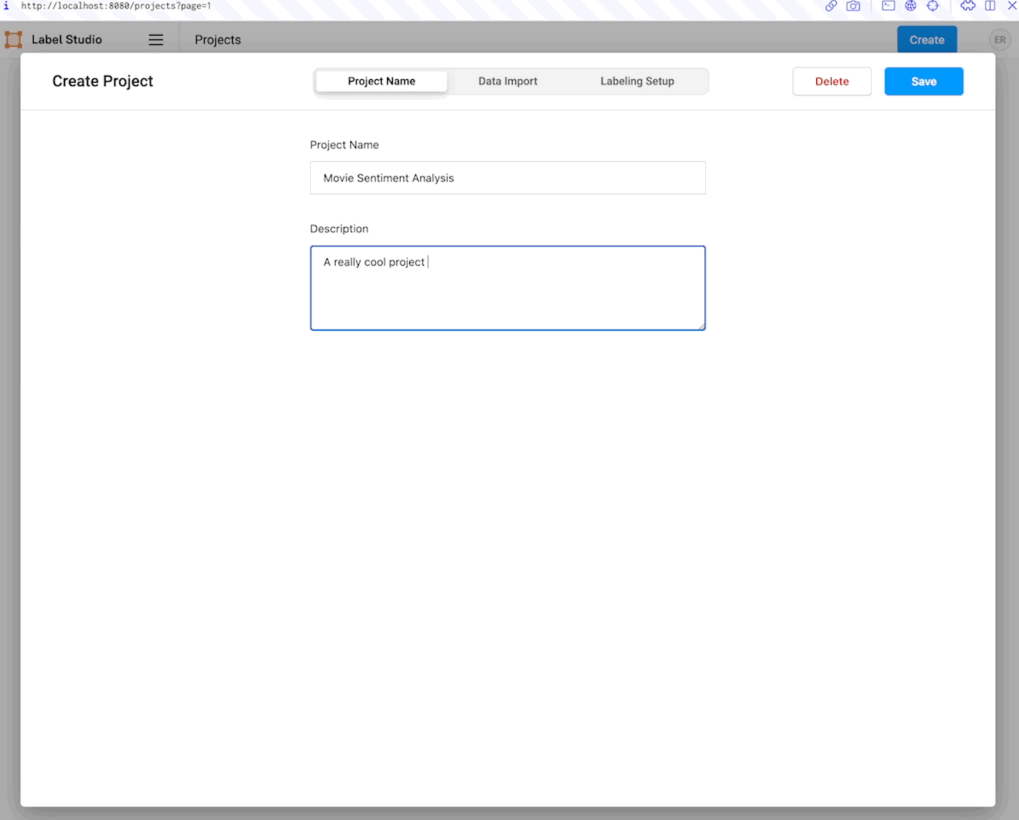
The project creation panel will present you with three tabs. In the first tab, “Project Name,” you can name and describe the project. In this case, we can call it “Movie Sentiment Analysis,” with the description “My first labeling project.”
Importing your data
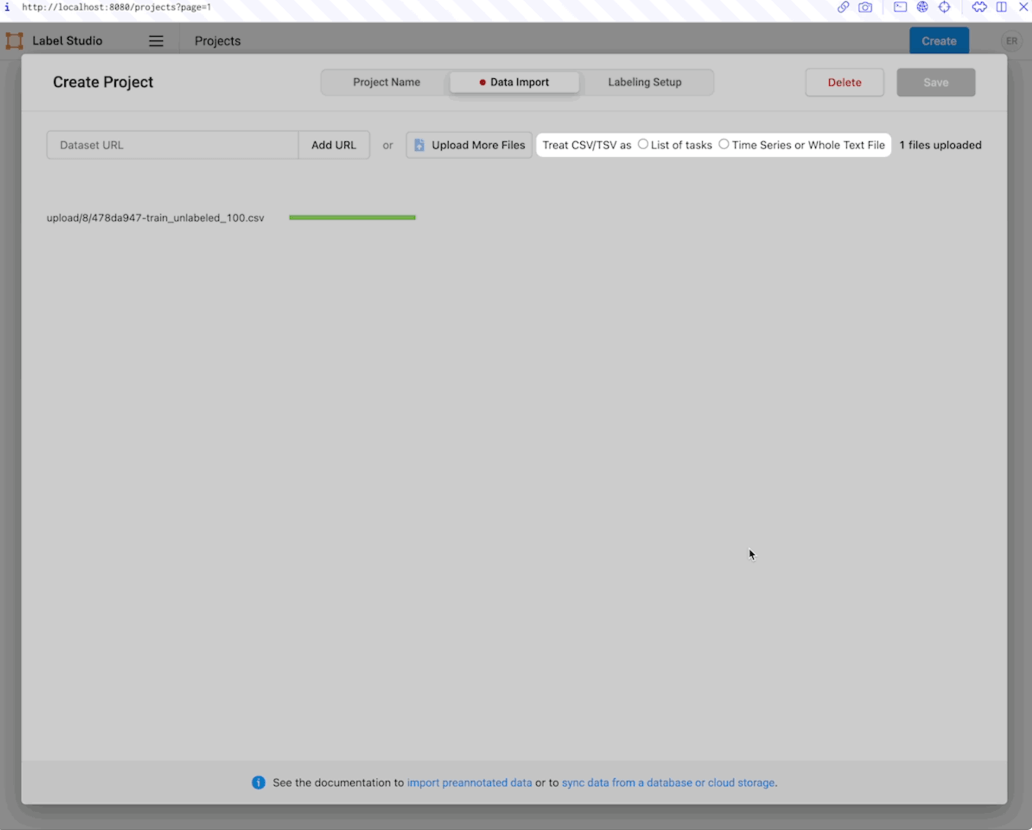
The next tab, “Data Import,” will present you with an interface to load a data set. Label Studio offers two options for loading data. You can upload data directly to the application or connect Label Studio to your cloud storage. Cloud storage has many advantages, including automatic updating and additional data security. However, for this tutorial, we will use the direct upload option.
- Download this csv file from Hugging Face Datasets.
- Select the “Upload Files” button, and follow the dialogue to upload the `IMDB_train_unlabeled_100.csv` file you downloaded.
- When prompted, choose “Treat CSV/TSV as List of tasks” to import each line of the data file as a unique data item for labeling.
Setting up the Labeling Interface
In the next tab, titled “Labeling Setup,” you’ll set up your labeling interface.
What is the Labeling Interface, and why is it important to set it up?
The Labeling Interface is the screen where data labels and annotators will conduct the labeling process. In this screen, annotators will review the data and select the specific annotations to add.
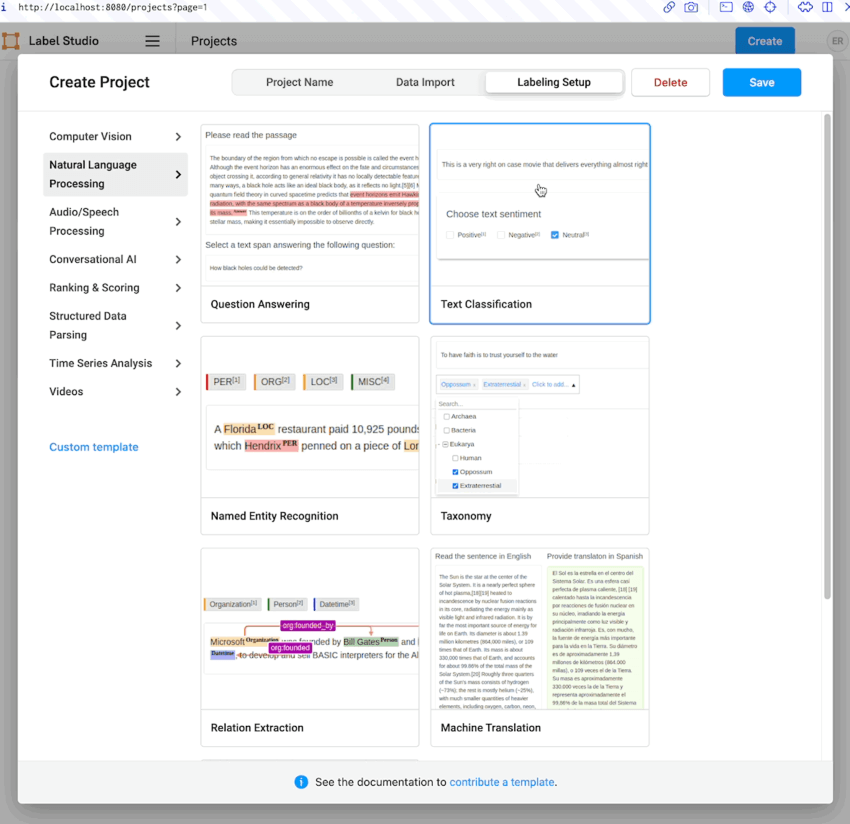
Label Studio provides a library of templates to get up and running in the Labeling Interface – no coding or hours spent customizing it required. In addition to the defaults offered by Label Studio, the community has curated a complete library of templates you can browse and try out in the Label Studio Playground. These include computer vision, audio/speech processing, conversational AI, NLP, and many more — there are plenty of templates for you to get started with.
Preparing the Labeling Interface for sentiment analysis
When setting up the Labeling Interface for our tutorial, we’ll set it up for an NLP-type of data annotation: sentiment analysis.
Select “Natural Language Processing” from the left side of the dialog, then select the “Text Classification” template. You’ll be presented with a split-pane view to help you configure your labeling interface. On the left is an automatically generated visual editor that allows you to choose which columns of the data you want to label. You can then create a set of labels that can be assigned to each data point. You can switch to a code editor to edit the XML template directly if you need more control over your labeling interface.
On the right side of the split pane is a UI preview of the Labeling Interface, which allows you to render the interface your labelers will be working with.
You will need to adjust the interface to do two things. The first is to create the appropriate labels for this project.
Sentiment analysis usually measures a range in intensity of an emotion or feeling that someone might be conveying. For example, stubbing your toe, on average, creates less discomfort than breaking your arm. In this case, we’re labeling whether the viewer either liked the movie or didn’t. Suppose you wanted to gain more information from your data and train a model across a broader range of sentiments. In that case, you could add additional options such as: “informational,” “sad,” “angry,” “happy,” or “not interested.”
Since the original dataset already includes labels with only two sentiments, “Positive” and “Negative,” you will want to follow the convention set by the data set authors. The chosen template contains three sentiments, “Positive,” “Negative,” and “Neutral.” Delete the “Neutral” sentiment by clicking on the red ‘x’ next to it in the visual editor.
The next item you must adjust is the data presented in the interface to label. Recall that the dataset has several columns, many of which are metadata associated with the dataset. You will want to set the interface to show the “review” field of the data to the labeler. Do this by selecting “$review” from the “Use text from field” option under the “configure data” header in the visual editor.
Confirm that the interface is configured how you want it, then click “Save” in the upper-right-hand corner of the dialog. Your data has been imported, and your labeling interface is ready!
Overall, what options you have in your interface largely depends on your project requirements. Your business application, model, and data types will be significant factors in determining how the interface will be set up for your data annotators.
After your project is set up
After setting the project up, you’ll be presented with the Label Studio project data page. This page looks overwhelming at first glance, so we’ll break it down into easy-to-digest parts.
Reviewing your imported data
Looking at the top of your screen, the top menu bar will have more detail about each column in Label Studio.
Examine the data that was imported. You’ll have a name and associated data type for each column in your CSV file. This enriched data set doesn’t just include the reviews (found in the “review” column) but also information about the number of stars that the review had, a link to the movie page on IMDB, and several IDs (one assigned by Label Studio, one assigned during the data preparation, and a non-unique one from the original data set). For now, you can ignore these fields and focus on the “review” column. This data is what annotators will evaluate and assign a sentiment of either “Positive” or “Negative.”
Using Label Studio’s terminology, each row corresponds to a labeling “task.”
Review Label Studio’s Additional Metadata
The first four columns in this view contain label metadata used by Label Studio to measure the progress and effectiveness of the labeling team. These include the data ID, the date labeling was completed, the number of annotations per task (to improve labeling accuracy, you can have multiple labels on each task), the number of times an annotator has skipped a task, the total number of predictions (including from pre-labeled sets or ML labeled tasks), and who has labeled the data in the task.
This top row of information is adjustable, allowing you to customize your view by clicking and dragging the menu bar items (much like in Excel or Google Sheets).
Time to Label some Data!
Now that we’ve imported our data and configured the interface, we can start labeling!
Click on the bright blue `Label All Tasks` button at the center of the toolbar to enter the labeling interface. You’ll then be presented with a screen with the label interface you defined during setup. You’ll notice that the text is drawn from the data set we imported. There will be a directive to choose from the sentiment options. To the right of the screen, there are additional buttons to “Skip” or “Submit” an annotation.
Using your judgment, you can select the sentiment of the text and choose “Submit” to move on to the next labeling task. Within this particular interface, you can speed up your annotations with the keyboard shortcuts listed next to the annotation options, in this case, ‘1’ for ‘Positive’ and ‘2’ for ‘Negative.’ If you’re unsure what sentiment to apply to the text, select “Skip” to move to the next task.
Without further ado — label away!
Exporting your data
Fast forward, and you’ve annotated all 100 tasks in the sample dataset. You can return to the data page by selecting the project title from the interface toolbar. With the labeling job completed, you can export this data to use in the rest of your machine learning or data science pipeline.
Label Studio supports various formats. The options for text-based data, like what we worked with today, include JSON, JSON-MIN, CSV, or TSV. If we were working with a dataset that included images, object detection, or numerical data, our export options would slightly differ. For non-tabular data, you will typically export a JSON file of the labels that includes references to the original images, video, or sound files you had your team label.
To keep things simple, you’ll export your labeled data as a CSV file.
In the interface, select the “Export” button. Then select “CSV” as the export format. Select the “Export” button at the bottom of the dialogue, and you will be prompted to save the exported data to your local disc.
What is exported data good for?
Exported data can be used in many ways — to speed up a classification in further data analysis, provide more accurate feedback to train a model, or even to make cumbersome tasks like search or trend prediction easier. Integrations with cloud data storage options and other DevOps tools and processes through our API allow further flexibility in use cases and annotations.
Making your Label Studio Hugging Face Space production-ready
As noted early in the tutorial, the default Label Studio Space has several limitations, most notably:
- The application allows for unlimited user access.
- All data and settings are stored in local storage of the space, which may be lost if the space is restarted.
The good news is that you can quickly overcome these limitations and configure the space to be a production labeling environment with access control and permanent storage.
Configuring access controls for Label Studio Spaces
You have two options for setting up access control for your Label Studio Space:
- Setting the space permissions to be private.
- Disabling public account creation for Label Studio.
The first is to set your space to be private. This is the easiest way to restrict access and will make it so that only you, and possibly collaborators who are part of your Hugging Face organization (if you’ve replicated the Space into an organization), can see that space. The downside to this approach is that you cannot set up integrations that rely on the Label Studio API since the API endpoints will not be publicly visible.
The second recommended option is to disable public account creation for the Label Studio application. This will ensure only specific people can access Label Studio while still being able to use the Label Studio API. To do this, you will need to take the following steps.
- Add the environment variable to the spaces Dockerfile:
ENV LABEL_STUDIO_DISABLE_SIGNUP_WITHOUT_LINK=trueThis will disable public account creation and require creating new accounts through an invitation link generated inside the Label Studio application.
- Set the following secrets in your Label Studio Spaces setting, assigning the appropriate login credentials:
LABEL_STUDIO_USERNAME
LABEL_STUDIO_PASSWORDPerforming a factory reset of the Space will cause these changes to take effect. You can log in with the username and password you set in step 2 and use the organization settings in Label Studio to share a login link with collaborators.
Attaching a Postgres database for permanent project configuration
To make your Label Studio Space durable to resets, you need to configure a connection to an external database. Label Studio supports Postgres as a network-attached database. Setup of Postgres is beyond this article’s scope, but several resources are available online to help you get started. To attach your Postgres database, configure the following secrets in your space configuration:
DJANGO_DB=default
POSTGRE_NAME=<postgres_name>
POSTGRE_PORT=<db_port>
POSTGRE_USER=<postgres_user>
POSTGRE_PASSWORD=<password>
POSTGRE_PORT=<db_port>
POSTGRE_HOST=<db_host>Attaching cloud storage for permanent data hosting
If you upload data files to your Label Studio Space instance, you risk losing the data when the space is restarted or reset. The Label Studio community strongly encourages you to use cloud storage to host your data for production environments.
If you’ve set up Postgres as your application database, you can attach storage to Label Studio from within the application, and the configuration settings will persist through space resets.
If you want to attach cloud storage as part of the application launch, you can set the following secrets to connect the storage at launch.
Amazon S3
STORAGE_TYPE=s3
STORAGE_AWS_ACCESS_KEY_ID="<YOUR_ACCESS_KEY_ID>"
STORAGE_AWS_SECRET_ACCESS_KEY="<YOUR_SECRET_ACCESS_KEY>"
STORAGE_AWS_BUCKET_NAME="<YOUR_BUCKET_NAME>"
STORAGE_AWS_REGION_NAME="<YOUR_BUCKET_REGION>"
STORAGE_AWS_FOLDER=""Google Cloud Storage
STORAGE_TYPE=gcs
STORAGE_GCS_BUCKET_NAME="<YOUR_BUCKET_NAME>"
STORAGE_GCS_PROJECT_ID="<YOUR_PROJECT_ID>"
STORAGE_GCS_FOLDER=""
GOOGLE_APPLICATION_CREDENTIALS="/opt/heartex/secrets/key.json"Azure Blob Storage
STORAGE_TYPE=azure
STORAGE_AZURE_ACCOUNT_NAME="<YOUR_STORAGE_ACCOUNT>"
STORAGE_AZURE_ACCOUNT_KEY="<YOUR_STORAGE_KEY>"
STORAGE_AZURE_CONTAINER_NAME="<YOUR_CONTAINER_NAME>"
STORAGE_AZURE_FOLDER=""Let’s review
In this tutorial, we’ve covered the basics of data labeling, how to get started with Label Studio, what role data labeling plays in the larger machine learning ecosystem, and how to get started yourself with a basic sentiment analysis project. Now that you’ve got the basics down — you’re equipped with the skills to provide higher-quality data annotations to your machine learning pipeline.
Are you itching to get your hands dirty with more before then? Join the Label Studio Slack Community to meet other folks using and building in the data labeling space or to get a hand along your data labeling journey. Or check out the Label Studio blog, where you can find more information about Label Studio, what we’ve been up to, and how to get involved with various projects and initiatives that we’ve been working on.
About the Data
The dataset used for this tutorial was derived from the “Large Movie Review Dataset,” a collection of 100,000 movie reviews. The original dataset is divided into two main categories: training and testing data. Each category has 25,000 data points labeled with “positive” or “negative” sentiment. The training data set also includes an additional 50,000 unlabeled data points. Each review is stored as an individual text file, with metadata encoded into the file name, directory structure, and additional sidecar files.
To prepare the data for this tutorial, we wrote a script that walked the directory structure to capture the data and metadata as rows of data. The data was written in randomized batches with rows corresponding to:
- 0 - 25,000: Labeled training data, with positive and negative sentiment mixed.
- 25,001 - 75000: Unlabeled training data.
- 75001 - 100,000: Labeled testing data, with positive and negative sentiment mixed.
These batches were also written out as separate files for convenience. Finally, the first 100 rows of each batch were written out as different files to support faster loading for a streamlined learning experience. We thank Andrew Maas for providing this free data set from their research.
Related Content
-
Integration Spotlight: OpenMMLab & Label Studio
How to use OpenMMLab with Label Studio's machine learning API to provide semi-automated bounded-box labeling using the mmdetection library.

Erin Mikail Staples
May 24, 2023
-
Introducing the Label Studio Integrations Directory
Check out the new Label Studio Integrations Directory to explore a growing number of integrations and resources, including documentation and links.

Label Studio Team
March 7, 2023