Introduction to Machine Learning with Label Studio
Introduction
This tutorial will walk you through the background knowledge and steps to use Machine Learning (ML) models with Label Studio. There’s a lot to cover, and at a high level this tutorial will show you:
- The prerequisites that are necessary to run this tutorial.
- The importance of ML in labeling workflows.
- A high-level overview of the different ways you can use ML in Label Studio
- Preliminaries on the Label Studio task and labeling interface formats that are essential to understand the information transfer between the backend and Label Studio.
- An example of pre-annotating data to import into Label Studio
- An example of interactively annotating data using a custom machine-learning backend.
By the end of this tutorial, you should understand how to pre-annotate datasets for your labeling workflow, as well know how to wrap ML models in Label Studio’s ML backend.
Prerequisites
This tutorial builds on the “Zero-to-One With Label Studio,” a guide that walks you through installing and using Label Studio for a simple data-annotation project. You will want to read that guide if this is your first time working with Label Studio. Even if you’re familiar with Label Studio, this tutorial assumes you’ve set up the labeling configurations and datasets described there.
In addition to the requirement of being able to run Label Studio inside of Docker, this tutorial also requires experience working with Python on the command line using a system that is capable of supporting PyTorch. A modest laptop with 16 GB of RAM should be sufficient. For the later examples, you must be able to run your instance of Label Studio and your machine learning examples on the same network so that Label Studio can communicate with the ML inference server. Running Label Studio and the ML backend on the same machine will meet this requirement.
Finally, you will need to have familiarity with using Git to download the code examples and sample data used in this tutorial.
Installing the Tutorial Repository
This tutorial includes a code repository with example code, models, and data. You can get the repository from your command line by calling:
git clone https://github.com/heartexlabs/label-studio-ml-tutorial.gitYou must install some Python library dependencies to run the tutorial successfully, including the Label Studio ML Backend and PyTorch. We suggest installing and running them in a Python virtual environment. The full details of how virtual environments work are beyond the scope of this tutorial, but you can read more about virtual environments in the Python docs.
Run the following commands in your terminal to create the virtual environment and install the dependencies.
cd label-studio-ml-tutorial
python3 -m venv .venv
source .venv/bin/activate
pip3 install -r sentiment_analysis/requirements.txt After running the tutorial, you can close the terminal or type deactivate to return your Python environment to its original configuration. If you want to work in a new terminal, you must run `source .venv/bin/activate` at the command line to restore your working environment.
If necessary, you can start Label Studio with the following command.
docker run -it -p 8080:8080 \
  -v `pwd`/mydata:/label-studio/data \
heartexlabs/label-studio:latest You can set up a new project using the labeling configuration in the tutorial repository called 'labeling_interface.xml', and you can load the original dataset as a series of tasks using the 'IMDB_train_unlabeled_100.csv' file.
With these prerequisites taken care of, it’s time to talk about ML in the context of labeling workflows.
Why ML is Important in the Labeling Workflow
Data Labeling and Annotation are critical to the machine learning and data science workflow. It is frequently a tedious task, requiring attention to the large amount of data necessary to train modern models. High-quality data leads to high-quality models, and the highest-quality data is obtained when expert human attention is applied to the problem.
However, the costs associated with this level of attention can quickly become significant. To most efficiently prepare data, it’s best to draw upon the wealth of existing knowledge captured in ML models to annotate as large a body of data as possible without human intervention. Then, expert human annotators can check low-quality annotation results or statistically validate a model’s labeling effectiveness.
Just as annotation teams use multiple human annotators to gain consensus and reduce errors in labeling, multiple prediction algorithms can be used for automated annotation, helping correct the individual errors and biases that other models might have. This ensemble approach is an efficient way to label large quantities of data.
It’s also possible to continuously improve a model by incorporating active learning into your labeling process. Active learning is when a human expert interacts with the machine learning model, labeling prediction tasks that the model has low-certainty predictions.
Rather than annotating many data items, a human annotator can focus on annotation tasks that will significantly improve model performance and accuracy. With the advent of foundational models built upon large datasets through unsupervised learning, incorporating some sort of active learning process into the finalization of models is an essential step in aligning large generative models with specific tasks.
How Machine Learning Works with Label Studio
Amongst Label Studio’s feature set is a rich framework for integrating machine learning into the annotation process. At the most basic level, predictions can be loaded into Label Studio in the data import process, making it easy to incorporate Label Studio into your data processing pipeline.
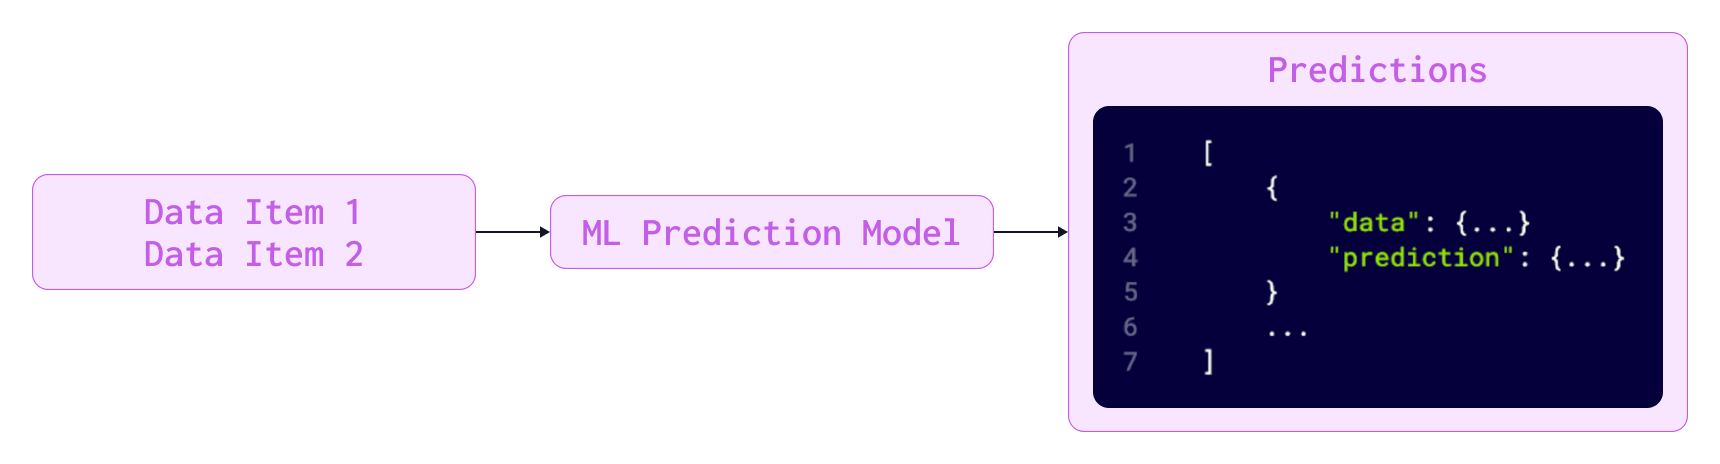
Label Studio also has a machine-learning backend interface, allowing the Label Studio application to connect to application endpoints dedicated to automatically performing inference on tasks. The backend interface lets you host any number of inference engines on robust infrastructure and give predictions synchronously with the data labeling workflow. The Label Studio ML backend interface also includes API calls for active learning, making it possible to simultaneously update your model as the annotation team completes labeling tasks.

Finally, as with nearly every other feature on the platform, Label Studio has a Predictions API from which you can build your custom machine learning integrations.
The remainder of this tutorial will focus on the first two machine learning integration methods, importing predictions and connecting an inference server with the machine learning backend. From this point on, this tutorial assumes that you’ve worked through the “Zero to One With Label Studio” tutorial, are familiar with the IMDB movie review sentiment analysis dataset described in that tutorial, and have set up the labeling interface built in that tutorial.
If you need to quickly set up the sentiment analysis project, a Label Studio project configuration file and initial dataset are provided with the tutorial repository.
Label Studio Task Format
To understand how machine learning works in Label Studio, it’s important to know how data is structured within Label Studio. A task structure includes the original data and additional Label Studio data for everything that needs to be annotated in Label Studio. The original data can be in nearly any format and is stored as key-value pairs. In our example of sentiment analysis, the data is simple key-value text pairs with text data embedded in the file. When working with more complex types like images, audio, or video, the data value fields will usually be a link to the remote storage of the data item.
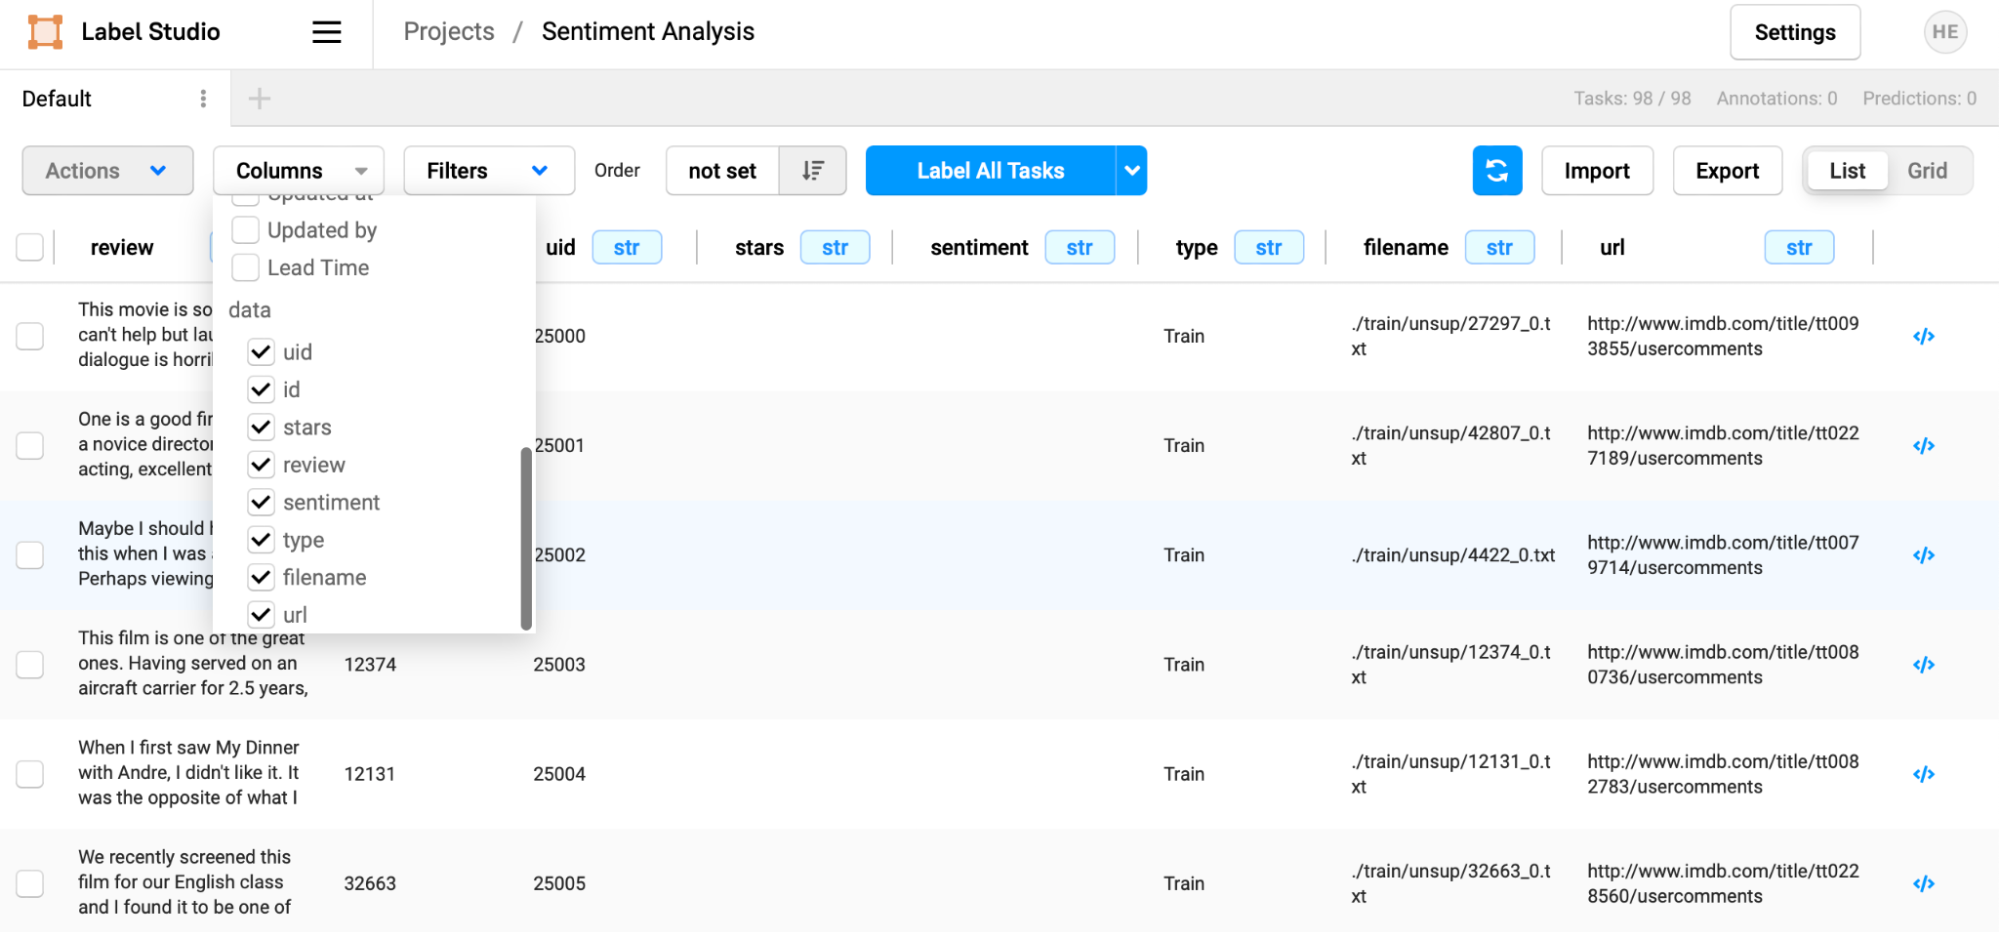
If you open the CSV file, you will see several fields associated with each task, many of which are metadata associated with the original dataset. For this tutorial, we are only interested in the text of the “review” column.
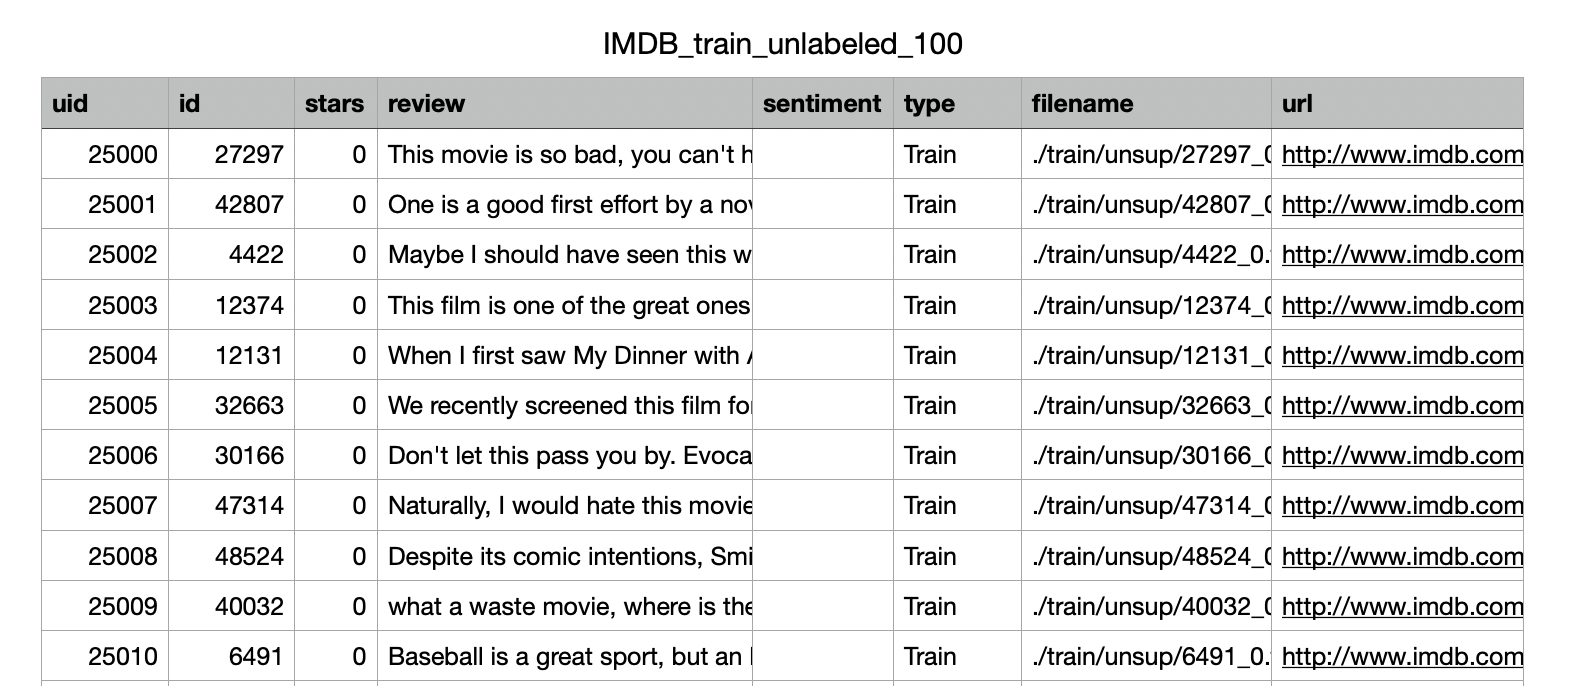
When you load the dataset into Label Studio, every row will be treated as one task, and every one of the columns from the original dataset will be reflected as a column for each task in the Label Studio representation.
Each task also has many additional fields created by Label Studio that maintains the task's state in the annotation process. Note how this includes information about how the data has been annotated, who has annotated it, automated predictions, and prediction scores.
With this simplified explanation of how tasks are represented in place, it’s time to go deeper into the Interface Configuration format that Label Studio uses to customize every annotation project.
Label Studio Interface Configuration
Recall from the original Label Studio tutorial that creating a labeling interface was one of the first steps in creating the Sentiment Analysis project setup. Recall that from the sentiment analysis template we configured the data to be labeled to use the ‘review’ column from the imported dataset.
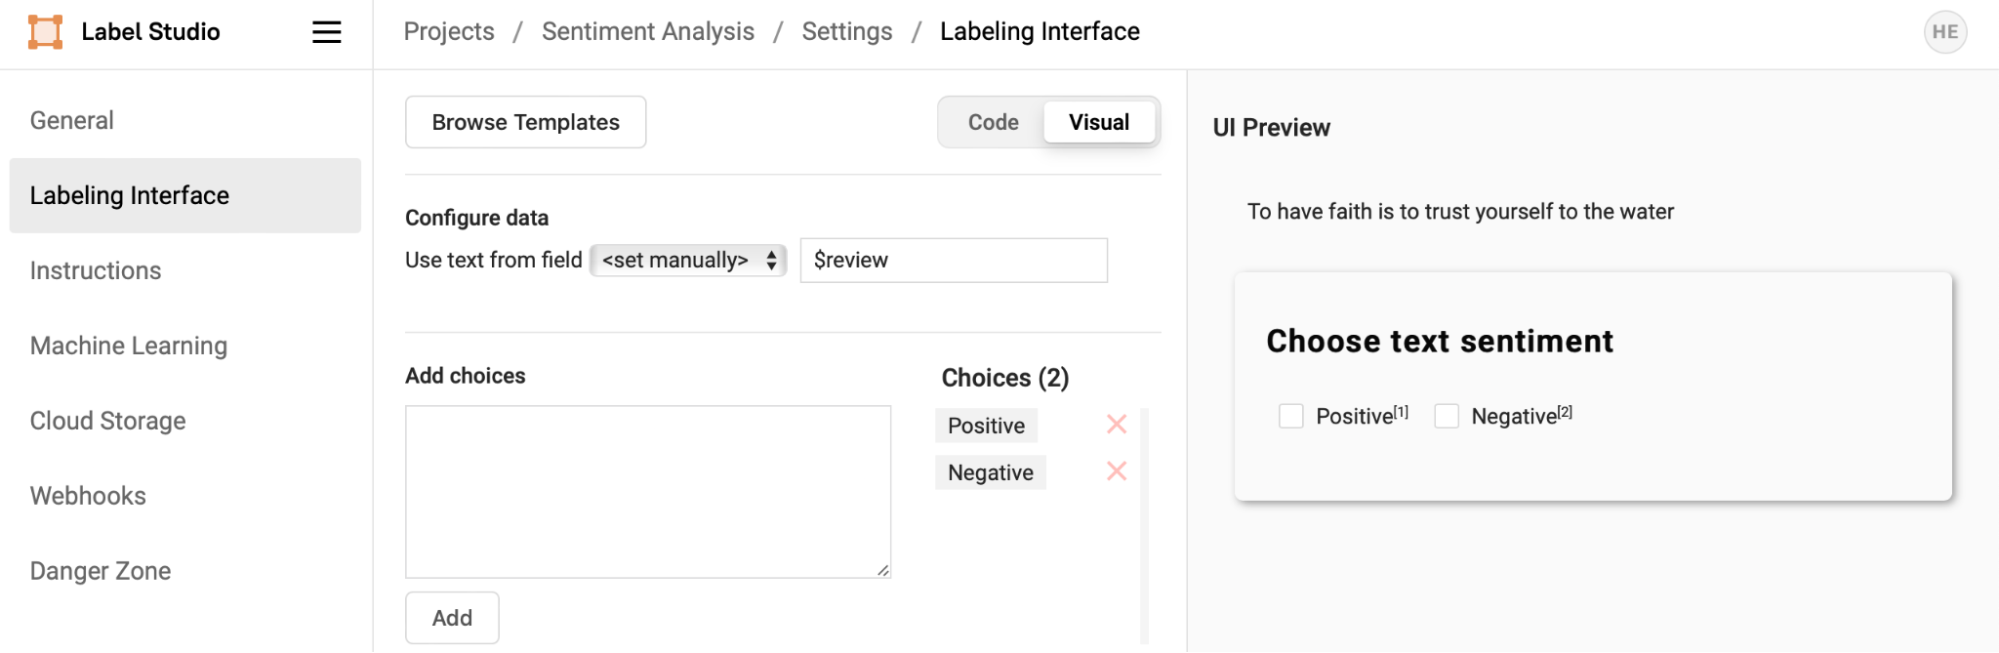
Open the code view of the Labeling Interface to see its XML representation.
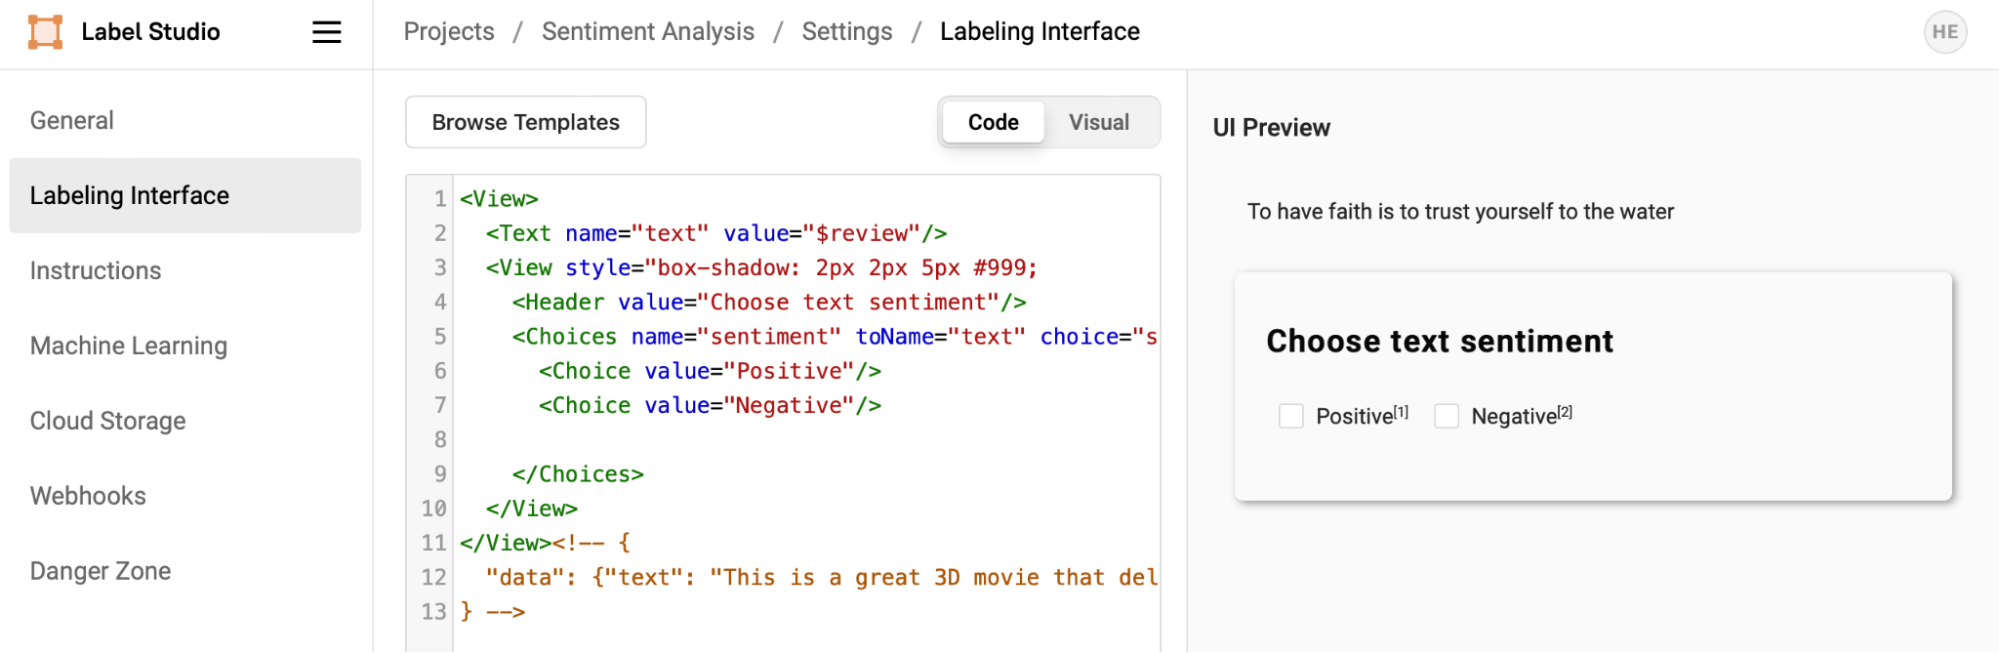
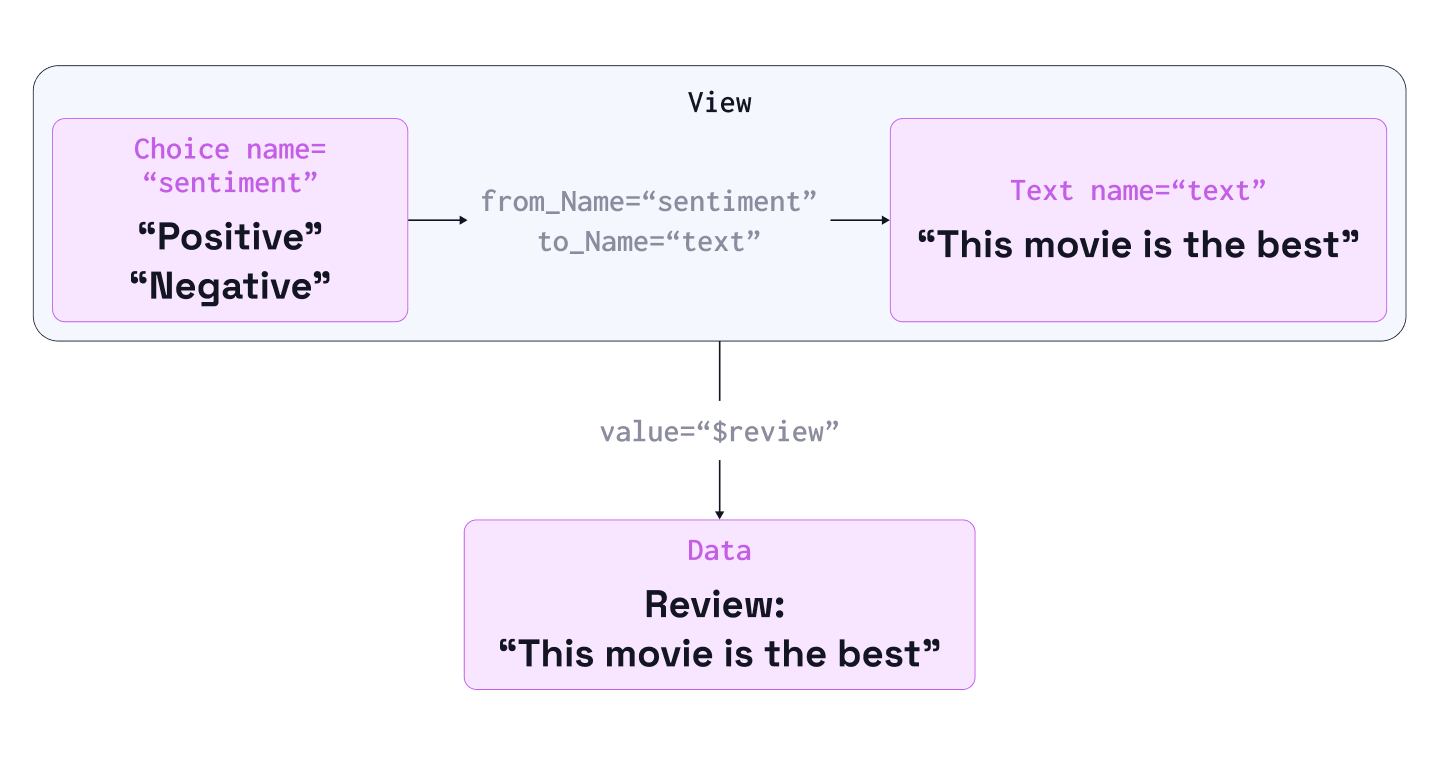
A Labeling Interface includes several nested and interrelated objects. In this case, a View contains a Text object, with the name 'text', whose value displays data from the 'review' column of the data. A Header gives instructions to the reviewer, and a Choices object allows an annotator to select from one of two choices: 'Positive' or 'Negative'. The Choices object has a name, 'sentiment', that can be referenced later and includes a 'toName' parameter that indicates that it’s annotating the data in the interface associated with the name 'text'.
<View>
  <Text name="text" value="$review"/>
  <View style="box-shadow: 2px 2px 5px #999; padding: 20px; margin-top: 2em; border-radius: 5px;">
    <Header value="Choose text sentiment"/>
    <Choices name="sentiment" toName="text" choice="single" showInLine="true">
      <Choice value="Positive"/>
      <Choice value="Negative"/>
    </Choices>
  </View>
</View>Sound complicated? Untangling these relationships can take effort, but understanding how the labeling interface acts as the logical intermediary between the annotations and the data is essential in successfully building machine learning integrations.
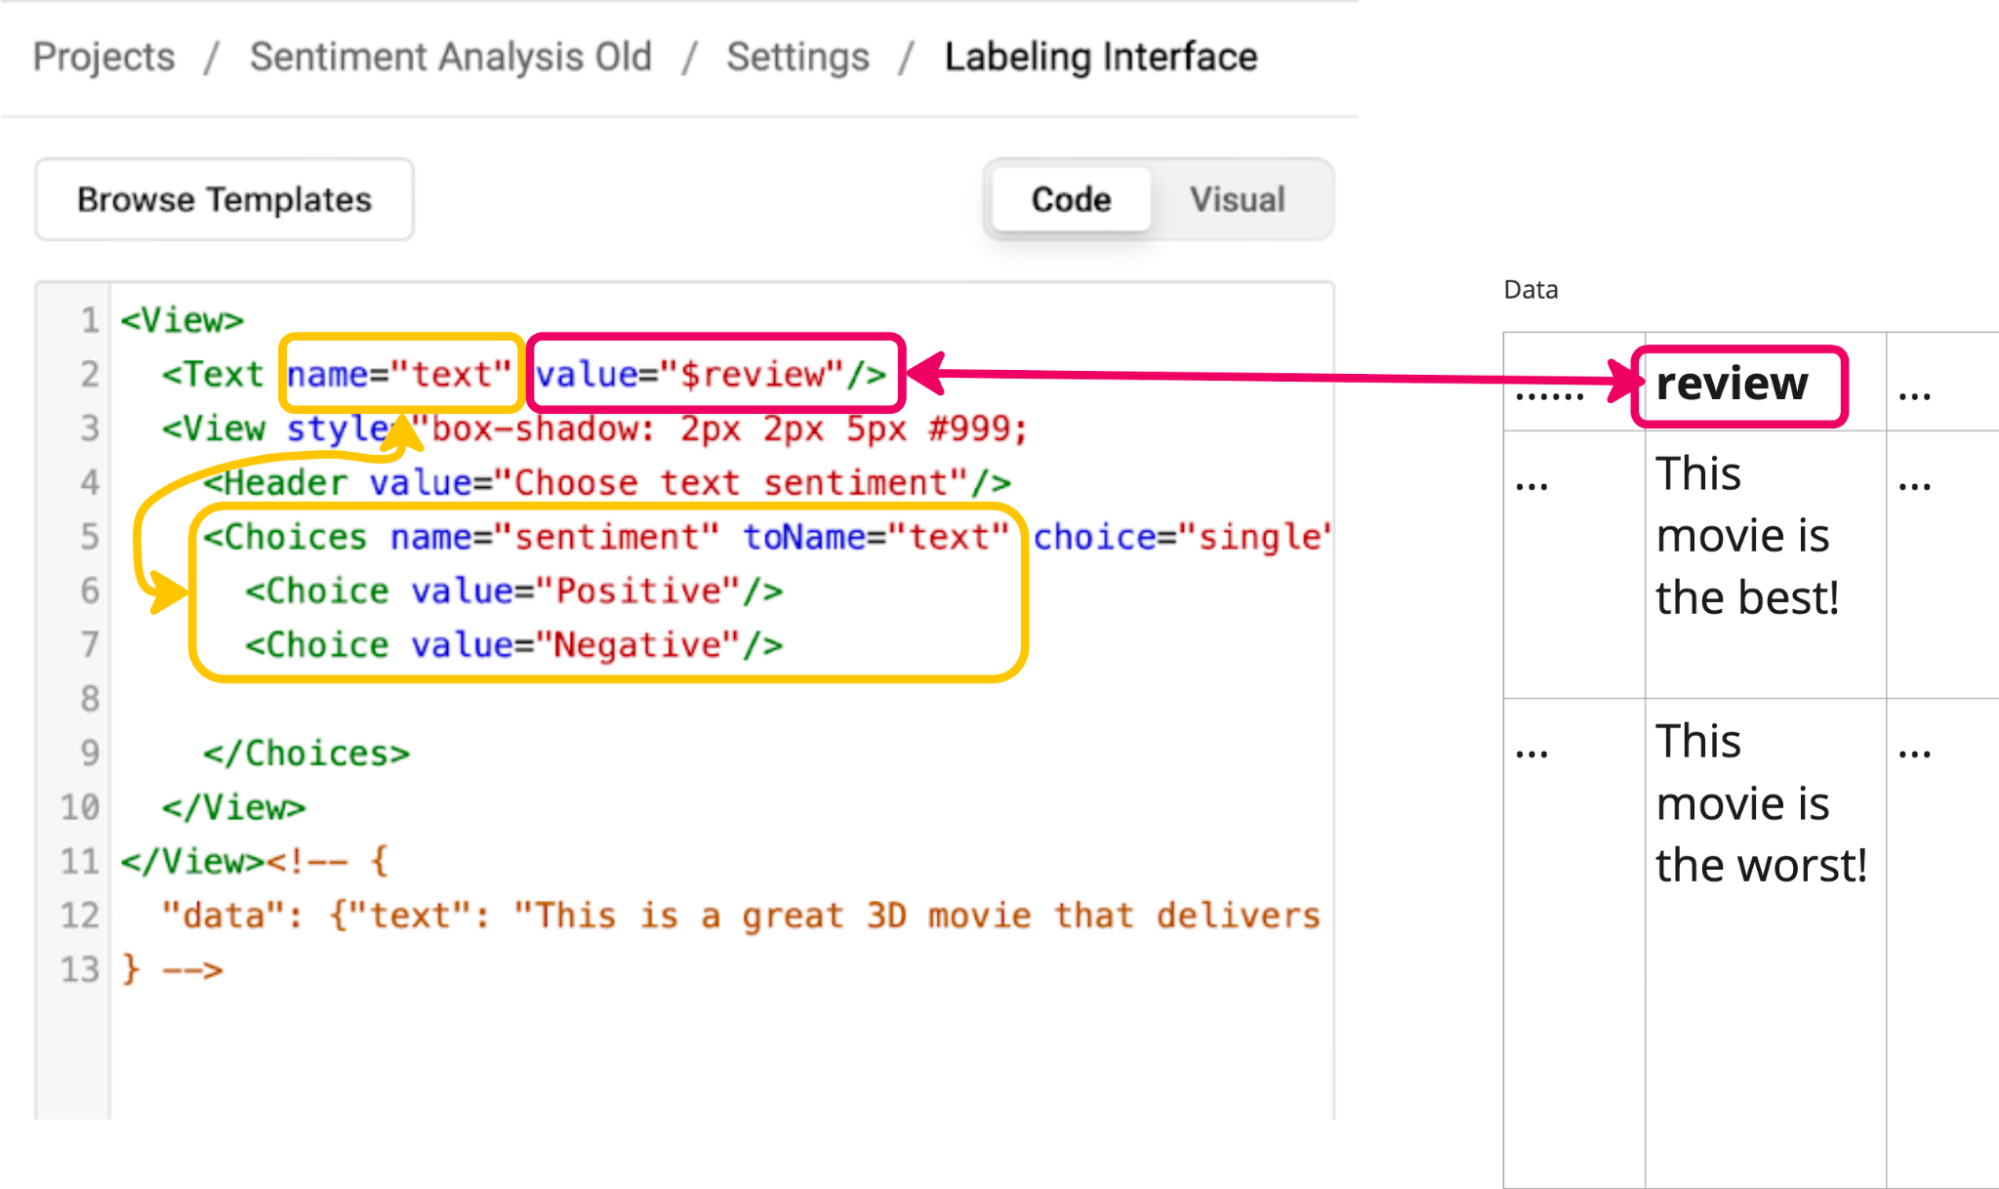
The diagram above visually represents these relationships between the annotations, interface, and data structure and will be helpful in the examples ahead. You could read it as: “sentiment is a choice of positive or negative that applies to the Text object called text, whose value is the in the data column called review.”

As we start digging into the machine learning examples, feel free to return to this section to understand how predictions are constructed by the machine learning processes to be imported into Label Studio.
Machine Learning Examples
The remainder of this tutorial will focus on two exercises: pre-annotating data to be imported into Label Studio and automatically making predictions using the Label Studio backend.
About the Model Used For These Examples
The model used for these examples is a Convolutional Neural Network (CNN) based on a series of Sentiment Analysis with PyTorch tutorials written by Ben Trevett. Their tutorial covers several different methods for building a sentiment analysis model using the same IMDB dataset that we’re using for this tutorial.
Using the example from that tutorial, we pre-trained a model using the IMDB dataset that makes a simple prediction: from the review text of the data, is the sentiment 'Positive' or 'Negative'. From that pre-training, we have an accompanying vocabulary file (a vocabulary is used to map words to numeric values within the model) and a snapshot of the trained model weights to make sentiment predictions. The model takes an arbitrary string, processes it to a tensor to input into the model, and returns an output tensor of length two that corresponds to the confidence that the model has that the phrase has either a 'Positive' or 'Negative' sentiment. The PyTorch model is wrapped in a class that allows you to initialize the model with the weights and vocabulary and extract a single prediction with a confidence level.
The model is included with the Label Studio ML Tutorial GitHub repository in the file 'sentiment_analysis/sentiment_cnn.py'. You can try it out for yourself with your own input. Using your terminal, just change into the sentiment-analysis directory and run the following Python code:
cd sentiment-analysis
python3

>>> from sentiment_cnn import SentimentCNN
>>> model = SentimentCNN(state_dict='data/cnn.pt', vocab='data/vocab_obj.pt')
>>> model.predict_sentiment("Label Studio is the best!")The output should look something like this:
(1, 0.9269511699676514) The first value, '1', represents a positive sentiment (a '0' would represent a negative sentiment), and the second value represents the confidence level the model has in that prediction, in this case, about 93%. Try out your own text strings to develop an intuition of how accurate the model is, especially with complex phrasing (like double negatives) that might confuse the model. When you’re done, type 'exit()' to return to the command line.
Importing Pre-Annotated Data into Label Studio
In the previous tutorial, we used a 100-task dataset with 100 unlabeled reviews. We will use a new 100-task dataset with 100 labeled reviews for this part of the tutorial. We’re choosing this set because it will allow us to evaluate the predictive power of our model. The dataset is included as 'file_train_labeled_100.csv'.
To prepare the sentiment predictions, we will take the following steps:
- Load the model and its parameters (including the weights and vocabulary) into memory.
- Read the dataset line-by-line, storing the data as a Python dictionary that can be output as a JSON object that Label Studio will understand.
- Make a sentiment prediction against each line, capturing the sentiment and confidence.
- Store the prediction in a Python dictionary that can be output as a JSON object that Label Studio will understand.
- For each pair of data and predictions, write a JSON object to file that matches the data with the prediction.
The resulting file can then be loaded into Label Studio. A complete script capturing this workflow can be found in the file 'sentiment_analysis/generate_predictions.py'. Let’s do a quick analysis of the code.
The first block loads the Python libraries needed for the script, including the custom sentiment analysis model, then creates an instance of the model using the pre-saved weights and vocabulary.
import sys
import csv
import json
import sentiment_cnn

# loads the model with the pre-generated weights and the vocabulary configuration
model = sentiment_cnn.SentimentCNN(
        state_dict='data/cnn.pt',
vocab='data/vocab_obj.pt')The next two lines capture the name of the file we want to load and the name of the file we want to write predictions to.
# read the input and output file names from the command line
infile = sys.argv[1]
outfile = sys.argv[2] ‘label_map’ is an easy way to convert the sentiment output of the model to the text annotations that Label Studio expects. In this case, ‘0’ maps to ‘Negative’, and ‘1’ maps to ‘Positive’. We also create an empty array to hold the predictions and set an arbitrary 'prediction_id' counter to '1000'.
# a helper map to convert model predictions to Label Studio choices
label_map = {
    0: 'Negative',
    1: 'Positive'
}The next step is to load the data file using Python’s built-in Comma Separated Value (CSV) reader. The first line of the file is headers for the data, so we capture that separately as the very first line that’s read.
with open(infile) as csvfile:
    header = None
    reader = csv.reader(csvfile)
    for row in reader:
        if not header:
            # first row is the header
header = row Every other row of the data is then read and zipped up into a dictionary that can be exported as a JSON object.
        else:
            # the rest of the rows are values
            values = row

            # turns the loaded data row into a dictionary, paired with the header
data = dict(zip(header, values))The model is then used to predict the sentiment, which is then mapped to one of the choices defined in the labeling configuration.
            # predict the sentiment and confidence score from the model
            sentiment, score = model.predict_sentiment(data['review'])

            # map the prediction to the choice expected by Label Studio
label = label_map[sentiment] In the next block, the prediction is written into the format Label Studio expects. A longer description of the expected format can be found in the Label Studio documentation, but it’s helpful to talk about some fields. The 'model_version' is an arbitrary identifier you can use to record precisely which model you used to make a prediction. The score will be shown to annotators to help them sort and guide their work. The score is associated with the 'model_version', and if you have multiple different models making predictions, you can decide which will be shown to annotators.
The 'id' gives each prediction a unique value we can refer to later.
Note how several items reflect the Labeling Interface configuration defined for this project. The 'from_name' tells Label Studio that the prediction is for the 'sentiment' annotation of type 'choices' (reflected in the 'value' object). The 'to_name' tells Label Studio that the annotation labels the 'text' field in the configuration, referring to the 'review' field in the data.
            # create a python dictionary object for the prediction to be written as JSON
            prediction = {
                'model_version': 'SentimentCNN 1',
                'score': float(score),
                'result': [{
                    'id': str(prediction_id),
                    'from_name': 'sentiment',
                    'to_name': 'text',
                    'type': 'choices',
                    'value': {
                        'choices': [
                            label
                        ]
                    }
                }]
} Take a moment to compare the prediction format with the labeling interface format. Understanding how the two objects relate is important in understanding how predictions can be successfully imported into Label Studio. This is a good time to refer to the previous section about the Labeling Configuration to understand what these fields refer to.
The data and prediction for the task are then appended to a tuple of key-value pairs at the end of the prediction list, the prediction_id is incremented, and the next task is processed.
            # pair the data with the predictions
            predictions.append({ 'data': data, 'predictions': [ prediction ] })

prediction_id = prediction_id + 1With all of the predictions made, the file is written out to disk and is ready to be imported into Label Studio.
with open(outfile, 'w') as jsonfile:
json.dump(predictions, jsonfile)Try it out for yourself! Run the script with the following command:
python3 generate_predictions.py \
  ../IMDB_train_labeled_100.csv \
../IMDB_predictions_100.jsonOnce the script completes, return to Label Studio and import the file into your Sentiment Analysis project. Select "Import" at the top of the task view.
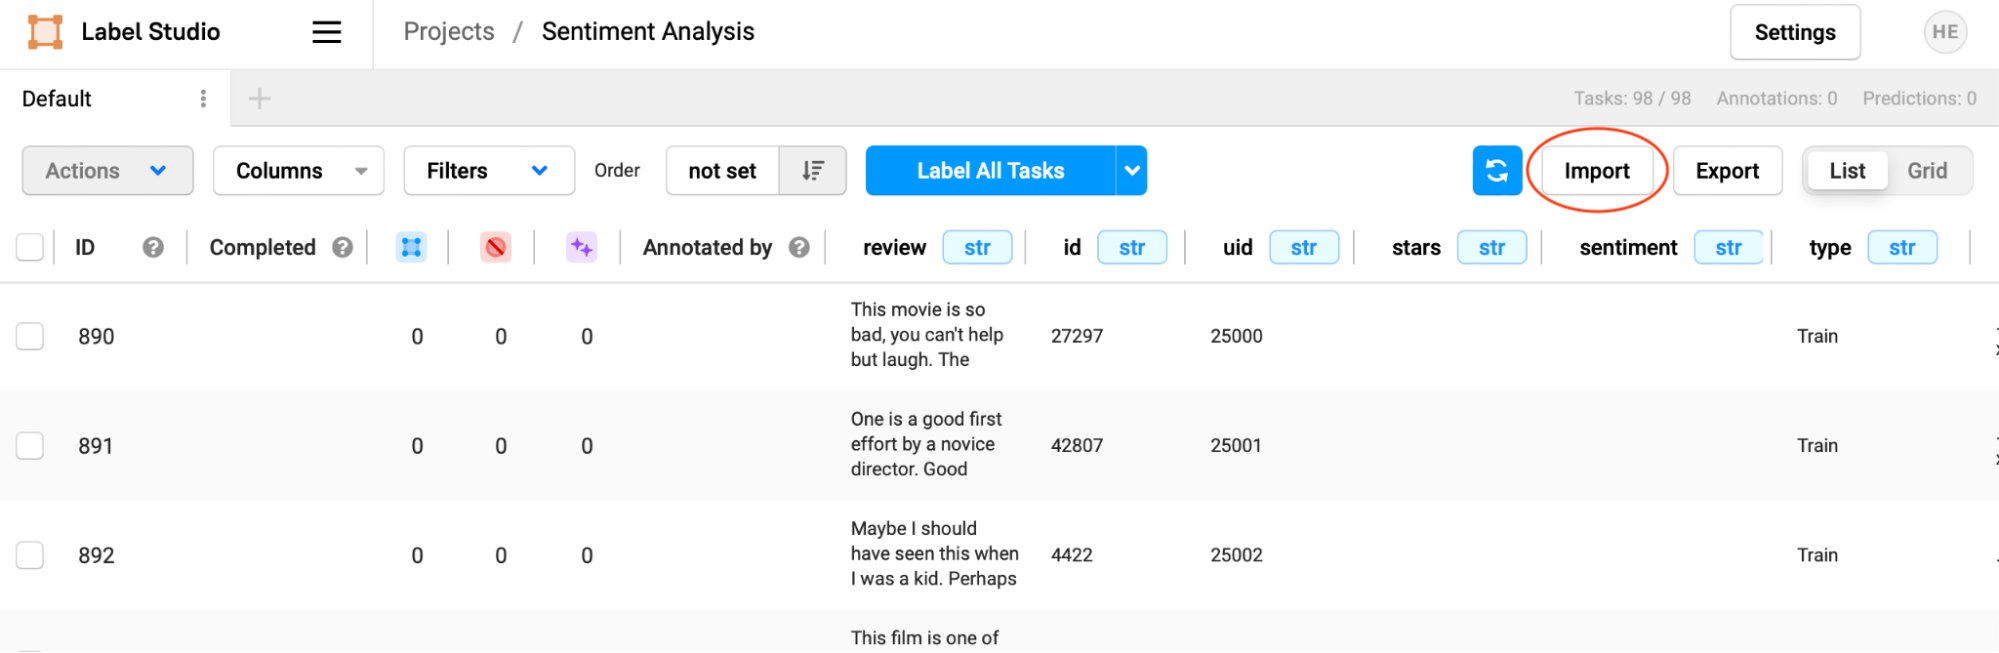
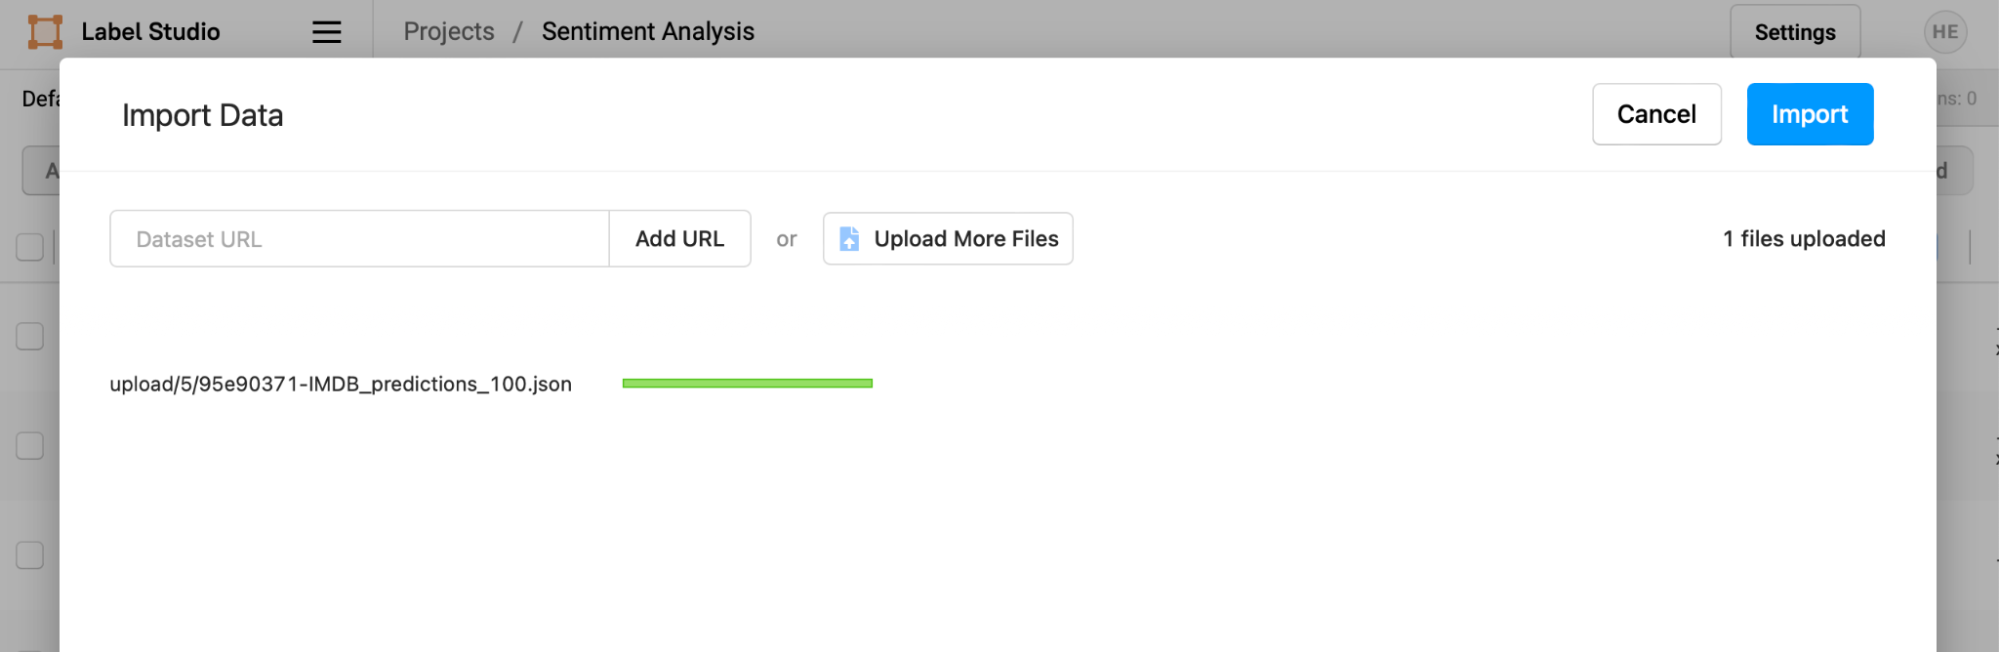
Navigate to the tutorial directory, then choose the 'IMDB_predictions_100.json' file you created. Confirm that the file is uploaded, then select "Import" to complete the process.
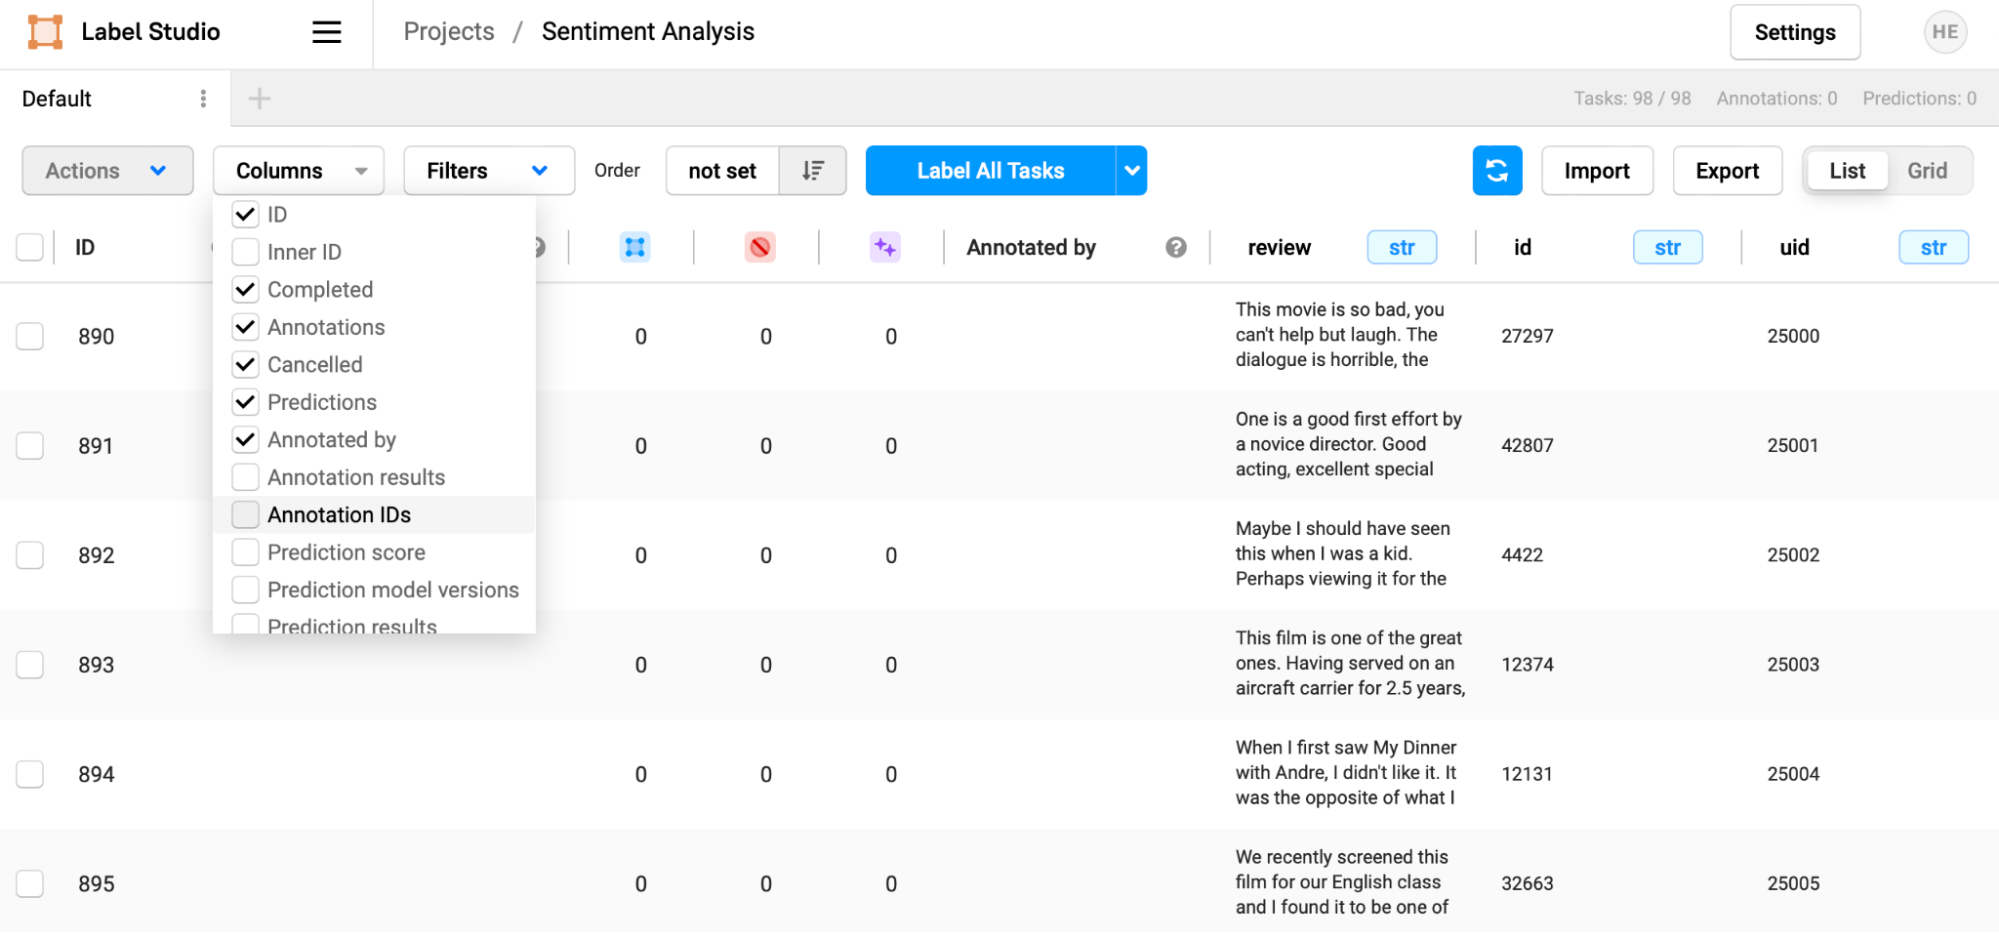
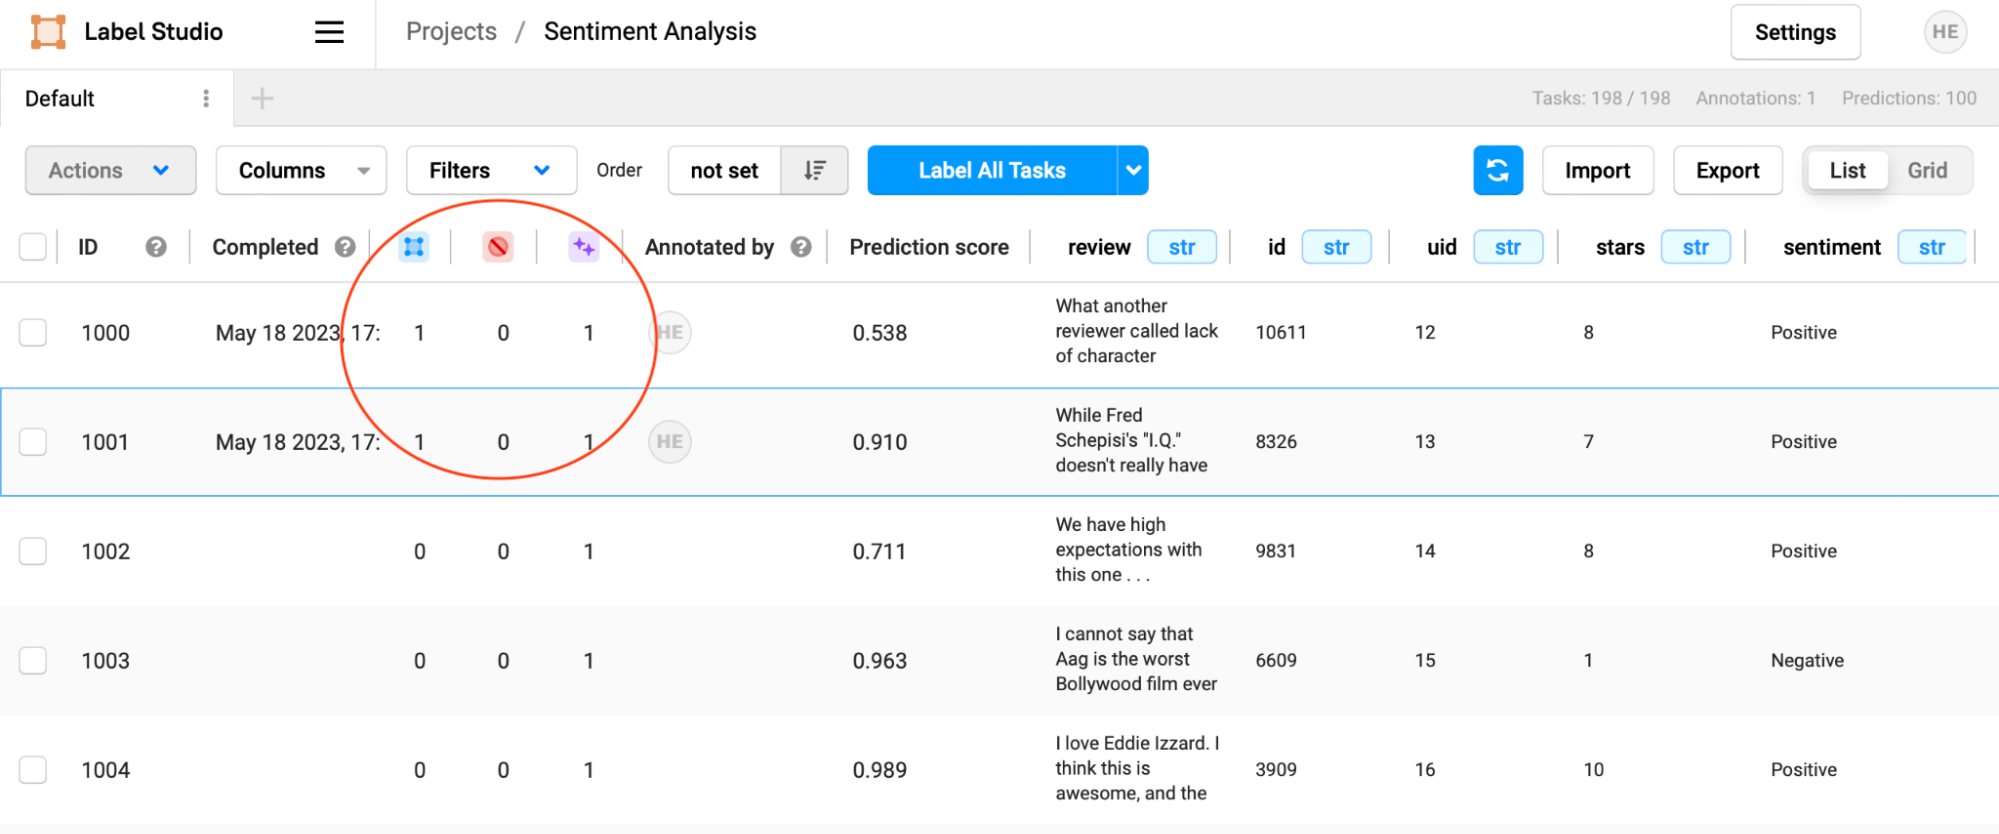
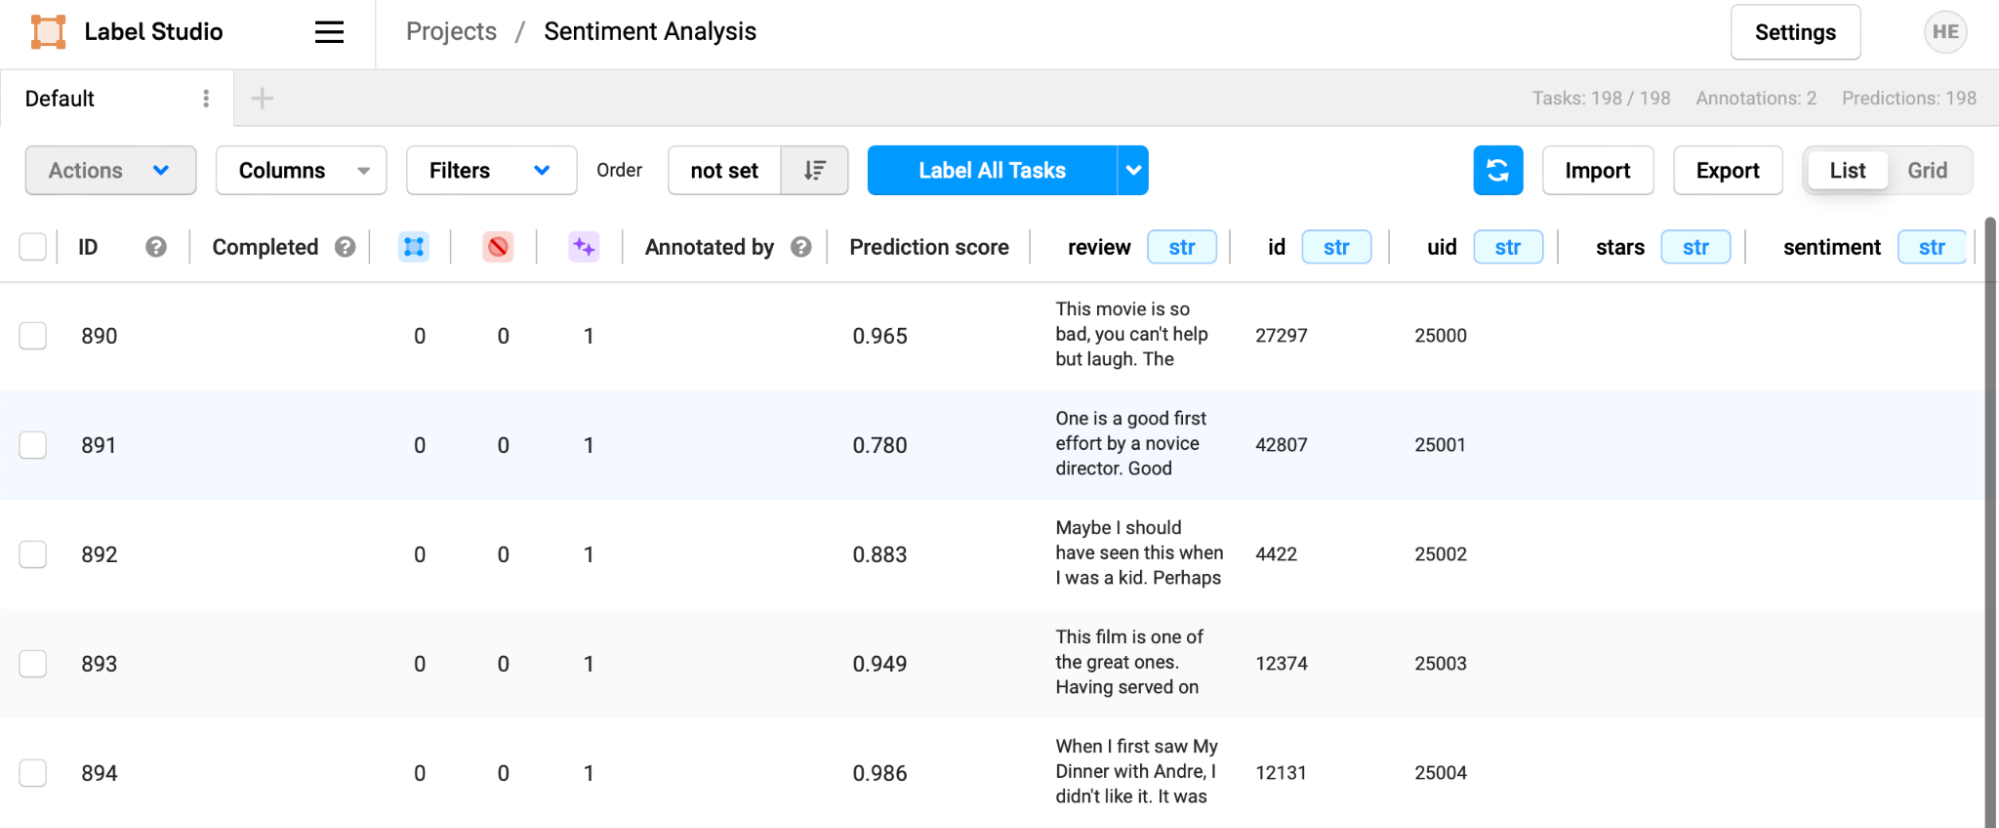
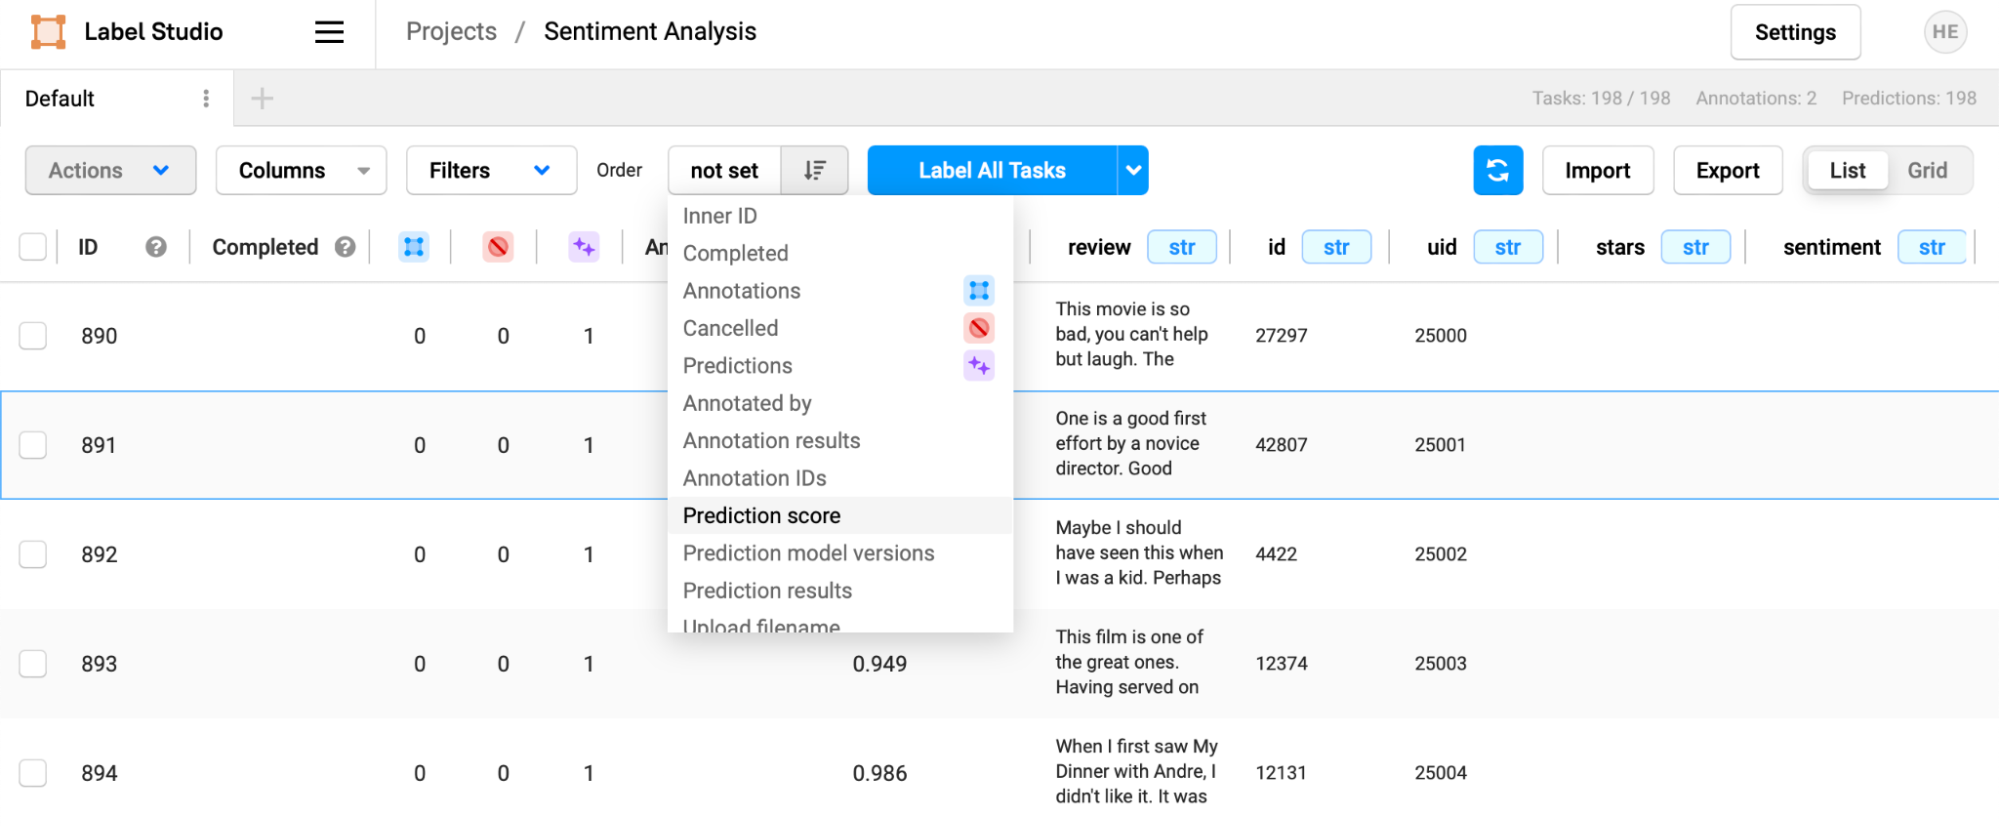
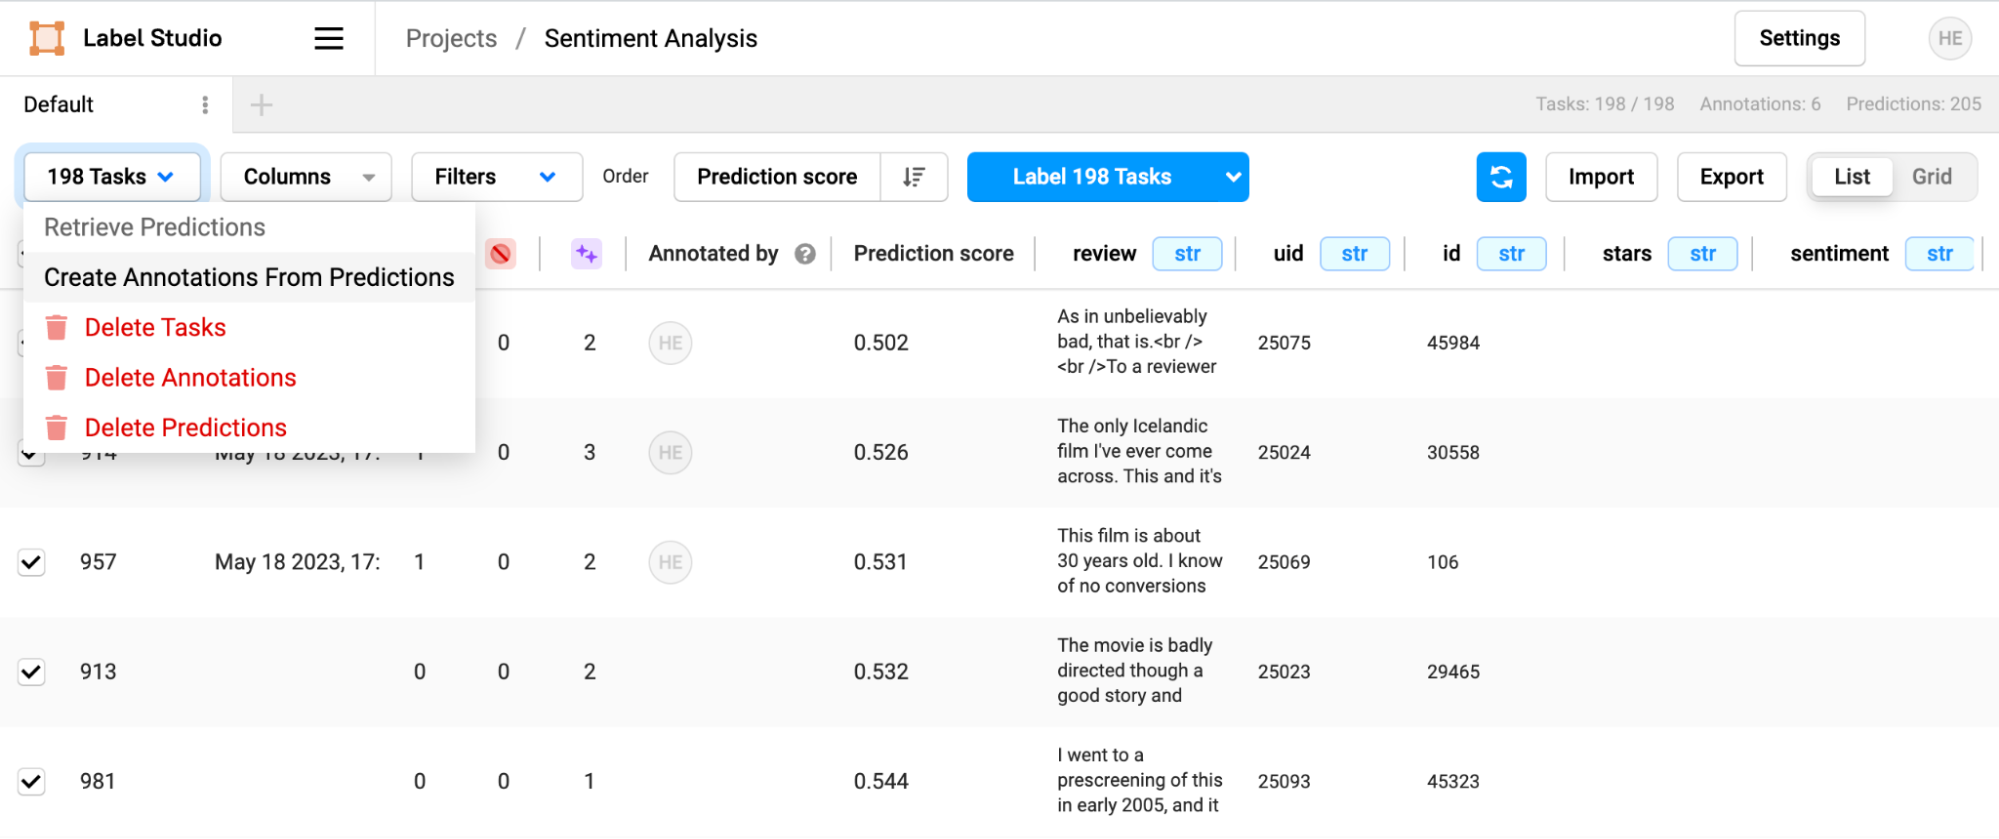
In the "Columns" dropdown, enable the "Prediction score" view in the column.
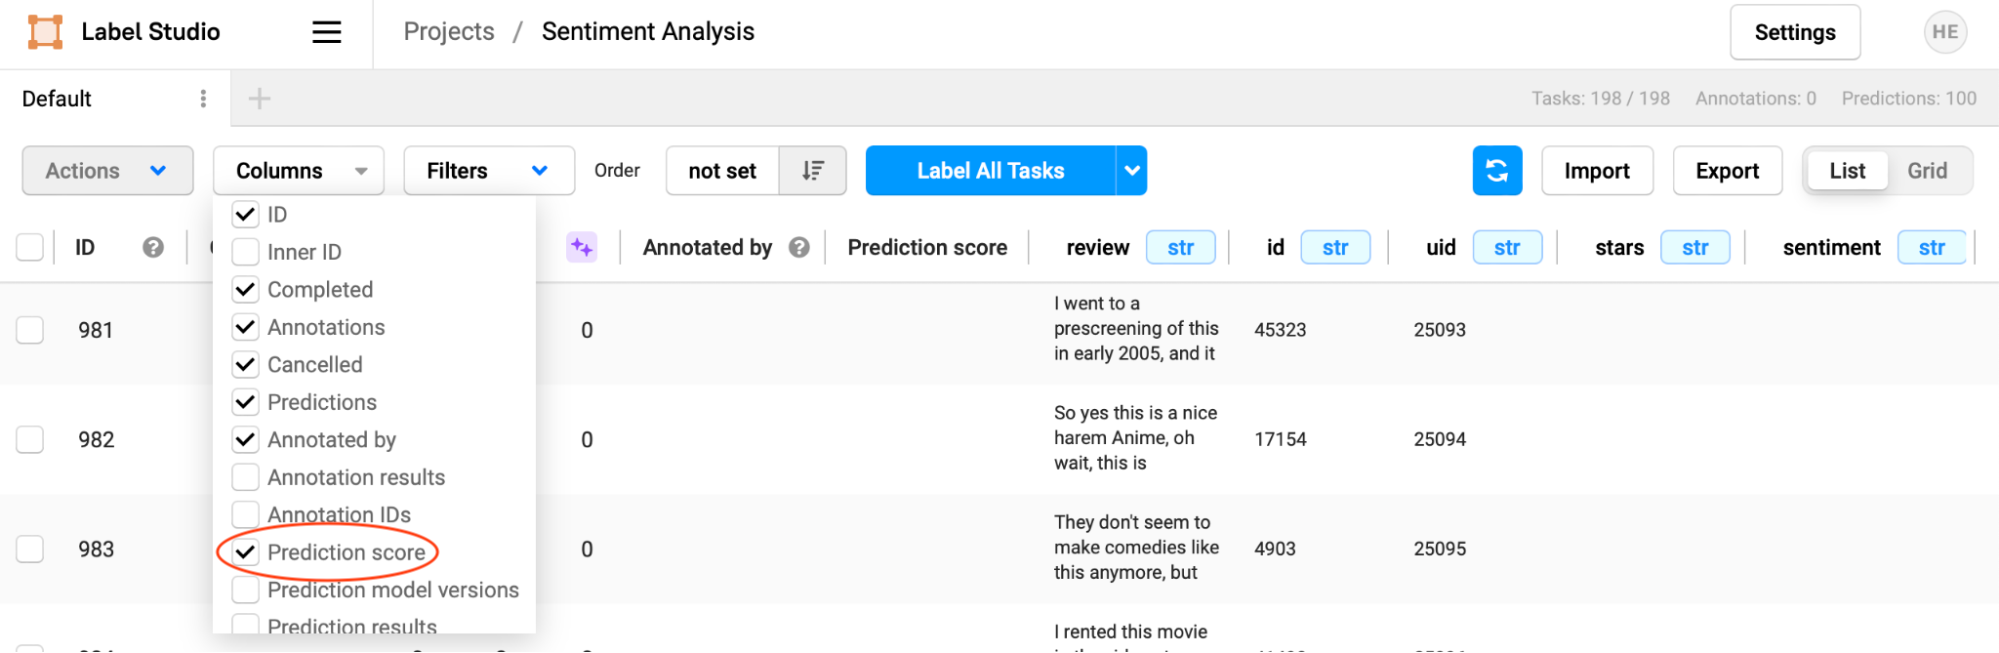
Scroll down the list of tasks, and you’ll find a new set of tasks, including Prediction Scores and Prediction Results.
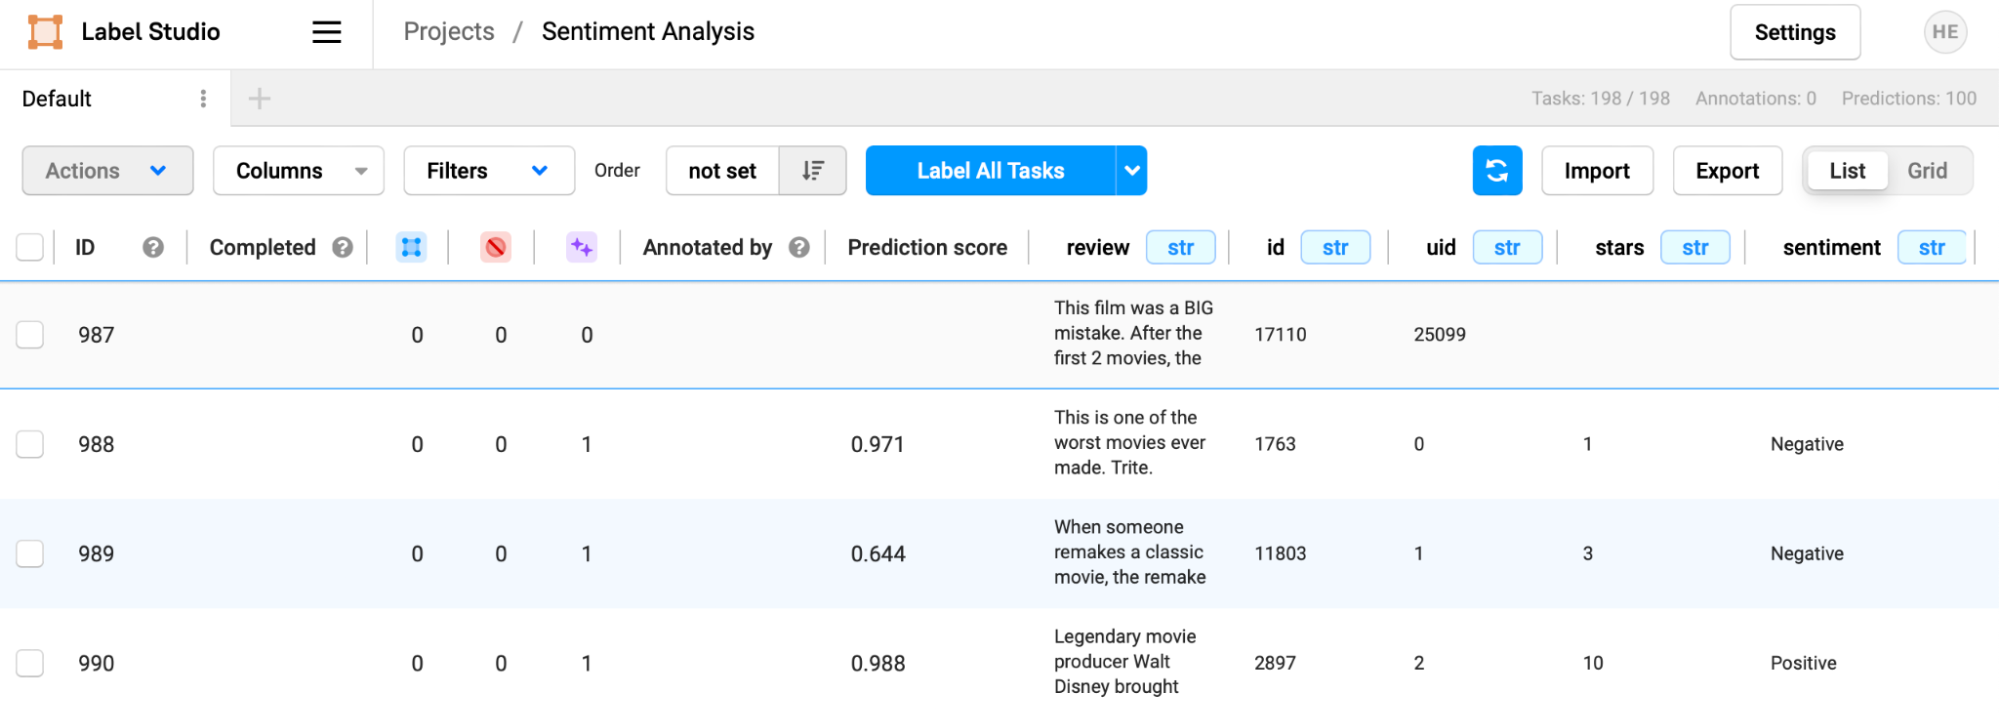
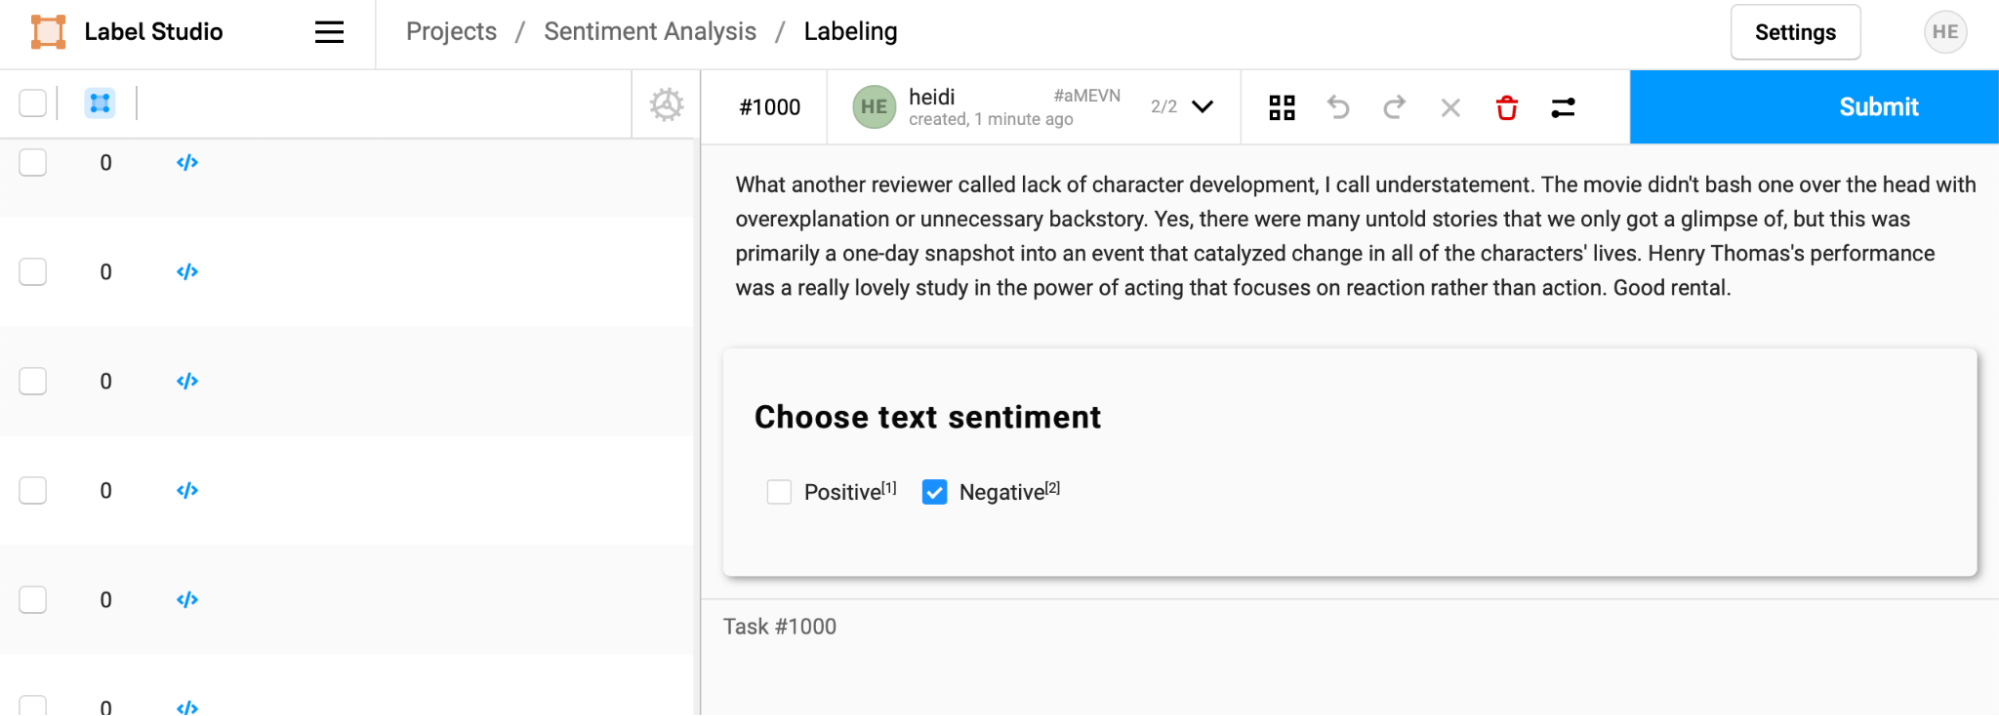
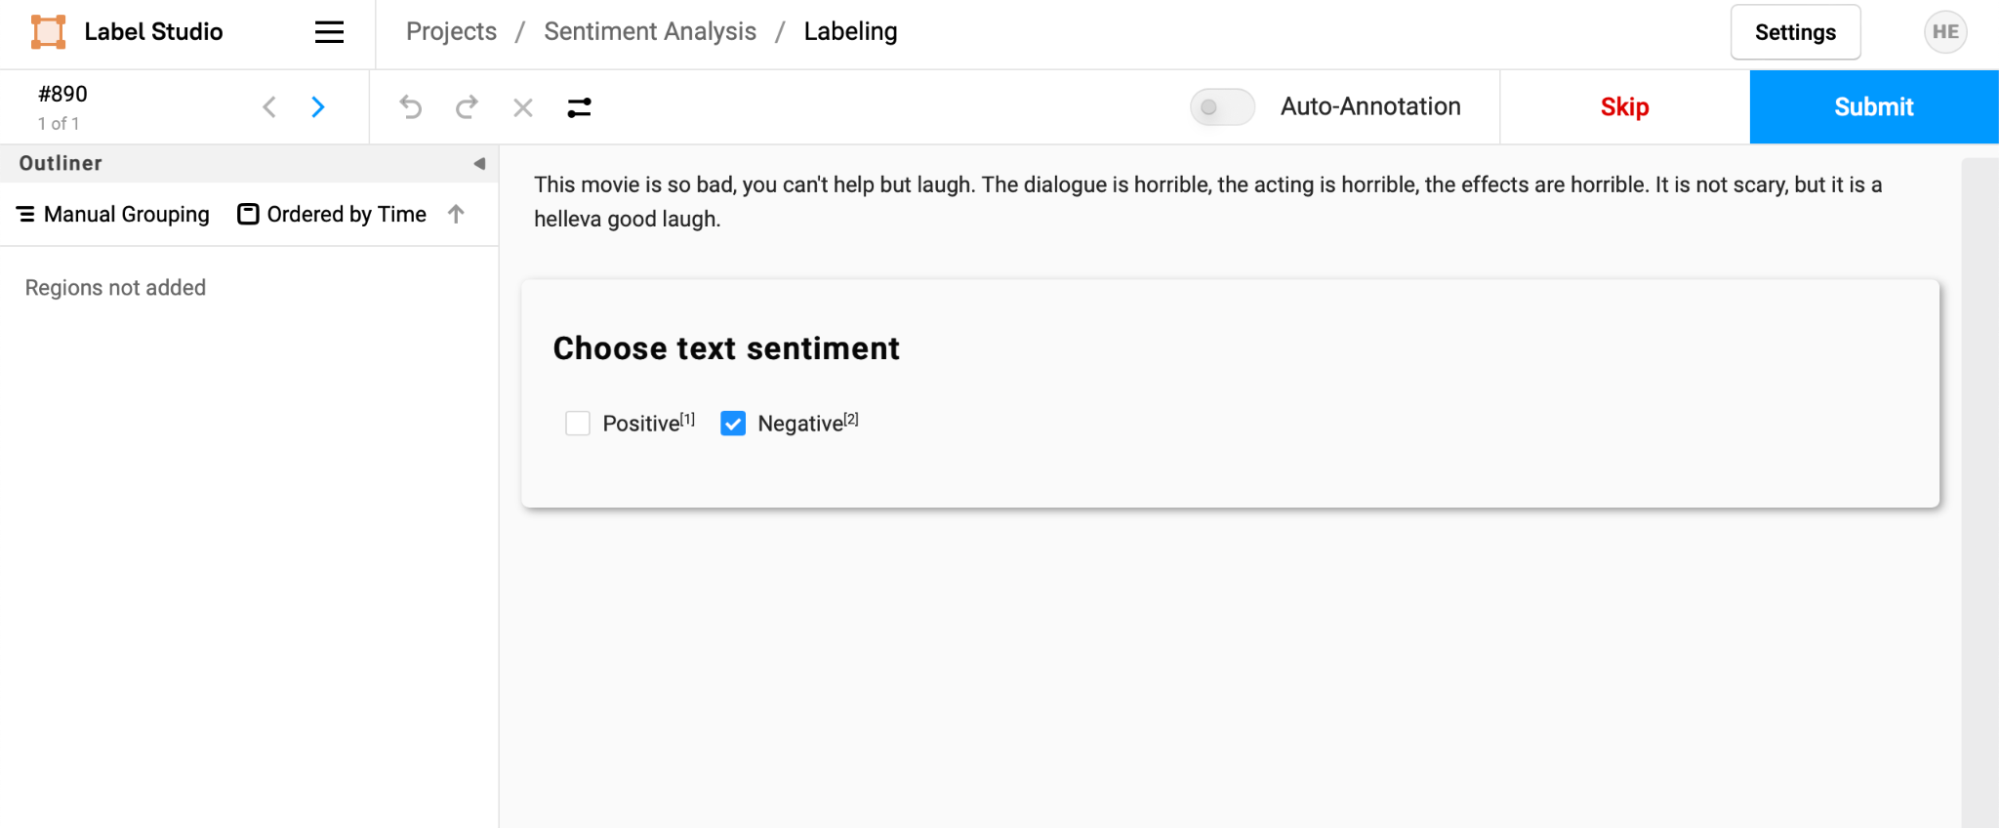
Click through on one of the tasks (in this instance, we chose one with a low confidence score), and you can see that the prediction is pre-filled into the annotation interface. An annotator can then accept or change this prediction before hitting submit to make their annotation. In this case, the annotation team member would want to choose "Positive" as the sentiment before submitting the result, correcting the mischaracterization by the ML model.
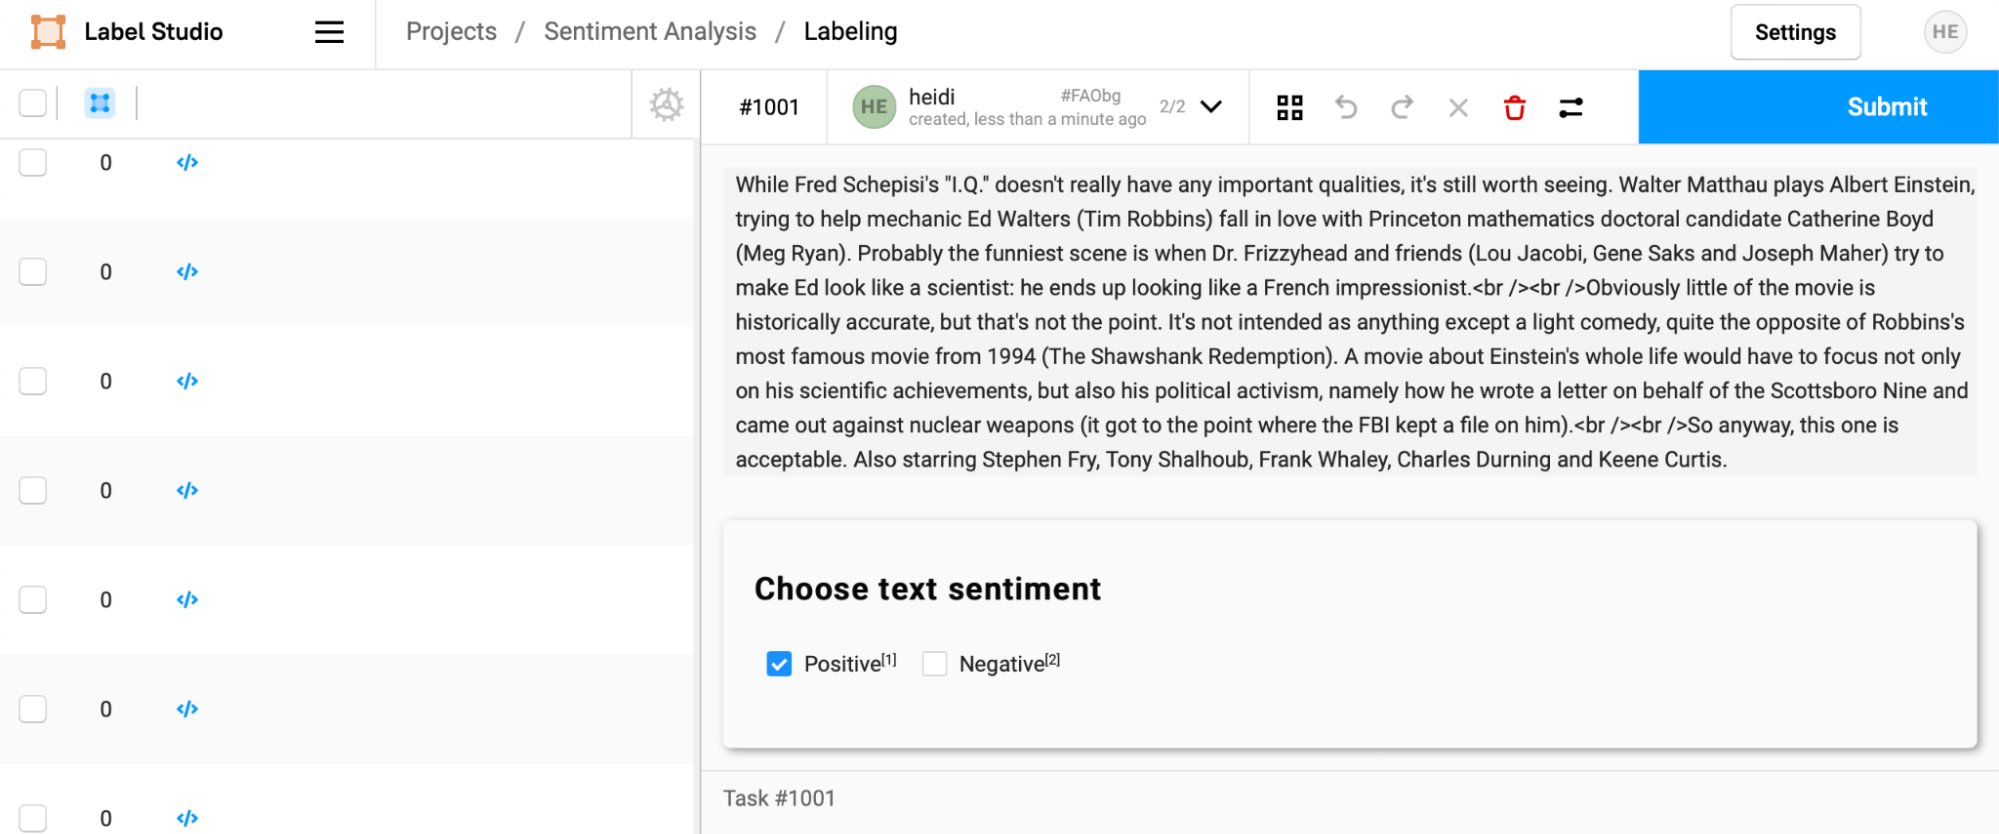
In looking at another review with a higher confidence score, the annotator can quickly confirm that the ML model made the correct prediction and affirm it by selecting "Submit."
Looking at the task interface, you may have noticed the “blue squares” and “purple stars” columns. These are counts of how many human annotations (blue boxes) and machine predictions (purple stars) have been made for a particular task, and along with prediction scores, can help prioritize work for your annotation team.
Pre-annotating data with ML predictions is a powerful tool for integrating Label Studio into your data pipeline. Label Studio also includes a machine learning backend that lets you make predictions directly from the application, bypassing the data import step.
Automatically Making Predictions with the Label Studio ML Backend
The machine learning backend for Label Studio makes it possible to integrate your model development pipeline into your machine learning workflow, allowing you to:
- Automatically pre-label data.
- Automatically label data with ML annotations.
- Conduct online learning by automatically updating your model while new annotations are created.
- Engage in active learning by selecting tasks the model is uncertain about for manual annotation.
This section will discuss setting up a Label Studio ML backend with the CNN model from our previous example to automatically pre-label data.
Writing the Prediction Interface
The Label Studio Machine Learning backend works by wrapping your model with a well-defined interface that Label Studio can communicate with, then running that interface as a web service within your ML infrastructure. As we did with the previous example, we’ve implemented the API interface and will walk through it line-by-line to see how it works. We only need to implement the `predict()` interface to make predictions.
At the top of the file, we import the necessary libraries. The first import is the base class that provides the interface for the Label Studio ML Backend API and a number of helper classes.
from label_studio_ml.model import LabelStudioMLBase
from sentiment_cnn import SentimentCNN

import torch
import torch.nn as nn
import torchtextIn the following lines, we define a SentimentModel class that inherits from the base class, along with an initialization function that creates a new instance of our SentimentCNN class (loading the pre-defined weights and vocabulary into it) and defines the label_map that can be used to transform predictions from numeric values to the choice values expected by Label Studio.
class SentimentModel(LabelStudioMLBase):
    def __init__(self, **kwargs):
        super(SentimentModel, self).__init__(**kwargs)

        self.sentiment_model = SentimentCNN(
                state_dict='data/cnn.pt',
                vocab='data/vocab_obj.pt')

        self.label_map = {
            1: "Positive",
0: "Negative"} Next, we define an implementation of the 'predict' interface. Recall from our previous example that we needed to make predictions using the objects we defined in the labeling interface. The base class includes a 'self.parsed_label_config' variable that defines your labeling interface as a Python object. This means you can dynamically parse the required 'from_name' and 'to_name', types, and other required information from your labeling interface.
We read these values from the labeling configuration to avoid hard-coding them into our prediction implementation.
    def predict(self, tasks, **kwargs):
        predictions = []

        # Get annotation tag first, and extract from_name/to_name keys from the labeling config
        #  to make predictions
        from_name, schema = list(self.parsed_label_config.items())[0]
        to_name = schema['to_name'][0]
data_name = schema['inputs'][0]['value'] Label Studio will attempt to send tasks out in batches, allowing you to optimize your prediction workflow. In this case, our function will loop over every task. Using the 'data_name' drawn from the labeling configuration, the text to make a prediction on is pulled out of the task.
Then the 'predict_sentiment' method returns the prediction and the confidence score.
        for task in tasks:
            # load the data and make a prediction with the model
            text = task['data'][data_name]
            predicted_class, predicted_prob = self.sentiment_model.predict_sentiment(text)
            print("%s\nprediction: %s probability: %s" % (text, predicted_class, predicted_prob))

label = self.label_map[predicted_class] Then, as in the previous example, a prediction object is constructed with the appropriate values for the 'from_name', 'to_name', mapped prediction class, and scores are written into the prediction object. Note that in this instance, because the data was supplied as an input to the method, it is automatically paired with the returned prediction and does not need to be generated as in the previous example.
After all the data has been looped over, the predictions are returned.
            # for each task, return classification results in the form of "choices" pre-annotations
            prediction = {
                'score': float(predicted_prob),
                'result': [{
                    'from_name': from_name,
                    'to_name': to_name,
                    'type': 'choices',
                    'value': {
                        'choices': [
                            label
                        ]
                    },
                }]
            }
            predictions.append(prediction)
return predictionsRunning the Prediction Server
We now need to start a prediction server to connect to Label Studio. Change to the top-level directory in the tutorial project from the command line, then generate the required scaffolding for the ML backend.
cd ..
label-studio-ml init \
  mlbackend \
--script sentiment_analysis/sentiment_api.pyYou will also need to copy over the supporting model and data files into the newly generated model template.
cp sentiment_analysis/sentiment_cnn.py mlbackend/.
mkdir mlbackend/data
cp sentiment_analysis/data/* mlbackend/data/.Navigate into the ‘mlbackend’ directory, and start the machine learning service.
cd mlbackend
label-studio-ml start .After the server successfully starts, you should see a message to the effect of:
[<date>] [INFO] [werkzeug::_log::225] * Running on http://192.168.50.212:9090/ (Press CTRL+C to quit)Copy the URL from that message and paste it into your browser. Upon loading the page, you should get a response that indicates a status of “UP."
Connecting the ML Backend to Label Studio
Now it’s time to connect Label Studio to the ML backend! Open up your instance of Label Studio, navigate to the Sentiment Analysis project, select “Settings”, then select “Machine Learning” from the left sidebar.
Select “Add Model”, paste the URL for the ML backend into the URL field, add a title and description, then toggle the switch for “Use for interactive preannotations” to on. When this is done, select “Validate and Save.”
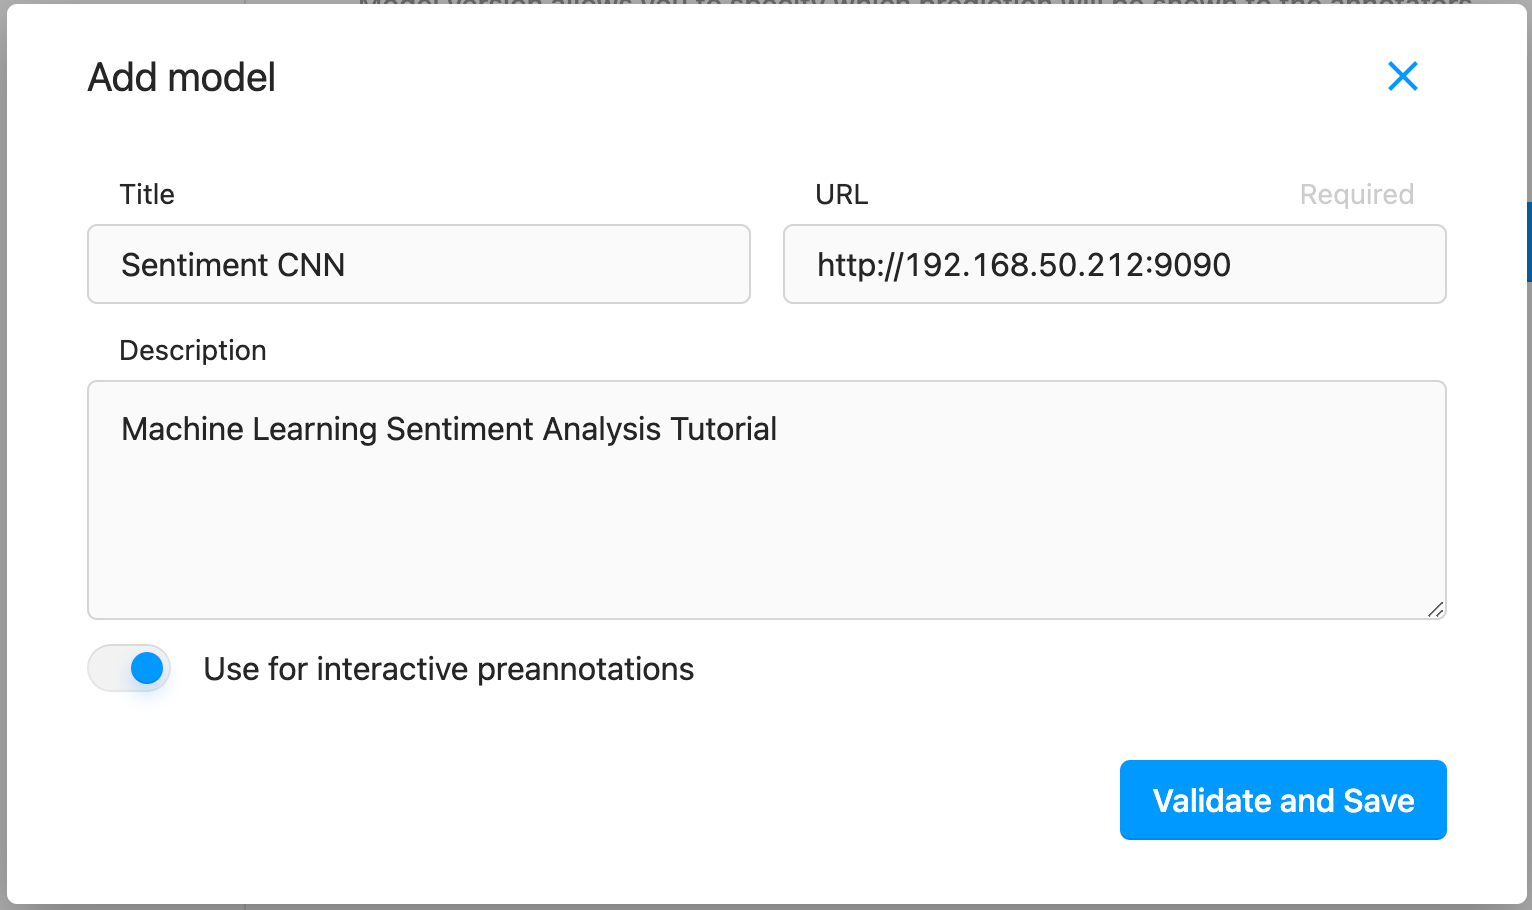
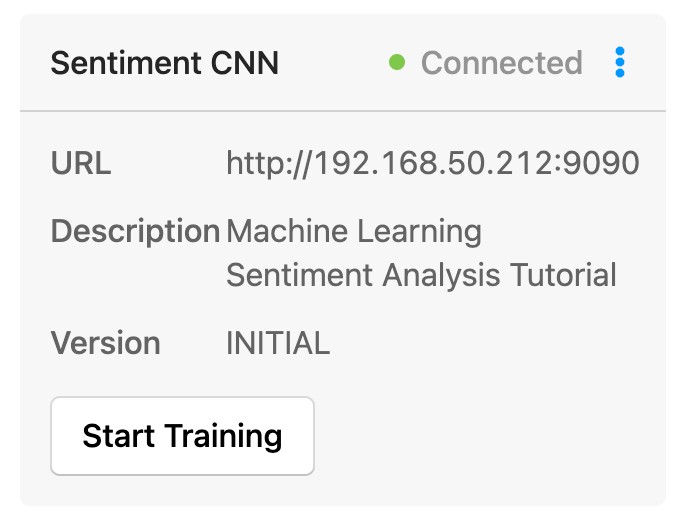
Once Label Studio connects to and validates the model, you’ll see an information card showing the status, URL, description, and version of the model.
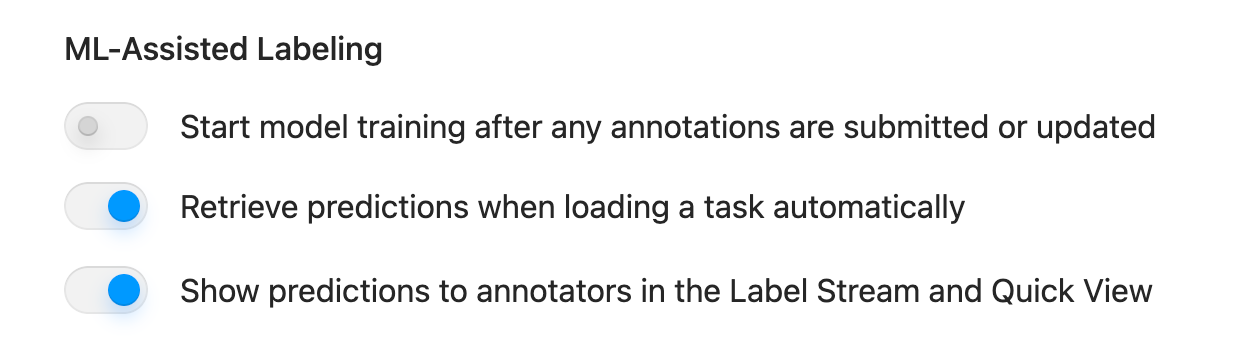
Toggle the “Retrieve predictions when loading a task automatically” to “on” as a final step in the setup process. This will ensure that predictions are made as annotators load tasks.
Automatically Labeling Tasks
Once the model is set up, you press the “Start Training” button to process all of the project's tasks automatically.
After giving the model some time to compute the predictions, navigate back to the task list, hit the refresh button, and your data will be pre-annotated with predictions from the model.
As with the file of pre-annotations loaded previously, the selection will be pre-filled when you begin the labeling process.
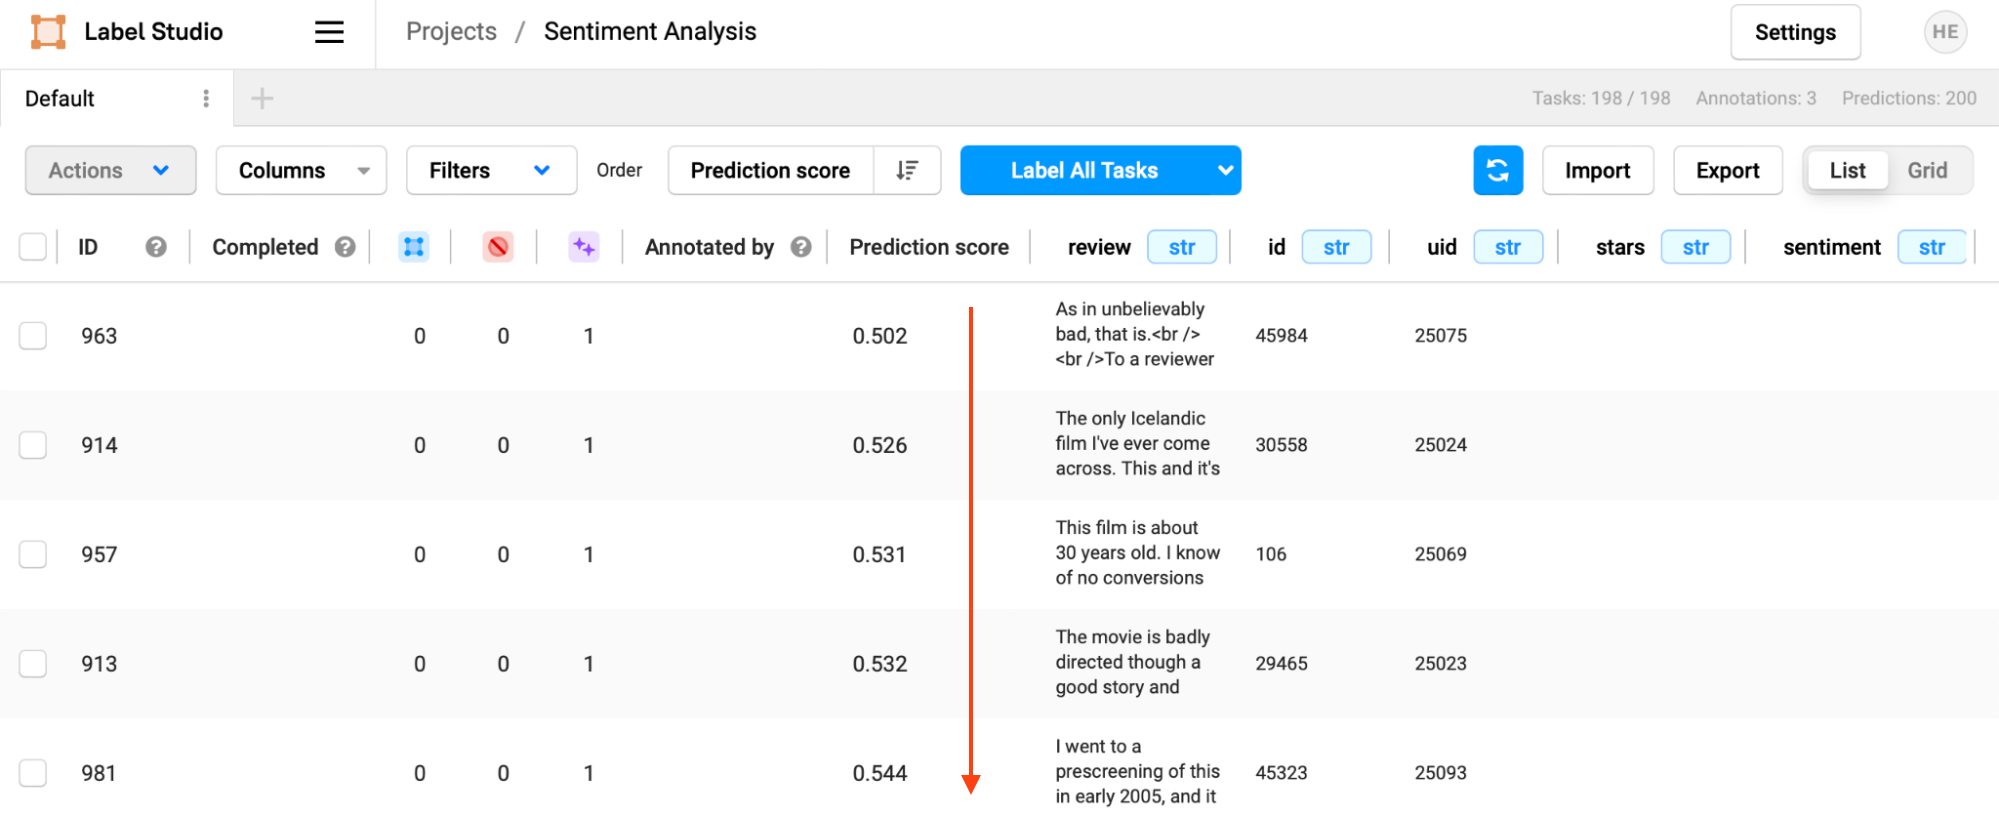
You can use the prediction score to your advantage by changing the sorting order of the tasks in the task view. In the "Order" dropdown, select "Prediction Score."
Now, the scores will be sorted from lowest to highest.
Select “Label Tasks as Displayed” to begin labeling in this newly sorted order.
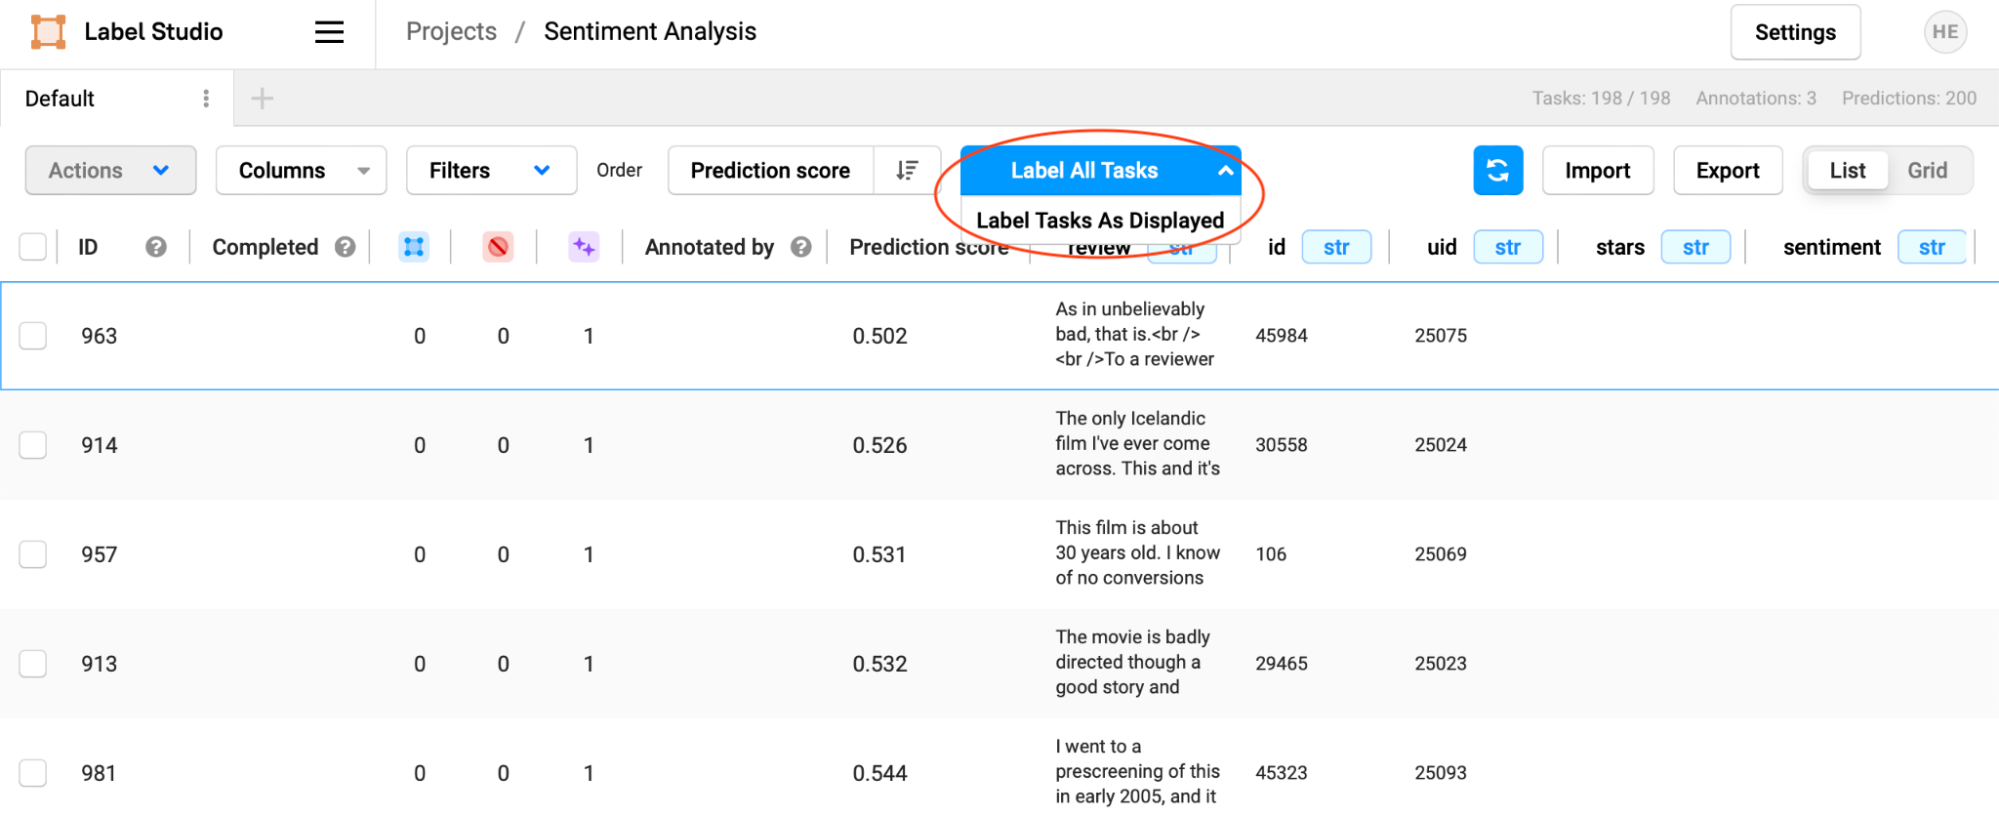
This way, you can focus your annotator efforts on the most challenging reviews, using their time more effectively.
Some Notes on Model Versions and Annotation Scores
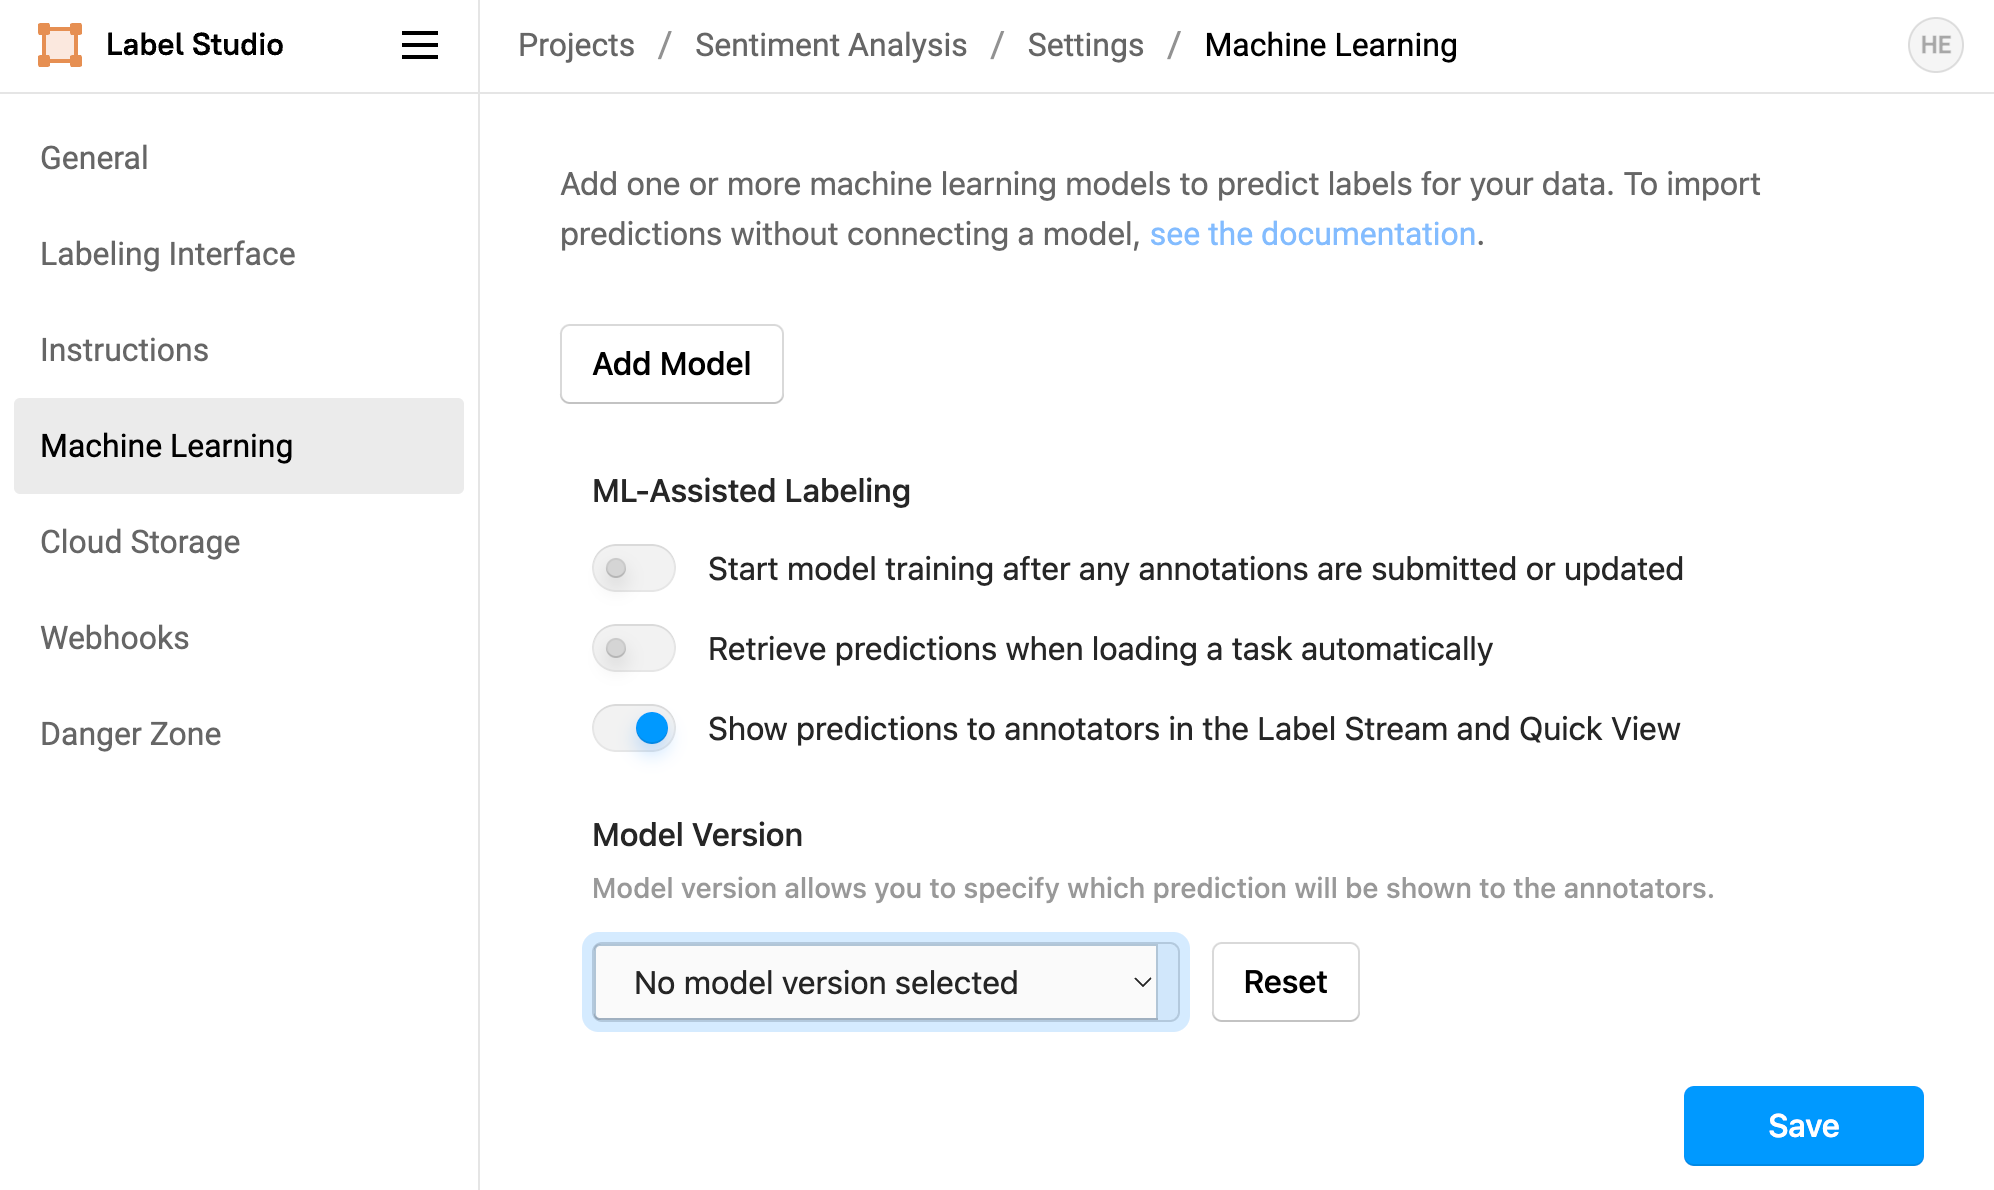
Label Studio maintains model versions for both pre-annotated and ML-backend annotated tasks. The ML backend generates this version number automatically, and you may find that the displayed prediction scores aren’t displayed. If you’re running into this issue, you can set which version of the results is displayed in the ML settings page. In the example below, if you wanted to display the most recent model scores, you would select "1684798288" as the model version to display to annotators.
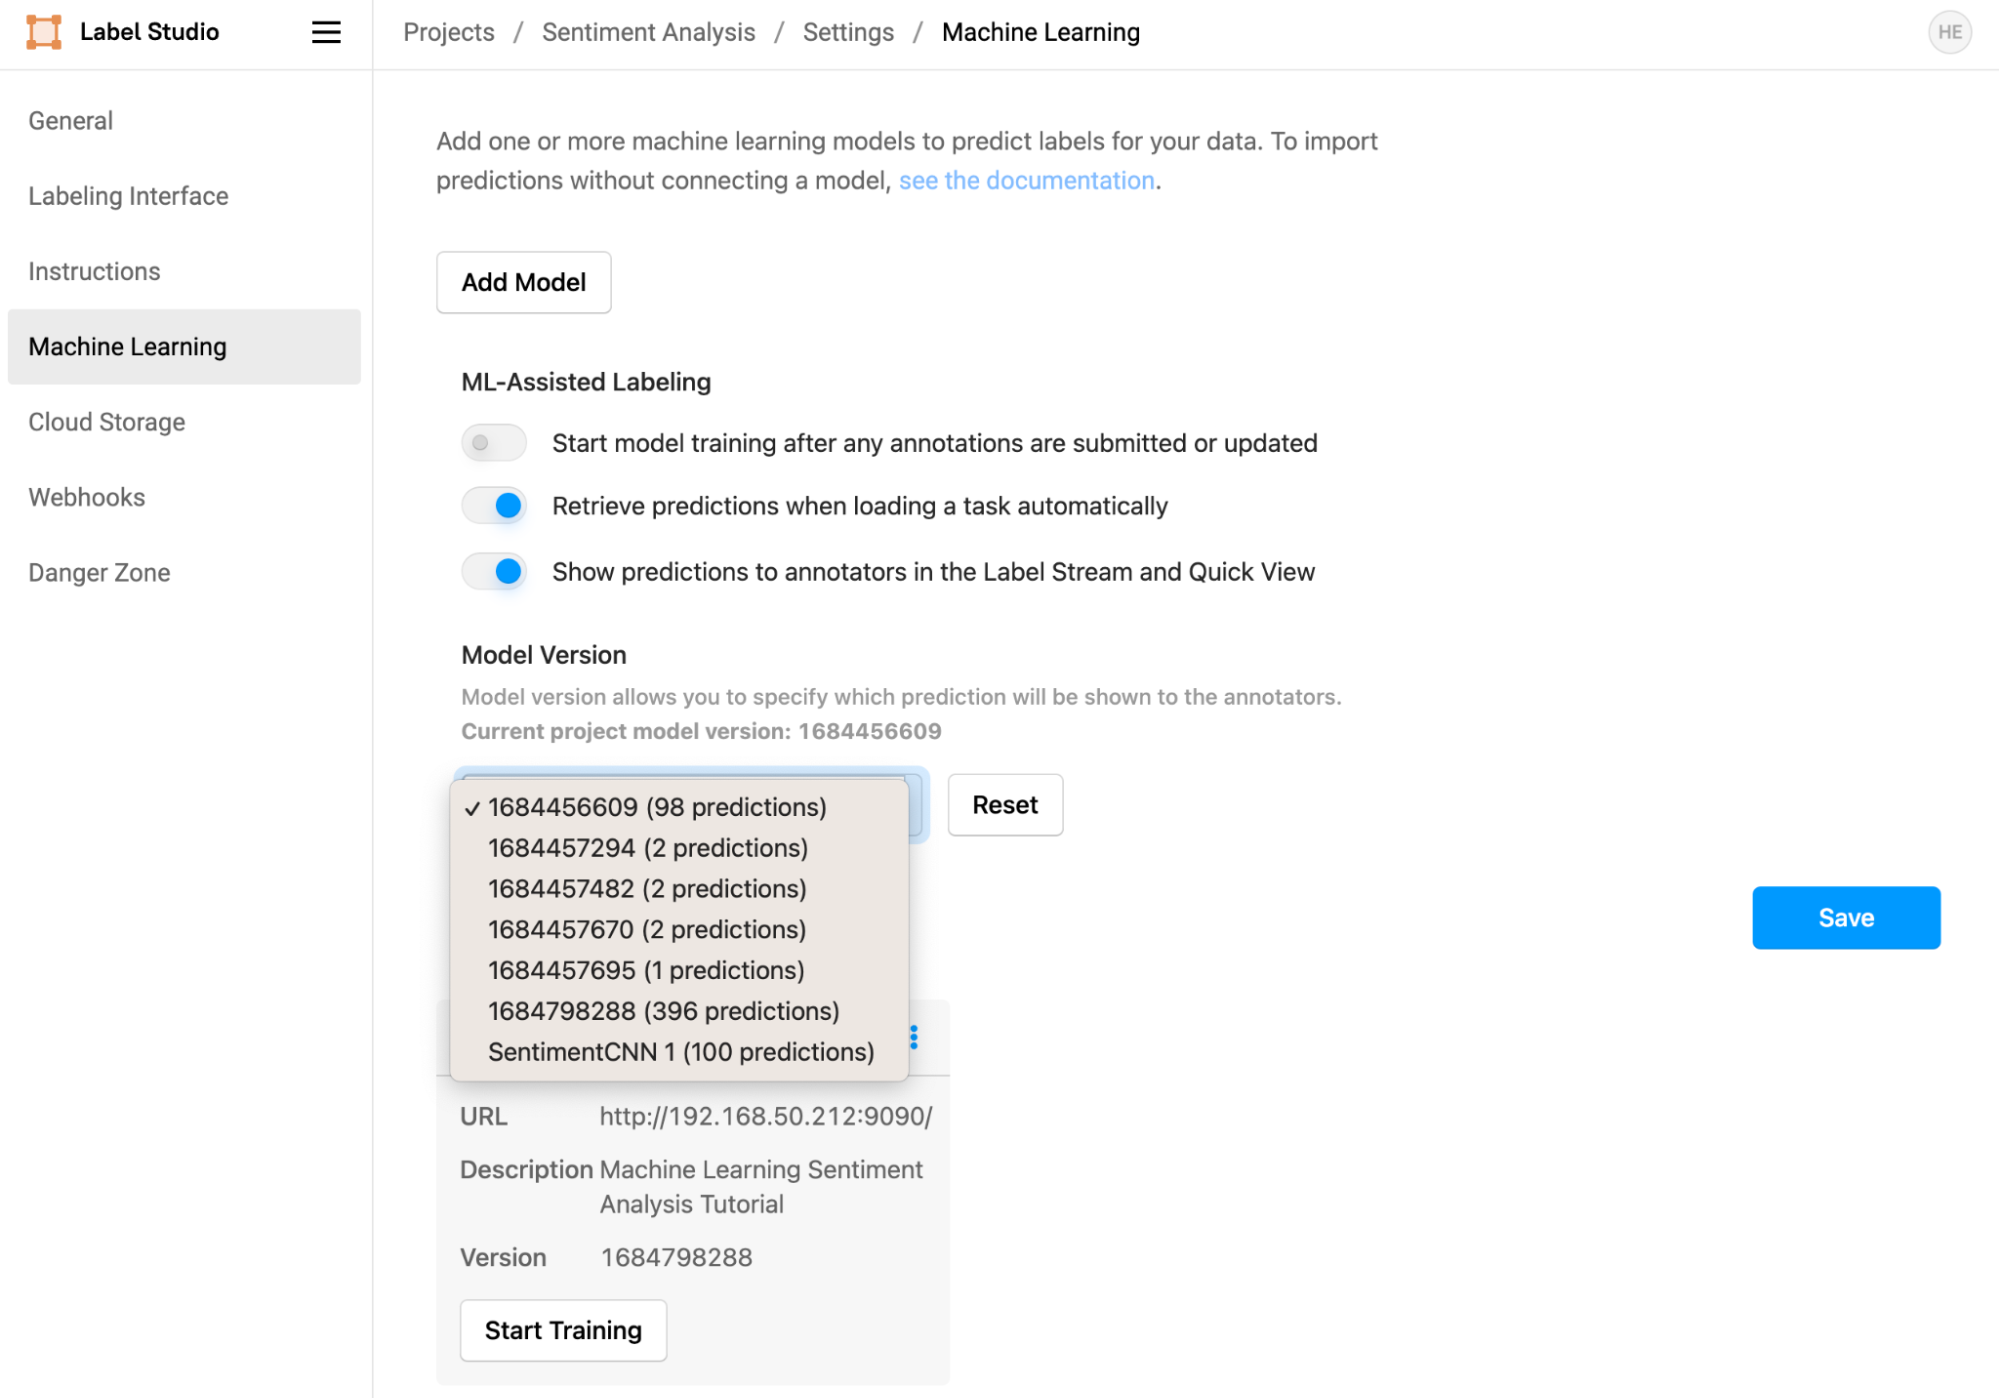
If you need to regenerate results for the current model version, you can select the tasks you want to generate results for and choose “Retrieve Predictions” or “Create Annotations from Predictions” from the Task management page.
Some Notes on running the ML Backend in Docker
The ML backend template generator also creates all of the files necessary to run your backend in Docker. This includes a 'Dockerfile' for building the backend image and a 'docker-compose.yml' file for launching the backend as a managed service. To build and launch the service, in the 'mlbackend' directory just enter
docker compose up You may need to make additional changes to the 'Dockerfile' and 'docker-compose.yml' files to enable advanced features like GPI passthrough. You will also need to know the ip address of the machine you are hosting your ML backend on, as it is not reported in the startup logs.
The resulting Docker build and compose service can be used to host your ML backend in your compute infrastructure, making it possible for you to run portable production workloads.
Conclusion
This tutorial was a first view of using machine learning in your data labeling and annotation workflow. Label Studio has many additional ML integration features, including a complete Predictions API and the ability to retrain models automatically as annotators label data.
Related Content
-
Video Object Segmentation and Tracking with VideoVector tag for SAM 2 in Label Studio
Draw a box around any object and follow it as it moves instead of segmenting frame by frame.

Micaela Kaplan
July 15, 2026
-
Building A Labeling Config in Label Studio Enterprise
How do you build the right labeling interface in Label Studio? This video walks through a practical progression: start with templates, customize with XML tags, extend with React Code, and standardize workflows with plugins.
-
Learn how to connect YOLO26 to a Label Studio project using the YOLO ML Backend so annotators can start from model predictions and focus on review and correction instead of drawing boxes from scratch.
Micaela Kaplan
February 12, 2026