From raw data to a trained model: Automate your ML pipeline with Label Studio & Amazon SageMaker
It can be difficult to get from raw data to a fully trained model, but the more you can do to automate your machine learning pipeline, the easier the process is. If you're using Amazon SageMaker but have complex labeling scenarios and corner cases, add Label Studio to your Amazon SageMaker machine learning pipeline and simplify annotating your data.
If you have a machine learning pipeline, or retrain your models frequently based on newly-annotated data, you know that it can be challenging to automate that process. Now that Label Studio supports webhooks, you can automatically receive updates every time a new annotation is created or a project is updated to include different labels.
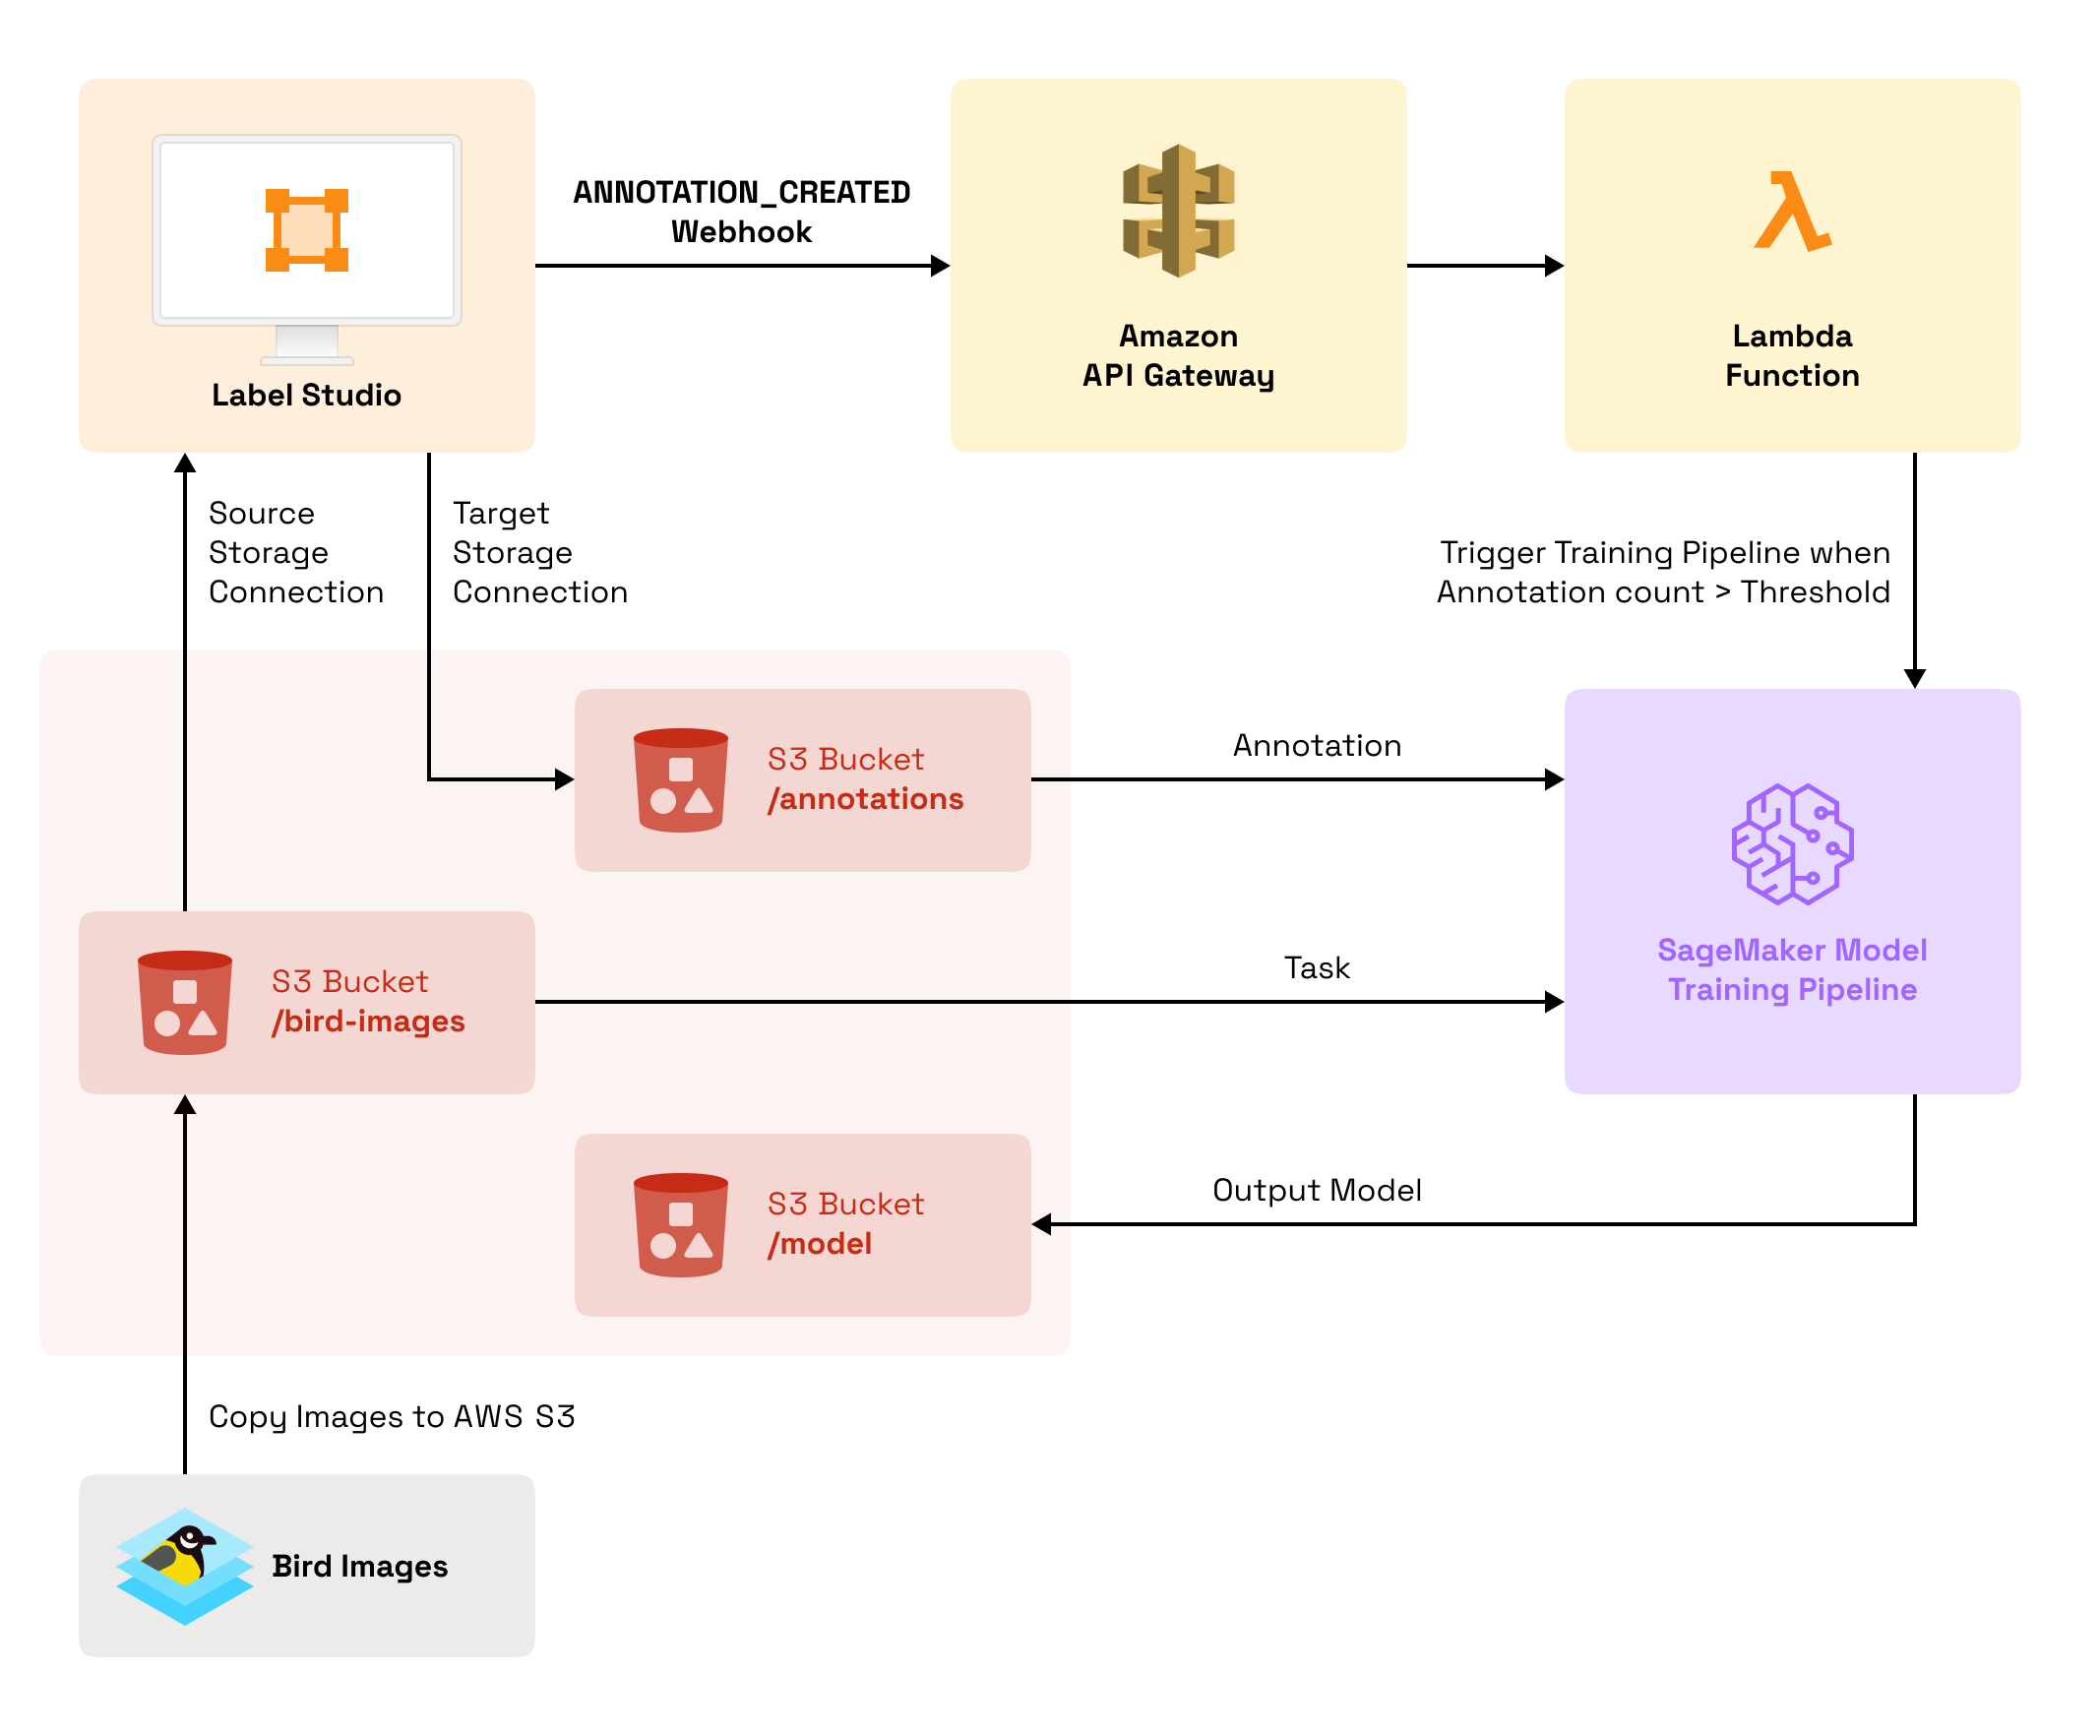
This blog post walks you through an example of using webhooks with Label Studio to trigger specific actions in an image segmentation machine learning pipeline built in Amazon Web Services (AWS) such as Amazon API Gateway, AWS Lambda, and Amazon SageMaker.
Image segmentation is a popular use case for machine learning, identifying the parts of an image. In this example, train an image segmentation model to recognize birds in images by labeling the various parts of birds that might be visible in an image. Whether you're a wildlife researcher, a scientist, or simply want to try out image segmentation, follow along with this example and learn how to integrate a data labeling project in Label Studio with Amazon SageMaker.
This example uses a pre-trained model, so it's faster to start training the model for this specific use case and then continually retrain the model as annotators identify additional birds in photos. This also lets you periodically test the quality of the updated model. When model quality plateaus, you can use that information to decide that you have enough annotations and can start using the trained model.
This example covers the following steps: 1. Adding public domain bird images to Amazon S3 storage. 2. Creating an image segmentation model pipeline in Amazon SageMaker using FCN ResNet-50 Image Segmentation. 3. Writing an AWS Lambda function to trigger retraining the Amazon SageMaker model based on annotation progress in Label Studio. 4. Configuring Amazon API Gateway to securely communicate between Label Studio and the AWS Lambda function. 5. Setting up a labeling project in Label Studio and annotating images.
Follow along with the entire process to go from a Label Studio installation to a full-fledged model retraining pipeline using Amazon services and Label Studio.
Before you start
This example assumes you have an Amazon AWS account with administrator privileges and that you are comfortable running commands from the command line.
- Install Label Studio locally or on AWS, if you haven't already installed it. Make sure you install the latest version of Label Studio. If you use Docker, pull the latest Docker image before you install.
- Install awscli and jq.
- Download a bird image dataset. This blog post uses bird images from the United States Midwest, courtesy of public domain images hosted on Flickr by the US Fish and Wildlife Service.
This example uses an AWS region of us-east-2, so if you prefer to use a different region, update that information where mentioned as you follow along.
Add bird images to Amazon S3
Add the bird images to Amazon S3 so that you can annotate them in Label Studio and so that Amazon SageMaker can easily access the annotations and source images.
1. Make sure that you downloaded the bird image dataset and save the images to a folder called bird-images.
2. From the command line, run the following:
aws s3 mb s3://showcase-bucket 3. Log in to the S3 Management Console and create folders to function as prefixes for the data. Create the following folders:
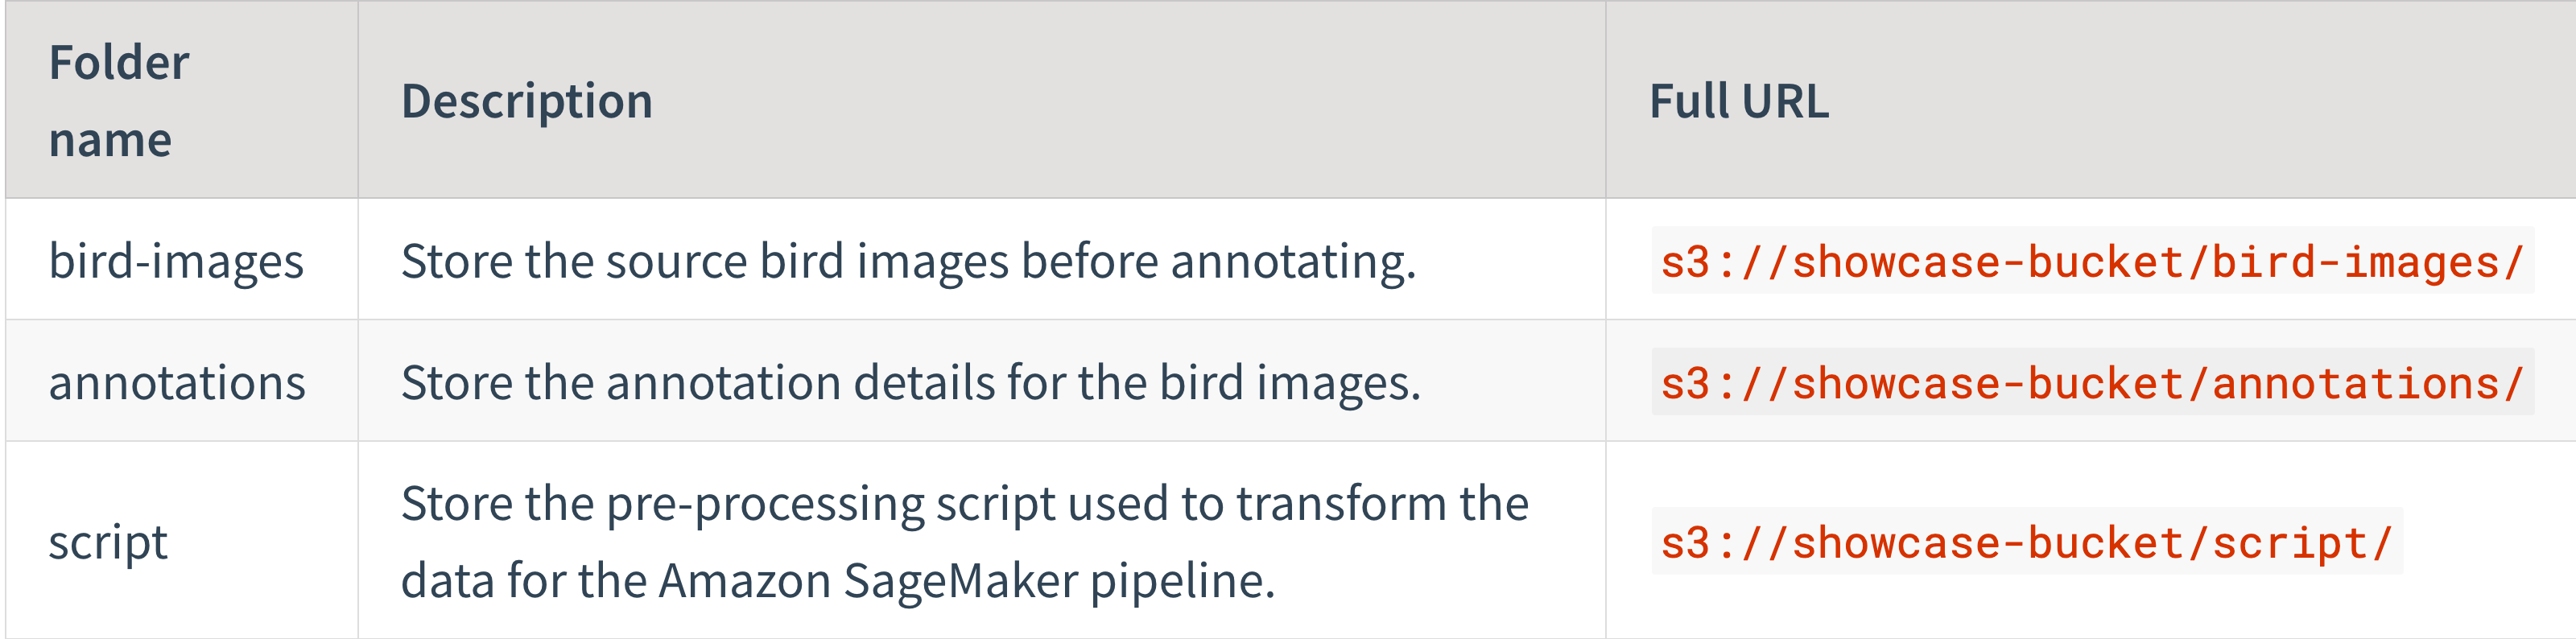
4. Then, copy the bird image dataset to the correct bucket prefix. From the command line, run the following:
aws s3 cp --recursive bird-images/ s3://showcase-bucket/bird-images/ The SageMaker pipeline also runs two scripts to manage the data for the model training process. A preprocessing script retrieves the bird images and annotations from the S3 bucket, drops any empty annotations, transforms the data into a format needed by the training process, and prompts the model to train on the newly-annotated images. The preprocessing script also creates additional prefixes in the S3 bucket to split the data into a training and validation set. A cleanup script runs after the model trains to remove the additional prefixes in the S3 bucket.
1. Copy and save the data preprocessing script as preprocessing.py. This script is run by the SageMaker pipeline to process your image annotations into a format that FCN ResNet-50 Image Segmentation can use for training.
import subprocess
import sys

subprocess.check_call([sys.executable, "-m", "pip", "install", "Pillow"])

import argparse
import os
import shutil
from PIL import Image
from PIL import ImageDraw
import random
import json
from urllib.parse import urlparse

def pil_use(points, image_width, image_height, path):
    tuple_points = []
    for point in points:
        point[0] = point[0] * image_width / 100
        point[1] = point[1] * image_height / 100
        tuple_points.append(tuple(point))

    img = Image.new('L', (image_width, image_height))
    draw = ImageDraw.Draw(img)
    draw.polygon(tuple_points, fill="white")
    img.save(path)


if __name__=='__main__':
    parser = argparse.ArgumentParser()
    parser.add_argument('--train-test-split-ratio', type=int, default=20)

    args, _ = parser.parse_known_args()
    print('Received arguments {}'.format(args))
    split_ratio = args.train_test_split_ratio
    # creating output dirs:
    if not os.path.exists("/opt/ml/processing/output/train_1/"):
        os.makedirs("/opt/ml/processing/output/train_1/")
    if not os.path.exists("/opt/ml/processing/output/train_1_annotation/"):
        os.makedirs("/opt/ml/processing/output/train_1_annotation/")
    if not os.path.exists("/opt/ml/processing/output/validation/"):
        os.makedirs("/opt/ml/processing/output/validation/")
    if not os.path.exists("/opt/ml/processing/output/validation_annotation/"):
        os.makedirs("/opt/ml/processing/output/validation_annotation/")
    # This is the data path inside the container where the Train.csv will be downloaded and saved
    data_path = '/opt/ml/processing/input/train'
    input_data_path = '/opt/ml/processing/input/raw'
    print('Reading input data from {}'.format(input_data_path))
    print('Train data files: ' + str(os.listdir(data_path)))
    print('Raw data files: ' + str(os.listdir(input_data_path)))
    images = os.listdir(input_data_path)
    for annotation in images:

        p = os.path.join(input_data_path, annotation)
        with open(p, 'rb') as f:
            try:
                anno = json.load(f)
                poly = anno['result'][0]['value']['points']
                original_width = anno['result'][0]['original_width']
                original_height = anno['result'][0]['original_height']
                filepath = os.path.join(input_data_path,
                                        os.path.basename(urlparse(anno['task']['data']['image']).path))
                pil_use(poly, original_width, original_height, filepath.split('.')[0] + ".png")
            except:
                print(f"{p} has invalid annotations.")
        os.remove(p)
    print('Annotation files: ' + str(os.listdir(input_data_path)))
    for image in os.listdir(input_data_path):
        target_set = 'train_1' if random.randint(0, 99) > split_ratio else 'validation'
        image_target_path = f'/opt/ml/processing/output/{target_set}'
        annotation_target_path = f'/opt/ml/processing/output/{target_set}_annotation'
        print(f"Moving file {os.path.join(data_path, image)} to {os.path.join(image_target_path, image)}")
        # move images to val folder
        shutil.move(os.path.join(data_path, image.split('.')[0] + '.jpg'),
                   os.path.join(image_target_path, image.split('.')[0] + '.jpg'))
        print(f"Moving file {os.path.join(input_data_path, image)} to {os.path.join(annotation_target_path, image)}")
        # move annotations to val folder
        shutil.move(os.path.join(input_data_path, image.split('.')[0] + '.png'),
                   os.path.join(annotation_target_path, image.split('.')[0] + '.png'))
2. Copy the preprocessing script to the correct bucket prefix. From the command line, run the following:
aws s3 cp preprocessing.py s3://showcase-bucket/script/ 3. Copy and save the data cleanup script as cleanup.py. This script runs at the end of the SageMaker pipeline to remove temporary files used to split your dataset into training and validation sets.
import boto3
import argparse
from urllib.parse import urlparse

if __name__ == '__main__':
    parser = argparse.ArgumentParser()
    parser.add_argument('--s3_validation_annotation_path', type=str, default=None)
    parser.add_argument('--s3_validation_path', type=str, default=None)
    parser.add_argument('--s3_train_annotation_path', type=str, default=None)
    parser.add_argument('--s3_train_path', type=str, default=None)

    args, _ = parser.parse_known_args()
    print(f"Cleaning up ARGS: {args}")
    s3_val = args.s3_validation_annotation_path
    s3_val_data = args.s3_validation_path
    s3_train_path = args.s3_train_path
    s3_train_annotation_path = args.s3_train_annotation_path

    s3 = boto3.resource('s3')
    print(f"Cleaning up storage folders: {[s3_val, s3_val_data, s3_train_path, s3_train_annotation_path]}")
    for item in [s3_val, s3_val_data, s3_train_path, s3_train_annotation_path]:
        o = urlparse(item)
        bucket = s3.Bucket(o.netloc)
        prefix = item.replace('s3://' + o.netloc + "/", "")
        print(f"Cleaning bucket {bucket} folder {prefix}")
        for key in bucket.objects.filter(Prefix=prefix):
            print('Deleting', key)
            key.delete()
print("Finished cleaning up bucket!")4. Copy the cleanup script to the correct bucket prefix. From the command line, run the following:
aws s3 cp cleanup.py s3://showcase-bucket/script/ After you prepare your datasets, deploy the model pipeline in Amazon SageMaker.
Set up your model pipeline in Amazon SageMaker
Create an image segmentation model pipeline in Amazon SageMaker using the FCN ResNet-50 Image Segmentation pretrained model. Start by setting up the IAM policies needed to create and run the pipeline, then define and deploy the pipeline itself.
Configure IAM permissions for SageMaker
Set up the IAM policies for Amazon SageMaker.
1. Set up a user policy with access to Amazon SageMaker. From the command line, run the following:
ASSUME_POLICY=$(echo -n '{"Version":"2012-10-17","Statement":[{"Effect":"Allow","Principal":{"Service":"sagemaker.amazonaws.com"},"Action":"sts:AssumeRole"}]}') 2. Create a role to manage the SageMaker pipeline. From the command line, run the following:
ROLE_ARN=$(aws iam create-role \
    --role-name SageMaker-Role \
    --assume-role-policy-document $ASSUME_POLICY \
    --output text \
--query 'Role.Arn')3. Apply a role policy to the role that you created that grants the role full access to Amazon SageMaker. From the command line, run the following:
aws iam attach-role-policy --policy-arn arn:aws:iam::aws:policy/AmazonSageMakerFullAccess --role-name SageMaker-Role 4. Attach a role policy that gives the role access to Amazon S3 so that it can retrieve the tasks and annotations from the S3 buckets and store the model output accordingly. From the command line, run the following:
aws iam attach-role-policy --policy-arn arn:aws:iam::aws:policy/AmazonS3FullAccess --role-name SageMaker-Role 5. Retrieve the RoleArn of the role that you just created. From the command line, run the following:
echo $ROLE_ARN You need this RoleArn for the SageMaker pipeline definition. Copy the output and save it somewhere secure.
Now you're ready to define the SageMaker pipeline.
Create a SageMaker pipeline
In Amazon SageMaker, create a model training pipeline with a pretrained FCN ResNet-50 semantic image segmentation model. using the source images and annotations created in Label Studio and stored in Amazon S3. The pipeline runs the preprocessing script to split the raw and annotation data from the S3 bucket into training and validation sets, retrains the model, and outputs the results to the S3 bucket prefixed with output.
This example Amazon SageMaker pipeline definition has been updated to match the S3 bucket names that you created earlier, but you need to update it with the RoleArn of the role that you set up in previous steps. Replace $SageMakerRoleArn with the actual RoleArn value that you saved.
If you're using a region other thanus-east-2, you also need to update the image registries for thesagemaker-debugger-rulesandsagemaker-scikit-learnpackages to the region you're using. See Docker Registry Paths and Example Code in the Amazon SageMaker Developer Guide for replacement URIs.
Copy the following pipeline definition, make any necessary updates, and save the pipeline definition and details as BirdPipeline.json.
{
  "PipelineName": "WebhookShowcase",
  "PipelineDisplayName": "WebhookShowcase",
  "RoleArn": "$SageMakerRoleArn",
  "PipelineDefinition": "{\"Version\": \"2020-12-01\", \"Metadata\": {}, \"Parameters\": [{\"Name\": \"ProcessingInstanceType\", \"Type\": \"String\", \"DefaultValue\": \"ml.m5.xlarge\"}, {\"Name\": \"ProcessingInstanceCount\", \"Type\": \"Integer\", \"DefaultValue\": 1}, {\"Name\": \"TrainingInstanceType\", \"Type\": \"String\", \"DefaultValue\": \"ml.m5.xlarge\"}, {\"Name\": \"ModelApprovalStatus\", \"Type\": \"String\", \"DefaultValue\": \"PendingManualApproval\"}], \"PipelineExperimentConfig\": {\"ExperimentName\": {\"Get\": \"Execution.PipelineName\"}, \"TrialName\": {\"Get\": \"Execution.PipelineExecutionId\"}}, \"Steps\": [{\"Name\": \"ProcessingStepWebhook\", \"Type\": \"Processing\", \"Arguments\": {\"ProcessingResources\": {\"ClusterConfig\": {\"InstanceType\": \"ml.m5.xlarge\", \"InstanceCount\": 1, \"VolumeSizeInGB\": 30}}, \"AppSpecification\": {\"ImageUri\": \"257758044811.dkr.ecr.us-east-2.amazonaws.com/sagemaker-scikit-learn:0.20.0-cpu-py3\", \"ContainerArguments\": [\"--train-test-split-ratio\", \"20\"], \"ContainerEntrypoint\": [\"python3\", \"/opt/ml/processing/input/code/preprocessing.py\"]}, \"RoleArn\": \"$SageMakerRoleArn\", \"ProcessingInputs\": [{\"InputName\": \"input-1\", \"AppManaged\": false, \"S3Input\": {\"S3Uri\": \"s3://showcase-bucket/annotations/\", \"LocalPath\": \"/opt/ml/processing/input/raw\", \"S3DataType\": \"S3Prefix\", \"S3InputMode\": \"File\", \"S3DataDistributionType\": \"FullyReplicated\", \"S3CompressionType\": \"None\"}}, {\"InputName\": \"input-2\", \"AppManaged\": false, \"S3Input\": {\"S3Uri\": \"s3://showcase-bucket/bird-images/\", \"LocalPath\": \"/opt/ml/processing/input/train\", \"S3DataType\": \"S3Prefix\", \"S3InputMode\": \"File\", \"S3DataDistributionType\": \"FullyReplicated\", \"S3CompressionType\": \"None\"}}, {\"InputName\": \"code\", \"AppManaged\": false, \"S3Input\": {\"S3Uri\": \"s3://showcase-bucket/script/preprocessing.py\", \"LocalPath\": \"/opt/ml/processing/input/code\", \"S3DataType\": \"S3Prefix\", \"S3InputMode\": \"File\", \"S3DataDistributionType\": \"FullyReplicated\", \"S3CompressionType\": \"None\"}}], \"ProcessingOutputConfig\": {\"Outputs\": [{\"OutputName\": \"train_1\", \"AppManaged\": false, \"S3Output\": {\"S3Uri\": \"s3://showcase-bucket/temp/train\", \"LocalPath\": \"/opt/ml/processing/output/train_1\", \"S3UploadMode\": \"EndOfJob\"}}, {\"OutputName\": \"train_1_annotation\", \"AppManaged\": false, \"S3Output\": {\"S3Uri\": \"s3://showcase-bucket/temp/train_annotation\", \"LocalPath\": \"/opt/ml/processing/output/train_1_annotation\", \"S3UploadMode\": \"EndOfJob\"}}, {\"OutputName\": \"val_annotation\", \"AppManaged\": false, \"S3Output\": {\"S3Uri\": \"s3://showcase-bucket/temp/validation_annotation\", \"LocalPath\": \"/opt/ml/processing/output/validation_annotation\", \"S3UploadMode\": \"EndOfJob\"}}, {\"OutputName\": \"val_data\", \"AppManaged\": false, \"S3Output\": {\"S3Uri\": \"s3://showcase-bucket/temp/validation\", \"LocalPath\": \"/opt/ml/processing/output/validation\", \"S3UploadMode\": \"EndOfJob\"}}]}}}, {\"Name\": \"ImageSegmentationTrain\", \"Type\": \"Training\", \"Arguments\": {\"AlgorithmSpecification\": {\"TrainingInputMode\": \"File\", \"TrainingImage\": \"825641698319.dkr.ecr.us-east-2.amazonaws.com/semantic-segmentation:1\"}, \"OutputDataConfig\": {\"S3OutputPath\": \"s3://showcase-bucket/output/\"}, \"StoppingCondition\": {\"MaxRuntimeInSeconds\": 36000}, \"ResourceConfig\": {\"InstanceCount\": 1, \"InstanceType\": \"ml.p3.2xlarge\", \"VolumeSizeInGB\": 100}, \"RoleArn\": \"$SageMakerRoleArn\", \"InputDataConfig\": [{\"DataSource\": {\"S3DataSource\": {\"S3DataType\": \"S3Prefix\", \"S3Uri\": \"s3://showcase-bucket/temp/train\", \"S3DataDistributionType\": \"FullyReplicated\"}}, \"ContentType\": \"application/x-image\", \"ChannelName\": \"train\"}, {\"DataSource\": {\"S3DataSource\": {\"S3DataType\": \"S3Prefix\", \"S3Uri\": \"s3://showcase-bucket/temp/validation\", \"S3DataDistributionType\": \"FullyReplicated\"}}, \"ContentType\": \"application/x-image\", \"ChannelName\": \"validation\"}, {\"DataSource\": {\"S3DataSource\": {\"S3DataType\": \"S3Prefix\", \"S3Uri\": \"s3://showcase-bucket/temp/train_annotation\", \"S3DataDistributionType\": \"FullyReplicated\"}}, \"ContentType\": \"application/x-image\", \"ChannelName\": \"train_annotation\"}, {\"DataSource\": {\"S3DataSource\": {\"S3DataType\": \"S3Prefix\", \"S3Uri\": \"s3://showcase-bucket/temp/validation_annotation\", \"S3DataDistributionType\": \"FullyReplicated\"}}, \"ContentType\": \"application/x-image\", \"ChannelName\": \"validation_annotation\"}], \"HyperParameters\": {\"backbone\": \"resnet-50\", \"algorithm\": \"fcn\", \"use_pretrained_model\": \"True\", \"num_classes\": \"4\", \"epochs\": \"10\", \"learning_rate\": \"0.0001\", \"optimizer\": \"rmsprop\", \"lr_scheduler\": \"poly\", \"mini_batch_size\": \"2\", \"validation_mini_batch_size\": \"2\"}, \"ProfilerRuleConfigurations\": [{\"RuleConfigurationName\": \"ProfilerReport-1629795191\", \"RuleEvaluatorImage\": \"915447279597.dkr.ecr.us-east-2.amazonaws.com/sagemaker-debugger-rules:latest\", \"RuleParameters\": {\"rule_to_invoke\": \"ProfilerReport\"}}], \"ProfilerConfig\": {\"S3OutputPath\": \"s3://showcase-bucket/output/\"}}, \"DependsOn\": [\"ProcessingStepWebhook\"]}, {\"Name\": \"CleanupStepWebhook\", \"Type\": \"Processing\", \"Arguments\": {\"ProcessingResources\": {\"ClusterConfig\": {\"InstanceType\": \"ml.m5.xlarge\", \"InstanceCount\": 1, \"VolumeSizeInGB\": 30}}, \"AppSpecification\": {\"ImageUri\": \"257758044811.dkr.ecr.us-east-2.amazonaws.com/sagemaker-scikit-learn:0.20.0-cpu-py3\", \"ContainerArguments\": [\"--s3_validation_annotation_path\", \"s3://showcase-bucket/temp/validation_annotation\", \"--s3_validation_path\", \"s3://showcase-bucket/temp/validation\", \"--s3_train_annotation_path\", \"s3://showcase-bucket/temp/train_annotation\", \"--s3_train_path\", \"s3://showcase-bucket/temp/train\"], \"ContainerEntrypoint\": [\"python3\", \"/opt/ml/processing/input/code/cleanup.py\"]}, \"RoleArn\": \"$SageMakerRoleArn\", \"ProcessingInputs\": [{\"InputName\": \"code\", \"AppManaged\": false, \"S3Input\": {\"S3Uri\": \"s3://showcase-bucket/script/cleanup.py\", \"LocalPath\": \"/opt/ml/processing/input/code\", \"S3DataType\": \"S3Prefix\", \"S3InputMode\": \"File\", \"S3DataDistributionType\": \"FullyReplicated\", \"S3CompressionType\": \"None\"}}]}, \"DependsOn\": [\"ImageSegmentationTrain\"]}]}"
}Then, reference the file when you create and deploy the pipeline. From the command line, run the following:
aws sagemaker create-pipeline --cli-input-json file://BirdPipeline.json After creating the pipeline, you see the PipelineArn:
{
    "PipelineArn": "arn:aws:sagemaker:us-east-2:USERID:pipeline/webhookshowcase"
}If you want to review the pipeline details, run the following:
aws sagemaker list-pipelines After creating and deploying the Amazon SageMaker pipeline, set up the AWS Lambda function that is going to manage the Label Studio webhook information and trigger the model training pipeline in SageMaker.
Set up an AWS Lambda function
You can use AWS Lambda to run code in AWS. In this example, use it to process the webhook event payload from Label Studio and send a model training request to your Amazon SageMaker pipeline.
Set up IAM policies
Before you can set up the AWS Lambda function itself, prepare a user role with the appropriate permissions policies to run the code and interact with Amazon SageMaker.
1. Specify the policy needed by a role to process the webhook from Label Studio and run the Lambda function. From the command line, run the following:
ASSUME_POLICY=$(echo -n '{"Version":"2012-10-17","Statement":[{"Effect":"Allow","Principal":{"Service":"lambda.amazonaws.com"},"Action":"sts:AssumeRole"}]}') 2. Create a role with that policy. From the command line, run the following:
ROLE_ARN=$(aws iam create-role \
    --role-name LsCustomWebhook \
    --assume-role-policy-document "$ASSUME_POLICY" \
    --output text \
--query 'Role.Arn')3. Attach a policy to that role to give it additional access to run Lambda functions. From the command line, run the following:
aws iam attach-role-policy --role-name LsCustomWebhook --policy-arn arn:aws:iam::aws:policy/service-role/AWSLambdaBasicExecutionRole 4. Define the policy needed to allow the Lambda function to invoke the SageMaker endpoint for the pipeline that you created with your model. From the command line, run the following:
POLICY=$(echo -n '{"Version":"2012-10-17","Statement":[{"Sid":"VisualEditor0","Effect":"Allow","Action":["sagemaker:StartPipelineExecution","sagemaker:InvokeEndpoint"],"Resource":"*"}]}')5. Create the policy in AWS. From the command line, run the following:
POLICY_ARN=$(aws iam create-policy \
    --policy-name AllowSmInvokeEndpoint \
    --policy-document "$POLICY" \
    --output text \
--query 'Policy.Arn')- Attach the policy to the role that runs the AWS Lambda function. From the command line, run the following:
aws iam attach-role-policy --role-name LsCustomWebhook --policy-arn $POLICY_ARN Now that you've set up a user role with the proper permissions, set up the Lambda function itself.
Set up the Lambda function
This Python Lambda function counts the number of annotations created in Label Studio, based on the ANNOTATION_CREATED webhook event payload sent from Label Studio. After the number of completed annotations reaches a "ready to train" checkpoint of 16 annotations, the Lambda function invokes the Amazon SageMaker pipeline and starts the training process.
16 annotations is the minimum number of annotations for FCN ResNet-50 Image Segmentation model training, but if your dataset is larger than the one used in this example, you might want to update the function to use a greater number of annotations, such as 50 or 100. In some cases, the number of annotations that you want to specify for initial training might be different than in this use case. Because this example is retraining a pre-trained model to focus on a specific use case of bird recognition, a smaller number of annotations is okay to start.
1. Copy and save the following Python code as LsCustomWebhook.py:
import json
import boto3


def lambda_handler(event, context):
    pipeline_name = f"WebhookShowcase"

    total = int(event['project']['total_annotations_number'])
    fire = total > 16 and total % 16 == 0
    name = ''
    if fire:
        client = boto3.client('sagemaker')
        execution = client.start_pipeline_execution(
                    PipelineName=pipeline_name)
        name = execution['PipelineExecutionArn']


    return {
        'statusCode': 200,
        'isBase64Encoded': False,
        'body': {
            'msg': str(f'Fired {name}' if fire else "Not fired")
        },
        'headers': {
            'Content-Type': 'application/json'
        }
} 2. Compress the Python script into a zip folder so that you can create it in AWS Lambda. From the command line, run the following:
zip LsCustomWebhook.zip LsCustomWebhook.py 3. Create the function in AWS Lambda. From the command line, run the following:
aws lambda create-function --function-name LsCustomWebhook --role $ROLE_ARN --runtime python3.8 --handler LsCustomWebhook.lambda_handler --zip-file fileb://LsCustomWebhook.zip After the function is created, you see JSON results that contain the FunctionArn of arn:aws:lambda:us-east-2:USERID:function:LsCustomWebhook and the role ARN used by the function, arn:aws:iam::USERID:role/LsCustomWebhook.
4. Store the ARN of the Lambda function so that the webhook function script can reference it. From the command line, run the following:
LAMBDAARN=$(aws lambda list-functions --query "Functions[?FunctionName==\`LsCustomWebhook\`].FunctionArn" --output text) After you set up and configure the AWS Lambda function, set up the Amazon API Gateway to permit access between AWS Lambda and Label Studio.
Set up the Amazon API Gateway
Set up the Amazon API Gateway to allow the webhook events sent from Label Studio to reach the AWS Lambda function. If you're using an Amazon VPC to host Label Studio, you can use a VPC endpoint instead of the Amazon API gateway, but this example only covers the setup for the Amazon API Gateway.
1. Specify a region. This example uses us-east-2 as a default region. If you're using a different AWS region, update the REGION variable to the AWS region that you're using. From the command line, run the following:
REGION=us-east-2 2. Specify your account ID so that the API Gateway can use it. From the command line, run the following:
ACCOUNT_ID=$(aws sts get-caller-identity --query Account --output text) 3. Create an AWS Gateway ID. From the command line, run the following:
GATEWAY_ID=$(aws apigateway create-rest-api \
--name 'LsCustomWebhookGateway' | jq -r .id)4. Get the root ID for the API Gateway. From the command line, run the following:
GATEWAY_ROOT_ID=$(aws apigateway get-resources \
--rest-api-id "$GATEWAY_ID" | jq -r '.items[] | select(.path == "/").id')5. Create an API Gateway resource ID for AWS Lambda. From the command line, run the following:
AWS_GATEWAY_LAMBDA_RESOURCE_ID=$(aws apigateway create-resource \
--rest-api-id "$GATEWAY_ID" \
--parent-id "$GATEWAY_ROOT_ID" \
--path-part LcWebHook | jq -r .id)6. Update the API Gateway with the resource ID for AWS Lambda. By default this example does not use authorization for the HTTP request, but you might want to secure your API Gatway configuration. See Set up method request authorization in the Amazon API Gateway documentation. From the command line, run the following:
aws apigateway put-method \
--rest-api-id "$GATEWAY_ID" \
--resource-id "$AWS_GATEWAY_LAMBDA_RESOURCE_ID" \
--http-method POST \
--authorization-type "NONE"7. Update the API Gateway with additional details for the Lambda function. From the command line, run the following:
aws apigateway put-integration \
--rest-api-id "$GATEWAY_ID" \
--resource-id "$AWS_GATEWAY_LAMBDA_RESOURCE_ID" \
--http-method POST \
--type AWS \
--integration-http-method POST \
--uri arn:aws:apigateway:${REGION}:lambda:path/2015-03-31/functions/${LAMBDAARN}/invocations8. After performing the setup, create the Amazon API Gateway:
aws apigateway create-deployment --rest-api-id $GATEWAY_ID --stage-name prod 9. Now that the API Gateway exists, add some additional permissions to the function to allow the API Gateway to run the lambda function. From the command line, run the following:
aws lambda add-permission --function-name LsCustomWebhook \
--statement-id apigateway-get --action lambda:InvokeFunction \
--principal apigateway.amazonaws.com \
--source-arn "arn:aws:execute-api:${REGION}:${ACCOUNT_ID}:${GATEWAY_ID}/*/*/*" 10. After you create the gateway, it becomes available at the following URL: https://$GATEWAY_ID.execute-api.${REGION}.amazonaws.com/prod/LcWebHook. Send webhook event payloads from Label Studio to this endpoint. To get your URL, from the command line, run the following:
echo https://$GATEWAY_ID.execute-api.${REGION}.amazonaws.com/prod/LcWebHook Save the output somewhere secure.
Now that you've finished setting up the Amazon AWS services for your pipeline configuration, it's time to start preparing to annotate some bird images.
Set up Label Studio for data annotation
To start annotating bird images, set up an image segmentation project and connect the S3 bucket with the bird images to Label Studio. You must already have Label Studio installed on AWS or locally using Docker.
Set up an image segmentation project
To perform image segmentation labeling in Label Studio, you want to set up a project to organize your dataset and annotation settings. The SageMaker pipeline defined earlier includes a model that expects 4 classes for image segmentation, so you want to make sure to set up 4 classes in the segmentation labeling project in Label Studio.
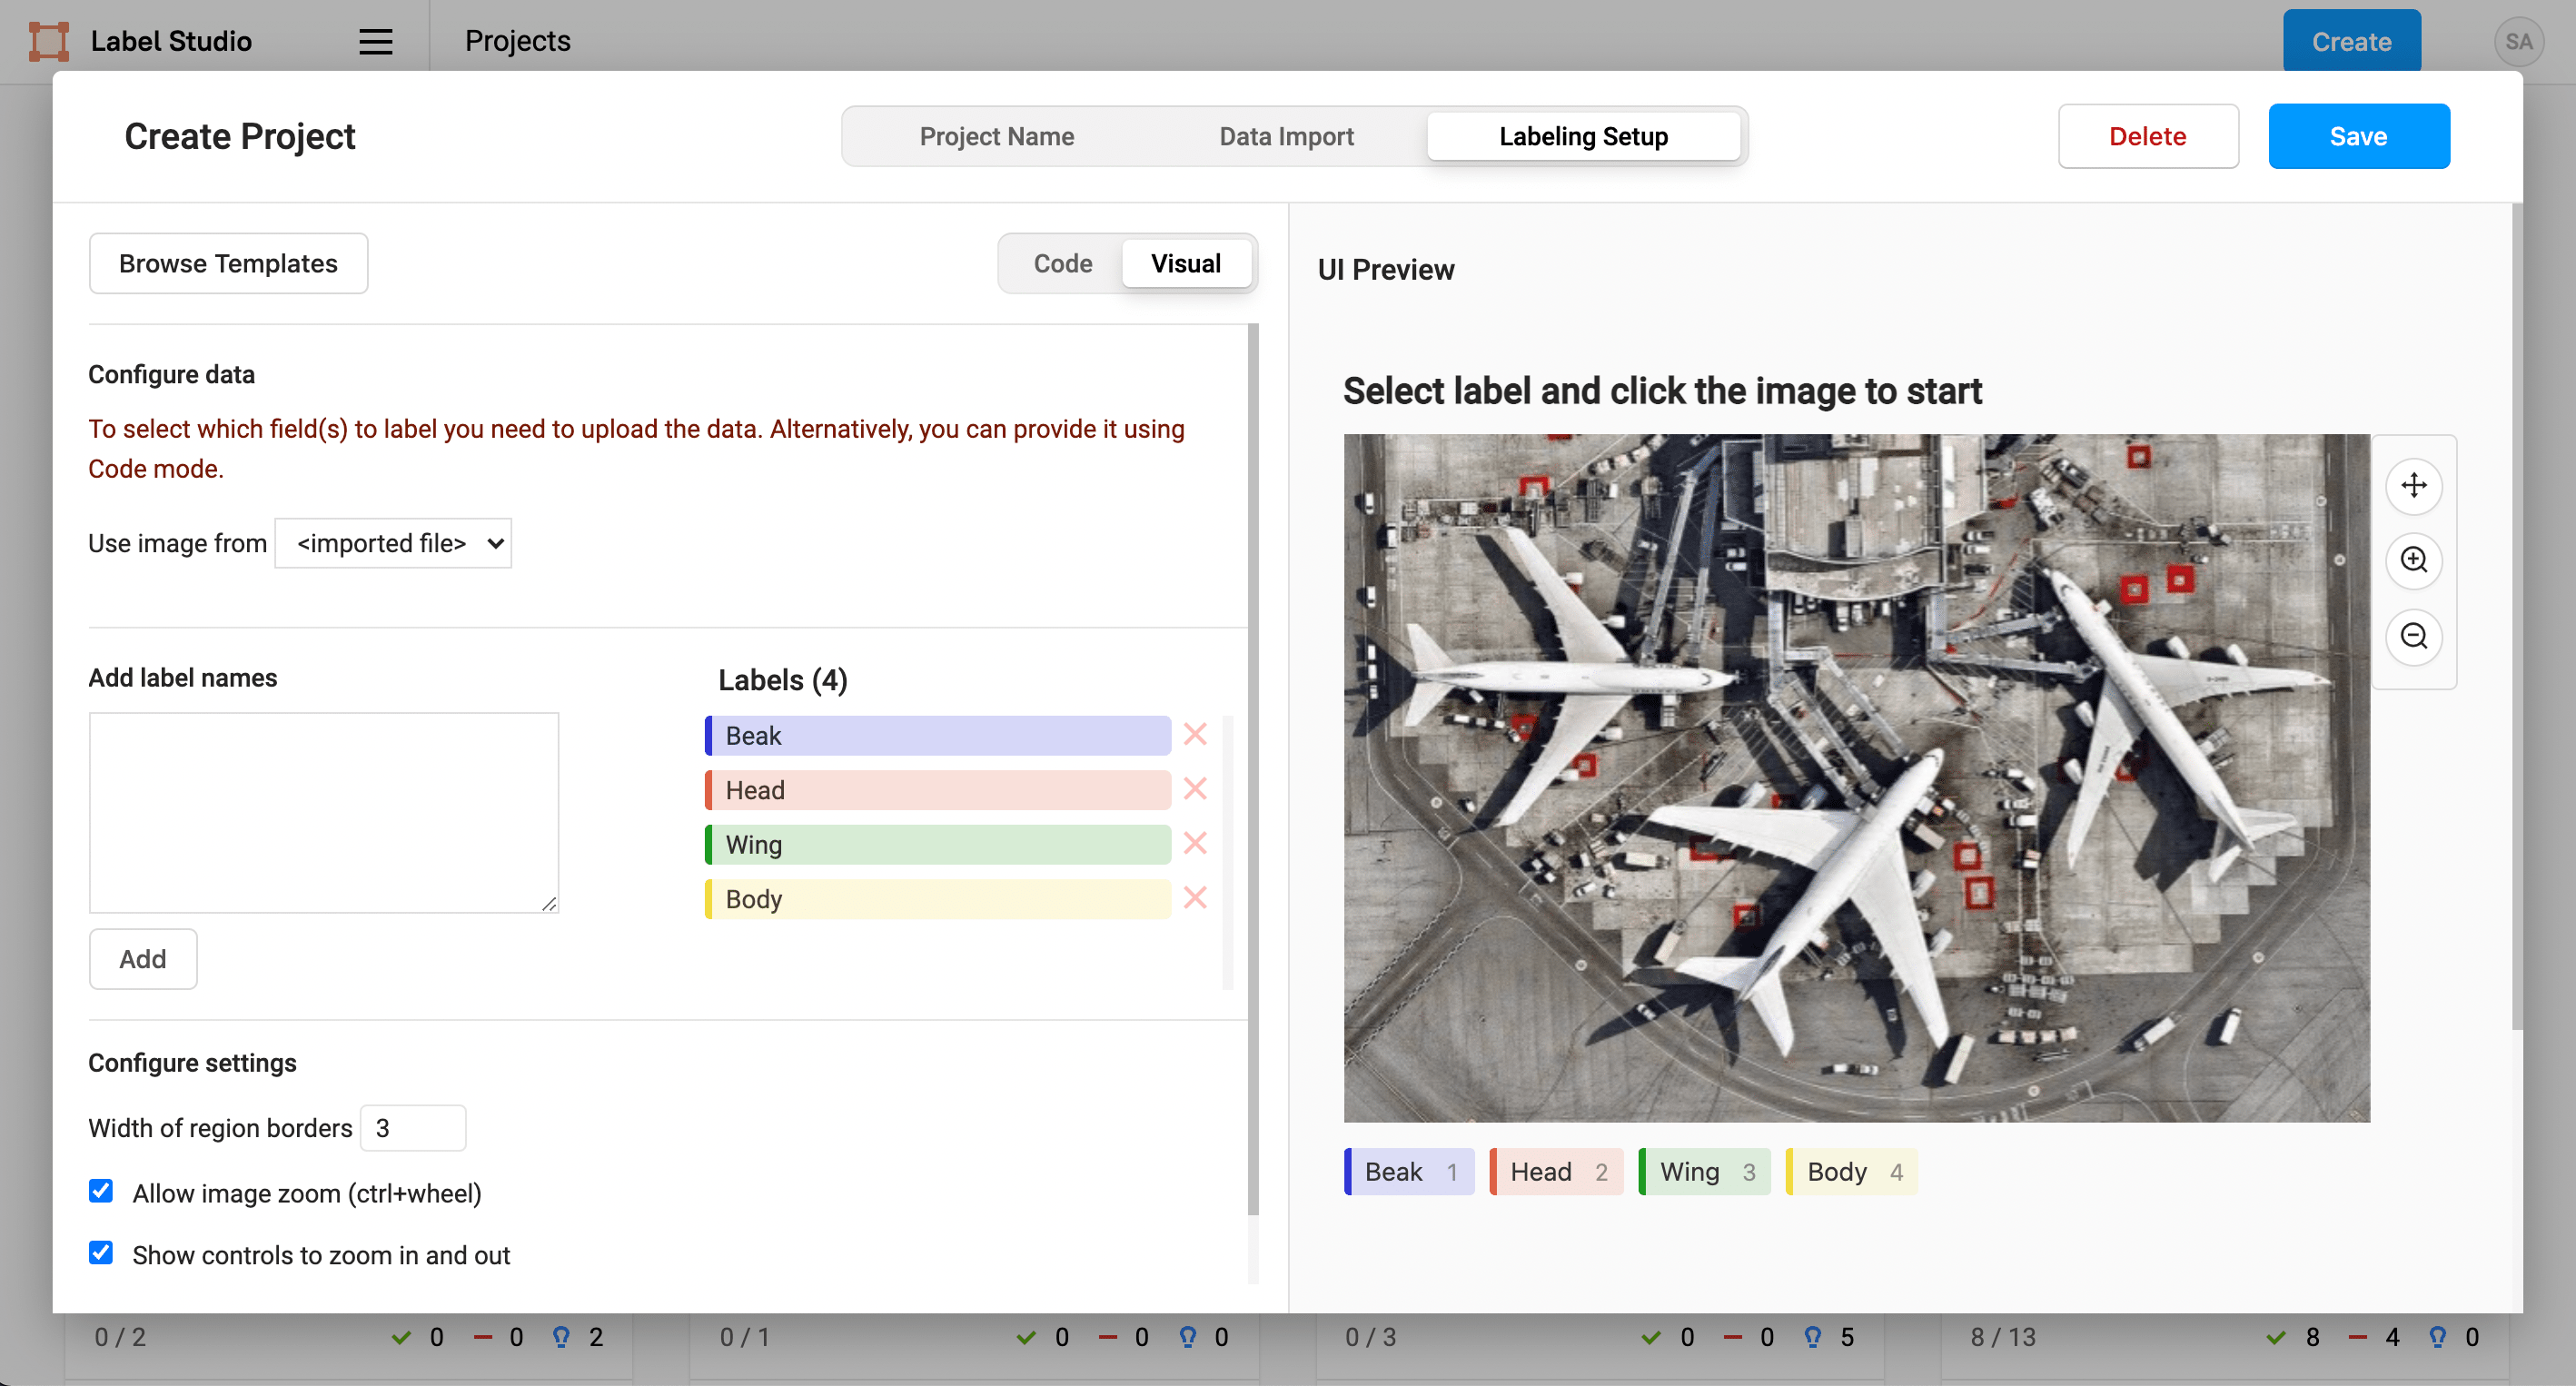
1. In the Label Studio UI, click Create to create a project.
2. Add a project name of Bird Segmentation.
3. Skip importing data for now, because the data is stored in S3.
4. On the Labeling Setup page, select the Semantic Segmentation with Polygons template.
5. Remove the existing labels Airplane and Car and replace them with the following 4 classes:
Beak
Head
Wing
Body6. Save the project.
Next, connect Label Studio and Amazon S3 so that you can retrieve the source images for labeling and save the data annotations where the Amazon SageMaker pipeline can easily retrieve them.
Connect the S3 bucket to Label Studio
Connect the S3 bucket and prefixes to Label Studio to ease the automation of your machine learning workflow.
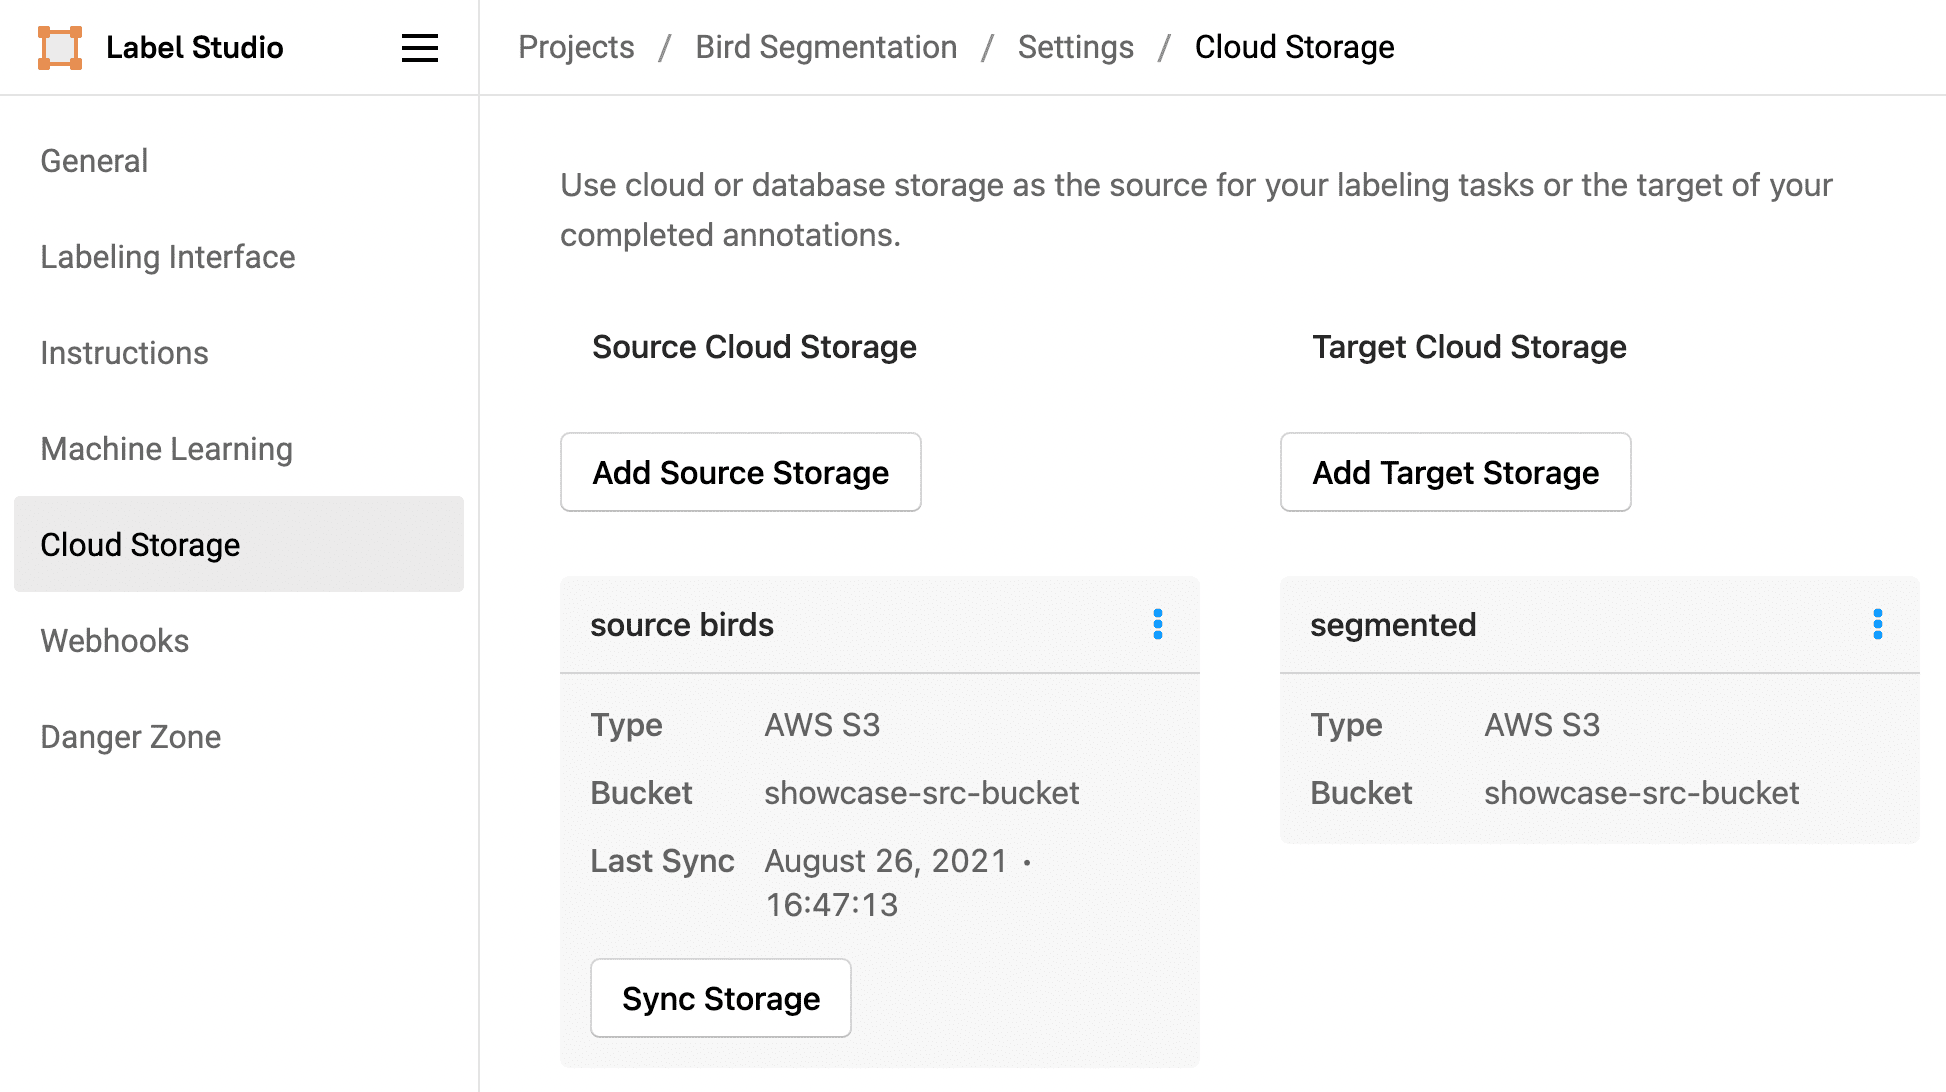
- In the Label Studio UI, click Settings to open the project settings.
- Click Cloud Storage.
- Click Add Source Storage.
- Specify a title for the storage. For example, Source bird images.
- Specify a bucket name of showcase-bucket and a bucket prefix of bird-images.
- Specify a file filter regex of
.*jpgso that Label Studio retrieves only images with that file extension from the S3 bucket prefix. - Specify a region name of
us-east-2, unless you're using a different region to follow along with this blog post. - Specify the Access Key ID, Secret Access Key, and Session Token for a user with access to S3 buckets. You can use the credentials of the user account that you used to create the S3 bucket.
- Select the option to Treat every bucket object as a source file.
- Click Add Storage.
- Click Sync Storage to sync the images.
As the images sync to Label Studio using pre-signed URLs, set up the target storage to store annotations. 1. In the Label Studio Cloud Storage Settings, click Add Target Storage. 2. Specify a title for the storage. For example, Annotated birds. 3. Specify a bucket name of showcase-bucket and a bucket prefix of annotations. 4. Specify a region name of us-east-2, unless you're using a different region to follow along with this blog post. 8. Specify the Access Key ID, Secret Access Key, and Session Token for a user with access to S3 buckets. You can use the credentials of the user account that you used to create the S3 bucket. 6. Click Add Storage.
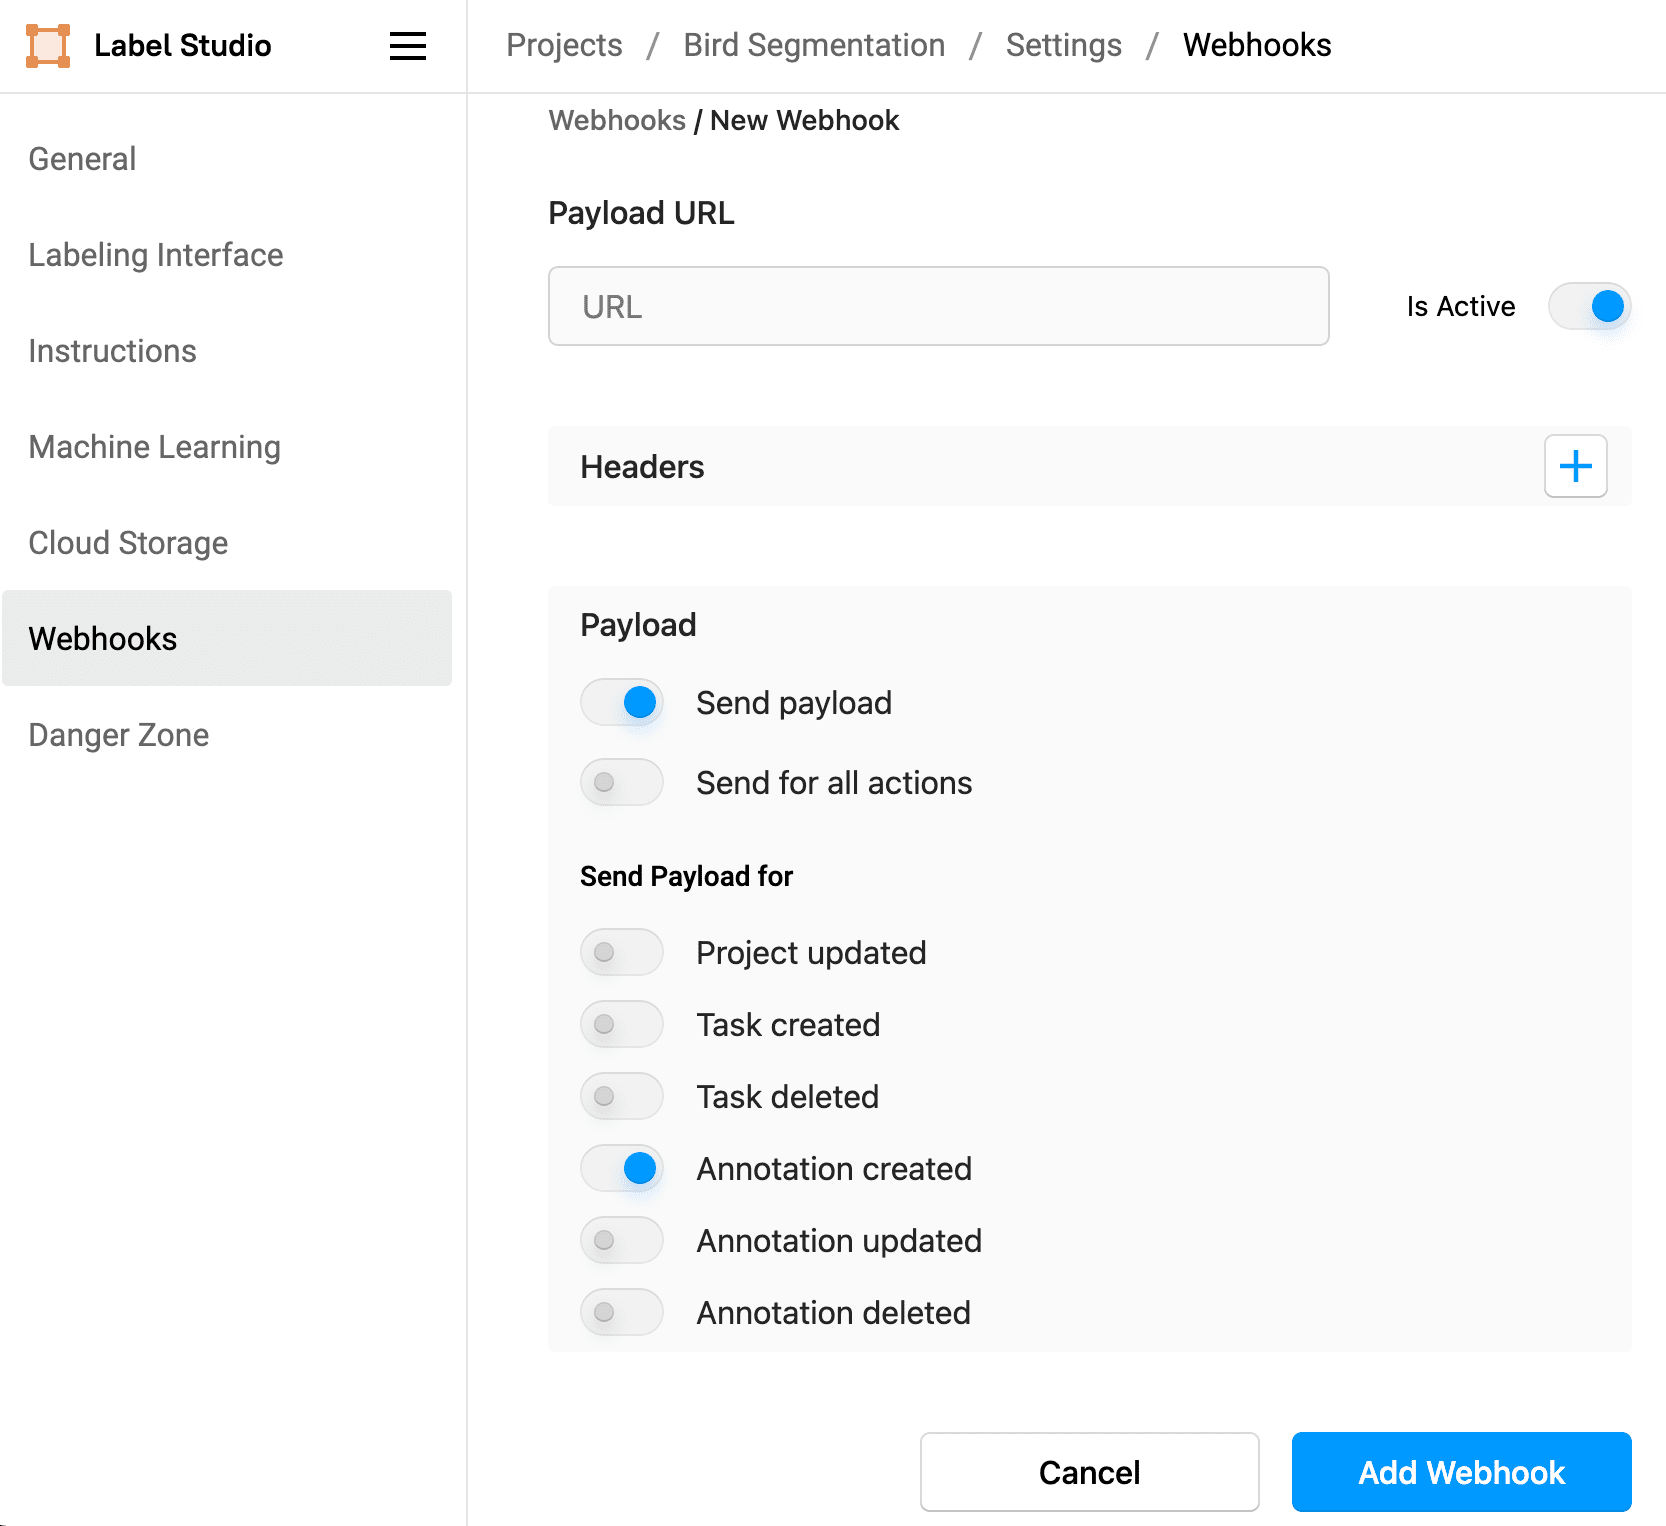
Set up the webhook URL and events
Set up the webhook URL so that you can send ANNOTATION_CREATED events from Label Studio to the AWS Lambda function using the Amazon API Gateway so that you can trigger the Amazon SageMaker pipeline.
- In the Label Studio project settings, click Webhooks
- Click Add Webhook.
- In the URL field, paste the Amazon API Gateway URL created when you set up the AWS API gateway. For example,
https://$GATEWAY_ID.execute-api.${REGION}.amazonaws.com/prod/LcWebHook. - Skip the Headers section, unless you set up authorization for the API Gateway configuration.
- For the Payload section, leave Send payload selected, but deselect Send for all actions.
- For Send Payload for, select Annotation created. You only want to send events to the AWS Lambda function when an annotation is created.
- Click Add Webhook to save your webhook.
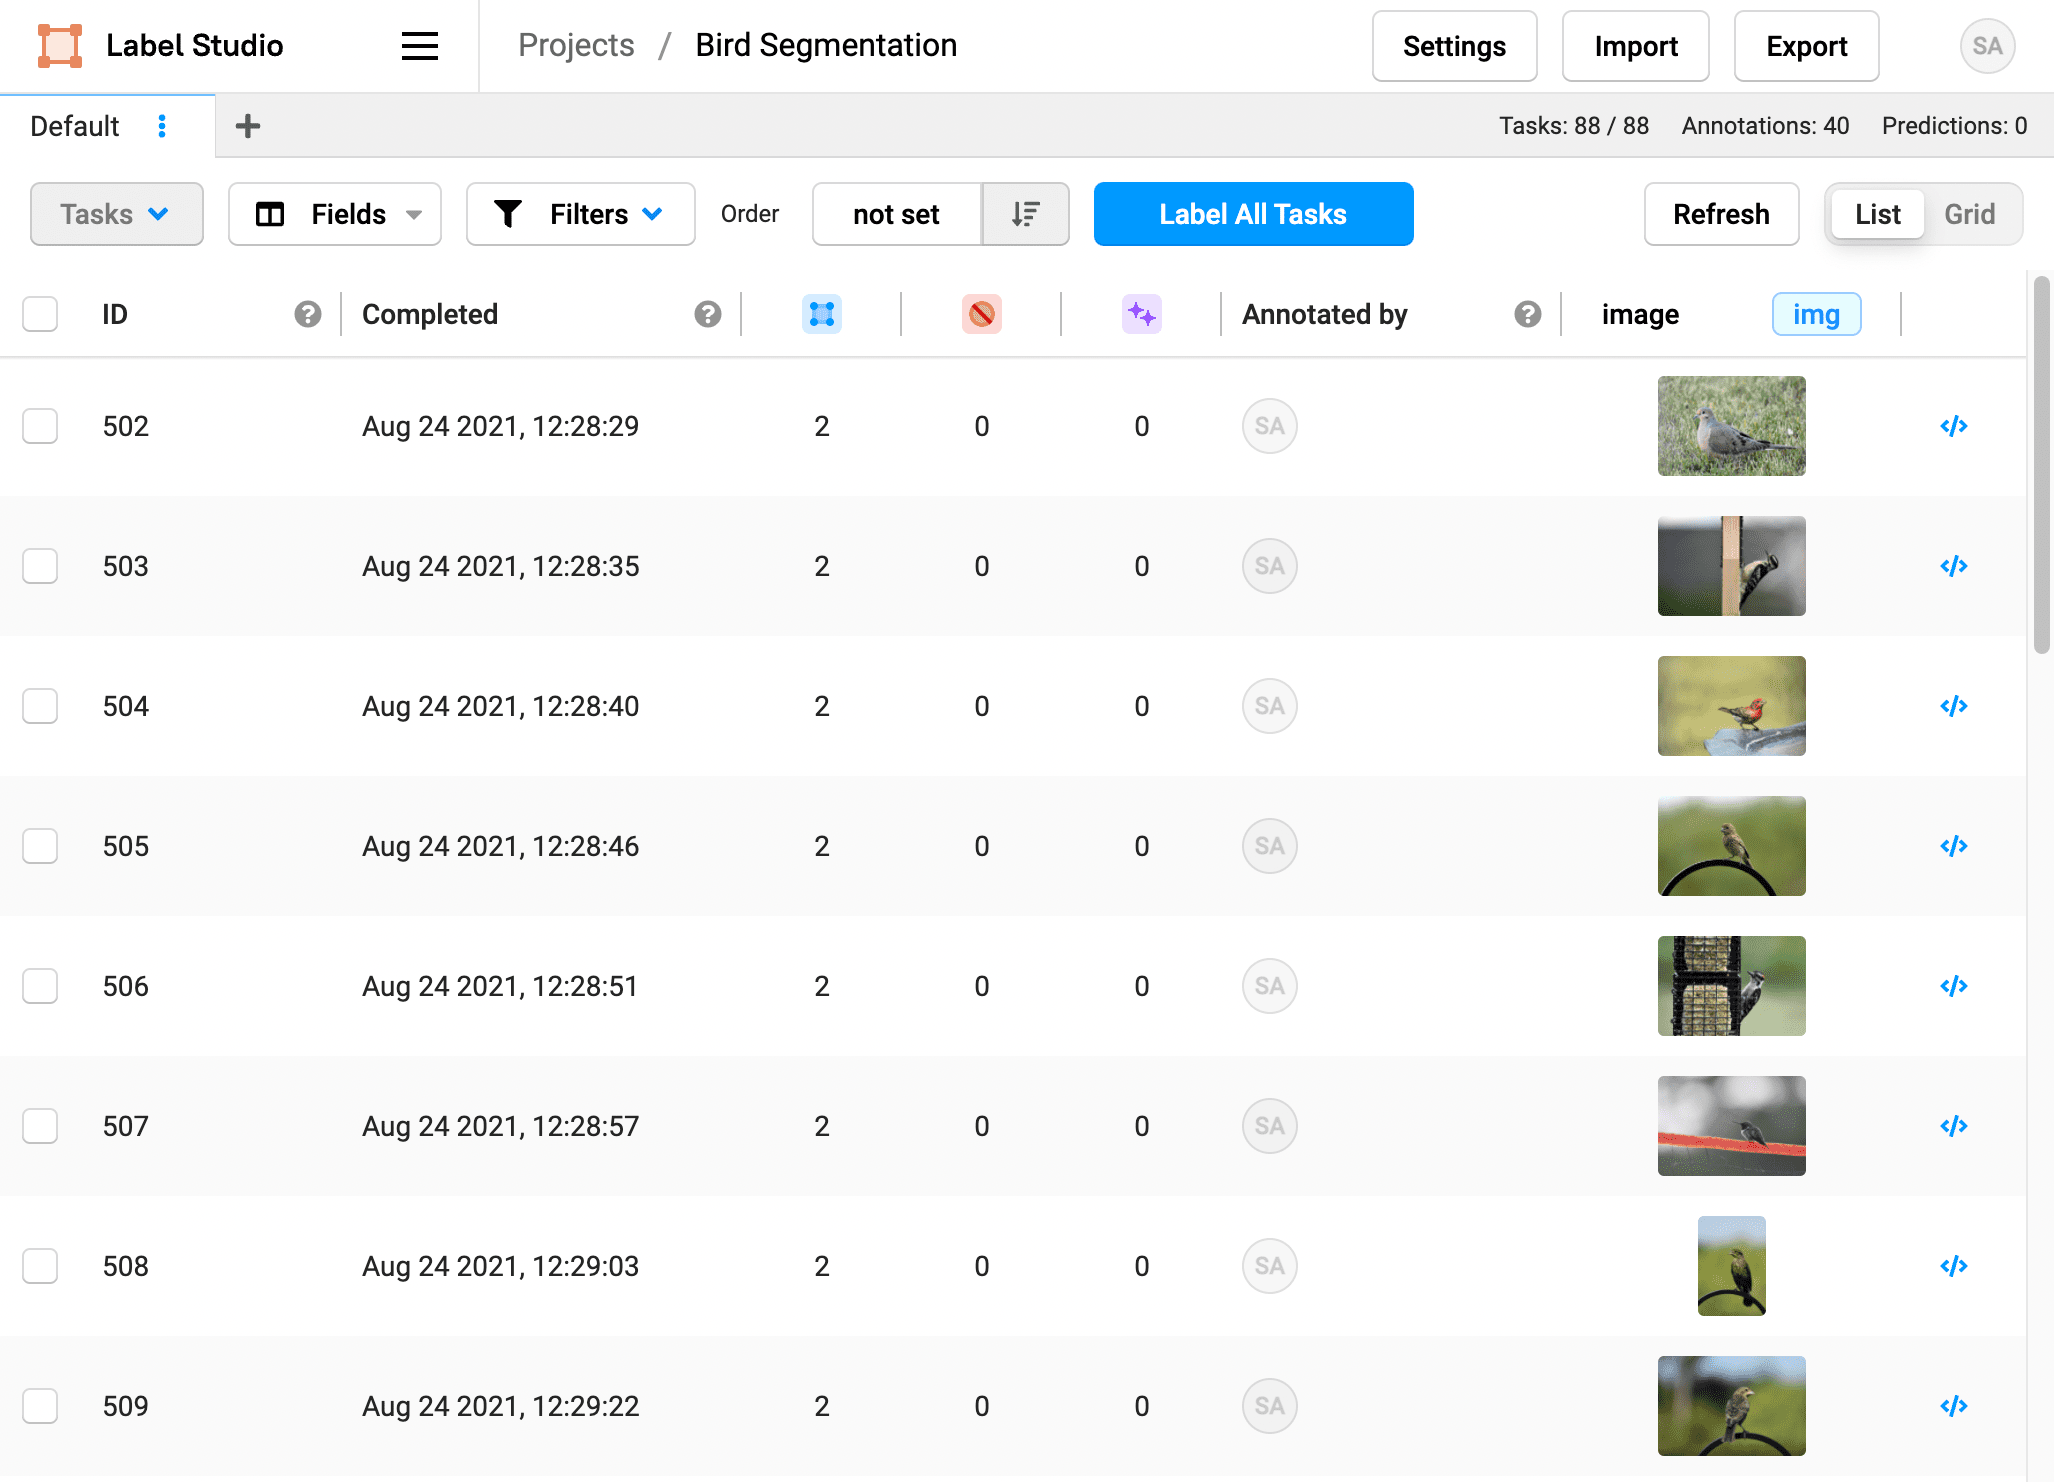
Start annotating data in Label Studio
After you set up the project, you can start labeling!
- In the Label Studio UI, return to the data manager by clicking Bird Segmentation in the breadcrumbs.
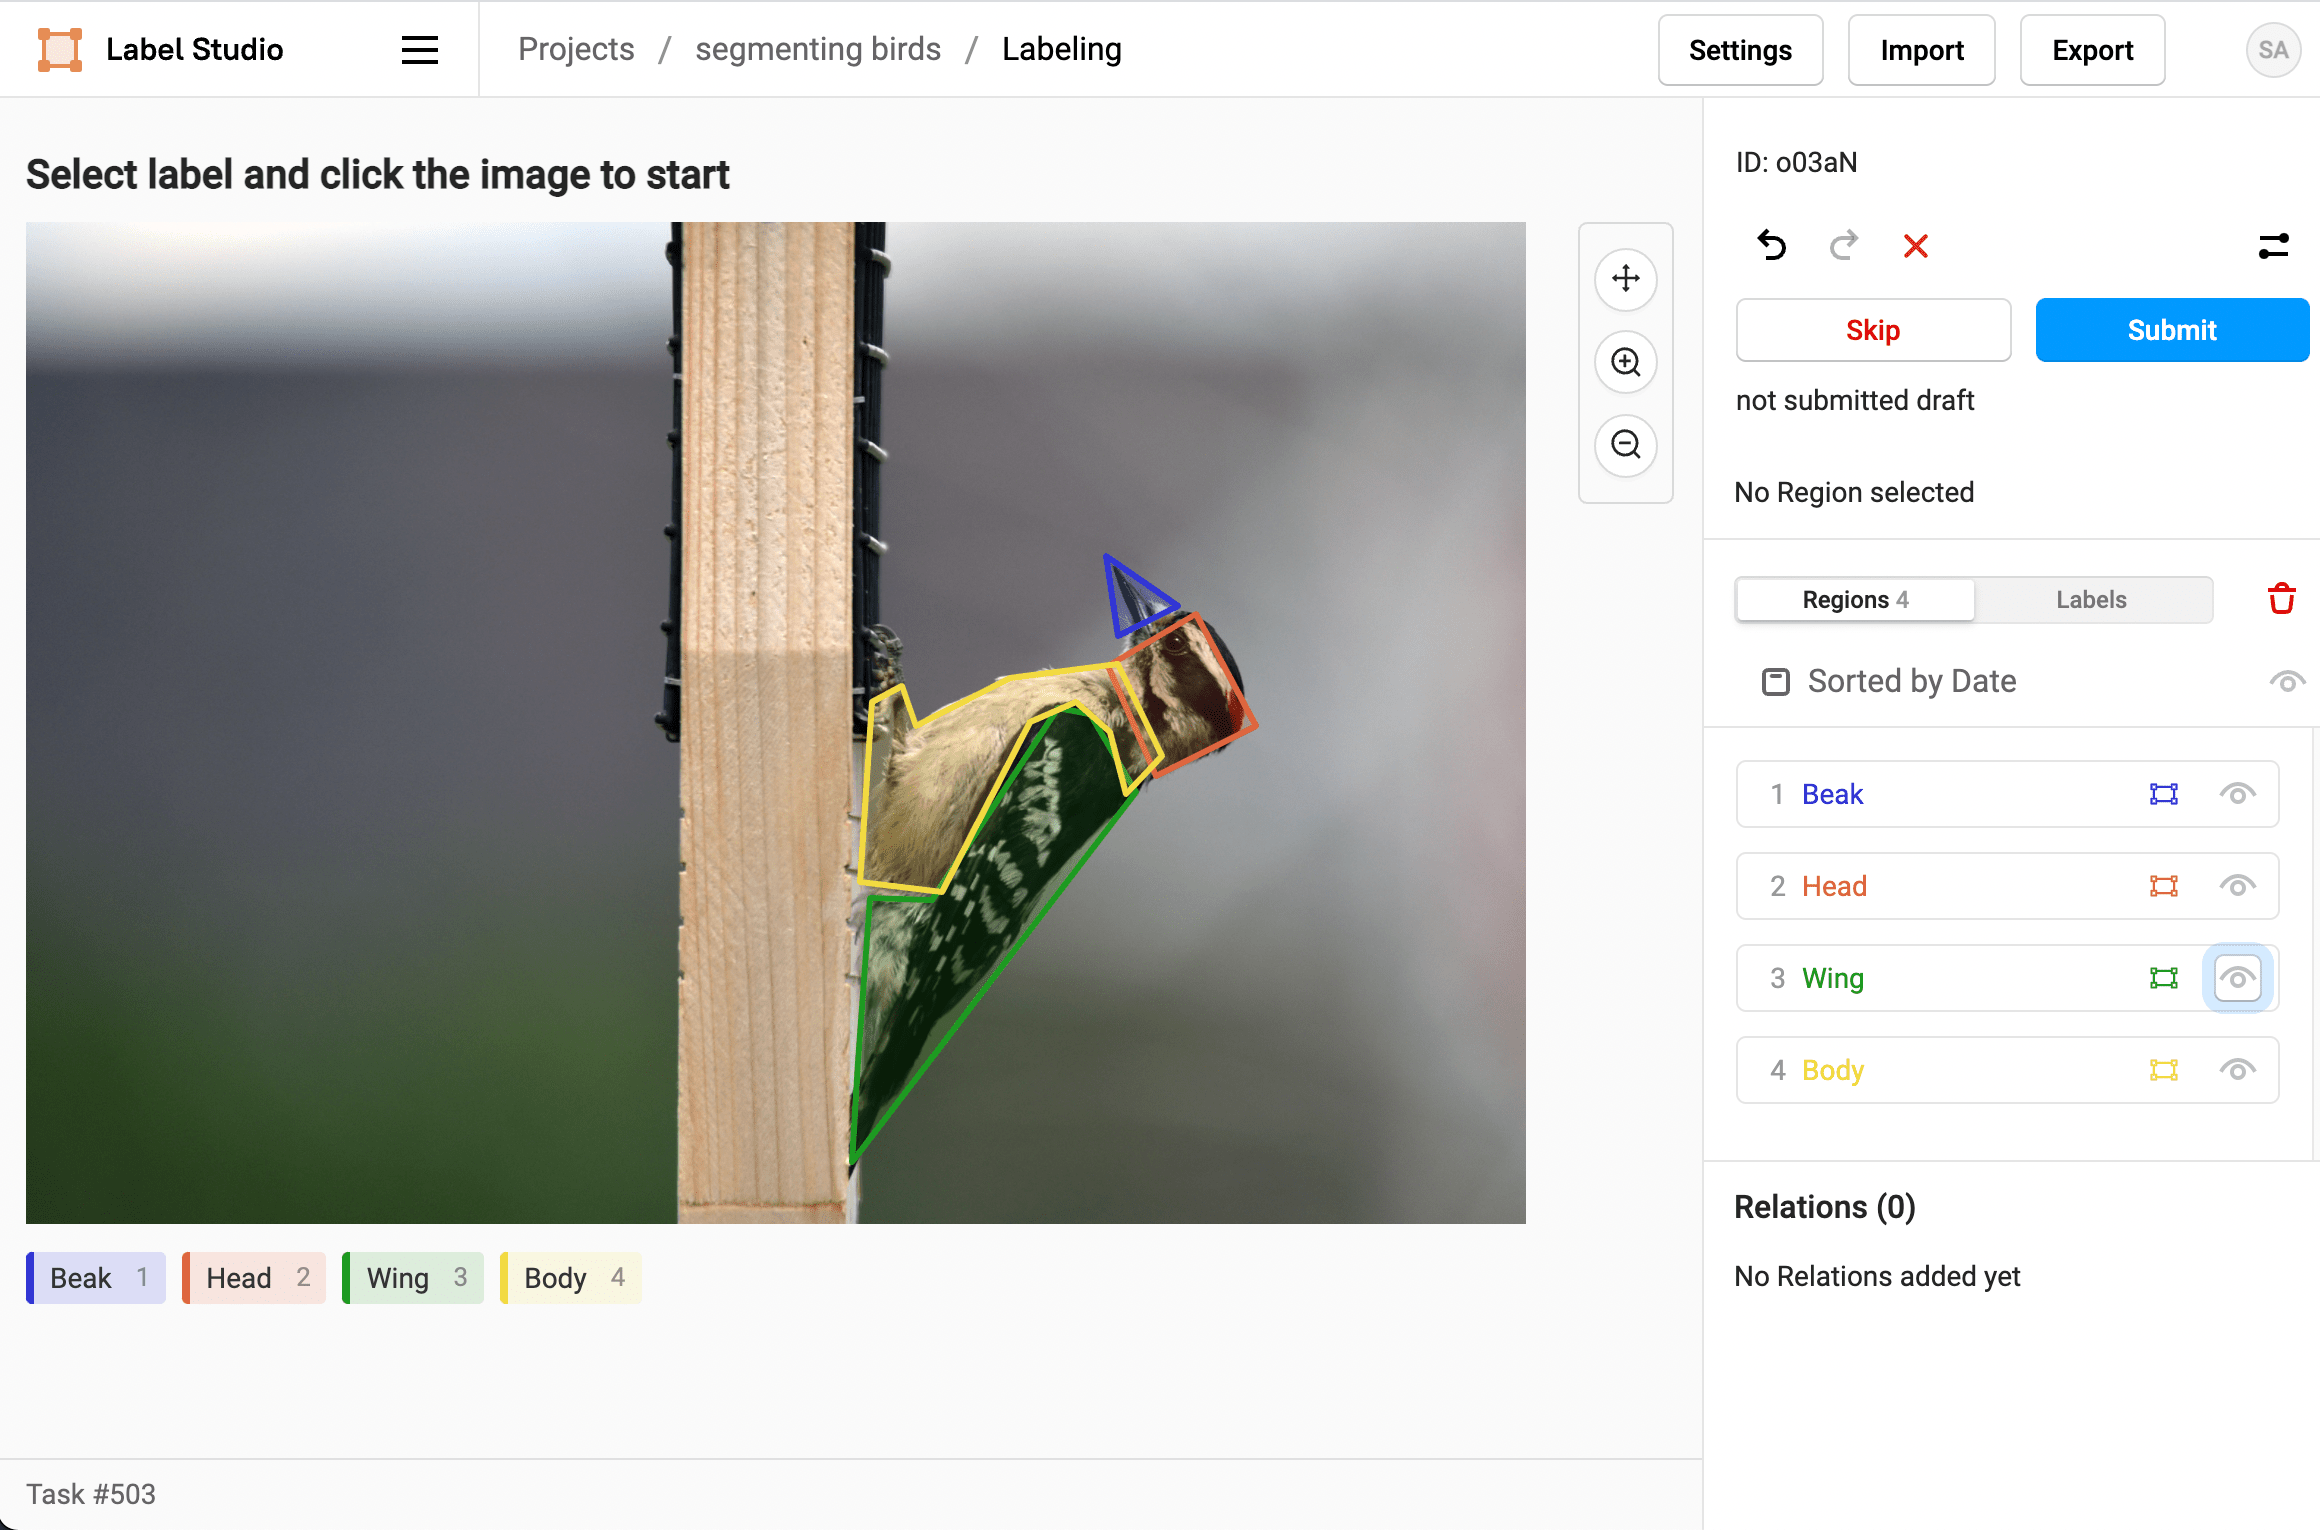
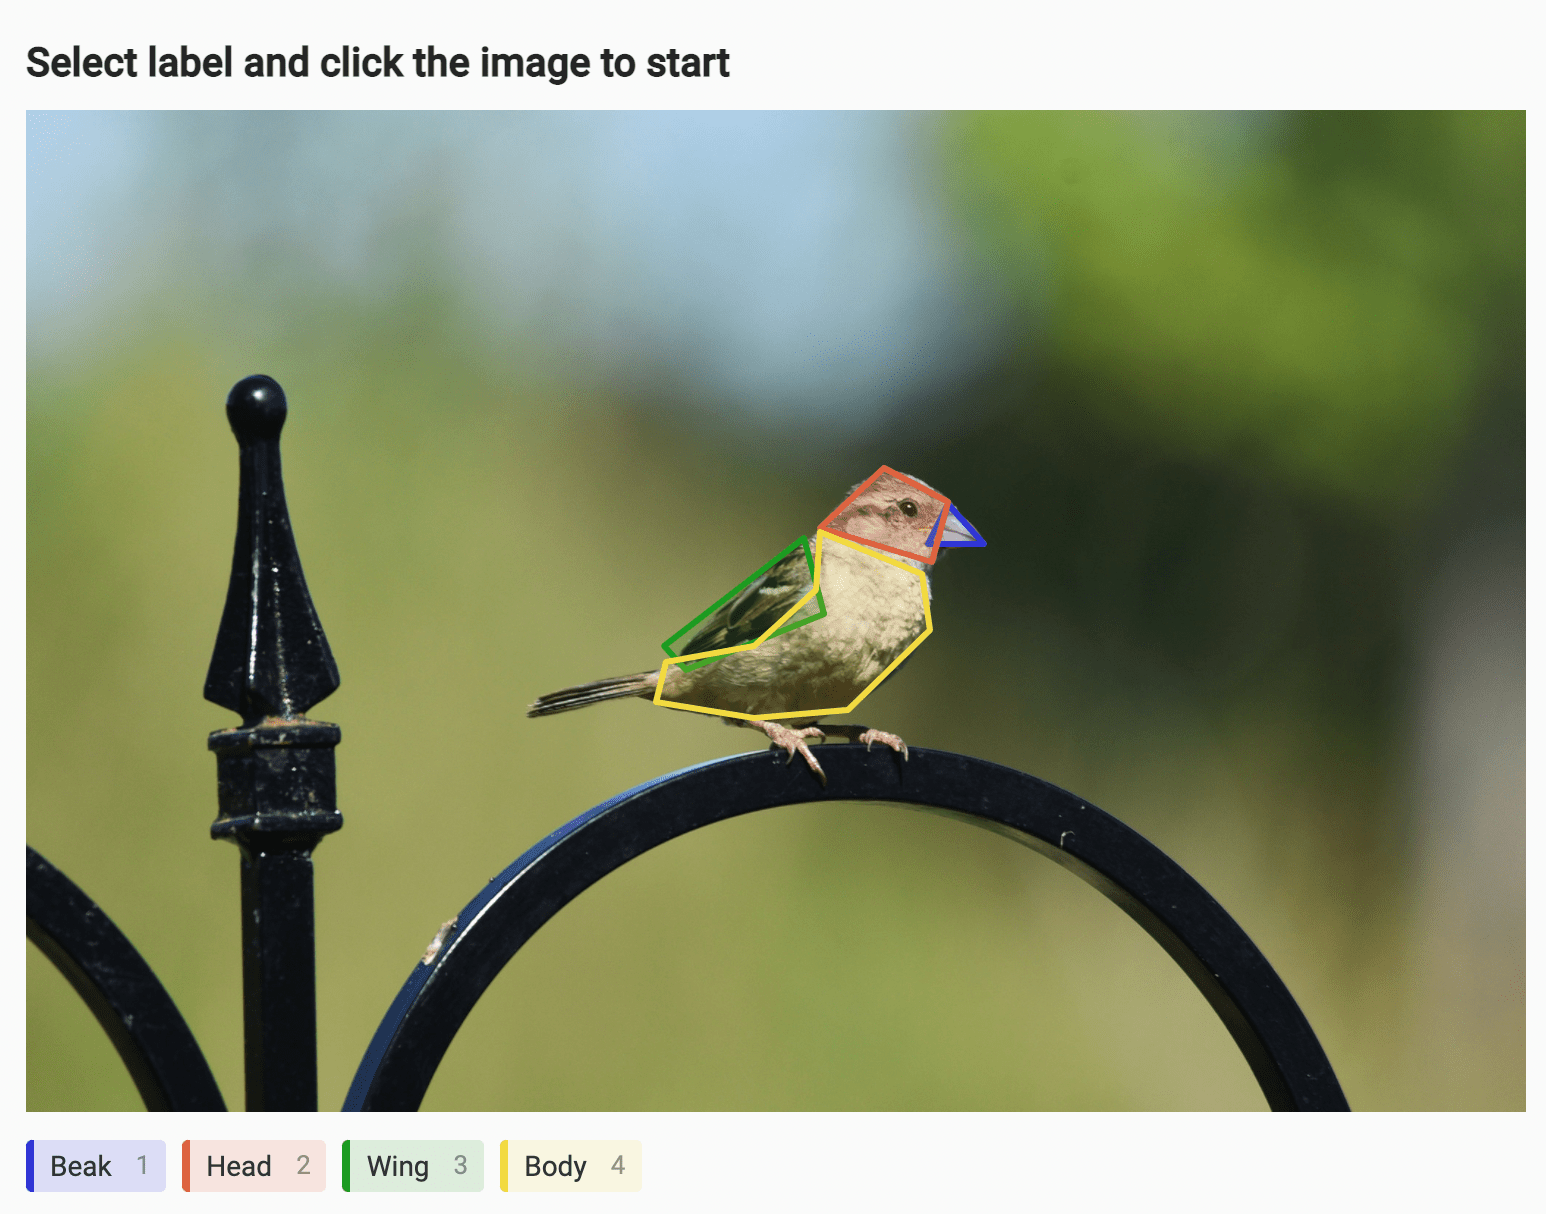
- From the data manager for the Bird Segmentation project, click Label All Tasks.
- Select a label and click points on the image to draw a polygon around parts of the bird.
- To make it easier to draw overlapping polygons, use the eye icon in the Regions sidebar to hide polygonal regions after you create them.
- When you're finished labeling the parts of the bird, click Submit to move onto the next task.
Label at least 16 bird images to trigger the SageMaker pipeline.
What the pipeline does behind the scenes
As you start annotating data, Label Studio saves the annotations to your S3 bucket with the /annotations/ prefix, and sends an event and payload through the Amazon API Gateway to the AWS Lambda function for each annotation created.
After you create at least 16 annotations, the Lambda function invokes the SageMaker pipeline that you created and starts processing the data using the preprocessing script and training the FCN ResNet-50 Image Segmentation model in the SageMaker pipeline.
You can check the status of the pipeline using the AWS Console and viewing the pipeline in Amazon SageMaker Studio. Search for the pipeline name and review the details of the pipeline execution.
To see the status of the pipeline, you need the pipeline execution ARN generated when the Lambda function executes the pipeline.
aws sagemaker list-pipeline-executions --pipeline-name WebhookShowcase After you retrieve the execution ARN, you can run the following from the command line:
aws sagemaker list-pipeline-execution-steps --pipeline-execution-arn {ARN of your execution} After the SageMaker pipeline finishes retraining the model, you can retrieve the output model from the \output\ prefix of your Amazon S3 bucket. It takes about 15-20 minutes for retraining to complete. Each training run creates a different folder with the model output, identified by the prefix pipelines-<pipeline-execution-ARN>, for example pipelines-ex1wl5v10ozo-ImageSegmentationTra-uQdocX42EE/.
Next Steps
Setting up an end-to-end pipeline from data labeling to model training is complex, but after it's up and running you can take advantage of the time savings of an automated machine learning workflow. Branch out to include other types of data labeling for the bird images, such as image classification by season, or add some images of other animals to provide a more evenly trained model for your original use case.
This is just one example of how you can use webhooks in Label Studio to simplify and automate part of your machine learning pipeline. You can also use webhooks to:
- Monitor model performance against ground truth annotations
- Notify experts when a new project is ready to be annotated
- Craft an active learning pipeline
- Version datasets based on labeling activities
Related Content
-
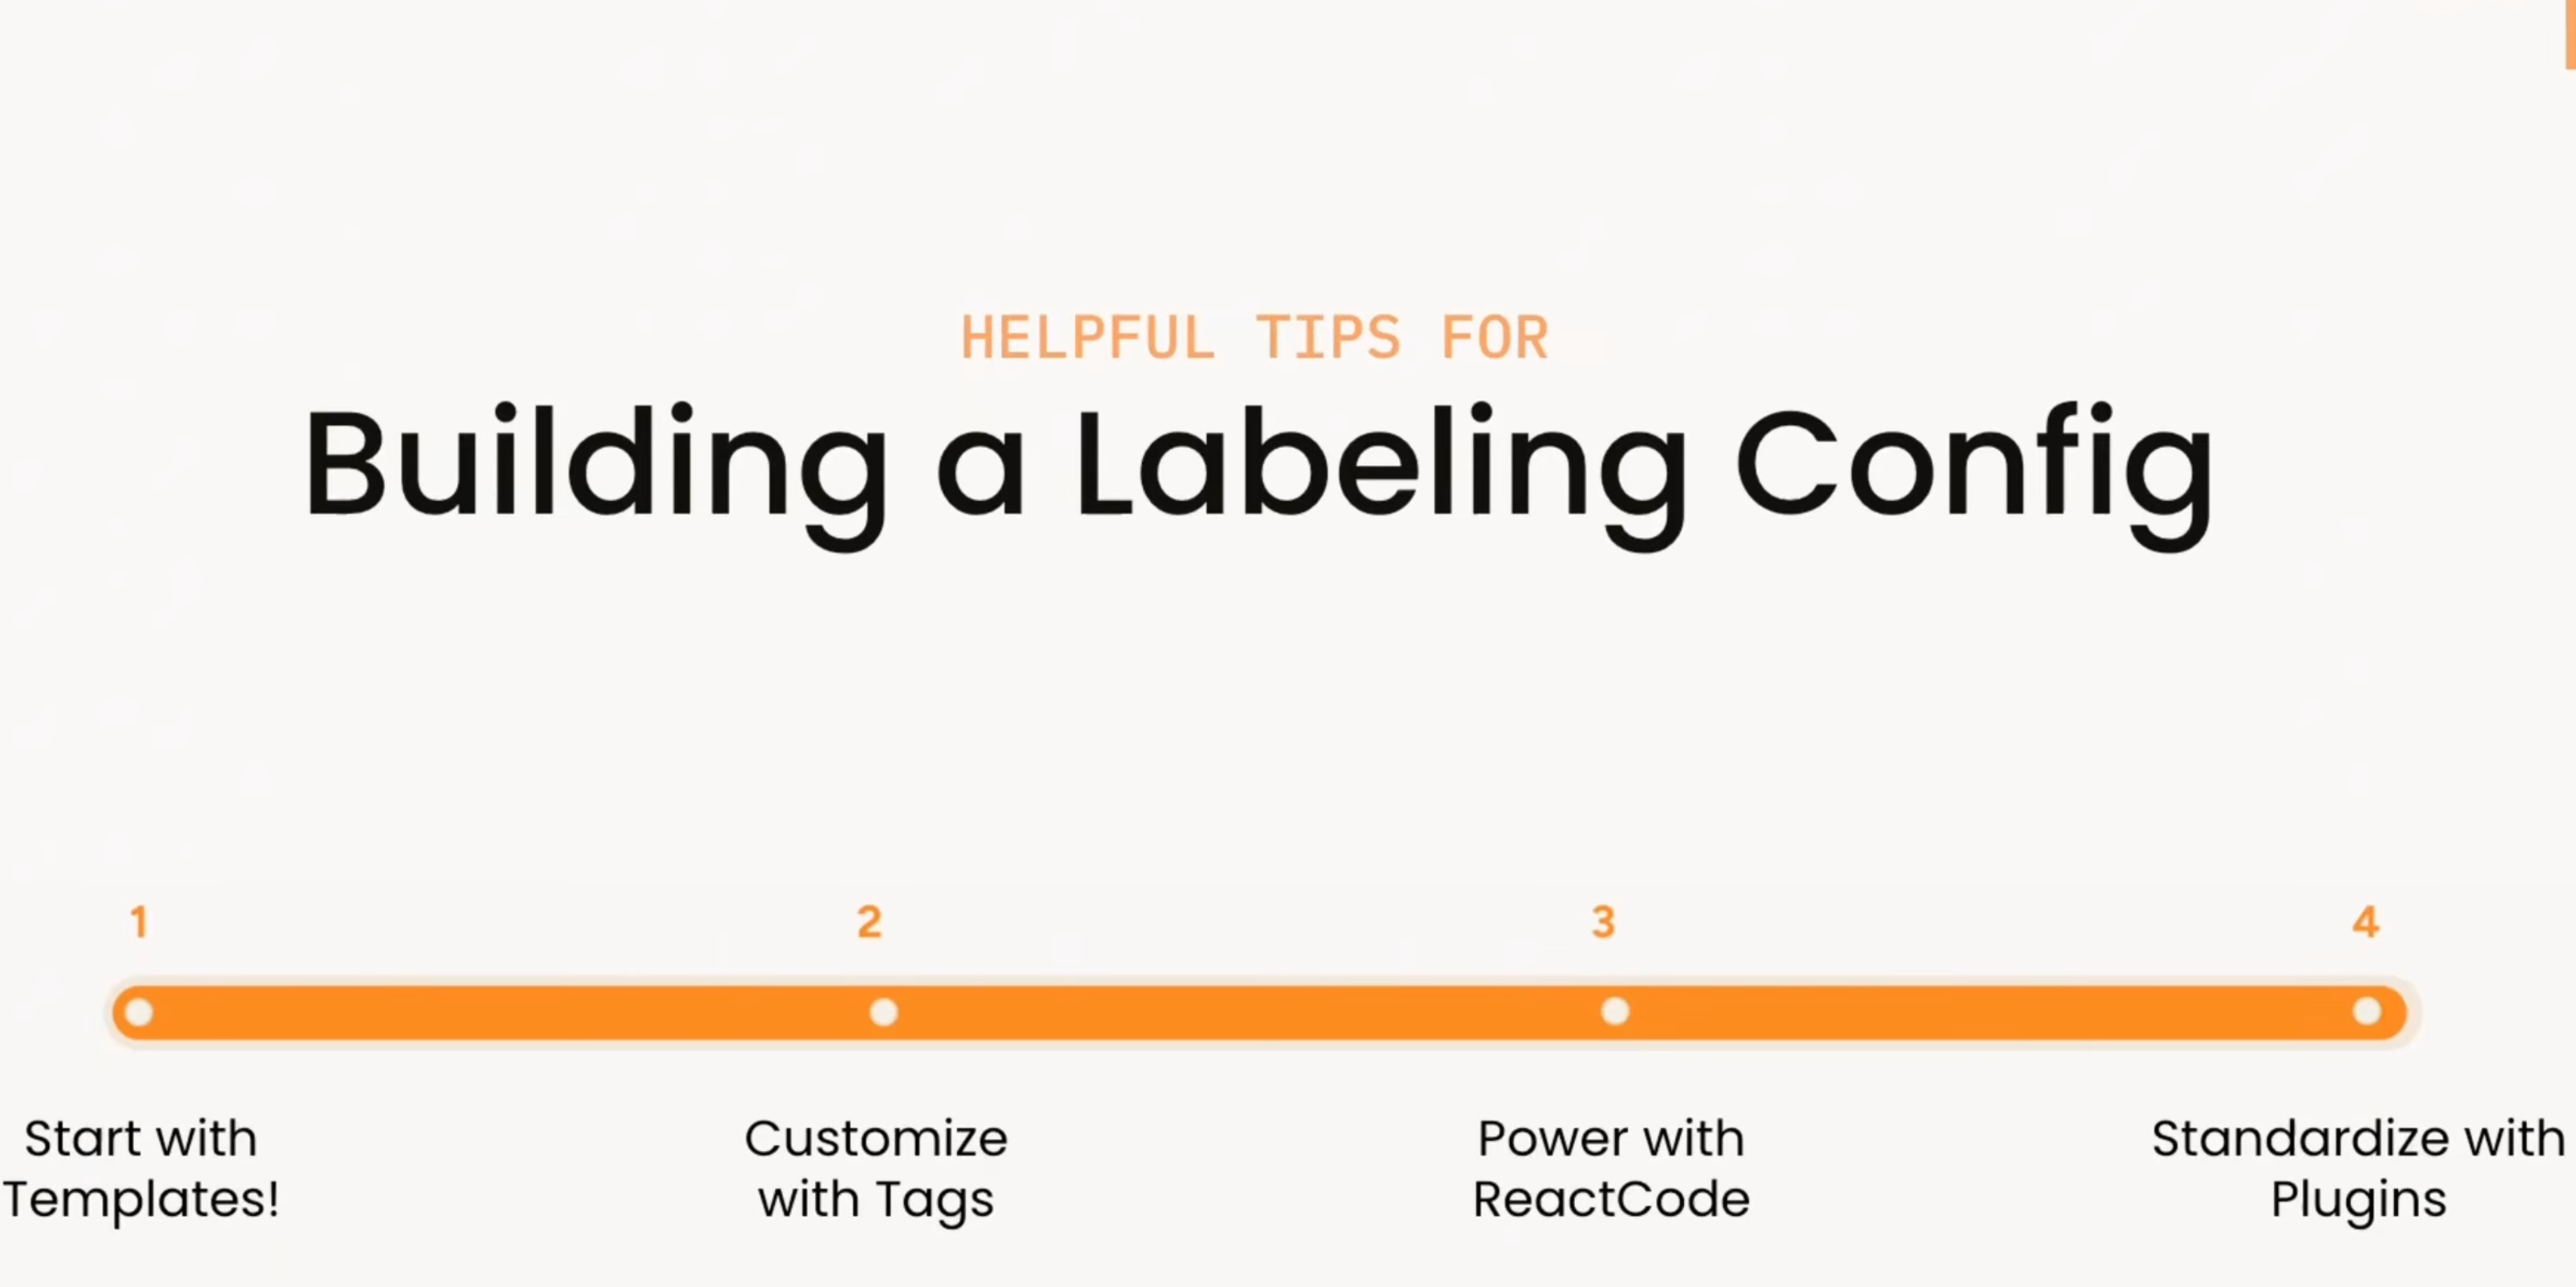
Building A Labeling Config in Label Studio Enterprise
How do you build the right labeling interface in Label Studio? This video walks through a practical progression: start with templates, customize with XML tags, extend with React Code, and standardize workflows with plugins.
-

Learn how to connect YOLO26 to a Label Studio project using the YOLO ML Backend so annotators can start from model predictions and focus on review and correction instead of drawing boxes from scratch.

Micaela Kaplan
February 12, 2026
-

Getting started with Label Studio
Everything you need to know about Label Studio to get started, from downloading and installing the tool to creating your first project, adding new members, and more!