Label Studio x Segment Anything in Hugging Face Spaces

The Label Studio community is excited to announce the release of the Segment Anything Machine Learning Backend on Hugging Face Spaces! This new release delivers the groundbreaking power of Segment Anything’s generalized object detection knowledge, using the MobileSAM build of the model as a Hugging Face Spaces application that will make it even easier to launch and connect to your Label Studio instance.
What is the Segment Anything Model?
Segment Anything is a model the Meta AI research team developed that “can ‘cut out’ any object, in any image, with a single click.” One of the most compelling features of SAM is that it “is a promptable segmentation system with zero-shot generalization to unfamiliar objects and images, without the need for additional training.”
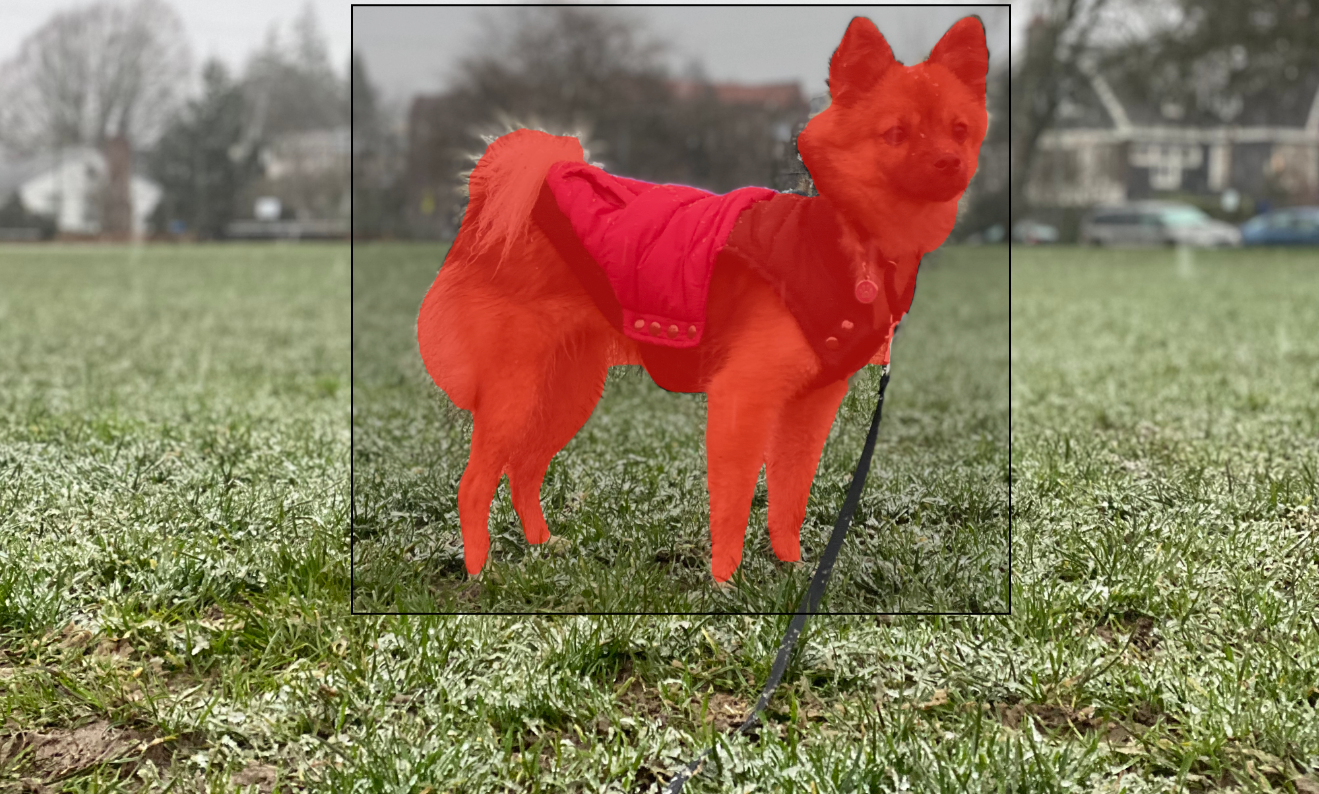
Segment Anything Model Selecting a Dog with a Bounding Box Constraint
What this means at a higher level is that SAM has a more generalized notion of what objects are, allowing it to identify and segment objects in an image even if it has never previously encountered them in training. This sort of zero-shot generalization, combined with powerful keypoint and bounding-box cueing, makes SAM an ideal tool for pre-annotating new image segmentation datasets.
You can learn more about the model at the official SAM website.
What is Hugging Face Spaces?
From the Hugging Face Spaces documentation: "Spaces offers a simple way to host ML demo apps directly on your or your organization’s. This flexible platform allows you to create your ML portfolio, showcase your projects at conferences or to stakeholders, and work collaboratively with others in the ML ecosystem." Beyond that, Hugging Face Spaces gives users a way to build and share ML applications collaboratively with the broader ML community.
For example, the Label Studio community launched its own Label Studio Space earlier this year. This space allowed users to try out Label Studio in a sandbox environment or replicate the Label Studio Space to run in their environment. With the addition of permanent storage in Spaces, you can even host a production-ready Label Studio Instance entirely in Hugging Face Spaces.
Now, we’re growing the portfolio of Label Studio Spaces with the release of the “Label Studio x Segment Anything” space. This article will guide you through launching Label Studio and Segment Anything Model instances to build an object labeling workflow.
Launch & Configure Label Studio
The fastest way to get started is to duplicate the Label Studio Space into your Hugging Face account. Navigate to the official Label Studio application space, expand the menu in the Spaces toolbar, and select Duplicate this Space. You'll be prompted to fill out some basic information, and then after you hit the Duplicate Space button, you’ll be ready to go. Once the interface is running, you can create a new login and get started with a new Label Studio demonstration environment.
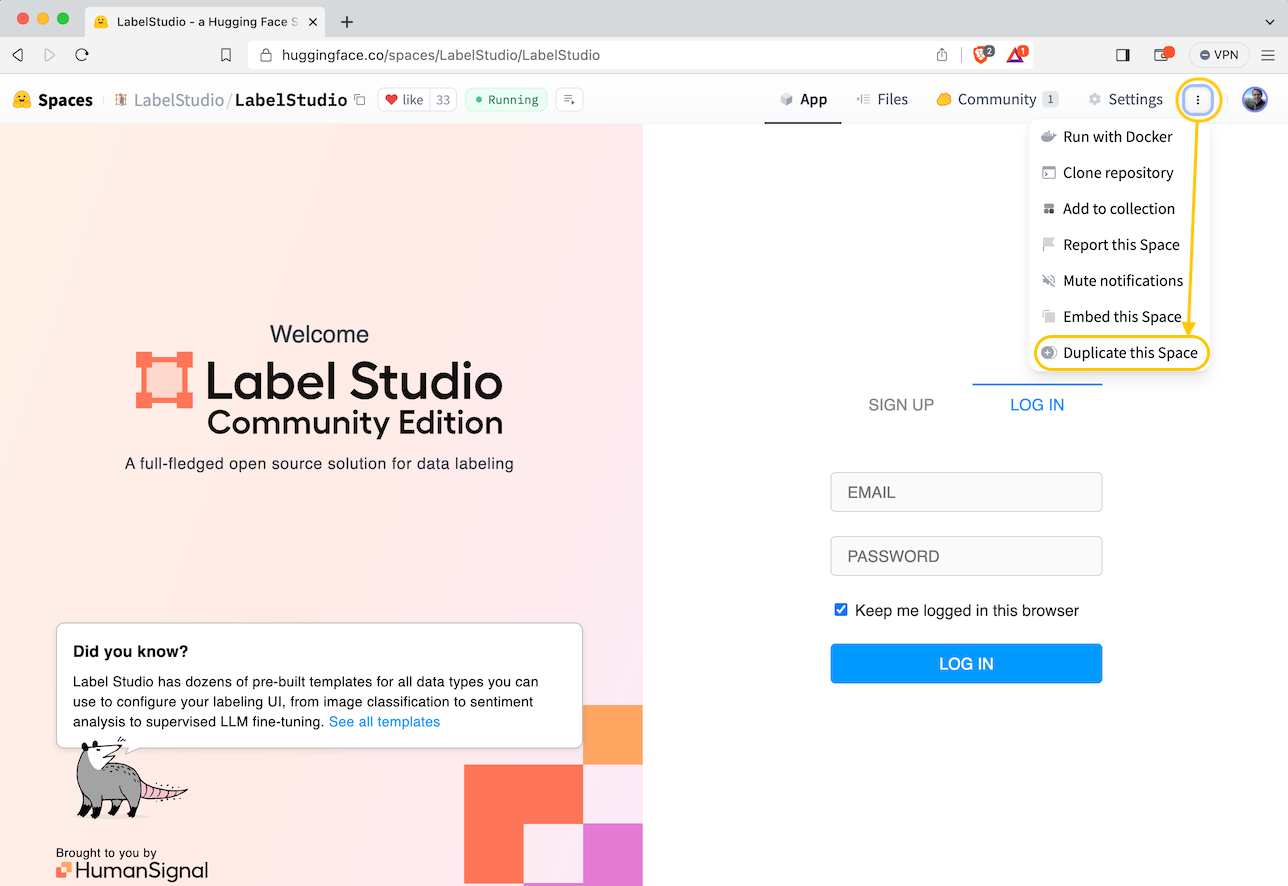
Duplicating the Official Label Studio Space
To run a secure instance of Label Studio with persistent storage, check out the article from earlier this year, Kickstart your Label Studio Annotation Project on Hugging Face Spaces, for complete details.
To give the Segment Anything Model access to your image data, you must enable file sharing from Label Studio. Select Settings in your Label Studio Space, then scroll down to Variables and Secrets, and add the following variables:
LABEL_STUDIO_LOCAL_FILES_SERVING_ENABLED=true
LABEL_STUDIO_LOCAL_FILES_DOCUMENT_ROOT=/label-studio/data/images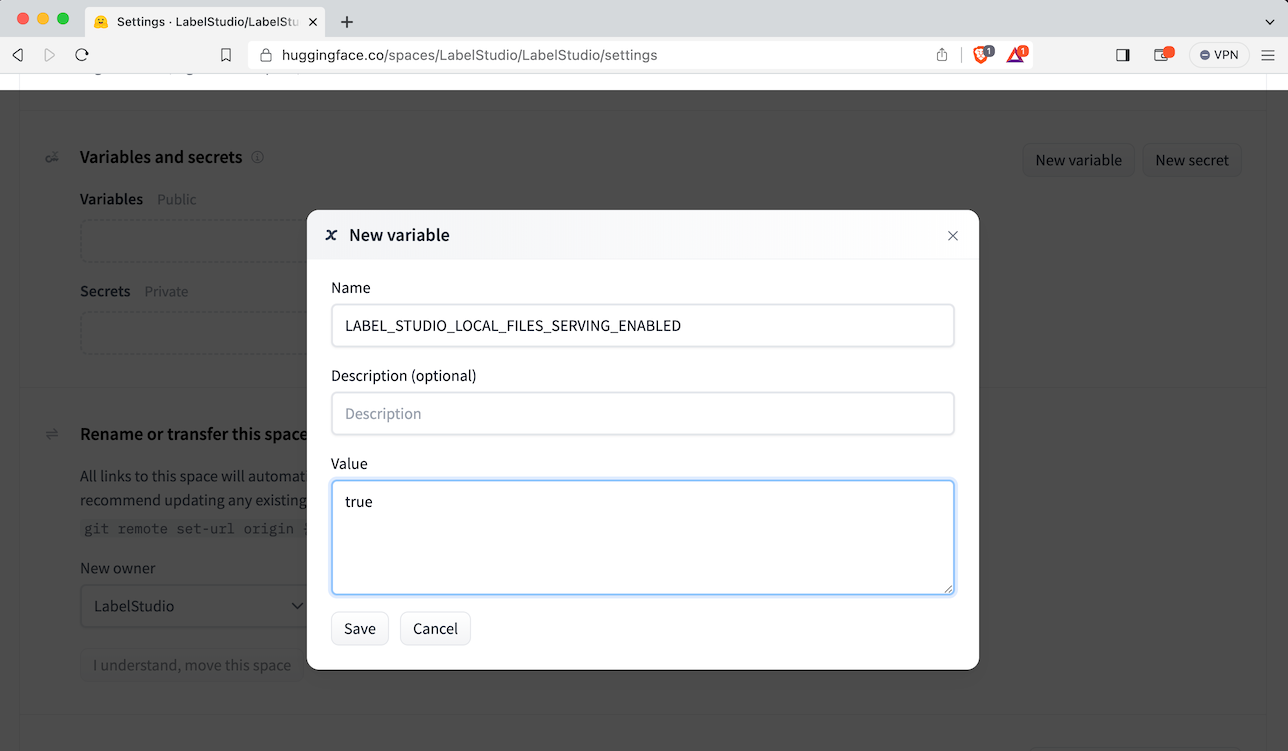
Enabling Local File Serving in Label Studio
The first enables local file serving, allowing SAM to download files from Label Studio. The second specifies the location where Label Studio should serve files. Use the setting above if you’re running Label Studio in demo mode. If you use permanent storage, using the instructions from the Kickstart article, set that variable to /data/images.
Get your Label Studio Endpoint and API Key
You will need to configure your SAM instance with information about how to connect to Label Studio. To get the direct URL to your Label Studio instance, select the Spaces application menu, choose Embed this Space, and make a note of the Direct URL value.
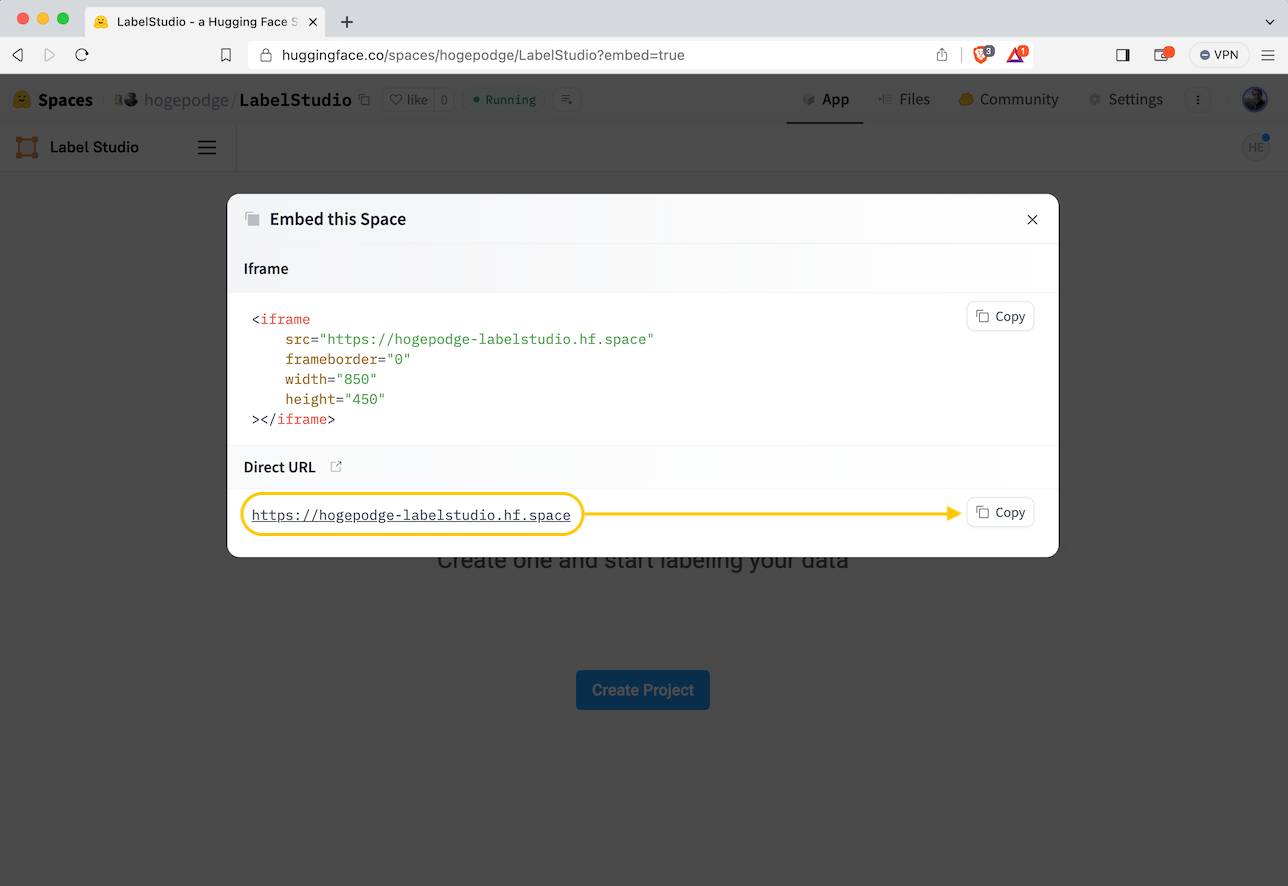
Copying the Label Studio URL
To get the Label Studio API key, log into Label Studio, click the user settings in the right-hand corner of the application, select Accounts & Settings from the dropdown menu, and note the Access Token.
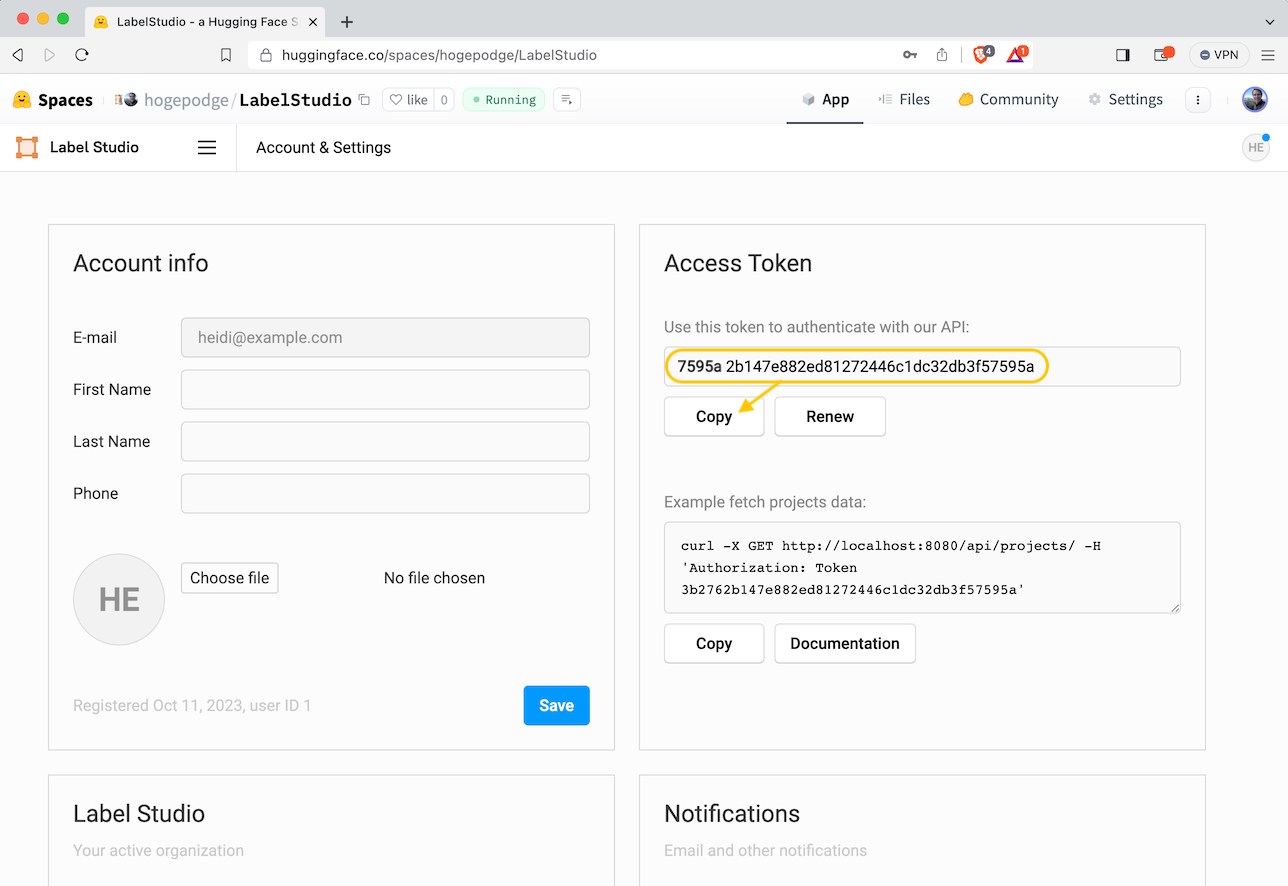
Copying the Label Studio Access Token
With these two values, you’re ready to launch your SAM Space!
Launch and Configure the SAM ML Backend
Now it’s time to launch the Segment Anything Space. Navigate to the official Label Studio Space for Segment Anything, select the Space application menu, and choose Duplicate this Space. Just as before, you’ll be prompted to fill out some basic information, and then after you hit the Duplicate Space button, your copy of the model will start to build.
As the model is building, navigate to the “Settings” of the space and set the following secrets with the values collected in Step 2:
LABEL_STUDIO_HOST=<YOUR_DIRECT_URL_HERE>
LABEL_STUDIO_ACCESS_TOKEN=<YOUR_ACCESS_TOKEN_HERE>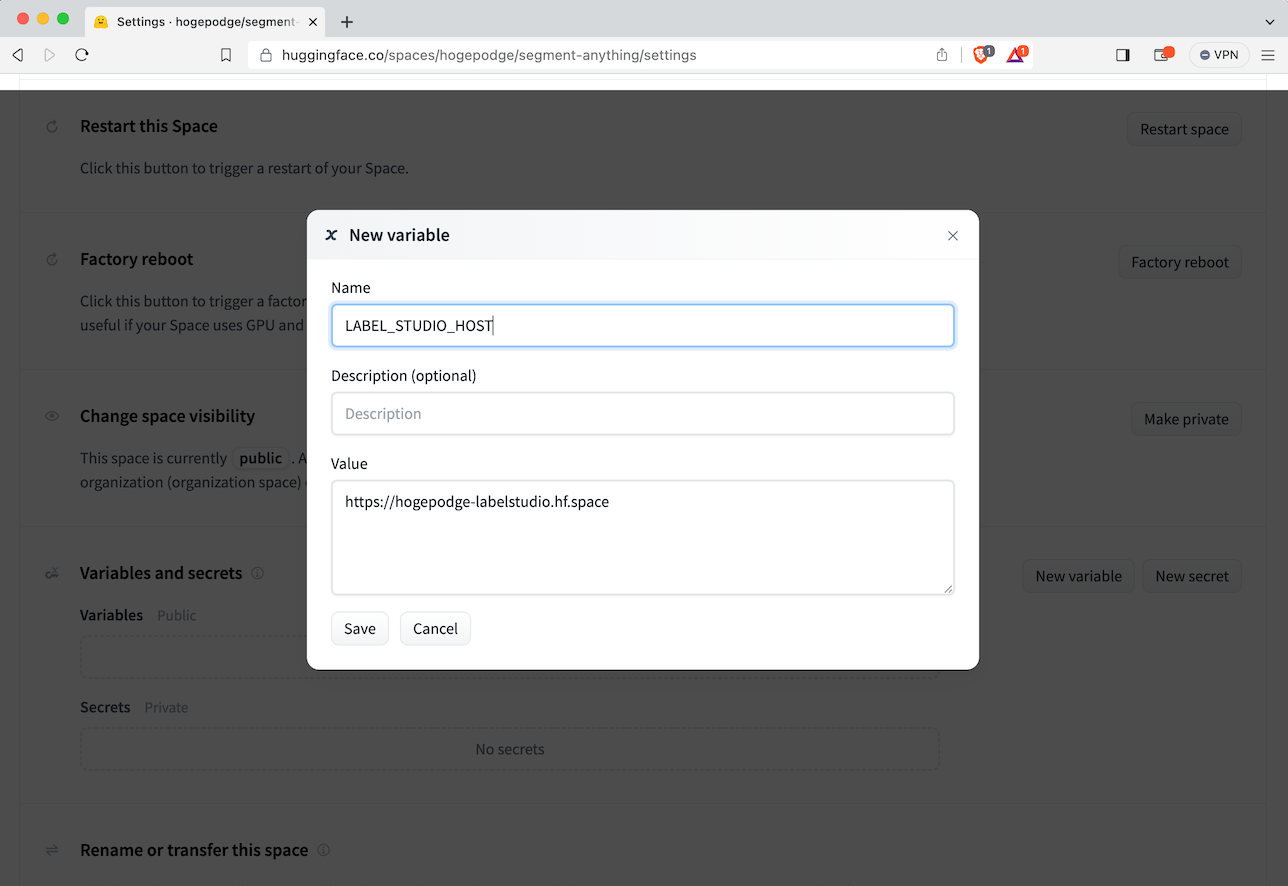
Setting the LABEL_STUDIO_HOST Variable
Wait for the space to build and launch. You’ll know it’s ready when the application reports:
{"model_class":"SamMLBackend","status":"UP"}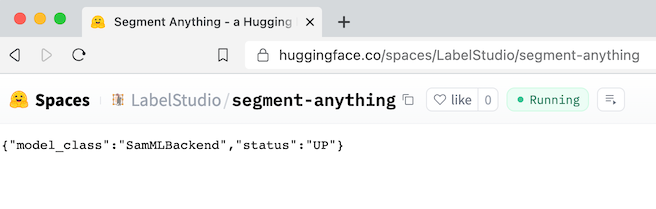
Verifying the Segment Anything Model is Running
Get the SAM URL by selecting the Spaces application menu and clicking Embed this Space. Make a note of the Direct URL value.
Set Up Your Labeling Project
Upon your first login, you’ll be greeted by Heidi the Opossum, asking you to create a new project. Select Create Project.
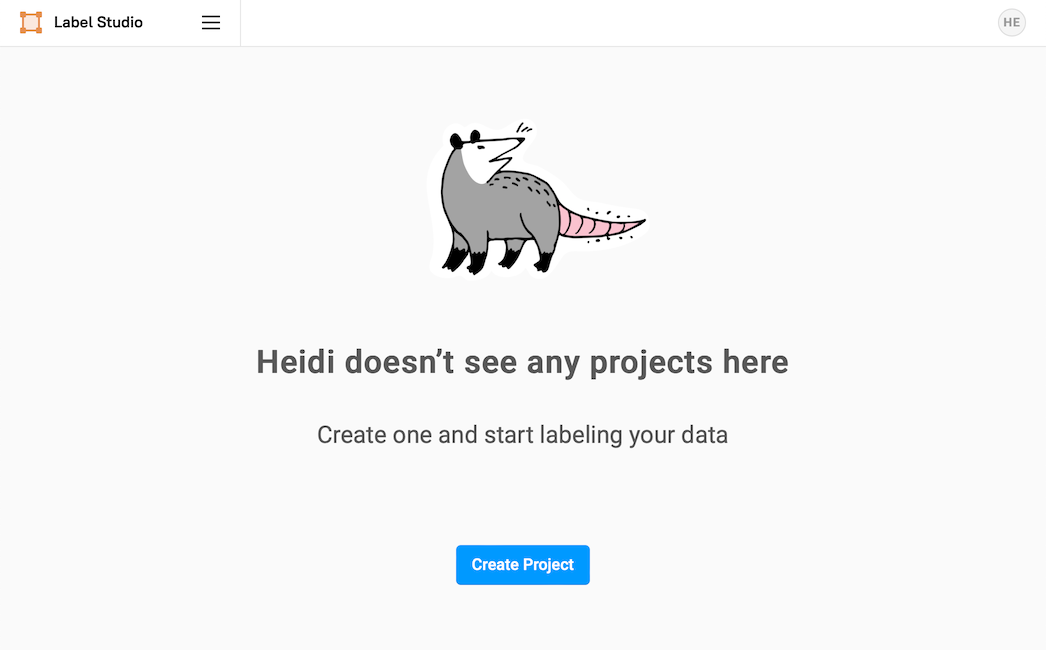
"Heidi doesn't see any projects here."
In the Create Project dialog, you will see three tabs. In the first tab, enter the name of your project (for example, Segment Anything), then select Labeling Setup. You’ll be presented with pre-configured labeling templates, but we will import a custom template for this project. Select the Custom Template option.
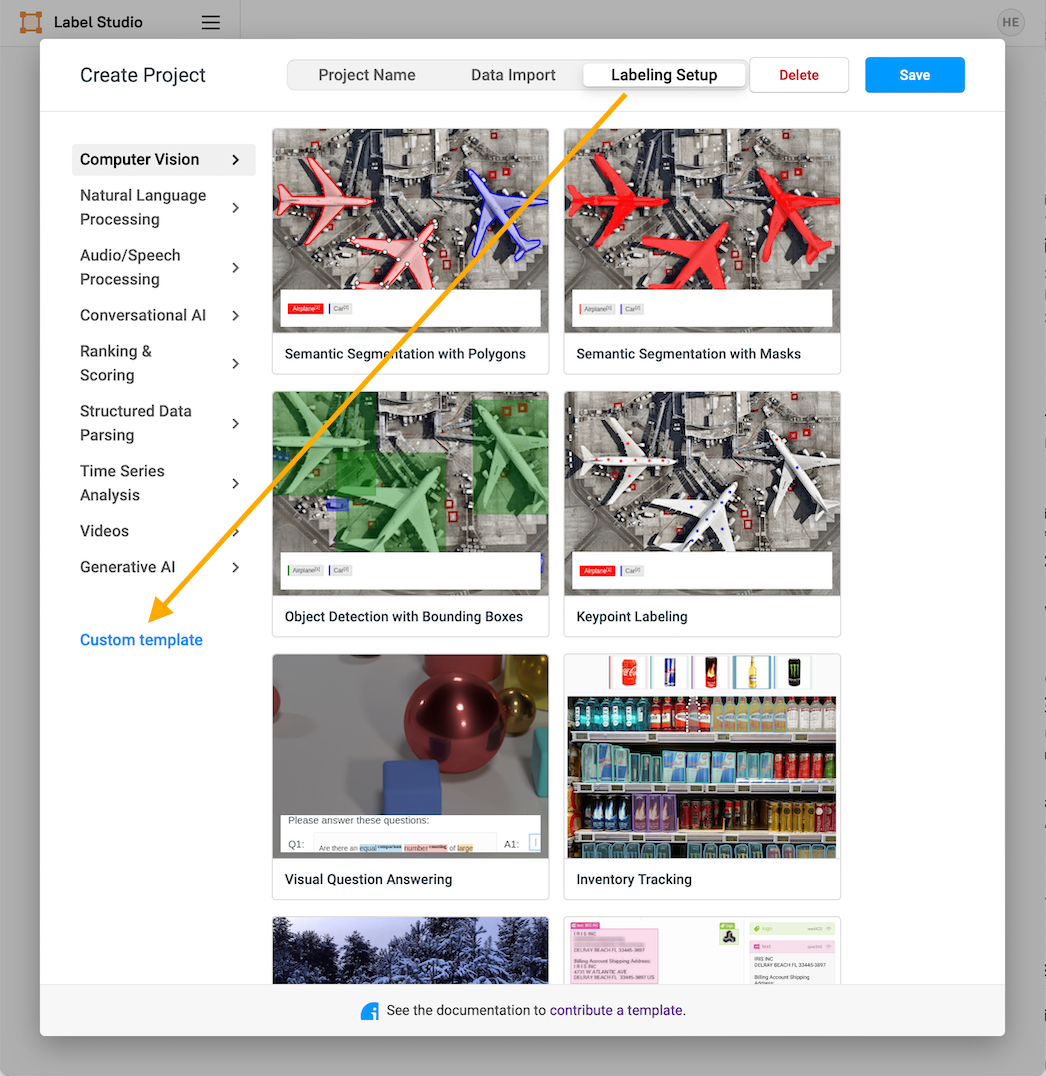
The Labeling Setup Interface
You’ll be presented with a template editing interface. Select Code, delete any existing code, and then paste the following configuration into the text field.
<View>
  <Image name="image" value="$image" zoom="true"/>
  <Header value="Brush Labels"/>
  <BrushLabels name="tag" toName="image">
  	<Label value="Dog" background="#FF0000"/>
  	<Label value="Possum" background="#0d14d3"/>
  </BrushLabels>
  <Header value="Keypoint Labels"/>
  <KeyPointLabels name="tag2" toName="image" smart="true">
    <Label value="Dog" smart="true" background="#000000" showInline="true"/>
    <Label value="Possum" smart="true" background="#000000" showInline="true"/>
  </KeyPointLabels>
  <Header value="Rectangle Labels"/>
  <RectangleLabels name="tag3" toName="image" smart="true">
    <Label value="Dog" background="#000000" showInline="true"/>
    <Label value="Possum" background="#000000" showInline="true"/>
  </RectangleLabels>
</View>Note that for this example, we are interested in labeling images with "Dogs" and "Possums." Feel free to replace these tag values with whatever application you’re interested in and with as many tags as you wish.
The labeling configuration includes brush, keypoint, and rectangle label interface elements. The keypoint and rectangle labels will send inference requests to the SAM ML Backend. The SAM backend doesn’t support smart brush labeling, but you can use the brush tool to refine automatically generated keypoint labels.
You’ll be presented with a sample labeling interface as you enter the code. When you are satisfied with the interface, select Save.
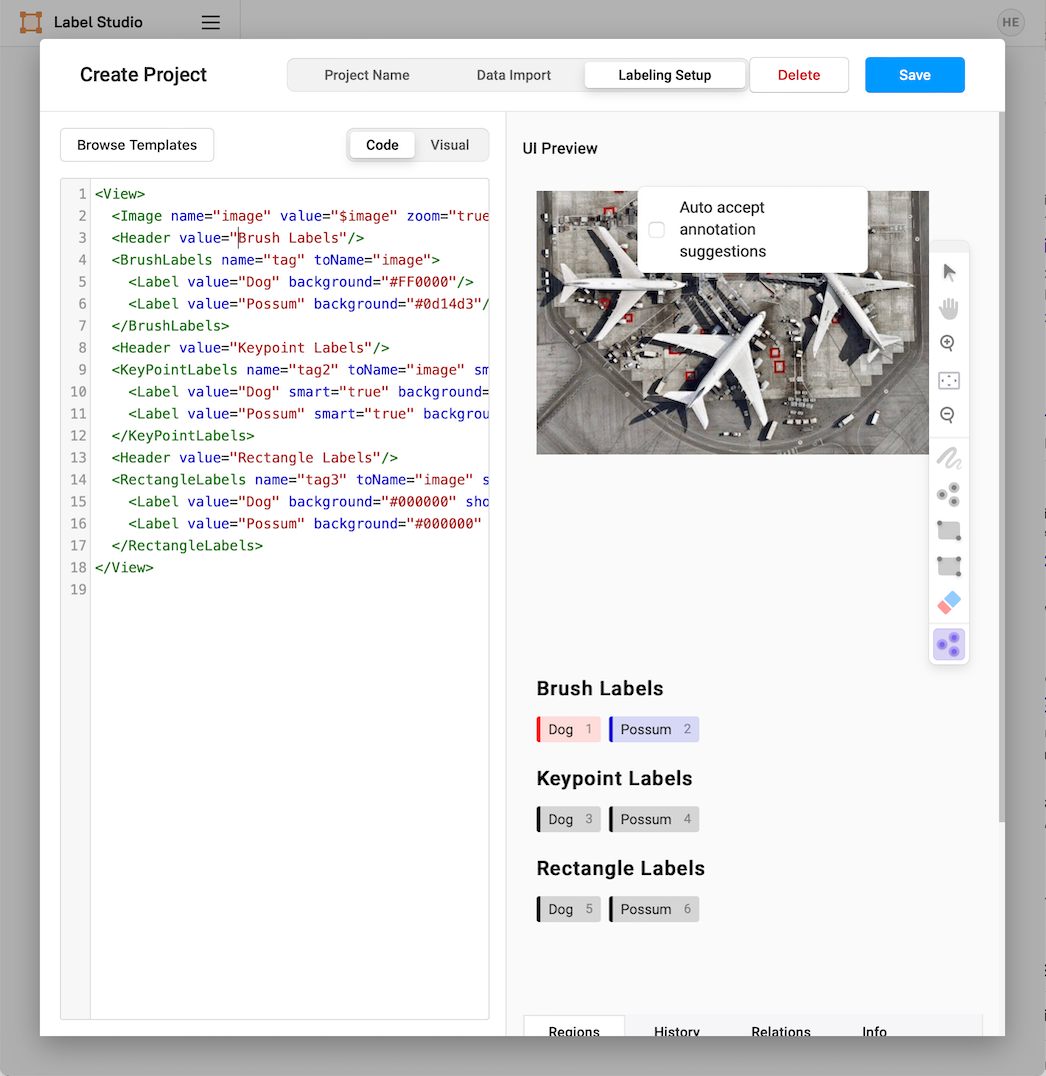
The Final Custom Labeling Interface
Connect Label Studio and SAM
Select the menu for Projects, then select Segment Anything (or whatever name you set for your project). Select Settings, then Machine Learning.
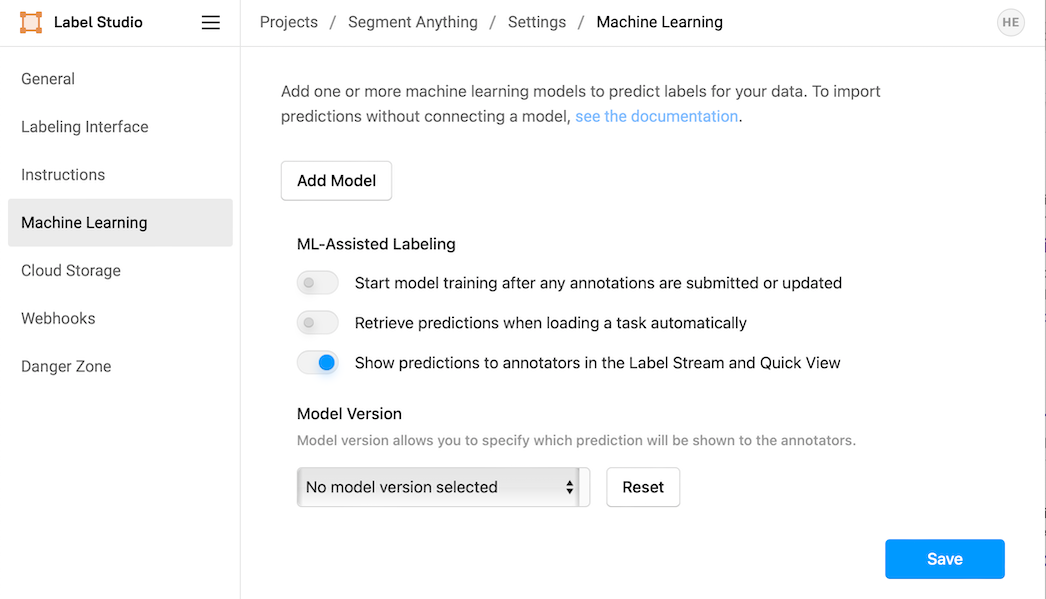
The Machine Learning Configuration Panel
Select Add Model, and fill in the Title and URL details. The URL will be the address for the Segment Anything space you set up. Toggle the switch for Use for interactive preannotations to on, then select Validate and Save.
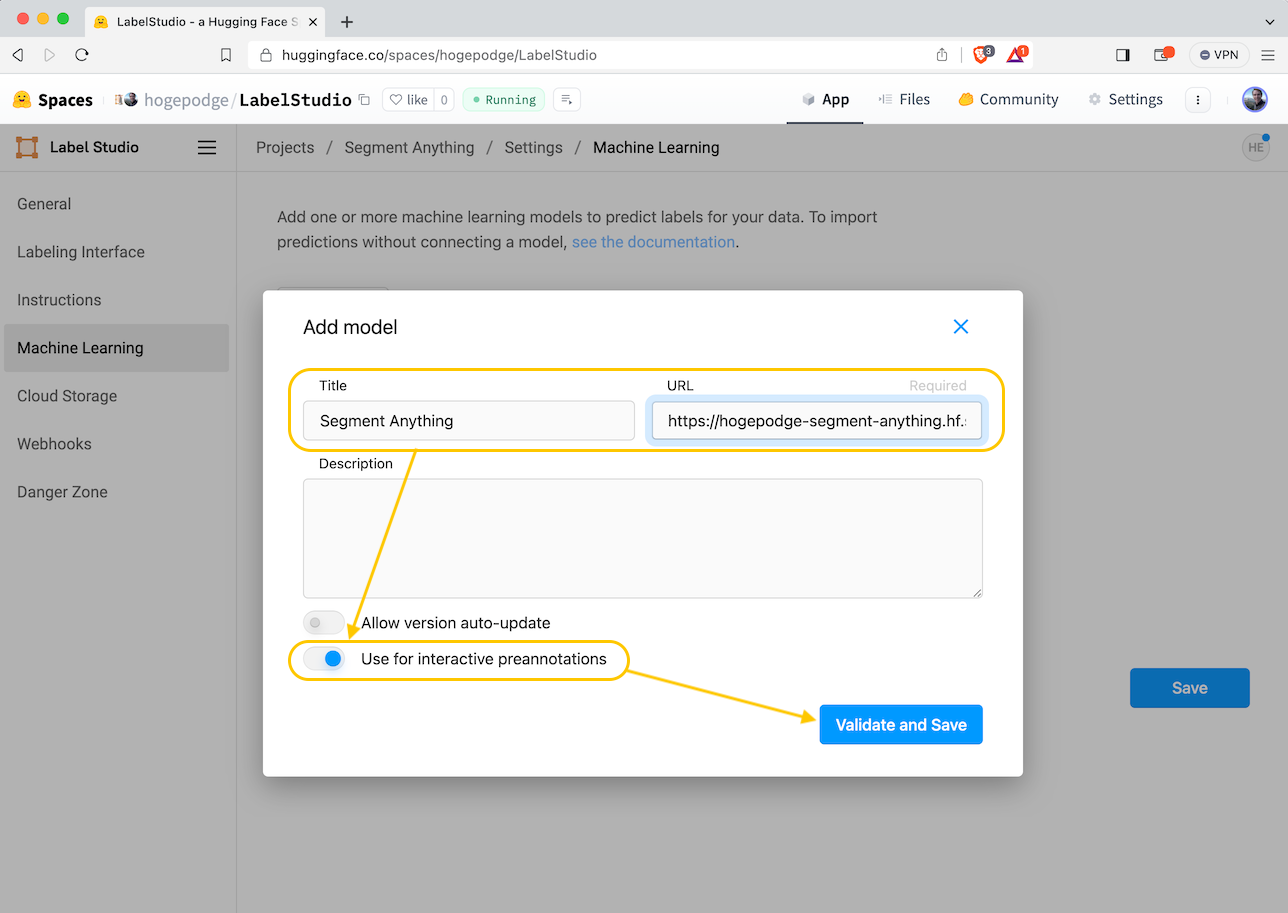
Adding and Validating the Segment Anything Model
Select Save, then select the project name in the navigator (right after Projects, in this example, Projects/Segment Anything) to return to the task interface.
Label Studio will present you with the task management interface, where you’ll see a screen indicating you haven’t imported any data yet.
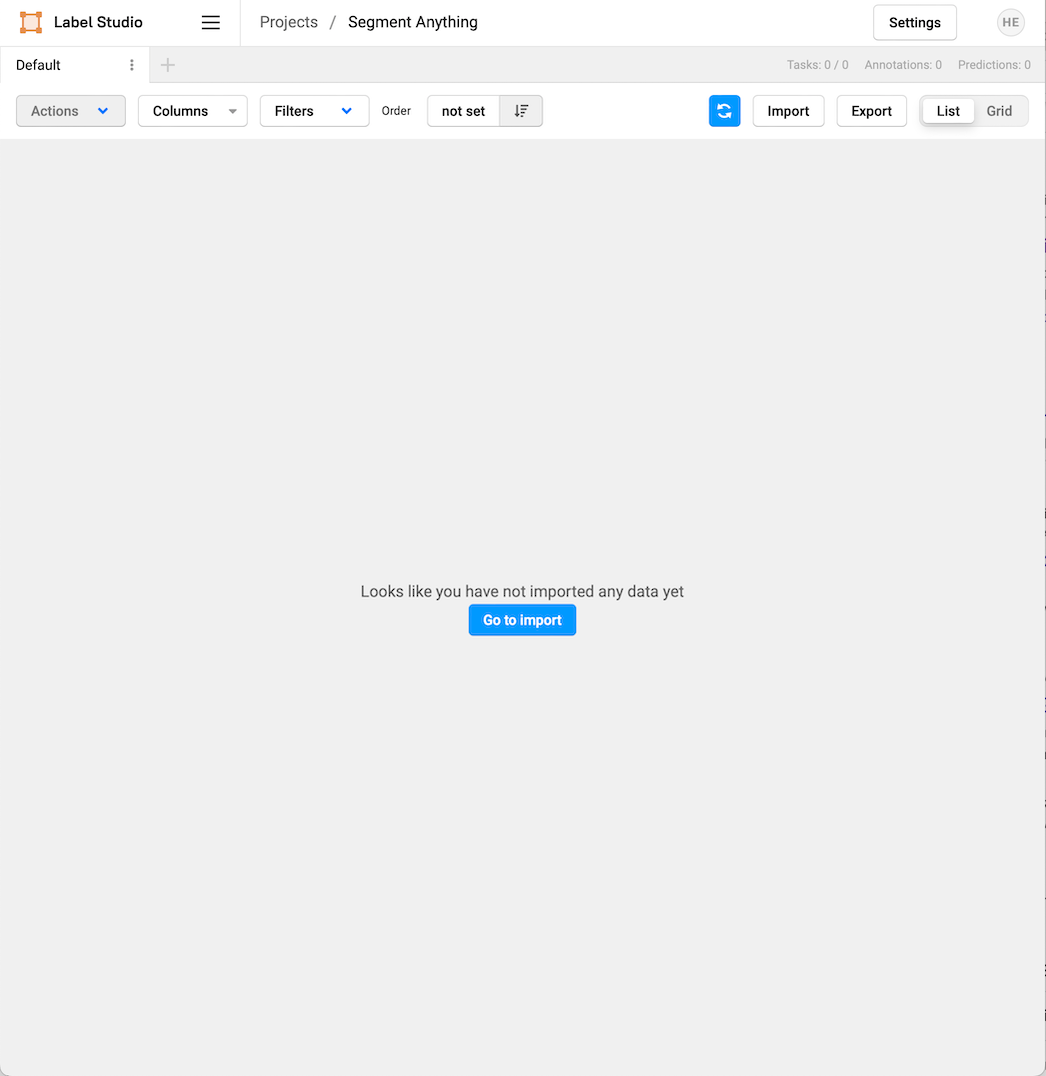
"Looks like you have not imported any data yet."
Select Go to import and import your first project images. Select Upload Files and choose any images you wish to use. For this example, we will use pictures of dogs and possums, but you can use any dataset you want.
Start Labeling
With your images imported, it’s time to start labeling! Select Label all Tasks to get started!
Label with Keypoints
After selecting Label all Tasks, you’ll be presented with the task labeling interface. You’ll have your image labeling task on the upper left side of the interface. Below it will be three rows of labels. The top row is for brush labeling, the second is for keypoint labeling, and the third is for bounding box labeling. To the right of the image, you’ll see a toolbar. At the bottom, you will see some navigation buttons. From the navigation buttons, ensure Auto-annotation is toggled to the on position, then make sure Auto accept annotation suggestions are unselected at the top of the image.
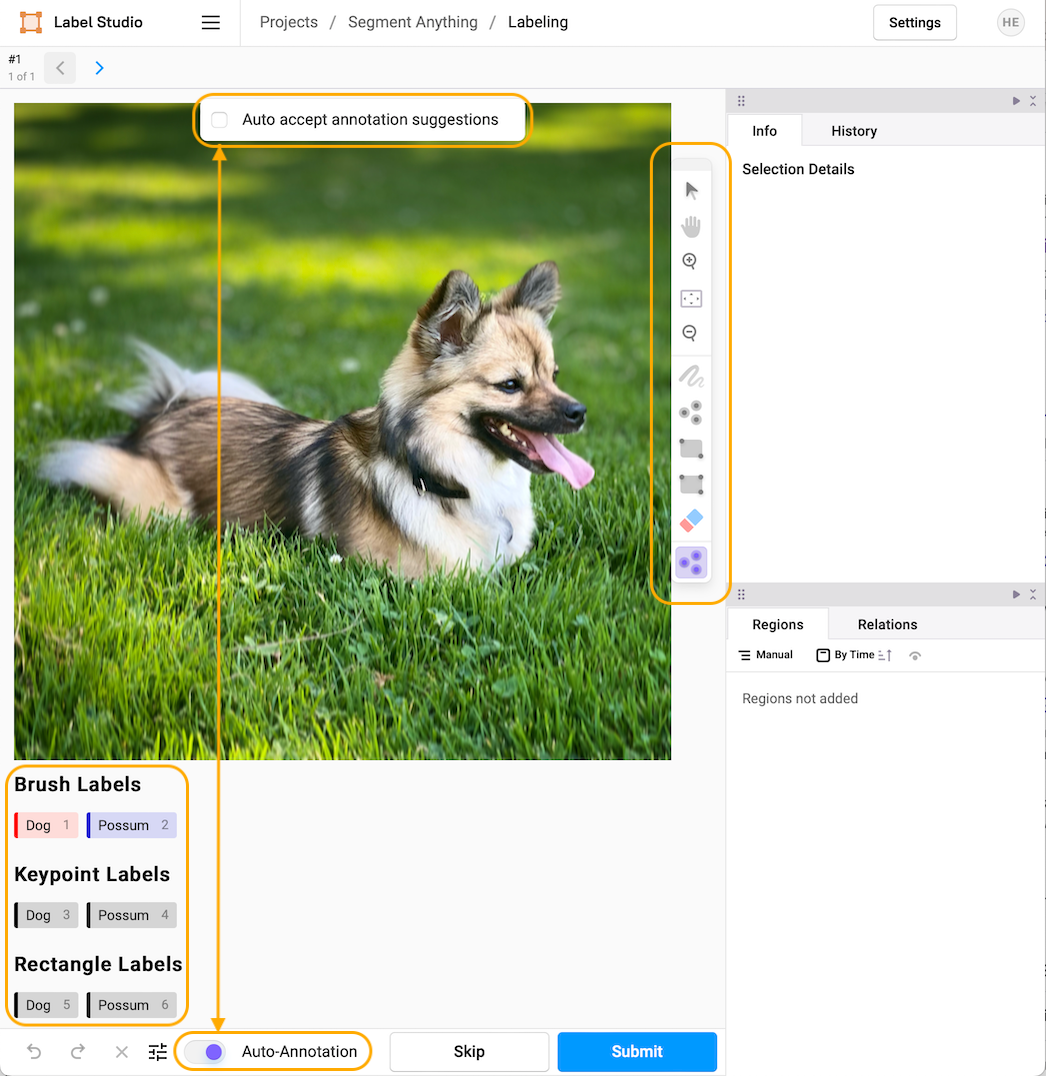
Overview of the Labeling Interface
We will begin with automated keypoint labeling. In the toolbar to the right, select the purple smart selection tool and click on it until the three purple dots are selected (this selects the smart keypoint tool).
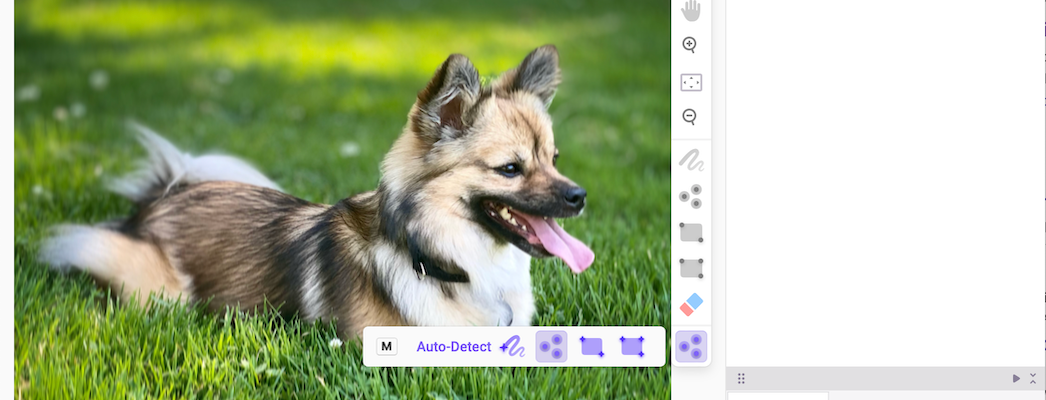
Selecting the Smart Keypoint tool
Now select the label you want in the second row (pro-tip, use the hot-key selection associated with the label to pick the label you want, in this case, 3). When the label is highlighted, select anywhere in the image to drop a keypoint and automatically trigger the SAM backend. The model may take a few seconds to return the prediction, depending on your hardware.
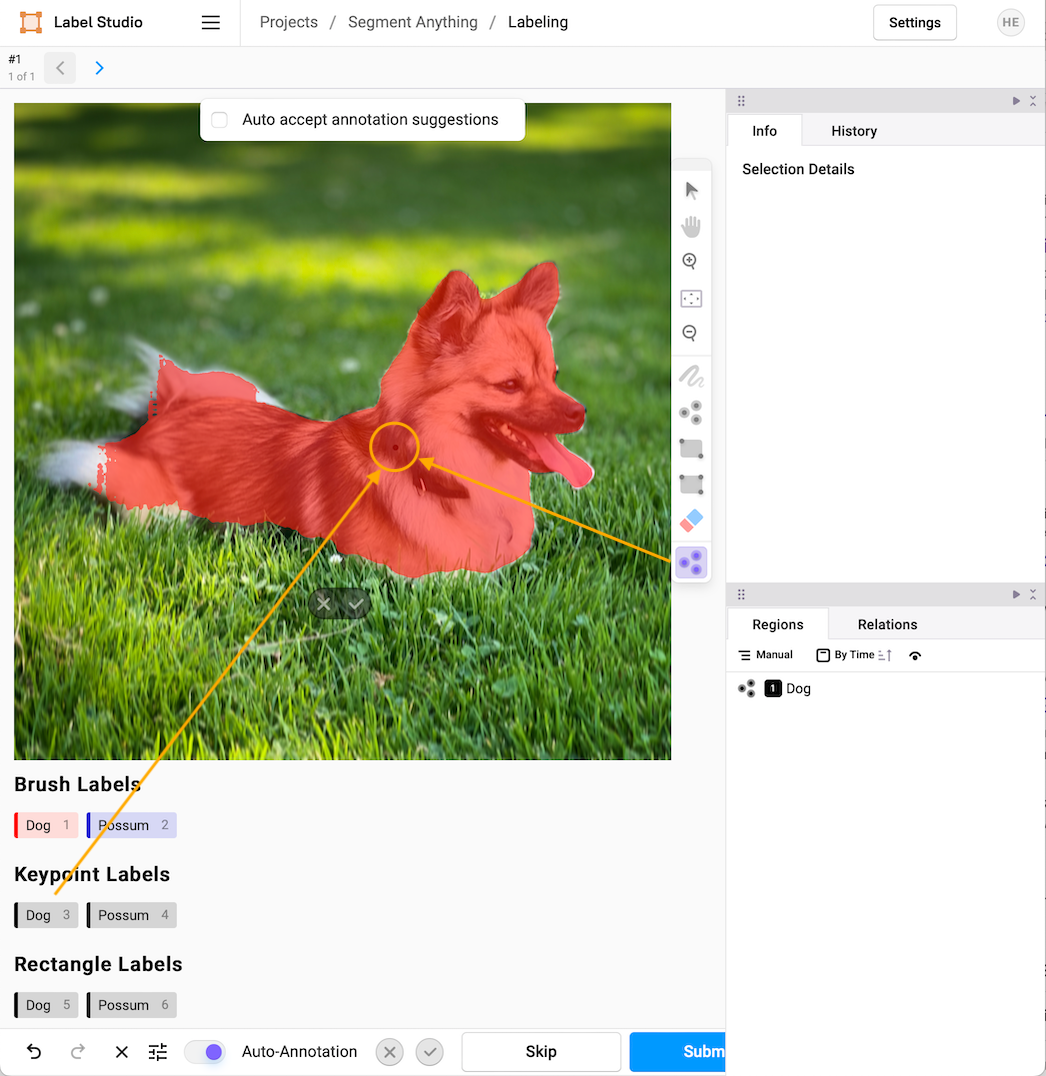
Using a Smart Keypoint to Select an Object Mask
If you’re satisfied with the segmentation mask, click the check mark next to the Auto-Annotation tool. If you’re not, repeat the process by selecting the keypoint tool and clicking the region you want to add to the annotation (this is where using hotkeys comes in handy, so in this instance, you would press 3 to select the Dog keypoint annotation then click on the region you want to refine).
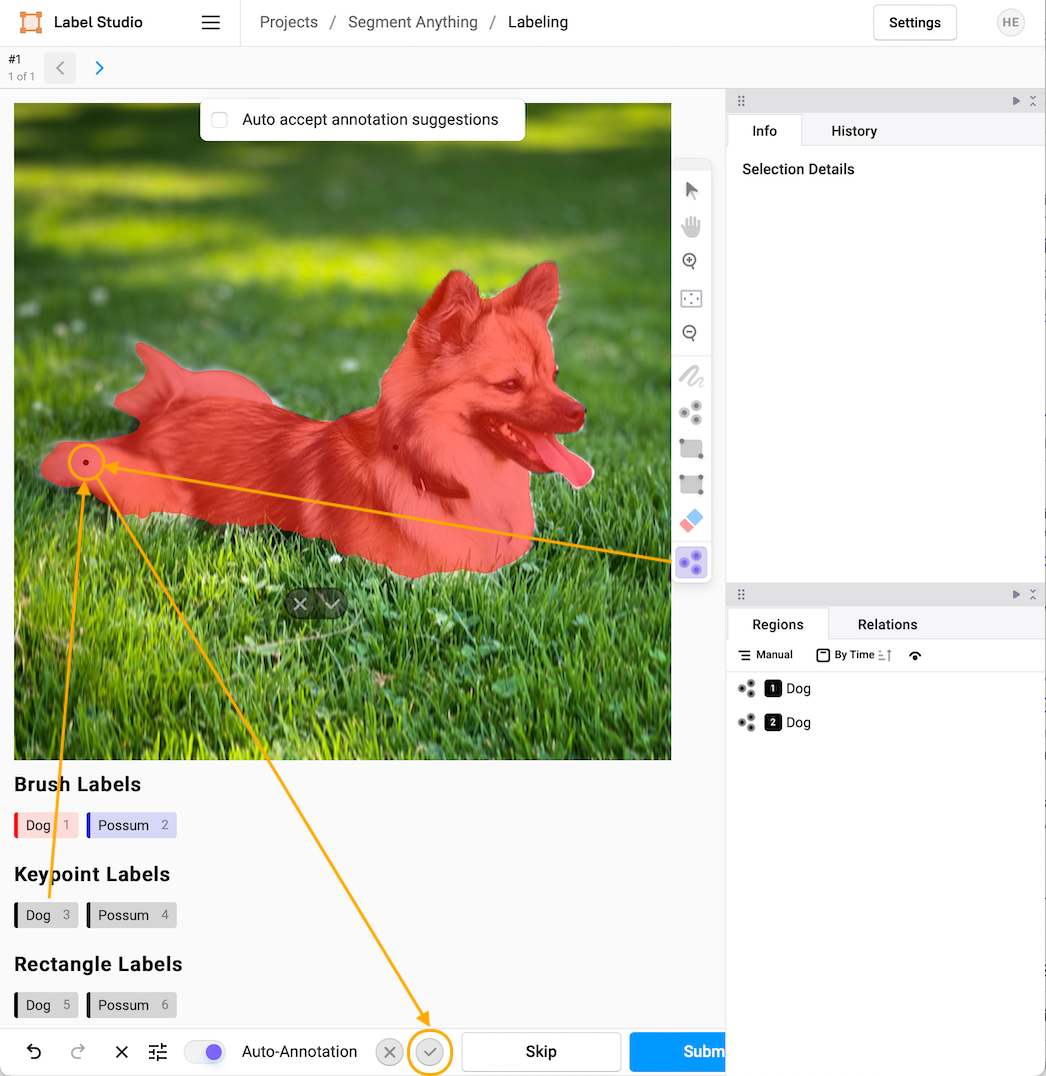
Refining the Selection with Additional Keypoints
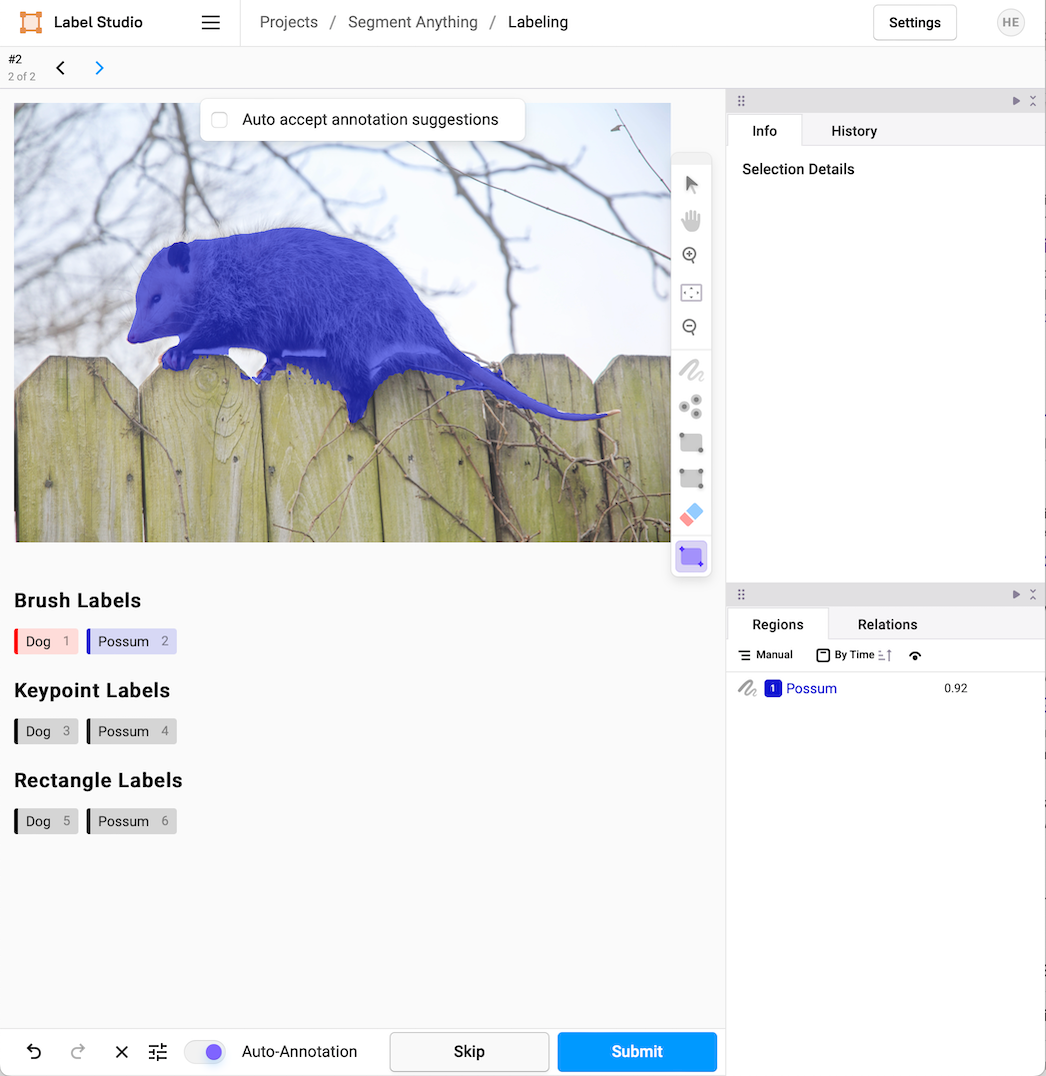
If the model has over-selected a region, you can make negative selections by holding down the option key while you drop a keypoint. Option-select will create a negative affinity and remove unwanted parts of the annotation. Select the checkmark when you’re satisfied with the selection, and the labeling interface will merge your keypoint selections into one mask. Note that the model also gives a confidence score for the selection, in this case 97%.
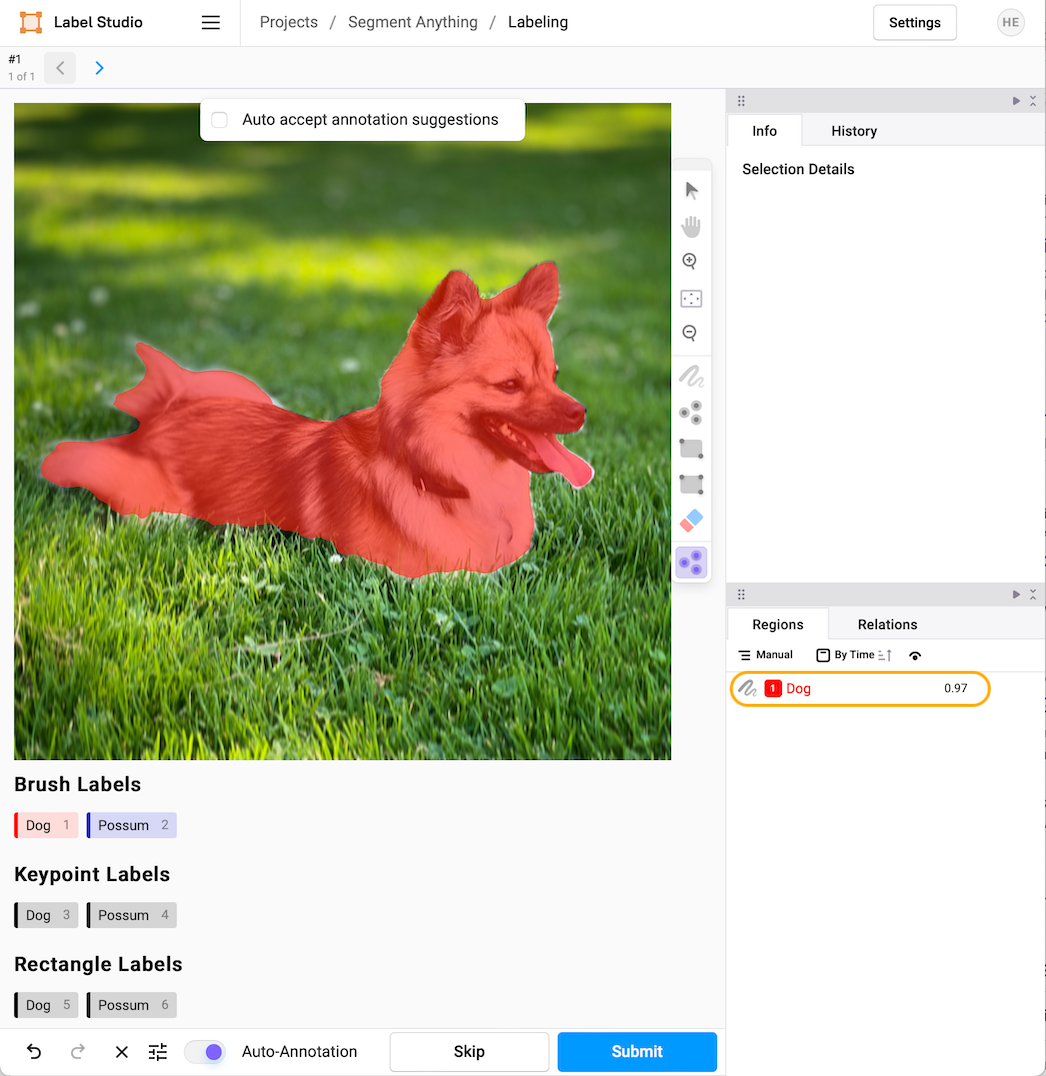
The Final Image Annotation
If you’re happy with the label, select Submit and advance automatically to the next labeling task.
Label with Bounding Boxes
In the following example, this time with a possum, begin by selecting the appropriate smart annotation tool, in this case, the rectangle bounding box.
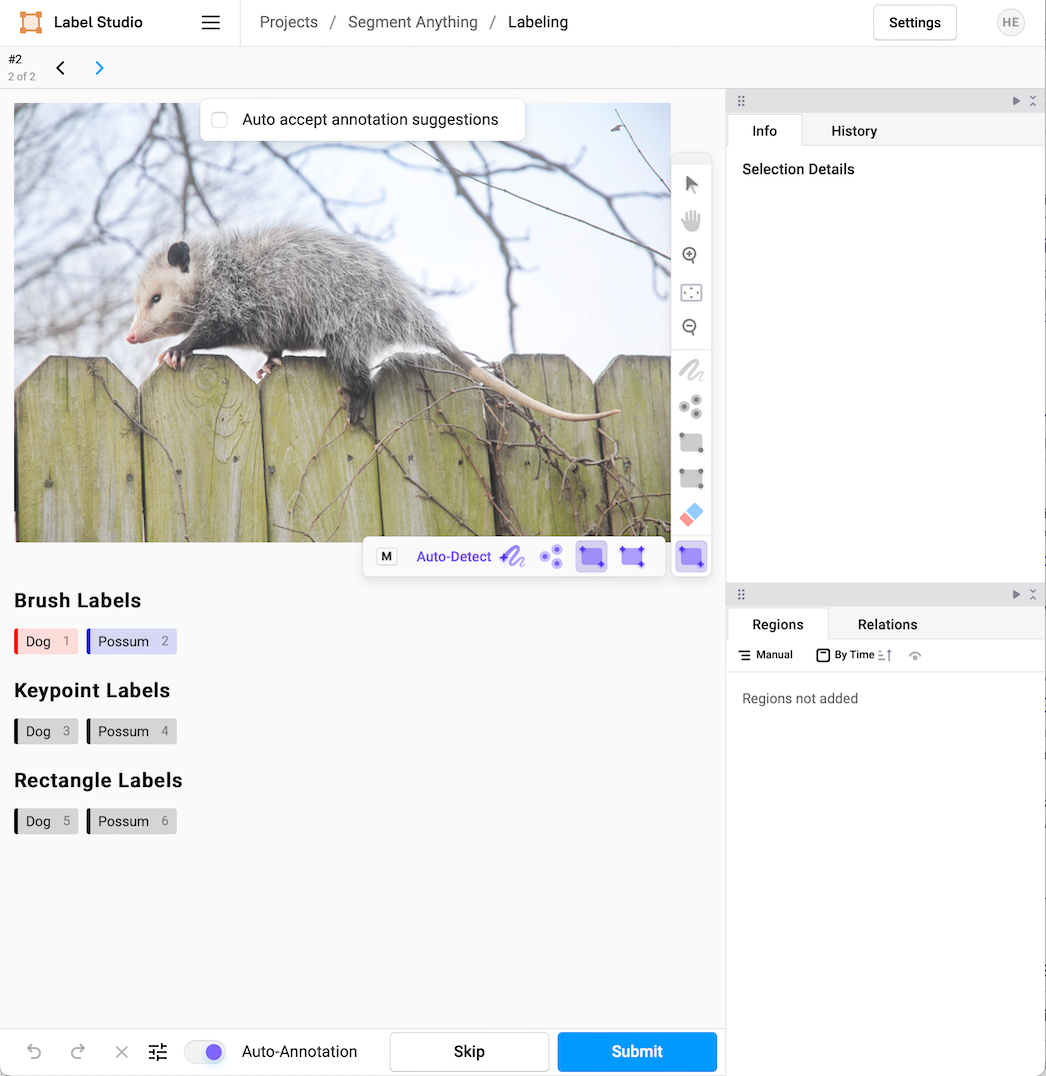
Selecting the Smart Rectangle Tool
Then select the rectangle tag you want to apply from the third row, in this case, Possum (with the associated hot-key 6). Drag a rectangle around the subject you’re interested in, and the SAM model will make a prediction based on that region.
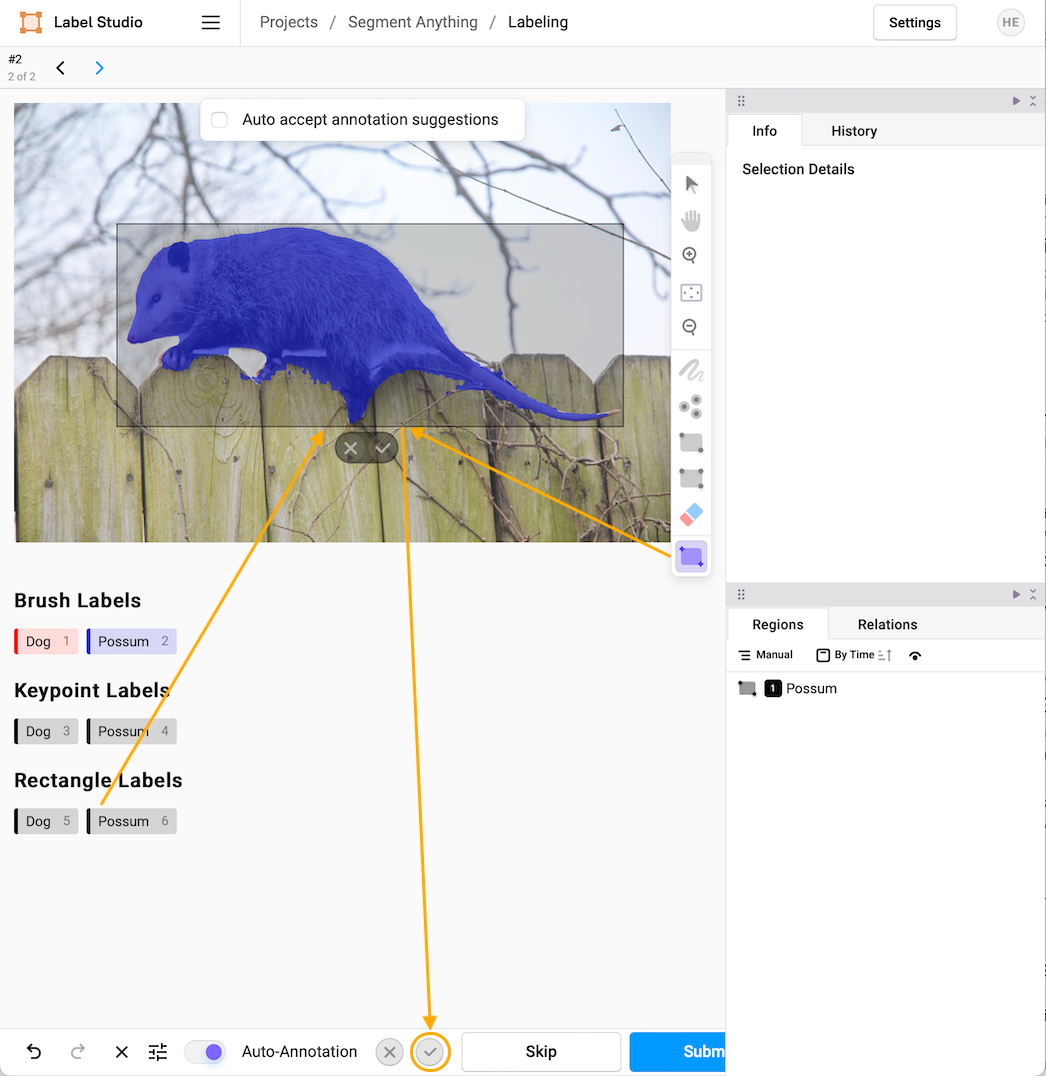
Object Mask Using the Smart Rectangle Tool
If you’re satisfied with the chosen region, select the check mark and submit the annotation.
Submitting the Final Annotation
Suppose you find (as with this example, with a confidence score of 92%) that the region is over-selected; you should use the keypoint tool to give you more control (with affinity and anti-affinity points) over the selection refinement.
What’s Next?
Label Studio plays a critical role in the machine learning pipeline, giving an interface for humans to guide the essential step of labeling and annotating data alongside machine learning systems to speed the process. You can learn more about integrating Label Studio into your machine-learning pipeline in the Label Studio docs. Check out the GitHub repository for complete documentation on the SAM ML Backend.
Once a labeling project is finished, you can export the labels using the “Export” interface from the project management home. Masks and annotations are exported as a JSON catalog for your ML and data science pipeline.
Shivansh Sharma, an active Label Studio Community member, developed the original SAM ML Backend. If you have projects you’d like to share or want to collaborate with others in launching your labeling project, join the Label Studio Slack Community, where over 10,000 Label Studio users have signed up to share insights and meet with their peers.
Happy Labeling!
Related Content
-
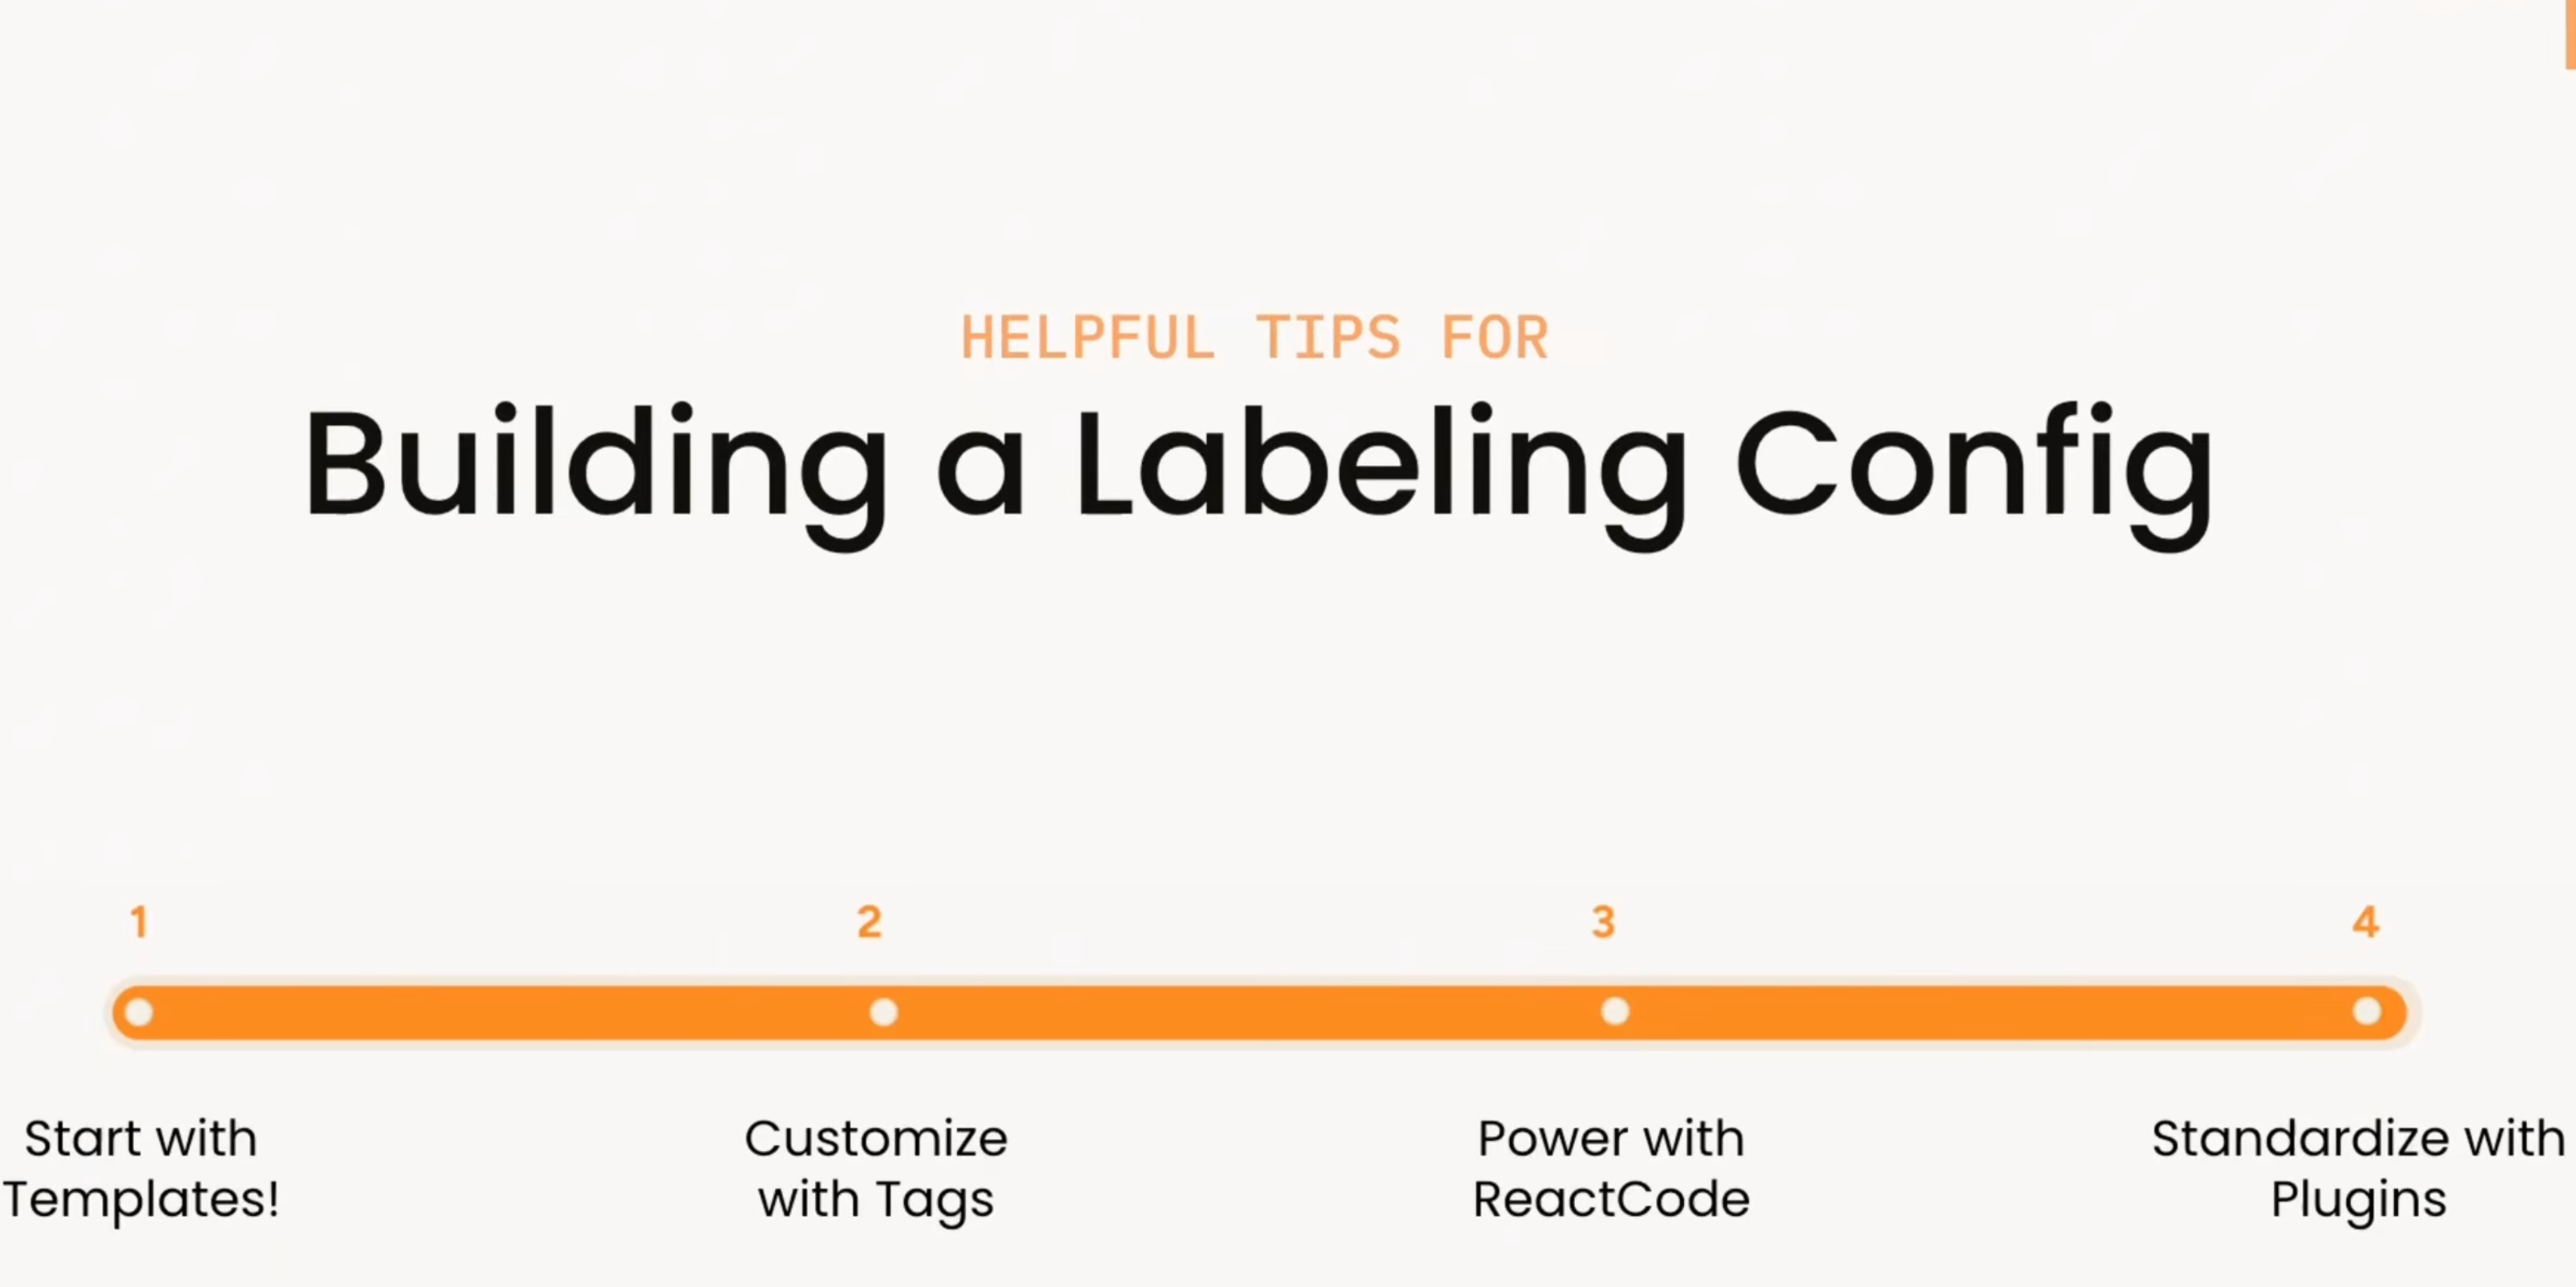
Building A Labeling Config in Label Studio Enterprise
How do you build the right labeling interface in Label Studio? This video walks through a practical progression: start with templates, customize with XML tags, extend with React Code, and standardize workflows with plugins.
-
Learn how to connect YOLO26 to a Label Studio project using the YOLO ML Backend so annotators can start from model predictions and focus on review and correction instead of drawing boxes from scratch.

Micaela Kaplan
February 12, 2026
-
Getting started with Label Studio
Everything you need to know about Label Studio to get started, from downloading and installing the tool to creating your first project, adding new members, and more!