Improve OCR quality for receipt processing with Tesseract and Label Studio
Performing accurate optical character recognition (OCR) on images and PDFs is a challenging task, but one with many business applications, like transcribing receipts and invoices, or even for digitizing archival documents for record-keeping and research.
The open source Tesseract library is a great option for performing OCR on images, but it can be difficult to tune an automated system for your particular OCR use case.
If you've already done what you can to treat the input and improve the likelihood of good quality output from Tesseract, focus on improving the accuracy of the results with a data labeling solution.
With Label Studio, you can import the output from Tesseract and use the Label Studio UI to correct the recognized text and produce a clean OCR dataset that you can use for model training or other data analysis.
Steps to process receipt images with Tesseract and Label Studio
A common use case for OCR is recognizing text in receipts collected by an expense application. Follow these steps to process receipt images with Tesseract and Python and correct the results with Label Studio.
- Get the data you want to process.
- Write a Python script to process the images with Tesseract and output them in Label Studio format.
- Install Label Studio and set up your project.
- Correct the OCR results in the Label Studio UI.
- Export the final results to train a machine learning model or to use for data analysis.

You need some basic familiarity with Python to follow this example.
Acquire your dataset
This example uses a receipt database made available as creative commons with attribution: CORD: A Consolidated Receipt Dataset for Post-OCR Parsing, from Park, Seunghyun and Shin, Seung and Lee, Bado and Lee, Junyeop and Surh, Jaeheung and Seo, Minjoon and Lee, Hwalsuk as part of the Document Intelligence Workshop at Neural Information Processing Systems in 2019. If you have your own dataset of receipts or other images, you can follow along with this blog post and use the same script with some changes to the image file type and location.
Process the training images in the dataset with Tesseract and prepare to correct the results with Label Studio.
- Download the CORD-1k-002.zip file from the link in the GitHub repository for CORD.
- Expand the zip file and locate the images folder in the
traindirectory. - To make the images available to Label Studio, run the following from the command line, updating the file path as needed:
./serve_local_files.sh ~/Downloads/CORD/train/image This runs a web server locally to generate URLs so that you can import data from a local directory into Label Studio. Because the Tesseract script handles the image URLs, ignore the files.txt file created by the shell script.
Write a script to process the images
Now that you have a dataset to work with, write a Python script to process the images in the receipt dataset with Tesseract OCR and return the recognized text, confidence scores for each image and each region, and the bounding boxes for each section of recognized text. This script saves the Tesseract output to a file in the Label Studio JSON format for predicted annotations.
Install and import necessary libraries
You need to install Tesseract and the pytesseract library.
Create a Python file named tesseractocr.py and place the following imports at the top:
import os
import json
import pytesseract
from PIL import Image
from pathlib import Path
from uuid import uuid4Decide how to process the images
The pytesseract library lets you specify the level of detail that you want to use for the bounding boxes. You can create page-level bounding boxes, where each page has one bounding box with all the recognized text, or have a bounding box for each block of text, paragraph of text, line of text, or one bounding box for each word.
Add the following to your tesseractocr.py script:
# tesseract output levels for the level of detail for the bounding boxes
LEVELS = {
    'page_num': 1,
    'block_num': 2,
    'par_num': 3,
    'line_num': 4,
    'word_num': 5
}Reference the images in the script
Label Studio handles images as URLs, so define a function that maps the images in the receipt dataset to URLs that Label Studio can open. If you use the script to run a web server locally as recommended, the image URLs are formatted like http://localhost:8081/filename.png.
Add the following to your tesseractocr.py script:
def create_image_url(filepath):
    """
    Label Studio requires image URLs, so this defines the mapping from filesystem to URLs
    if you use ./serve_local_files.sh <my-images-dir>, the image URLs are localhost:8081/filename.png
    Otherwise you can build links like /data/upload/filename.png to refer to the files
    """
    filename = os.path.basename(filepath)
return f'http://localhost:8081/{filename}'If you need to use a different format, for example if you chose to upload the files directly to Label Studio or import them using the storage sync options, update this function to return references like /data/upload/filename.png to refer to the files.
Define how to convert the results to Label Studio JSON format
After you decide how to process the images and prepare them for Label Studio, construct the next portion of the script to define how to retrieve the results from Tesseract and transform the output into the Label Studio JSON format for predicted annotations.
Add the following to your tesseractocr.py script:
def convert_to_ls(image, tesseract_output, per_level='block_num'):
    """
    :param image: PIL image object
    :param tesseract_output: the output from tesseract
    :param per_level: control the granularity of bboxes from tesseract
    :return: tasks.json ready to be imported into Label Studio with "Optical Character Recognition" template
    """
    image_width, image_height = image.size
    per_level_idx = LEVELS[per_level]
    results = []
    all_scores = []
    for i, level_idx in enumerate(tesseract_output['level']):
        if level_idx == per_level_idx:
            bbox = {
                'x': 100 * tesseract_output['left'][i] / image_width,
                'y': 100 * tesseract_output['top'][i] / image_height,
                'width': 100 * tesseract_output['width'][i] / image_width,
                'height': 100 * tesseract_output['height'][i] / image_height,
                'rotation': 0
            }

            words, confidences = [], []
            for j, curr_id in enumerate(tesseract_output[per_level]):
                if curr_id != tesseract_output[per_level][i]:
                    continue
                word = tesseract_output['text'][j]
                confidence = tesseract_output['conf'][j]
                words.append(word)
                if confidence != '-1':
                    confidences.append(float(confidence / 100.))

            text = ' '.join(words).strip()
            if not text:
                continue
            region_id = str(uuid4())[:10]
            score = sum(confidences) / len(confidences) if confidences else 0
            bbox_result = {
                'id': region_id, 'from_name': 'bbox', 'to_name': 'image', 'type': 'rectangle',
                'value': bbox}
            transcription_result = {
                'id': region_id, 'from_name': 'transcription', 'to_name': 'image', 'type': 'textarea',
                'value': dict(text=[text], **bbox), 'score': score}
            results.extend([bbox_result, transcription_result])
            all_scores.append(score)

    return {
        'data': {
            'ocr': create_image_url(image.filename)
        },
        'predictions': [{
            'result': results,
            'score': sum(all_scores) / len(all_scores) if all_scores else 0
        }]
}This section of the script defines the function to retrieve bounding boxes for each block of text and convert the pixel sizes for the bounding boxes into the image annotation units expected by Label Studio.
Tesseract also produces a confidence score for each word that it processes. This script averages that confidence score for each block of recognized text so that you can review lower-confidence predictions before other regions, and averages all the scores for all regions for each image to provide an overall prediction score for each task. Reviewing lower-confidence predictions first lets you focus on the text regions that are least likely to be correct and use your annotation time wisely.
Process the images and export the results to a file
In the last part of the script, call the functions to process the images with Tesseract and convert the output to Label Studio JSON format for predictions. Finally, export the results to a file that you can add to Label Studio for reviewing and correcting the recognized text regions.
Add the following to your tesseractocr.py script:
tasks = []
# collect the receipt images from the image directory
for f in Path('image').glob('*.png'):
    with Image.open(f.absolute()) as image:
        tesseract_output = pytesseract.image_to_data(image, output_type=pytesseract.Output.DICT)
        task = convert_to_ls(image, tesseract_output, per_level='block_num')
        tasks.append(task)

# create a file to import into Label Studio
with open('ocr_tasks.json', mode='w') as f:
json.dump(tasks, f, indent=2)Run the script to collect results
Save your script and run it from the command line to process the images.
The script expects the image directory to be a subdirectory of where you run the script, so if you saved the dataset to your Downloads folder, change your directory to the train directory and save and run the script there, or move the image directory to the same directory as the script.
From the command line, run the following:
python3 tesseractocr.py The script takes a minute or so to run and process the images. When it finishes, a file called ocr_tasks.json is saved in the directory where you run the script.
Correct the results in Label Studio
After you've processed the images with Tesseract and Python, you can start working with the results in Label Studio to make any adjustments and validate the accuracy of the OCR.
Install and set up Label Studio
- Install Label Studio using your preferred method. If you install Label Studio using Docker, set environment variables to access the image files.
- Create a project called
OCR Receiptsto manage the results. - Import the
ocr_tasks.jsonfile from thetesseractocr.pyscript run. - Select the Optical Character Recognition template for your labeling interface. If you want, change the region labels to describe product names and prices, or leave the template with the default region labels of Text and Handwriting.
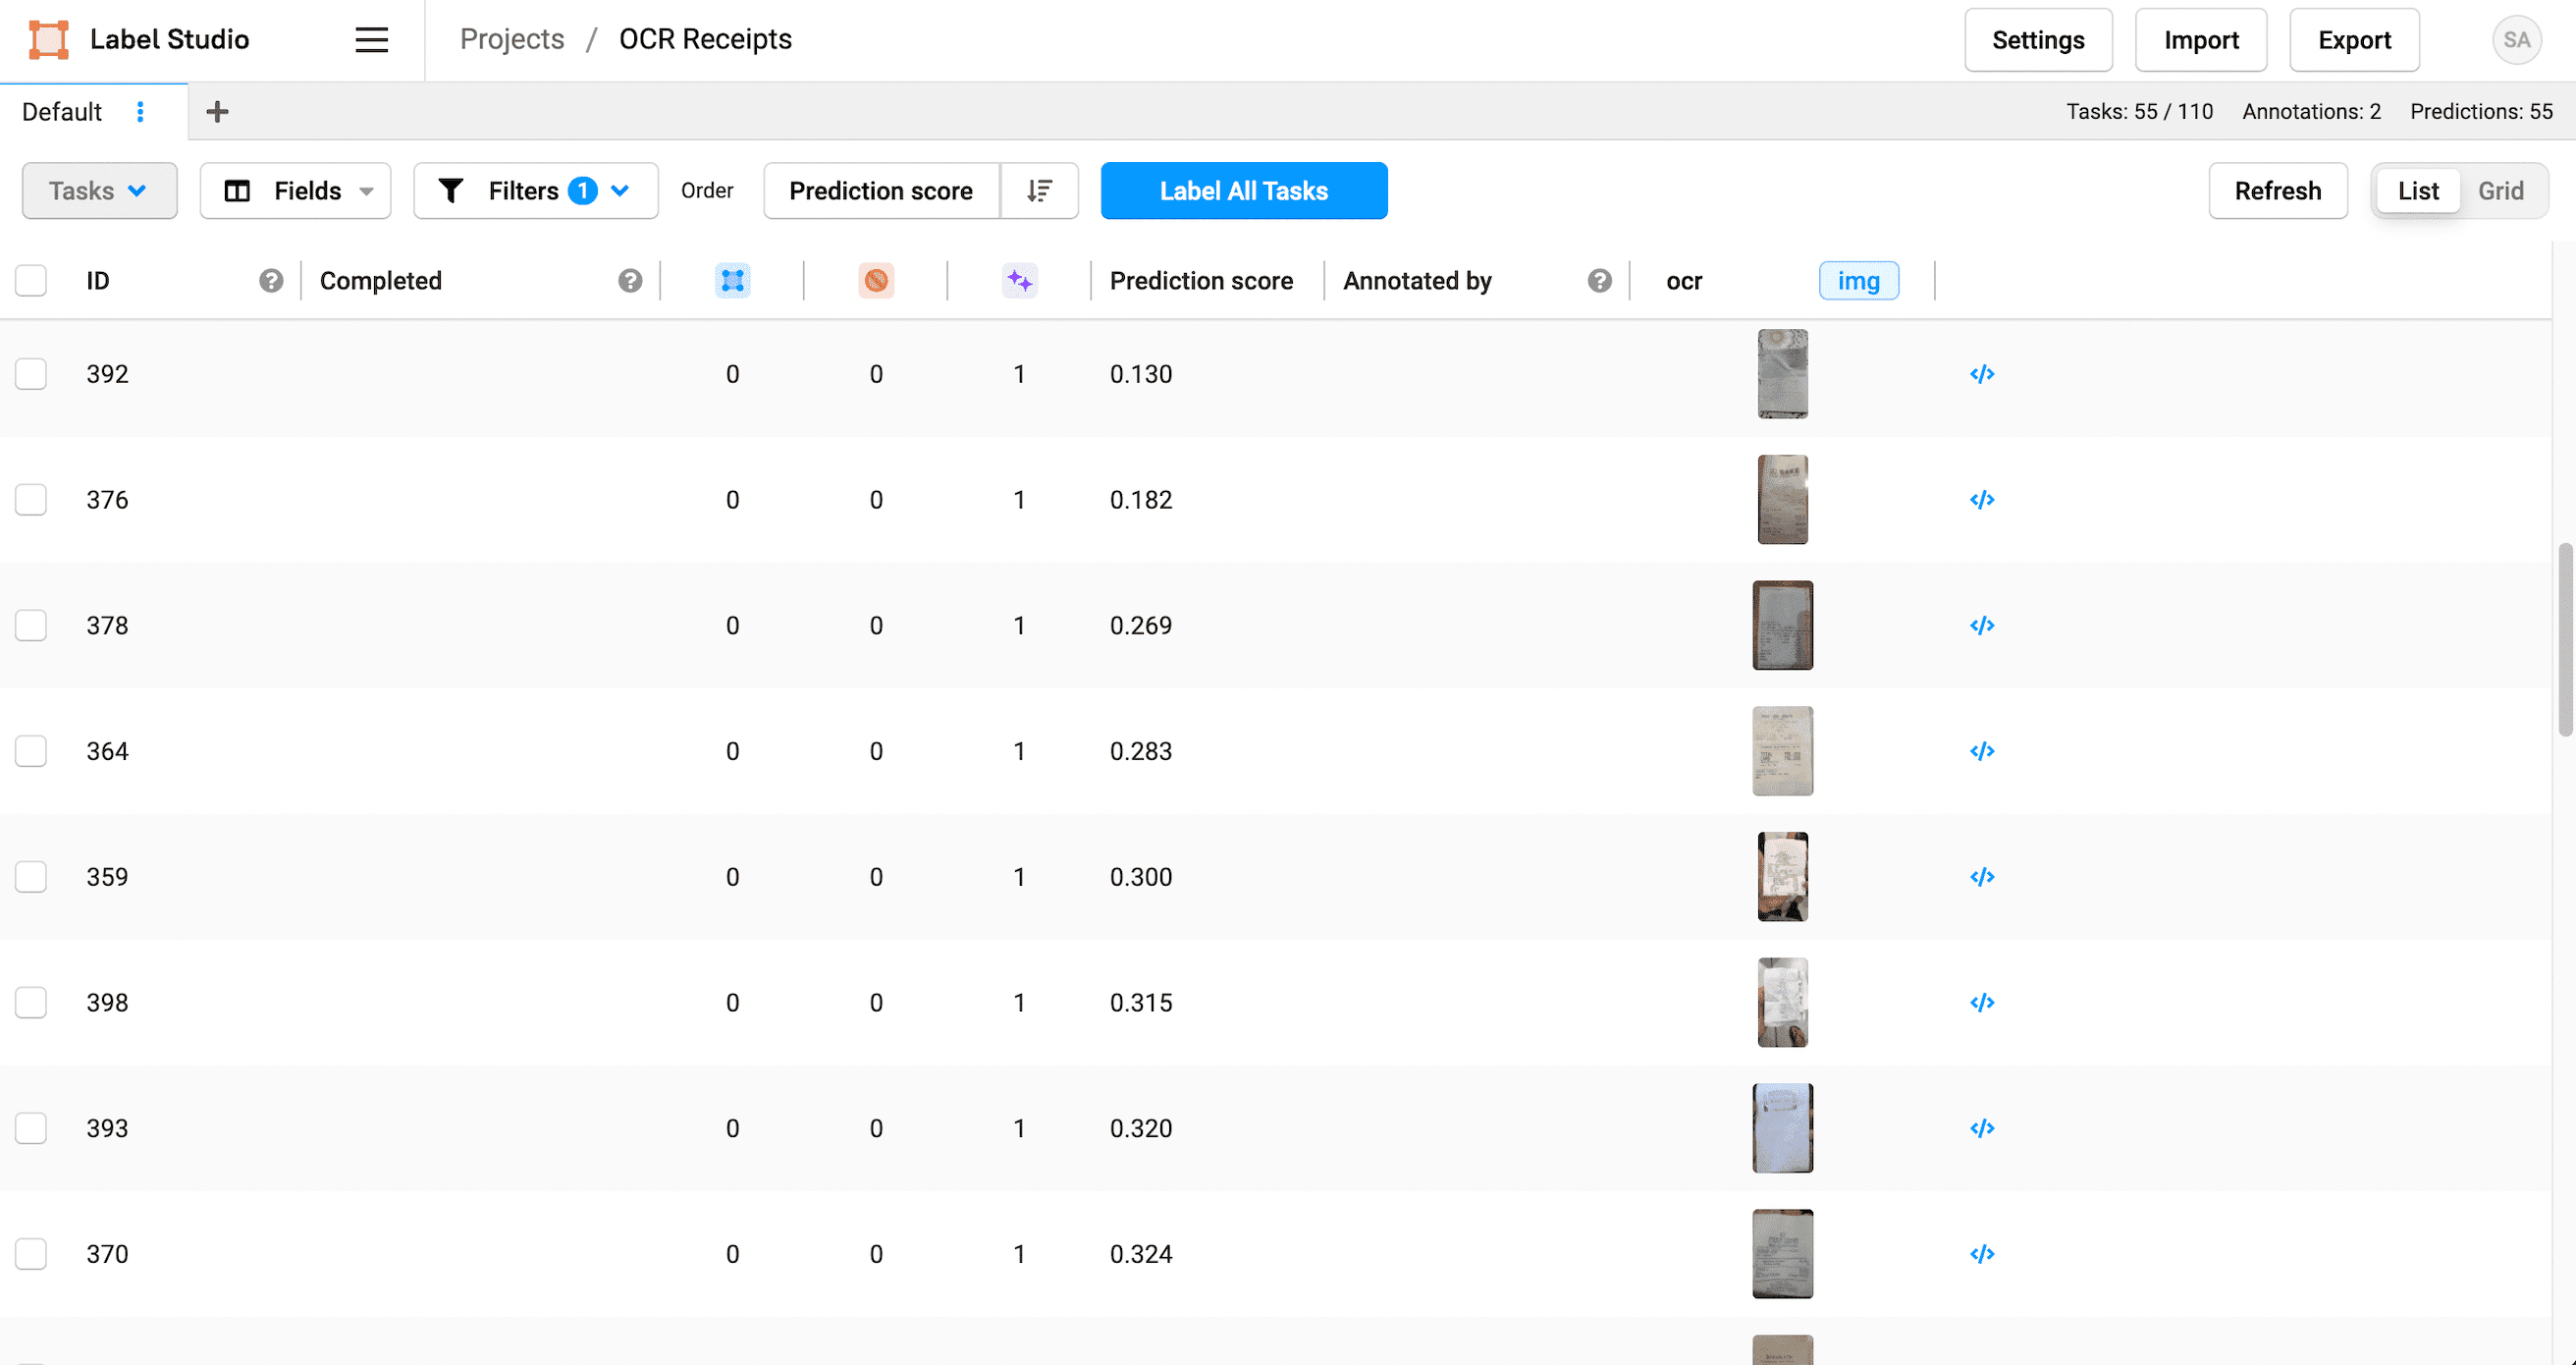
- Adjust the data manager fields to show the Prediction score on the UI and sort the prediction scores to view the lowest score images first.
Correct the recognized text
After you set up your project and import the results from Tesseract, start labeling the tasks to review the OCR predictions and make any necessary changes.
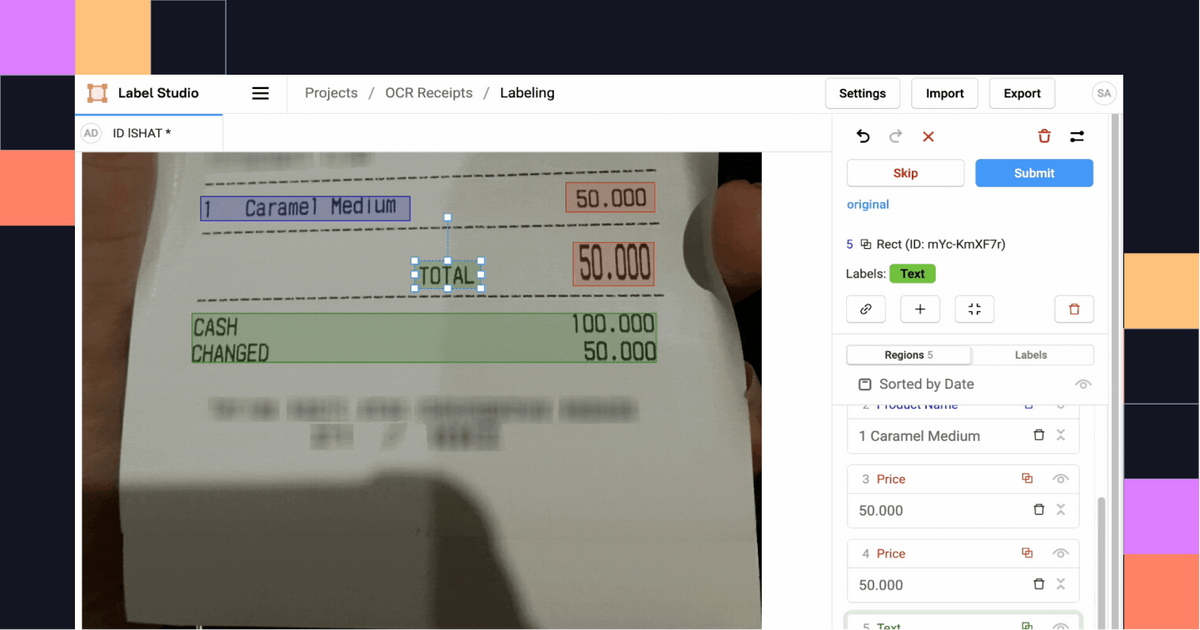
1. Click Label all Tasks and start correcting the recognized text regions.
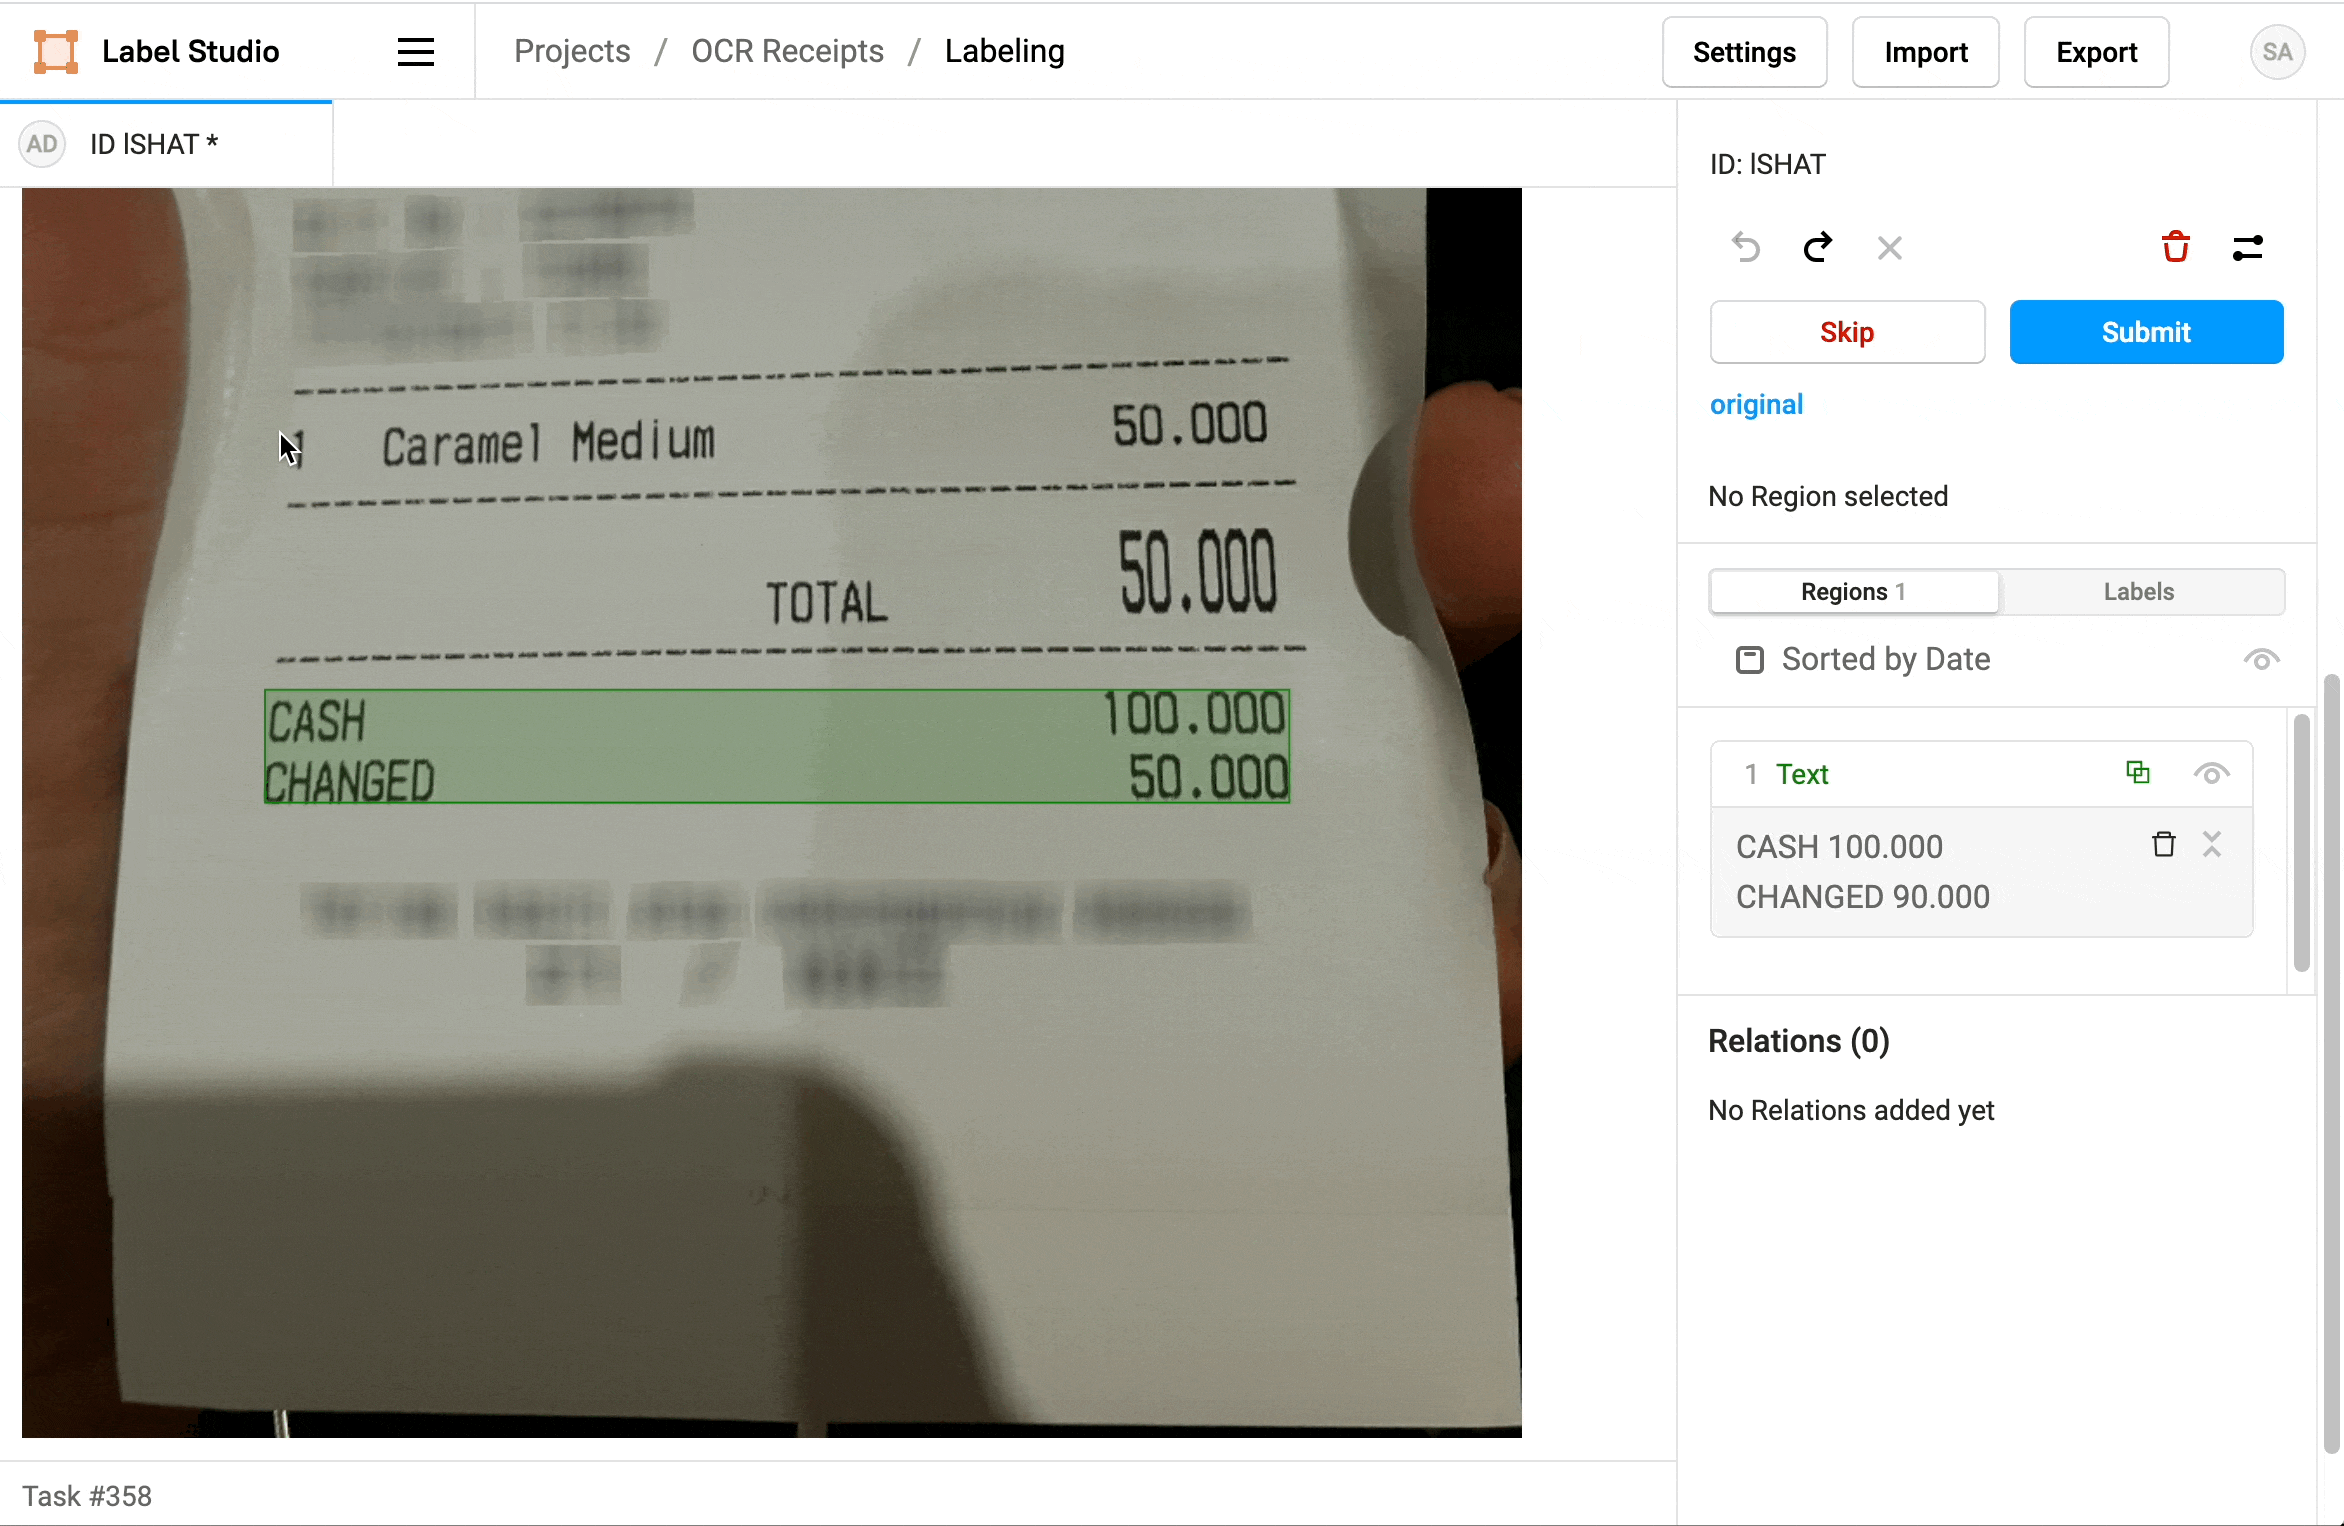
2. Locate a region in the sidebar and click to update the text.
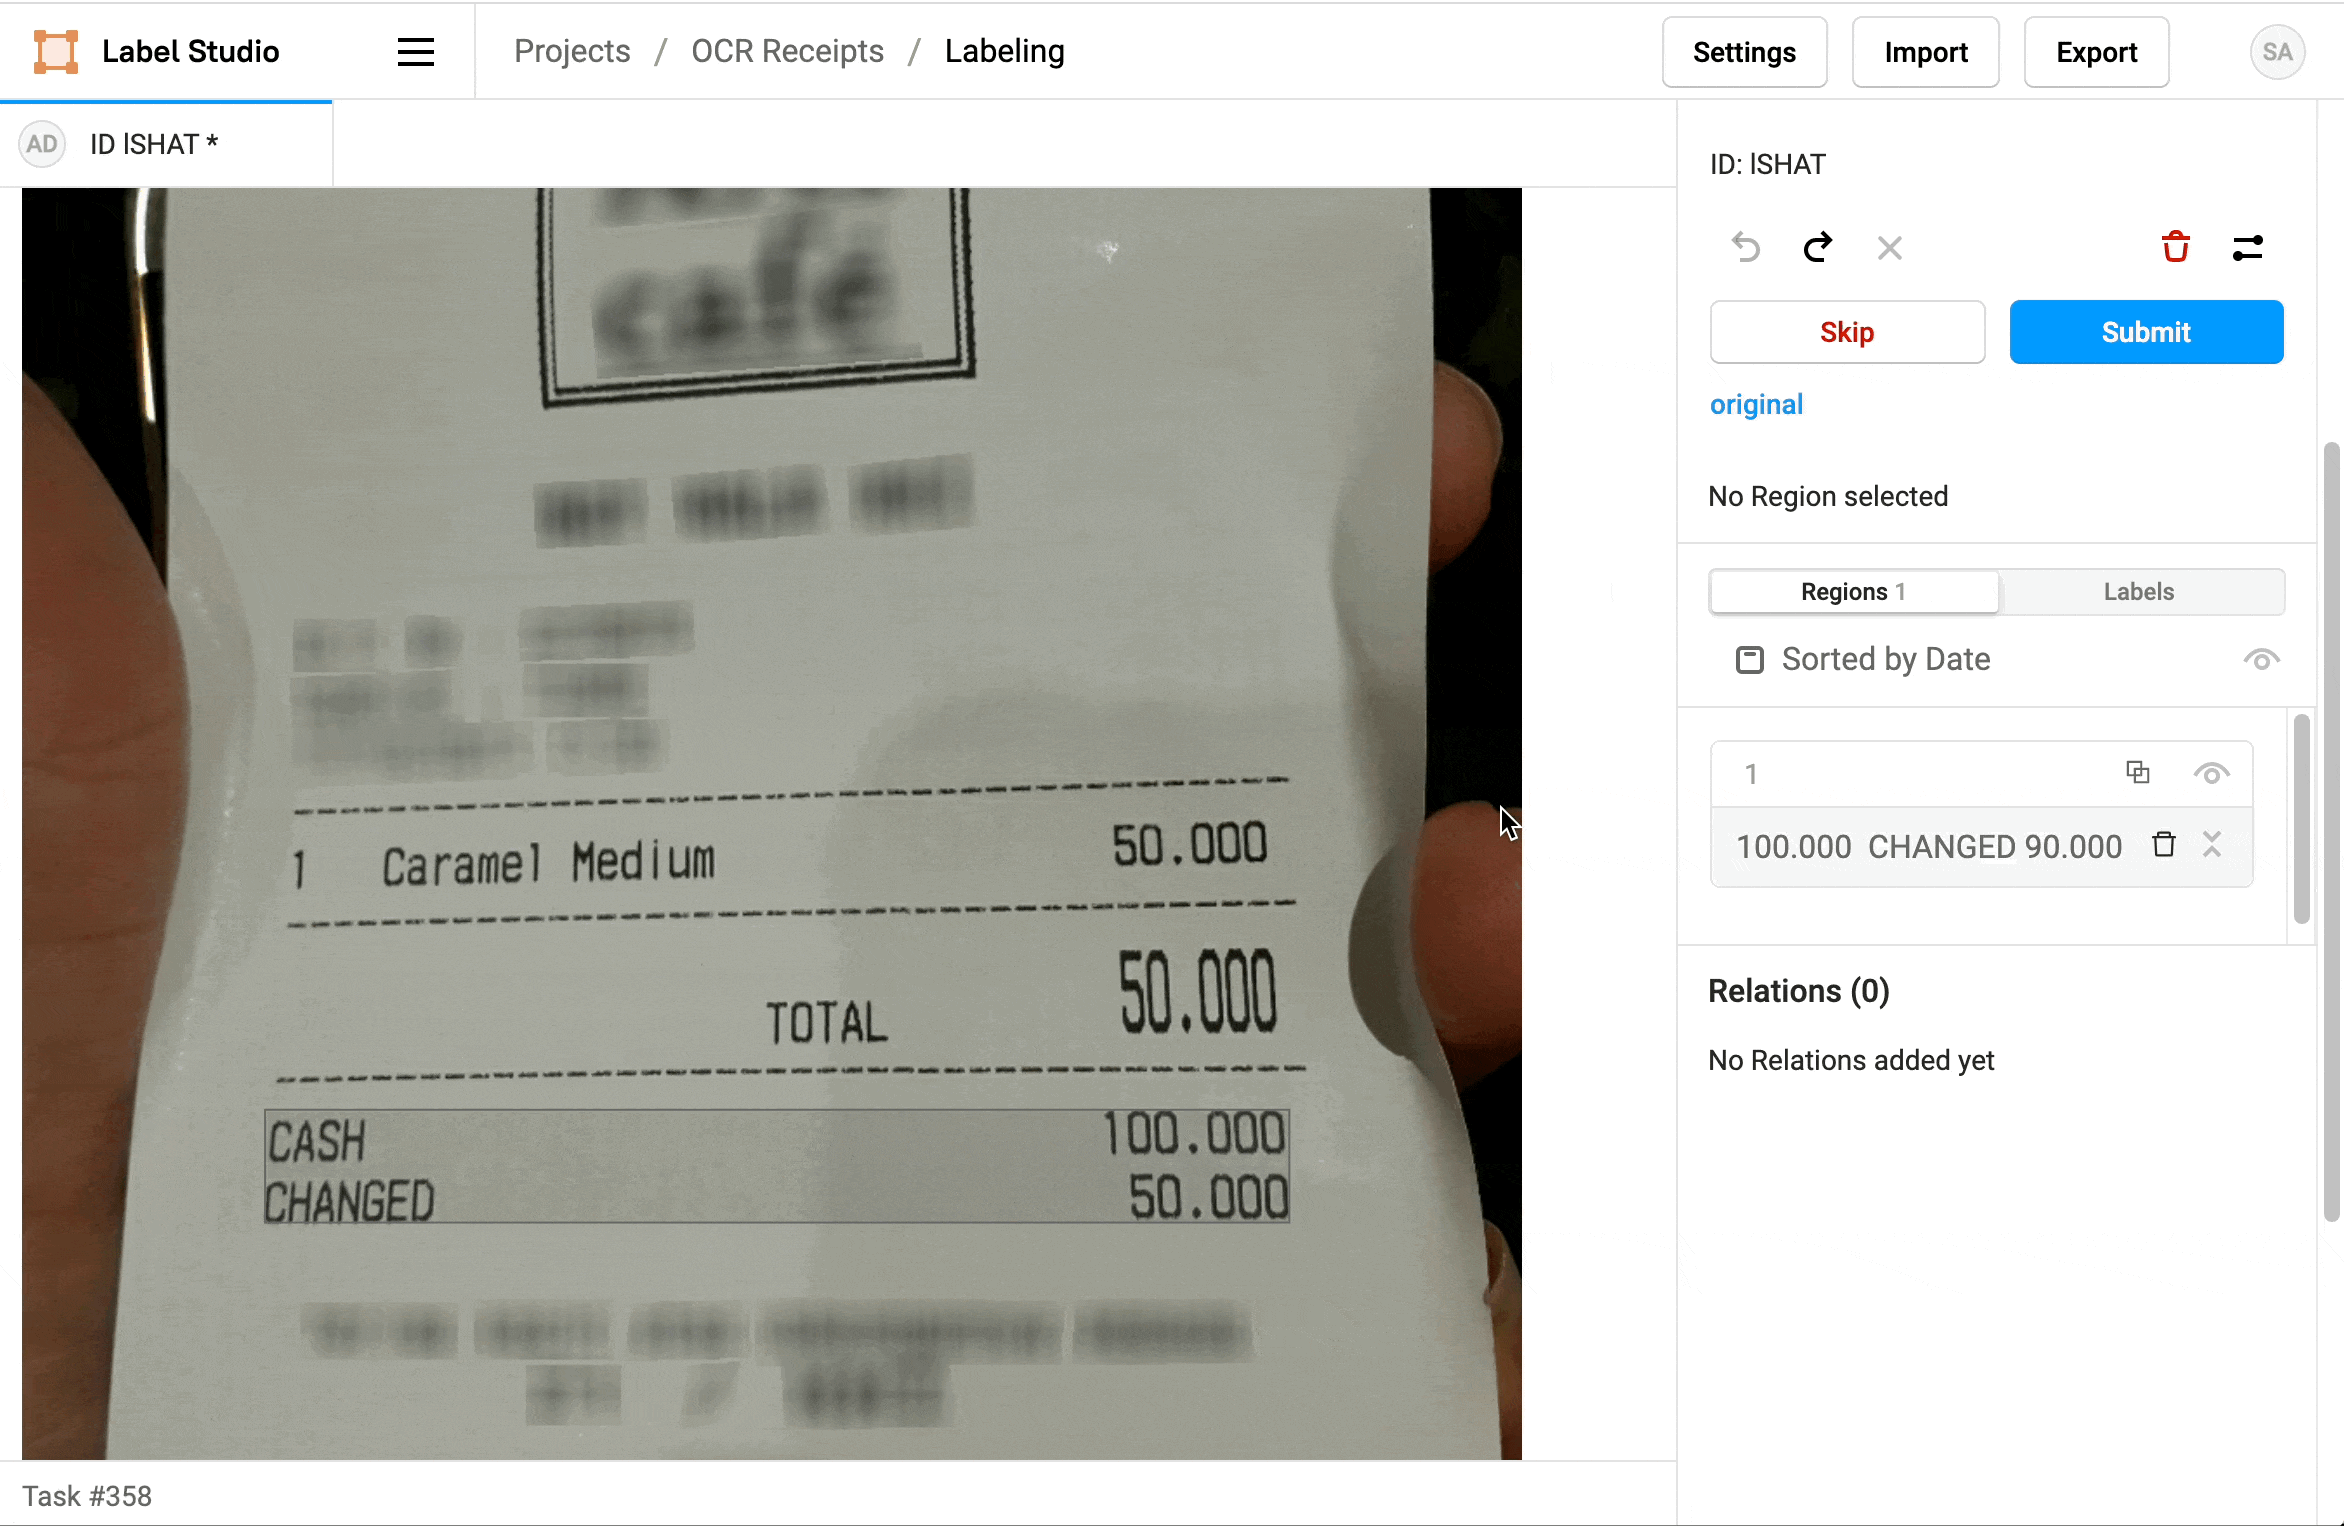
3. Click a label to identify the region as Text, a Product Name, or a Price.
4. If needed, add additional regions.
5. When you're done, click Update or Submit to move on to the next task.
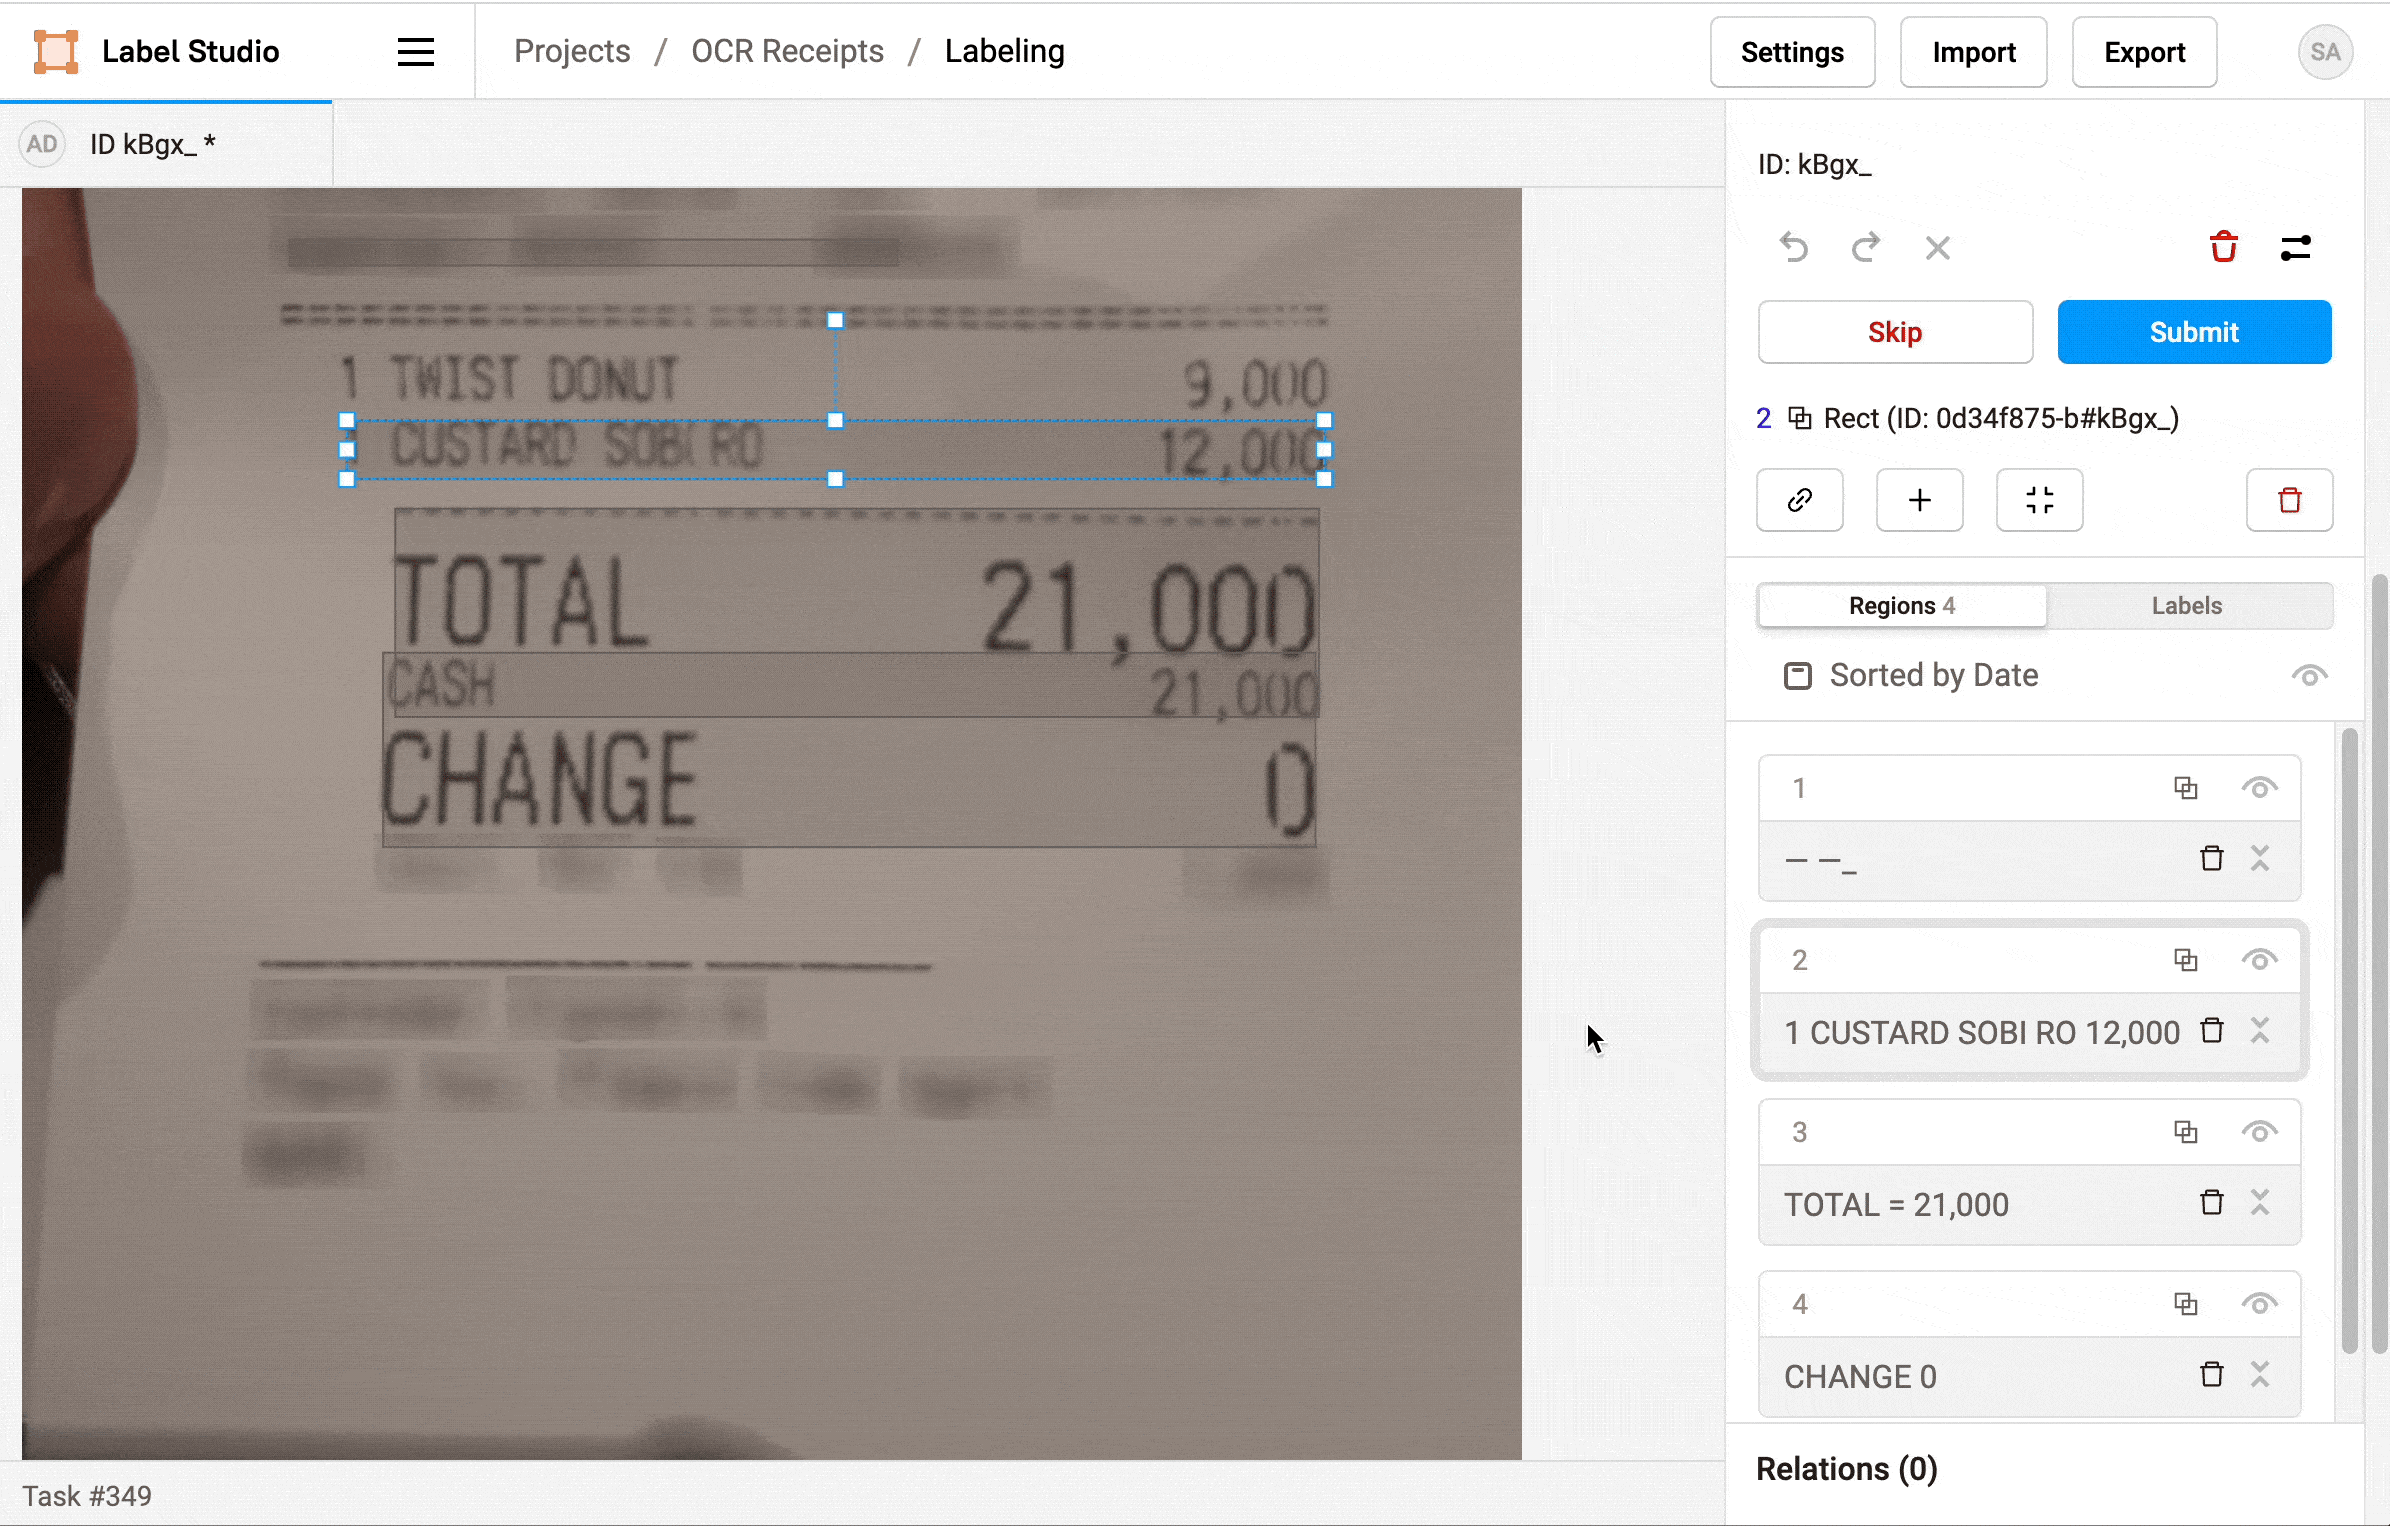
Repeat the labeling steps for every image in the dataset.
Takeaways for OCR with Tesseract and Label Studio
OCR is a valuable tool when automating tasks that are time-consuming and error-prone for humans. Take advantage of existing OCR tools to save time and money when building your own machine learning model. You can use a tool like Label Studio to improve the overall results of the OCR tools so that you can have confidence in the resulting dataset.
This example tutorial showcases the capabilities of Label Studio with OCR use cases, especially using Tesseract and Python to process the images and data. You can reuse this script to process other types of images with OCR, such as parsing screenshots, recording invoices, identifying addresses, reading street signs and house numbers, transcribing archival documents, and more.
You can even go to the next level and further process the text recognized by Tesseract and corrected in Label Studio by performing named entity recognition to parse the meaning or sentiment of the recognized text.
Related Content
-
Building A Labeling Config in Label Studio Enterprise
How do you build the right labeling interface in Label Studio? This video walks through a practical progression: start with templates, customize with XML tags, extend with React Code, and standardize workflows with plugins.
-

Learn how to connect YOLO26 to a Label Studio project using the YOLO ML Backend so annotators can start from model predictions and focus on review and correction instead of drawing boxes from scratch.

Micaela Kaplan
February 12, 2026
-
Getting started with Label Studio
Everything you need to know about Label Studio to get started, from downloading and installing the tool to creating your first project, adding new members, and more!