Start Label Studio
After you install Label Studio, start the server to start using it.
label-studio startBy default, Label Studio starts with an SQLite database to store labeling tasks and annotations. You can specify different sources and target storage for labeling tasks and annotations using Label Studio UI or the API. See Database storage for more.
Command line arguments for starting Label Studio
You can specify a machine learning backend and other options using the command line interface. Run label-studio --help to see all available options, or refer to the following tables.
Some available commands for Label Studio provide information or start the Label Studio server:
| Command | Description |
|---|---|
label-studio |
Start the Label Studio server. |
label-studio -h label-studio --help |
Display available command line arguments. |
label-studio init <project_name> <optional_arguments> |
Initialize a specific project in Label Studio. |
label-studio start <project_name> --init <optional_arguments> |
Start the Label Studio server and initialize a specific project. |
label-studio reset_password |
Reset the password for a specific Label Studio username. See Create user accounts for Label Studio. |
label-studio shell |
Get access to a shell for Label Studio to manipulate data directly. See documentation for the Django shell-plus command. |
label-studio version |
Show the version of Label Studio and then terminates. |
label-studio user --username <email> |
Show the user info with token. |
The following command line arguments are optional and must be specified with label-studio start <argument> <value> or as an environment variable when you set up the environment to host Label Studio:
| Command line argument | Environment variable | Default | Description |
|---|---|---|---|
-b, --no-browser |
N/A | False |
Do not automatically open a web browser when starting Label Studio. |
-db --database |
LABEL_STUDIO_DATABASE |
label_studio.sqlite3 |
Specify the database file path for storing labeling tasks and annotations. See Database storage. |
--data-dir |
LABEL_STUDIO_BASE_DATA_DIR |
OS-specific | Directory to use to store all application-related data. |
-d --debug |
N/A | False |
Enable debug mode for troubleshooting Label Studio. |
-c --config |
CONFIG_PATH |
default_config.json |
Deprecated, do not use. Specify the path to the server configuration for Label Studio. |
-l --label-config |
LABEL_STUDIO_LABEL_CONFIG |
None |
Path to the label configuration file for a specific Label Studio project. See Set up your labeling project. |
--ml-backends |
N/A | None |
Command line argument is deprecated. Specify the URLs for one or more machine learning backends. See Set up machine learning with your labeling process. |
--sampling |
N/A | sequential |
Specify one of sequential or uniform to define the order for labeling tasks. See Set up task sampling for your project on this page. |
--log-level |
N/A | ERROR |
One of DEBUG, INFO, WARNING, or ERROR. Use to specify the logging level for the Label Studio server. |
-p --port |
LABEL_STUDIO_PORT |
8080 |
Specify the web server port for Label Studio. Defaults to 8080. See Run Label Studio on localhost with a different port on this page. |
--host |
LABEL_STUDIO_HOST |
'' |
Specify the hostname to use to generate links for imported labeling tasks or static loading requirements. Leave empty to make all paths relative to the root domain. For example, specify "https://77.42.77.42:1234" or "http://ls.example.com/subdomain/". See Run Label Studio with an external domain name on this page. |
--cert |
LABEL_STUDIO_CERT_FILE |
None |
Deprecated, do not use. Certificate file to use to access Label Studio over HTTPS. Must be in PEM format. See Run Label Studio with HTTPS on this page. |
--key |
LABEL_STUDIO_KEY_FILE |
None |
Deprecated, do not use. Private key file for HTTPS connection. Must be in PEM format. See Run Label Studio with HTTPS on this page. |
--initial-project-description |
LABEL_STUDIO_PROJECT_DESC |
'' |
Specify a project description for a Label Studio project. See Set up your labeling project. |
--password |
LABEL_STUDIO_PASSWORD |
None |
Password to use for the default user. See Set up user accounts. |
--username |
LABEL_STUDIO_USERNAME |
default_user@localhost |
Username to use for the default user. See Set up user accounts. |
--user-token |
LABEL_STUDIO_USER_TOKEN |
Automatically generated. | Authentication token for a user to use for the API. Must be set with a username, otherwise automatically generated. See Set up user accounts. |
--agree-fix-sqlite |
N/A | False |
Automatically agree to let Label Studio fix SQLite issues when using Python 3.6–3.8 on Windows operating systems. |
--enable-legacy-api-token |
LABEL_STUDIO_ENABLE_LEGACY_API_TOKEN |
False |
Enable legacy API token authentication. Useful for running with a pre-existing token via --user-token. |
| N/A | LABEL_STUDIO_LOCAL_FILES_SERVING_ENABLED |
False |
Allow Label Studio to access local file directories to import storage. See Run Label Studio on Docker and use local storage. |
| N/A | LABEL_STUDIO_LOCAL_FILES_DOCUMENT_ROOT |
/ |
Specify the root directory for Label Studio to use when accessing local file directories. See Run Label Studio on Docker and use local storage. |
Set environment variables
How you set environment variables depends on the operating system and the environment in which you deploy Label Studio.
In *nix operating systems, you can set environment variables from the command line or with an environment setup file. For example:
export LABEL_STUDIO_LOCAL_FILES_SERVING_ENABLED=truenote
If you are using Docker, you can write all your environment variables into the .env file.
On Windows, you can use the following syntax:
set LABEL_STUDIO_LOCAL_FILES_SERVING_ENABLED=trueTo check if you set an environment variable successfully, run the following on *nix operating systems:
echo $LABEL_STUDIO_LOCAL_FILES_SERVING_ENABLEDOr the following on Windows operating systems:
echo %LABEL_STUDIO_LOCAL_FILES_SERVING_ENABLED%Run Label Studio on localhost with a different port
By default, Label Studio runs on port 8080. If that port is already in use or if you want to specify a different port, start Label Studio with the following command:
label-studio start --port <port>For example, start Label Studio on port 9001:
label-studio start --port 9001Or, set the following environment variable:
LABEL_STUDIO_PORT = 9001Run Label Studio on Docker with a different port
To run Label Studio on Docker with a port other than the default of 8080, use the port argument when starting Label Studio on Docker. For example, to start Label Studio in a Docker container accessible with port 9001, run the following:
docker run -it -p 9001:8080 -v $(pwd)/mydata:/label-studio/data heartexlabs/label-studio:latest label-studioimportant
As this is a non-root container, the mounted files and directories must have the proper permissions for the UID 1001.
Or, if you’re using Docker Compose, update the docker-compose.yml file that you’re using to expose a different port for the NGINX server used to proxy the connection to Label Studio. For example, this portion of the docker-compose.yml file exposes port 9001 instead of port 80 for proxying Label Studio:
...
nginx:
    image: nginx:latest
    ports:
      - 9001:80
    depends_on:
      - app
...
Run Label Studio on Docker with a host and sub-path
To run Label Studio on Docker with a host and sub-path, just pass LABEL_STUDIO_HOST env variable with sub-path to docker/docker-compose:
LABEL_STUDIO_HOST=http://localhost:8080/foo docker-compose up -dExpose a local Label Studio instance outside using ngrok
Sometimes it’s useful to have the LabelStudio instance you’re running on your local machine to be reachable over the internet. For example, if you want to share your Label Studio instance with a team member or a client.
One way to do that is to use ngrok, a reverse proxy that allows you to expose your instance to the Internet.
If you have Label Studio running, stop it (
Ctrl+C).Sign up for a free ngrok account at ngrok.com.
When you log in to your ngrok account, you will open a dashboard with instructions to install ngrok and authenticate it. Complete both these steps:
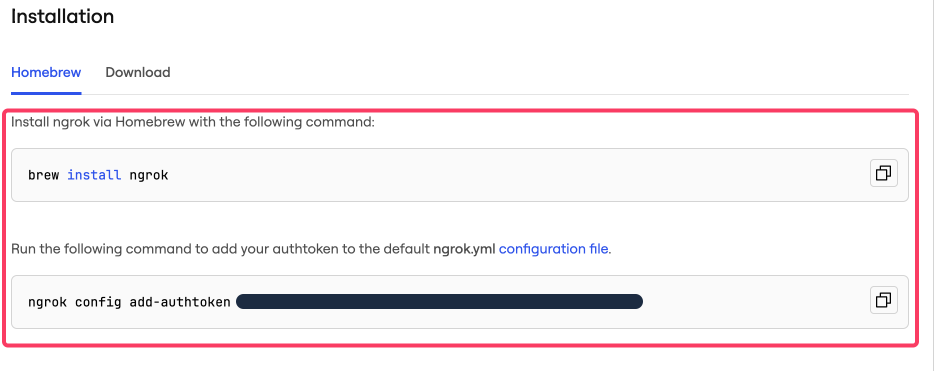
Start ngrok and point it at Label Studio:
ngrok http --host-header=rewrite 8080This will output a randomly generated URL. Copy this URL:
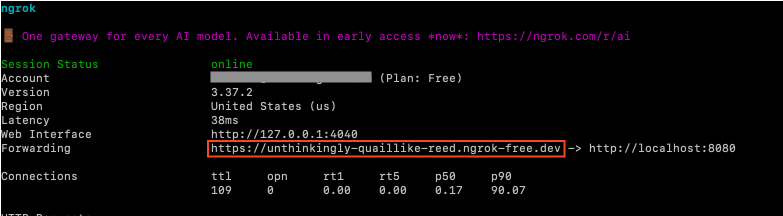
Run the following commands (replace
your-subdomain.ngrok-free.appwith your actual ngrok URL as copied in step 5):
# Avoid CSRF errors
# Must exactly match the ngrok HTTPS URL, with no trailing slash
export CSRF_TRUSTED_ORIGINS=https://your-subdomain.ngrok-free.app
# Start Label Studio
LABEL_STUDIO_HOST=https://your-subdomain.ngrok-free.app label-studio start
# Avoid CSRF errors
# Must exactly match the ngrok HTTPS URL, with no trailing slash
set CSRF_TRUSTED_ORIGINS=https://your-subdomain.ngrok-free.app
# Start Label Studio
LABEL_STUDIO_HOST=https://your-subdomain.ngrok-free.app label-studio start# Avoid CSRF errors
# Must exactly match the ngrok HTTPS URL, with no trailing slash
docker run -it -p 8080:8080 \
-e CSRF_TRUSTED_ORIGINS=https://your-subdomain.ngrok-free.app \
-e LABEL_STUDIO_HOST=https://your-subdomain.ngrok-free.app \
-v <yourvolume>:/label-studio/data \
heartexlabs/label-studio:latestimportant
As this is a non-root container, the mounted files and directories must have the proper permissions for the UID 1001.
# Avoid CSRF errors
# Must exactly match the ngrok HTTPS URL, with no trailing slash
CSRF_TRUSTED_ORIGINS=https://your-subdomain.ngrok-free.app \
LABEL_STUDIO_HOST=https://your-subdomain.ngrok-free.app docker compose up -d
Now you can open the ngrok URL in browser to make sure you see your Label Studio instance.
Run Label Studio on Docker and use Local Storage
To run Label Studio on Docker and reference persistent local storage directories, mount those directories as volumes when you start Label Studio and specify any environment variables you need.
The following command starts a Docker container with the latest image of Label Studio with port 8080 and an environment variable that allows Label Studio to access local files. In this example, a local directory ./myfiles is mounted to the /label-studio/files location.
docker run -it -p 8080:8080 -v $(pwd)/mydata:/label-studio/data \
--env LABEL_STUDIO_LOCAL_FILES_SERVING_ENABLED=true \
--env LABEL_STUDIO_LOCAL_FILES_DOCUMENT_ROOT=/label-studio/files \
-v $(pwd)/myfiles:/label-studio/files \
heartexlabs/label-studio:latest label-studio
important
As this is a non-root container, the mounted files and directories must have the proper permissions for the UID 1001.
By specifying the environment variable LABEL_STUDIO_LOCAL_FILES_DOCUMENT_ROOT=/label-studio/files, Label Studio only scans this directory for local files. It’s highly recommended to explicitly specify a LABEL_STUDIO_LOCAL_FILES_DOCUMENT_ROOT path to secure the volume access from the Docker container to your local machine.
Place files in the specified source directory (./myfiles in this example) and reference that directory when you set up local storage. For more information about using volume mounts in Docker, see the Docker documentation on volumes.
If you’re using Docker Compose, specify the volumes in the Docker Compose YAML file and add the relevant environment variables to the app container. For more about specifying volumes in Docker Compose, see the volumes section of the Docker Compose file documentation.
Run Label Studio with HTTPS
To run Label Studio with HTTPS and access the web server using HTTPS in the browser, use NGINX or another web server to run HTTPS for Label Studio.
Run Label Studio on the cloud using Heroku
To run Label Studio on the cloud using Heroku, specify an environment variable so that Label Studio loads.
LABEL_STUDIO_HOSTIf you want, you can specify a different hostname for Label Studio, but you don’t need to.
To run Label Studio with Heroku and use PostgreSQL as the database storage, specify the PostgreSQL environment variables required as part of the Heroku environment variable DATABASE_URL. For example, to specify a PostgreSQL database hosted on Amazon:
DATABASE_URL = postgres://username:password@hostname.compute.amazonaws.com:5432/dbnameThen you can specify the required environment variables for a PostgreSQL connection as config variables. See Database storage.
Our Heroku manifest uses postgresql addon out of the box. Please notice that the storage capacity is limited.

Please notice that all uploaded data via import will be lost after a dyno replace since filesystem is ephemeral. Using S3 storage is recommended.
Run Label Studio with an external domain name
If you want multiple people to collaborate on a project, you might want to run Label Studio with an external domain name.
To do that, use the host parameter when you start Label Studio. These parameters ensure that the correct URLs are created when importing resource files (images, audio, etc) and generating labeling tasks.
There are several possible ways to run Label Studio with an external domain name.
- Replace the
hostparameter in the file which you specified with--configoption. If you don’t use--configthen editlabel_studio/utils/schema/default_config.jsonin the Label Studio package directory. - Specify the parameters when you start Label Studio:
label-studio start --host http://your.domain.com/ls-root. - Specify the parameters as environment variables
HOSTespecially when setting up Docker:HOST=https://your.domain.com:7777.
Or, you can use environment variables:
LABEL_STUDIO_HOST = https://subdomain.example.com:7777You must specify the protocol for the domain name: http:// or https://
If your external host has a port, specify the port as part of the host name.
Set up task sampling for your project
When you start Label Studio, you can control the order in which tasks are exposed to annotators for a specific project.
For example, to create a project with sequential task ordering for annotators:
label-studio start <project_name> --sampling sequentialThe following table lists the available sampling options:
| Option | Description |
|---|---|
| sequential | Default. Tasks are shown to annotators in ascending order by the id field. |
| uniform | Tasks are sampled with equal probabilities. |
| prediction-score-min | Tasks with the minimum average prediction score are shown to annotators. To use this option, you must also include predictions data in the task data that you import into Label Studio. |
You can also use the API to set up sampling for a specific project. Send a PATCH request to the /api/projects/<project_id> endpoint to set sampling for the specified project. See the API reference for projects.
Individual annotators can also control the order in which they label tasks by adjusting the filtering and ordering of labeling tasks in the Label Studio UI. See Set up your labeling project.