Multi-Page Document Annotation
Multi-page document annotation allows you to annotate documents that consist of multiple pages. By representing each page as an image, you can import them into a single task and annotate each page while maintaining the context of the entire document.
If you just need to classify a PDF document as a whole, you can also use the PDF Classification template.
Enterprise
If you are performing OCR annotation and you are a Label Studio Enterprise users, see OCR Labeling for PDFs.
Prerequisites
Multi-page document annotation requires that you first pre-process your document by converting it into separate images. There are multiple tools to do this, including a built-in option in Adobe Acrobat.
To improve performance, we preload images by downloading an image via XHR and storing it in the local browser’s storage. For this to function properly, you must set up a CORS policy on the CDN/storage where the images are located. Specifically, the following headers must be set:
Access-Control-Allow-Origin: https://app.humansignal.com
Access-Control-Allow-Methods: GET, OPTIONS
Access-Control-Allow-Headers: Content-Type
Limitations
For performance reasons, we recommend that the maximum number of tasks per project be limited to around 100,000.
If you are creating tasks with multiple images, you may need to plan for a smaller task limit within each project. For example, a task with 100 images would be roughly equivalent to 100 tasks (in terms of performance considerations).
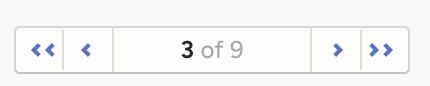
Page navigation
When performing multi-page annotations, you’ll see a new navigation menu:
Tip
- To navigate to a specific page, click on the page numbers in the center and enter the desired page.
- You can also use the following hot keys to navigate:
command + left/command + rightorctrl + left/ctrl + right.
Labeling configuration
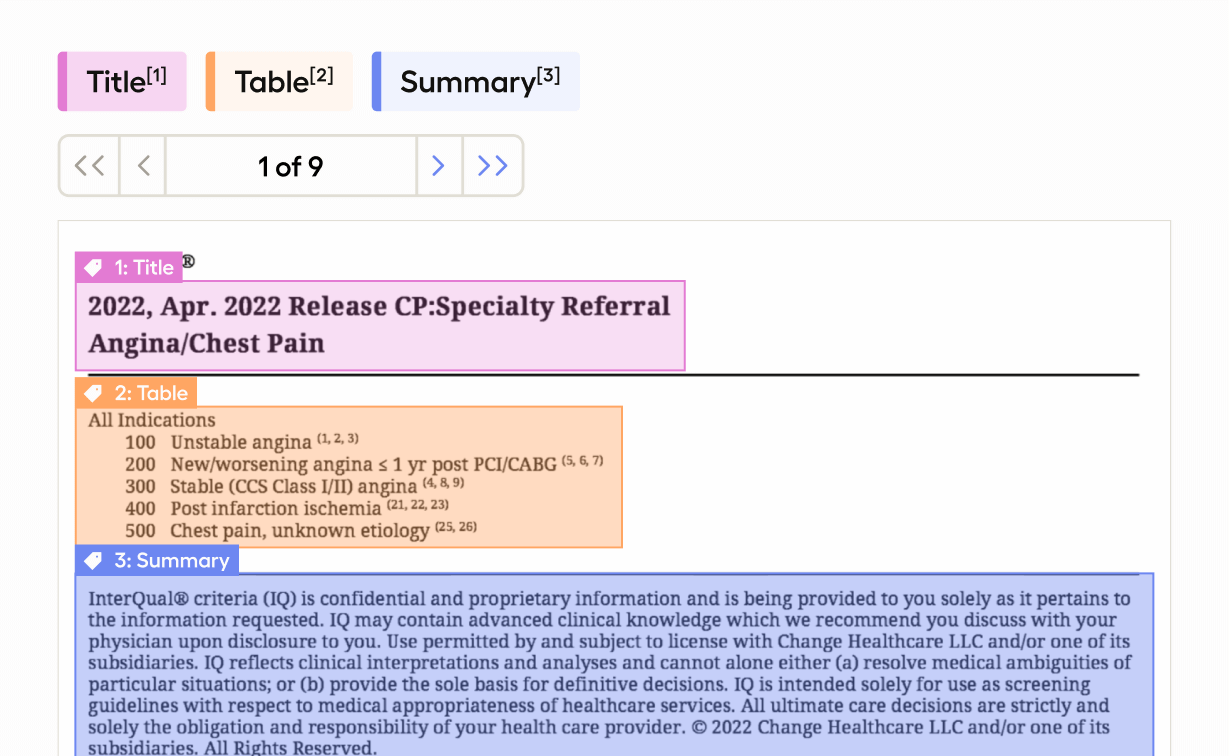
Enable multi-page annotation by using the <Image> tag and setting the valueList parameter instead of the value parameter.
<View>
  <RectangleLabels name="rectangles" toName="pdf" showInline="true">
    <Label value="Title" background="red"/>
    <Label value="Summary" background="blue"/>
    <Label value="Author" background="green"/>
    <Label value="Table" background="gold"/>
    <Label value="Citation" background="purple"/>
  </RectangleLabels>
  <Image valueList="$pages" name="pdf"/>
</View>
Similar to value, the valueList parameter accepts a variable. The difference in this case is that you are referencing an array in your JSON.
For example, the following references pages in the example input data below.
<Image valueList="$pages" name="pdf"/>Classification
This example uses bounding box labeling. However, you can modify the template to perform classification tasks instead (using the Choices tag). When using the Choices tag, note the following:
- You can perform per-page classification using
perItem="true". - You can also leave
perItem="false"(the default) to perform per-document classification. perRegion="true"is supported when drawing regions on pages.
Input data format
The following example would upload a 5-page PDF that had been pre-processed into 5 images. You would reference the pages in your labeling configuration using valueList="$pages".
{
  "data": {
    "pages": [
      "https://htx-pub.s3.amazonaws.com/demo/images/demo_stock_purchase_agreement/0001.jpg",
      "https://htx-pub.s3.amazonaws.com/demo/images/demo_stock_purchase_agreement/0002.jpg",
      "https://htx-pub.s3.amazonaws.com/demo/images/demo_stock_purchase_agreement/0003.jpg"
    ]
  }
}
Export format
When exporting your annotations, the item_index property returns the index of the image that a region is attached to. Indexes start with 0, meaning the first image will be 0, the second will be 1, and so on:
[
  {
    "id": 859,
    "annotations": [
      {
        "id": 25569355,
        "result": [
          {
            "id": "tdS8Of63VJ",
            "type": "rectanglelabels",
            "value": {
              "x": 2.48868778280543,
              "y": 4.807692307692308,
              "width": 52.88461538461539,
              "height": 5.128205128205128,
              "rotation": 0,
              "rectanglelabels": [
                "Title"
              ]
            },
            "origin": "manual",
            "to_name": "pdf",
            "from_name": "choices",
            "item_index": 0,
            "image_rotation": 0,
            "original_width": 2550,
            "original_height": 3300
          },
          {
            "id": "RGGrHm95R7",
            "type": "rectanglelabels",
            "value": {
              "x": 30.693815987933636,
              "y": 12.179487179487179,
              "width": 58.4841628959276,
              "height": 1.2820512820512828,
              "rotation": 0,
              "rectanglelabels": [
                "Citation"
              ]
            },
            "origin": "manual",
            "to_name": "pdf",
            "from_name": "choices",
            "item_index": 1,
            "image_rotation": 0,
            "original_width": 2550,
            "original_height": 3300
          }
        ]
      }
    ]
  }
]