Chatbot Evaluation 🔒
Use this template to quickly assess whether your chatbot is ready for production. Have reviewers score real conversations for answer quality, grounding in the right sources, safety, and tone.
Then turn findings into action: fine-tune the model, expand your knowledge base, or refine the system prompt to close the gap to production.
Enterprise
This template requires Label Studio Enterprise or Starter Cloud.
For Community users, see our Conversation AI templates or the Multi-Turn Chat Evaluation template.
Labeling configuration
<View>
<Style>
    .chat {
      border: 1px solid #ccc;
      padding: 10px;
      border-radius: 5px;
    }
    .evaluation {
        border: 2px solid var(--color-blueberry-800);
        background: var(--color-blueberry-100);
        color: var(--color-blueberry-900);
        padding: 10px;
        border-radius: 5px;
        margin-bottom: 20px;
    }
     <!-- Choice text -->
     .evaluation span {
        color: var(--color-blueberry-900);
        line-height: 1.1;
     }
    <!-- Star rating -->
     .evaluation .ant-rate-star.ant-rate-star-full span {
       color: #f4aa2a;
      }

    .instructions {
       color: var(--color-blueberry-900);
       background-color: var(--color-blueberry-100);
       padding-top: 15px;
       padding-bottom: 15px;
    }
    <!-- Allow enlarging the instruction text -->
    .lsf-richtext__container.lsf-htx-richtext {
      font-size: 16px !important;
      line-height: 1.3;
    }

    <!-- Remove excess height from the chat to allow space for instruction text -->
    .htx-chat {
      --excess-height: 275px
    }
  </Style>
  <View style="display: flex; gap: 24px;">

    <!-- Left: conversation -->
    <View className="chat" style="flex: 2;">
      <View className="instructions">
        <Text name="instructions" value="Review the conversation in detail.
                                         As you read through it, click on individual messages to
                                         provide feedback about accuracy, clarity, and intent." />
      </View>

      <Chat name="chat" value="$chat"
            minMessages="2"
            maxMessages="$max"
            editable="false" />
    </View>

    <!-- Right: conversation-level evaluation -->
    <View style="flex: 1;" className="evaluation">
      <View style="position:sticky;top:14px">

        <!-- Only visible when no message is selected -->
         <View visibleWhen="no-region-selected">
          <View>
          <Header value="Click on a message to evaluate it"/>
          </View>
        </View>

        <!-- Only visible when a user message is selected, and only applies to selected message -->
        <View visibleWhen="region-selected" whenRole="user">
          <Header value="Rate message clarity"/>
          <Rating name="user_clarity" toName="chat" perRegion="true" />
          <Header value="Classify the topic"/>
          <Choices name="request_classification" toName="chat" perRegion="true" >
            <Choice value="Labeling Config" />
            <Choice value="Project setup" />
            <Choice value="Importing/exporting data" />
            <Choice value="SDK/API" />
            <Choice value="ML backends" />
            <Choice value="Predictions" />
          </Choices>
       </View>

        <!-- Only visible when an assistant message is selected, and only applies to selected message -->
        <View visibleWhen="region-selected" whenRole="assistant">
          <Header value="Rate response clarity"/>
          <Rating name="assistant_response_clarity" toName="chat" perRegion="true" />

          <Header value="Rate response accuracy"/>
          <Rating name="assistant_response_accuracy" toName="chat" perRegion="true" />

          <Header value="Documentation provided"/>
          <Choices name="docs" toName="chat" perRegion="true" >
            <Choice value="All proper documentation provided" />
            <Choice value="Provided some documentation, missing some" />
            <Choice value="Missing critical documentation,
                           provided incorrect or irrelevant documentation" />
          </Choices>

          <Header value="Answered question"/>
          <Choices name="questions_answered" toName="chat" perRegion="true" >
            <Choice value="Yes" />
            <Choice value="No" />
            <Choice value="Partial" />
          </Choices>

          <Header value="Tone/Style"/>
          <Choices name="style" toName="chat" perRegion="true" choice="multiple" >
            <Choice value="Too verbose" />
            <Choice value="Too friendly" />
            <Choice value="Too technical" />
          </Choices>

       </View>
     </View>
   </View>
 </View>
</View>
About this labeling configuration
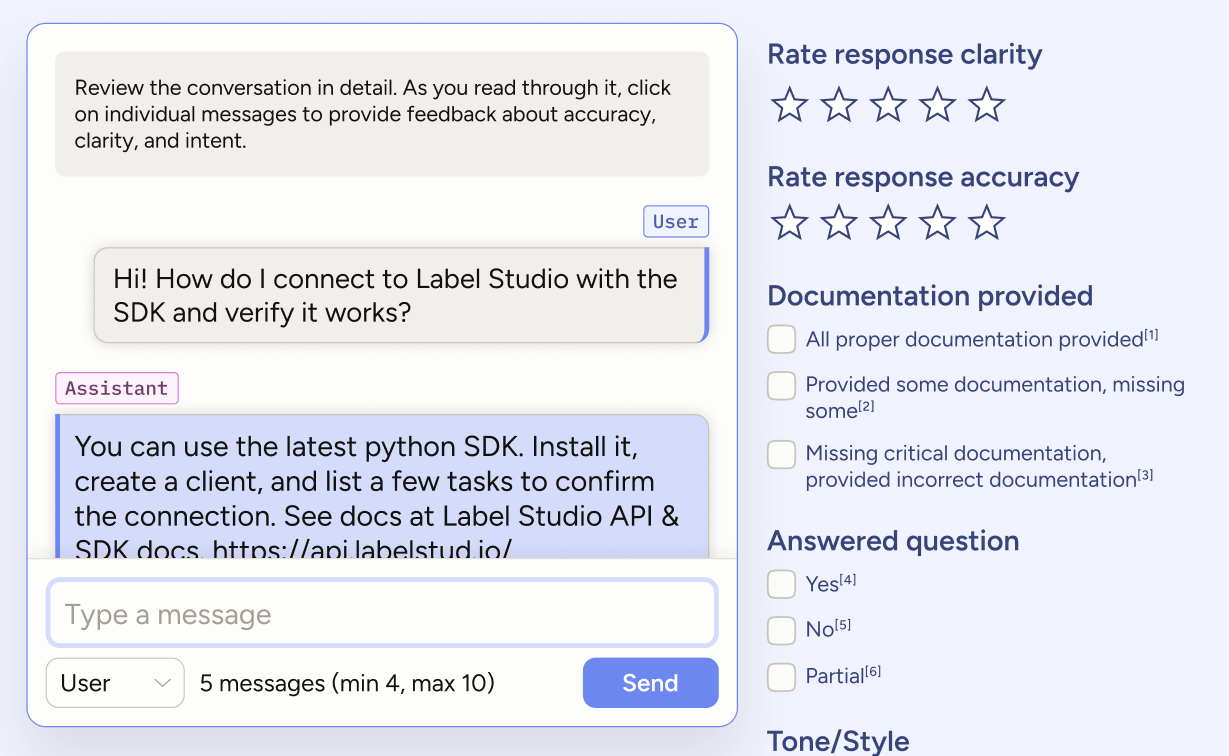
This labeling configuration is divided into two columns with the chat interface on the left and message evaluation on the right.
Style
The styling is applied through <View> tags, which are rendered as HTML <div> tags.
You can apply styling using inline styles directly on View tags or by defining CSS rules for classes in a <Style> block. Those classes are then applied within the labeling configuration using the className parameter.
For example, this View tag uses a combination of inline styles and className:
<View className="chat" style="flex: 2;">The CSS rules for the .chat class are defined with the <Style> block.
Tip
.htx-chat is a special Label Studio class that allows you to control the height of the chat portion of the interface.
For more information, see the Style tag.
Text
Above the chat there are instructions guiding the user as to what they should try to achieve with the text.
You can hard-code this into the labeling configuration (<Text value="Your instruction text" />), but if you are going to have multiple tasks within a project, you will likely want to specify the text as part of the imported data.
In this example, we use $text because the input JSON uses "text". See input data below.
For more information, see the Text tag.
Chat
The Chat tag provides an interface where the annotator can type and send messages.
<Chat name="chat" value="$chat"
            minMessages="2"
            maxMessages="$max"
editable="false" />name: This is required, and when you want your control tags (choices, ratings, etc) to reference the chat element, you point to it usingtoName="chat". You can use whichever name you like when customizing your own labeling configurations.value: This is required, and should use a variable referencing your input data. In this example, we use$chatbecause the input JSON uses"chat".minMessages: The minimum number of messages users must submit to complete the task. .maxMessages: The maximum number of messages a user can submit. In this example, you are using a variable to set this dynamically from the task data ($max), allowing you to change the maximum from task to task. See input data below.editable: In this example, you are not allowing the annotator to edit messages.
For more information and additional parameters, see the Chat tag.
note
This template is designed to be used to evaluate an imported conversation, so you will likely want to import messages from an external source as predictions.
Per-message evaluation
This configuration only allows per-message evaluation. An annotator must click on a message in the chat interface, and then options specific to that role appear on the right. For an example of using conversation-level evaluation, see Fine-tune an agent with an LLM.
For example:
<View visibleWhen="region-selected" whenRole="user">visibleWhen- The controls within this section are only visible when a region (in this case a chat message) is selected.whenRole- Further refinesvisibleWhenso that the controls within the section are only visible when the selected region (message) is from the specified role.
For more information, see the View tag.
Rating and Choices
Since your chat will likely have multiple messages from each role, use perRegion="true" to ensure that users will be able to annotate multiple messages within a conversation.
<Rating name="assistant_response_accuracy" toName="chat" perRegion="true" />For more information, see the Rating tag, Choice tag, and Choices tag.
Input data
The Chat tag accepts JSON data.
Empty chat
The following would provide an empty chat window and instruction text for the annotator:
{
  "data": {
    "text": "Review the conversation in detail. As you read through it, click on individual messages to provide feedback about accuracy, clarity, and intent.",
    "chat": []
  }
}
Imported chat messages
You can also import demo chat messages as follows:
{
  "data": {
    "text": "Review the conversation in detail. As you read through it, click on individual messages to provide feedback about accuracy, clarity, and intent.",
    "chat": [
        {
            "role": "user",
            "content": "Demo chat message 1"
        },
        {
            "role": "assistant",
            "content": "Demo chat message 2"
        },
        {
            "role": "developer",
            "content": "Demo chat message 3 "
        }
    ]
  }
}
attention
The chat messages that you import are not selectable. This means that you cannot edit them or apply annotations (ratings, choices, etc) to them.
You can only select and annotate messages that are added to the chat by an annotator or that are imported as predictions.
Predictions
If you want to be able to select messages and evaluate them, then you can use predictions. For example:
[
  {
    "data": {
      "chat": [
        {
          "text": "Review the conversation in detail. As you read through it, click on individual messages to provide feedback about accuracy, clarity, and intent."
        }
      ]
    },
    "predictions": [
      {
        "model_version": "demo-model",
        "result": [
          {
            "type": "chatmessage",
            "value": {
              "chatmessage": {
                "role": "user",
                "content": "I'm onboarding a new annotator. What are the first steps to ensure quality and speed?",
                "createdAt": 1757612212681
              }
            },
            "to_name": "chat",
            "from_name": "chat"
          },
          {
            "type": "chatmessage",
            "value": {
              "chatmessage": {
                "role": "assistant",
                "content": "Start by creating their account and assigning the Annotator role so permissions are scoped correctly. Add concise labeling instructions that appear before labeling. Use a small ground-truth set and require overlap (e.g., 2 annotators per task) with a reviewer to resolve disagreements. Enable comments so reviewers can leave precise, in-task feedback.",
                "createdAt": 1757612363718
              }
            },
            "to_name": "chat",
            "from_name": "chat"
          }
        ]
      }
    ]
  }
]